Needlework
06/18/2018 Anastasia Prozheva
Do you want to update the decor and atmosphere in your kitchen, but don’t have the energy or money to renovate? Then it’s time to dilute the old interior with new interesting details. For example, make your own paintings or panels in a style that suits your apartment. This DIY bean panel tutorial will help you transform your kitchen walls and bring your fantasies to life. You can use a lot of interesting products in needlework: from peas and beans to beans and coffee beans. The main thing is to carefully follow the description and not forget about each stage. Beans are a fairly vulnerable product, so choose them carefully for crafts: they should be spotless, firm, and without holes. Also, beans are vulnerable to bugs and other insects, so each craft must be varnished.
Coffee happiness
To make a panel of beans, we will need:
- small canvas;
- pencil;
- brush;
- paints;
- PVA glue;
- acrylic lacquer;
- beans.
To begin, draw all the details of the picture on the canvas with a pencil. You can add captions to the image.
Now it's time to paint over all the details.
In our master class, the color chosen is black, but you can use any other color that suits the style of your kitchen.
We are waiting for the paint to dry completely. Next, apply a thick layer of glue to the drawing, specifically on the image of the teapot itself, and not on the white background. Then glue our beans to the canvas. If our background is black, then the beans themselves should be black. We place grain on grain on the base so that there are no gaps.
Now cover the entire background of the work with glue. Place white beans on the background. You can choose another bean, the main thing is that the colors contrast, otherwise the teapot and cup will not stand out well.
Related article: Pearl pattern with knitting needles for snood with description and video
In order for such a craft to last a long time, the beans need to be protected with varnish. Apply it to the panel with a brush. Wait for it to dry and hang it on the wall. The kitchen panel is ready!
Master classes
Interior decorations
Such wonderful coffee-themed
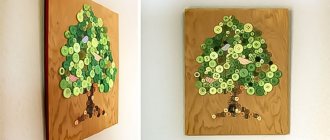
decorative bean panels And for this you do not need to have professional artist skills. All you need is basic knowledge and inspiration. Let's take a sheet of plywood or fiberboard, a simple pencil, gouache paints, glue, beans of two colors and let's get creative.
We draw any pencil sketch on plywood. Don't be afraid and use your imagination. After this, we paint over the background with black and white gouache so that the wood does not show through. After complete drying, we gradually begin to fill our graphic design with beans, gluing it with PVA glue. The finished panel can be varnished and placed in the interior. A rather original little thing for your kitchen is ready.
Wall decoration
Here is a small master class on creating a painting from beans “Cats”.
For it we will need:
- picture frame;
- beans of two colors;
- a simple pencil and brush;
- gouache white and black;
- PVA glue.
As in the previous case, we draw with a simple pencil the outline of our black cats on the inside of the photo frame.
An even moon can be drawn using a compass or circled around some round object of suitable size. We draw the tail so that its thickness is equal to the size of a bean. At the next stage, we paint over the sketch with gouache. You can download the picture you like from the Internet and cut it out along the contour. The result will be something like a stencil.
And now let's get to the most exciting part - gluing the beans . For fastening and durability, we coat it with varnish. All that remains is to place the finished painting on the wall.
In the same way, you can draw absolutely any composition that will perfectly suit your interior.
Pictures don’t have to be made from just beans; you can add coffee beans, buckwheat, lentils and even millet. Various combinations of cereals give quite beautiful effects in one artistic composition.
Lots of ideas
Not only paintings and panels are made from beans. For example, you can decorate glass bottles, boxes, decorative vases and even Easter eggs. Topiaries (trees of happiness) made from beans look very beautiful and impressive.
To make it yourself, we will need the following materials:
- base ball;
- kebab skewers or stick for the barrel;
- beans of various colors;
- glue gun;
- a pot for topiary (a coffee can, mug or flowerpot is perfect);
- plaster or alabaster;
- decorative elements (beads, ribbons, small pieces of fabric).
First you need to build a solid base for the crown of our topiary .
Ready-made foam balls are sold, which can be purchased at craft stores, but we will make everything ourselves. Take some old newspapers and squeeze them tightly into a ball. It is advisable to wrap the resulting sphere with thread or masking tape for better fixation. The next stage is making the trunk of the future tree. We wrap several skewers together with thread or floral tape. We make a hole in the ball with scissors, pour hot glue into it and insert the barrel. Our base is ready, all that remains is to decorate the ball with beans in accordance with your creative idea. We decorate the pot in which we will plant our tree of happiness according to our own taste. You can simply paint it with acrylic paints or cover it with fabric or burlap. We dilute alabaster, pour it into our pot, plant a tree, wait until the composition sets, and leave it until completely dry. Now you can cover the topiary with varnish and glue beads and bows from satin ribbons. The finished tree can be presented as a gift or left in the apartment as a decoration.
For cat lovers
But such a panel will be an excellent handmade gift for family and friends who adore cats.
Necessary materials:
- white and black beans;
- Photo frame;
- pencil;
- paints;
- glue "Moment";
- glue gun
To begin with, you need to draw a design on the inner surface of the frame.
Using a brush, paint over everything with black and white paints. Look at the photo:
In order to draw an even circle, we need a plate. Trace the outline with a pencil or thin marker. Glue the beans.
We coat the product with varnish. We put on the frame. A wonderful cat panel is ready!
Bean box (video):
See how to make a very beautiful “coffee topiary”.
Natural materials that surround us everywhere can be used in joint creativity between parents and children. For example, you can create crafts from beans with your own hands. Many mothers have various cereals stored in their kitchens, which can also be used in games with their children. After all, any cereal and working with it help develop fine motor skills in a child and stimulate speech, which is important in childhood. But sometimes parents wonder what can be made from beans at home. You can use it to make appliqués, three-dimensional figures, mandalas, paintings, and bouquets of flowers.
If you take an empty bottle and beans of different colors, you can create an original interior design detail: alternating the colors of the beans, you need to pour them inside the bottle.
Crafts: bean applique (master class)
You can make various applications from beans, which do not take much time and are quite simple to do. For example, a “chicken” applique, for which you need to prepare:
- colored cardboard (green, red);
- scissors;
- a simple pencil;
- white beans;
- seeds – 8 pieces;
- one grain of corn;
- red and black plasticine;
- glue.
- Draw the silhouette of a chicken on red cardboard and cut it out.
- Glue the resulting silhouette onto green paper.
- Take red plasticine, pinch off a small piece and glue it to one bean. Then we attach this bean to our chicken. Thus, it is necessary to seal the entire chicken with beans. In this case, you need to leave a small gap for the eye and beak.
- Roll a ball out of black plasticine and place it on the chicken. This is the eye.
- We also spread the corn kernel with red plasticine and attach it to the chicken.
- Take the seeds and black plasticine and glue them on. We sculpt “legs” from seeds onto the chicken. First we glue one seed at a time, then three down.
The chicken applique is ready.
Bean painting
You can use beans to create a beautiful picture that will decorate any room. For the craft we will need:
- black and white beans;
- glue;
- paints: black and white;
- pencil;
- wooden canvas.
- We draw a sketch of the future painting with a pencil.
- We paint with paints.
- Glue the beans according to the color: black beans on black, white beans on white. The picture is ready.
DIY bean tree
From beans you can make a bonsai tree that will decorate any interior in the apartment. It is necessary to prepare the following materials:
- flower pot;
- red beans;
- threads;
- balloon;
- silicate glue;
- branch for a tree trunk;
- dark wood varnish;
- brush.
- Let's think of a balloon. We wet the thread and wrap the ball with thread.
- Let the glue dry and lower the ball.
- Take one bean at a time and coat it with glue, then glue it onto the resulting ball of thread. It is advisable to take the color of the thread the same color as the beans.
- Paint the branch (tree trunk) with brown paint.
- The tree itself is ready. Place it in a pot and secure it (for example, with pebbles).
Read also: Treatment with burdock root, dandelion and wheatgrass
Handmade bean crafts can be easily completed by a child on their own. However, parents need to make sure that the beans do not get into their mouths. Therefore, such crafts are recommended for children aged 3 years and older.
It's a dull time outside - autumn. Season of yellow leaves and rains. Have you ever thought about how many natural materials surround us, from which you can make various home interior items? And you don’t always have to go far to find them; just look in your kitchen cabinet, where cereals are usually stored. There was undoubtedly a package of beans lying around there. In this article we will talk about how to make crafts from it with your own hands.
For example, you can take an empty glass bottle of an interesting shape and pour beans of different colors into it in layers. The result is a designer item that can be placed on a bedside table or chest of drawers.
Magical transformation of ordinary objects
When a picture emerges from several types of cereals and seeds, it is akin to a miracle. After all, it is traditionally believed that we cook porridge from buckwheat and rice, and throw away melon and watermelon seeds without a second thought if we are not going to plant them. But it won’t be difficult to look at it differently and try to use non-traditional materials to create crafts.
Then cereals, legumes, seeds will magically turn into paints, and your imagination can suggest very unexpected solutions, and your little one will receive the first lessons in craftsmanship... But before you start mastering crafts from cereals, give your children a short drawing lesson on... semolina. Pour it into the tray and show how your finger can create a picture: a sun, a Christmas tree, a mushroom... The baby will be delighted!
What may be useful
Just imagine: creativity doesn’t require any special devices or materials. You most likely already have everything you need in your home:
thick paper, cardboard;- glue, brush, pencil;
- gouache, alcohol, food coloring;
- plasticine;
- seeds of various plants;
- regular cereals.
When creating crafts from cereals for children with your own hands, you can use the natural colors of the inhabitants of the kitchen cabinet:
- brown - buckwheat, tea leaves;
- shades of white - rice, semolina, pumpkin seeds, zucchini;
- yellow - peas, millet;
- shortbread - wheat groats;
- black, gray - seeds.
You can create a whole picture from beans of various colors!
DIY rainbow
But if you want brighter colors, such as red or blue, the solution is simple: change the color of white raw materials with food coloring. Even if a young creator suddenly dares to taste a grain or a seed for inspiration, you will have nothing to fear.
- Add a few drops of vinegar to the prepared solution of the desired color. Color saturation can be adjusted by adding water.
- Place rice in a ziplock bag and add coloring.
- Close the bag and shake the contents periodically to ensure uniform coloring.
- The cereal has acquired the desired color, now you need to pour it onto a linen napkin in one layer to dry.