Before the next matinee, mothers are knocked off their feet looking for outfits for their children. Some people prefer to sew a dress or suit themselves. The situation is more complicated if a crown is required. You can buy it in a store or make it yourself.
Little princesses often ask their parents for this type of jewelry to complement their outfit. Therefore, mothers are interested in how to make a crown out of cardboard with their own hands. To do this, you need to be patient and use your imagination.
Paper crown
The easiest option would be to purchase colored cardboard or shiny paper. You can use a ready-made template or make it yourself. It is better to immediately discuss with your child what shape and color of decoration he wants to receive.
To understand how to make a paper crown with your own hands, just look at pictures of princesses or kings. Kids often prefer the product worn by the main characters in their favorite cartoon. This is what you should start from in order to please the little fidgets.
Making a patterned blue crown
After a survey I conducted on social media, I was convinced that I needed to challenge myself and write an article on how to make a crown.
I really hope that after reading this article, you will be able to make this or a similar crown simply by following the instructions given.
Note: It's best to plan ahead. It will take 2 to 4 days before you can move the cutout onto the cake.
In order to make a crown from mastic, you will need:
- Printed sketch of a crown. There are many different options, but I think the sketch below is the most versatile;
- Wax paper;
- Scissors;
- Adhesive tape;
- Confectionery fat;
- Mastic or sugar paste;
- Extruder with round or oval nozzle;
- Tylose;
- Sharp knife;
- Cutting board;
- Edible glue or sugar syrup;
- Small brush;
- Food glitter;
- Vodka;
- Gel food colors.
1. Print out the sketch and fold the paper so that the bottom edge of the crown is located along the edge of the sheet.
2. Wrap the paper around the can (bottle) so that the bottom edge of the sheet is at its bottom, then secure the sheet with adhesive tape.
3. Cut a piece of wax paper, fold it lengthwise and cover the sketch with it. Grease the top with a thin layer of confectionery fat.
4. Place a nozzle with a large hole on the extruder and make a long rope of mastic that will serve as the base of the crown. I prefer to make this part thicker than the rest.
I colored the fondant blue to match the color scheme of the cake.
Note: in the comments on social media, many people told me that they do not have an extruder, etc. Here's my opinion on this: of course, you can make all these ropes by hand, but it will take a very long time and it will be difficult to get them all the same thickness. But if this doesn’t turn you off, then why not?!
However, an extruder is a relatively inexpensive tool and, to be honest, I use mine every week and recommend you buy one. My extruder came with 16 different attachments that can be used to make grass, hair, frames, and many other elements.
5. Wrap the string around the base of the jar and use a sharp knife to cut off the excess. The mastic should stick slightly to the surface.
6. Using a nozzle with a smaller hole, make ropes from the fondant to create the remaining elements. It is better to do it in small parts, because the mastic will quickly crack if it sits idle for too long.
I usually make a short string, attach it to the sketch, then make another one, and so on. As you can see in the picture below, I sprinkled tylose on the cutting mat to prevent the mastic from sticking and also to help it set faster and be stronger.
7. For this sketch, it is wise to start by sculpting two ropes. I formed them into a U shape, laid them on the mat and made curls around the edges, then placed them in the appropriate place on the side of the jar.
The length of each piece of mastic must be checked by comparing it with the sketch and cutting off the excess. Over time, you will learn to determine it by eye.
8. Using edible glue or sugar syrup, glue the pieces of mastic to the base. I coat all contacting areas with glue.
9. Repeat these steps adding additional curls and crown layers. I usually start working from the center outwards, creating the lowest layers first, onto which smaller elements will then be attached.
As you can see below, I glued the string on top of the previous layer, making sure to coat each contact point with syrup.
Here are some more photos of this process:
10. Finally, all that remains is to add a few small curls around the edges. Unfortunately I don't have any pictures of this step, but I do have a few pictures of the finished edges.
11. Let the crown dry.
Leave it on the jar in a horizontal position for several hours. After this, you can move it to a vertical position. I'm very impatient, so it's generally best to leave the crown for at least 24-48 hours to allow it to dry and harden thoroughly. You can even prepare it several weeks in advance.
Remember that the crown is very fragile, so store it in a safe place, but not in a closed container, at least until it is completely dry.
12. As I already mentioned, I am an impatient person, so below you can see my crown a day after cooking. Now all that remains is to remove it from the jar.
Again, I don't have photos of these steps being completed, so I'll just tell you about it. Hold the crown with one hand and gently twist the jar in a circular motion with the other to release it.
The dried and hardened crown looks like this:
13. It's time to paint it. Mix glitter with vodka and add a drop of blue gel coloring.
I painted the crown with this mixture to make the color more saturated. I also glued on a pink fondant pearl to give it the finished look.
After coloring, leave it to dry overnight and then you can decorate the cake with it.
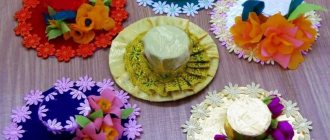
I ended up with this cake:
Making a crown from paper
Glue is used for this. You can also add rain if decoration is required for the New Year holiday. Products decorated with paints look beautiful. Hairspray with glitter will give the accessory a finished look.You need to cut out a blank from cardboard according to the template, and then carefully glue it together. They decorate it with bright beads, rhinestones, sequins and other elements.
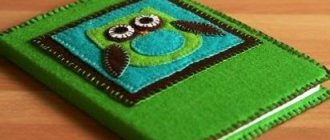
DIY felt crown with cutting template
The next copy will be made on a hair clip; different materials can be suitable for production, be it felt, foamiran, eco leather, or I have this oilcloth material with glitter (honestly, I don’t even know what it’s called exactly, my friend gave it to me), I found on Aliexpress that something like this only without glitter, it’s called vinyl leather, you can see it here.
You can only trace the contours on it with a felt-tip pen; by the way, it is then erased very easily and leaves no marks.
In order to then connect it into a ring, special notches are made at the ends.
You will also need 30 cm long and 2.5 cm wide ribbons. Any will do, I took brocade. It must be collected with small stitches on a needle and thread.
The edges of the tape need to be singed so that they do not crumble.
We tighten the tape to form a uniform circle.
You also need 2 circles of felt with a diameter of 4 cm.
Hot glue the felt to the bottom of the crown.
Next, we glue the assembly of tape and a hairpin with another circle of felt.
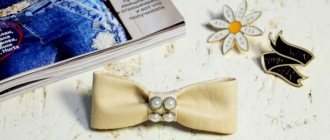
For beauty, you can also attach a bow made of satin ribbon to the side.
Nowadays it is fashionable to wear such jewelry not only on holidays, but often children love to dress up in such beauty every day.
Crown made of cardboard and fabric
A piece of thick paper can be covered with gold or silver cloth. Small scraps are enough, which are often left over by needlewomen after sewing. You can buy ribbon or lace in the desired shade. This method will allow you to make a crown for a boy with your own hands.
First of all, the shape of the accessory for the future product is selected, then the base is made from cardboard. It is carefully covered with fabric and stitched.
To hide the seams, beads or small beads are sewn on. Bright buttons or special sew-on stones, which are sold in sewing stores, are used as precious stones.
Sharp tops are complemented with large beads to match or choose details in a contrasting color. Such a bright and shiny crown is suitable for a girl and a boy. It will sparkle in natural and artificial light and will become a worthy accessory to the royal outfit of your son or daughter.
Master class on letter pillow: pattern and fabric calculation
Soft, beautiful, original hand-made pillows have always attracted attention and aroused interest. And even more remarkable are the letter-shaped pillows. This pillow can be used to mark a child’s room, or his bed, for example, for a boy among others. Or you can pleasantly surprise people dear to your heart with such a soft gift. We will show you how to make an unusual letter pillow with your own hands from ordinary materials.
Of course, everything that is made by hand is always different from what is purchased, because the soul is put into the work. Everyone who tries and takes a creative approach to this type of work will definitely be rewarded for their efforts with a unique product.
To complete the work we will need:
- Patterns of future letters
- Textile
- Filler
- Sewing machine
- Scissors
- Sewing supplies
This is the main thing, but everyone knows that patience and accuracy are also needed.
In the manufacture of this type of pillow, you can use different types of fabric at the same time, thereby making the design of the product unique.
Let's start making a letter pillow
- Before you start making the letter, you need to make a pattern and, based on it, calculate the fabric.
- We print out any letter you like, or several letters if there is a whole word, and cut them out along the contour. Don't forget that for each letter you will need two templates, one of which must be made in a mirror image. For letters such as M, N, O, P, A, E, S, T and others, this pattern is the same, depending on the font, of course. But for letters like Ya, Yu, U, Shch, and similar ones you need to mirror them.
- We lay out our template on the fabric, which lies face up, place it so that the maximum number fits, if there are several letters, thus we get a visual calculation of the fabric. Cut out the letters. Do not forget that for the back side of the letter you need a mirrored blank.
- We make the sides of the future pillow. The length of the side flap should be equal to the perimeter of the letter, plus two centimeters for allowances. The width of this strip depends on how thick the future letter pillow is planned. Let's assume that our letter is six centimeters wide, this width is enough for the letter to be sufficiently stable, but you determine it yourself. We add allowances of two centimeters, resulting in a total of eight centimeters. Cut strips. If a strip of the required length along the perimeter of the letter cannot be obtained, then you need to sew several strips until the desired length is obtained.
- Now that the blanks and sides are ready, it’s time to sew them together. You need to fold the front blank and the side panel with the front sides facing each other and sew them around the perimeter. If you want, you can pin both blanks. Don't forget to make cuts in all places where there are folds. This will help prevent “waves” from forming on the letter. One more important note. You need to start sewing the side strip to the front blank on the side of the letter that will be less noticeable. There will subsequently be a seam connecting the side strip. Most often this is from the bottom of the letter.
- Also, do not sew up the place where the side strip is connected yet. This hole will serve us at least twice when we turn the letter inside out and fill it with filler.
- Now we sew on the second half of the letter.
- Now all that remains is to fill our letter so that it becomes a pillow. Synthetic padding polyester of any density or padding polyester (holofiber), foam rubber and even scraps of fabric are suitable for this. Stuffing is a very important process, treat it responsibly. Pay special attention to the corners, carefully and evenly, and most importantly, fill the letter very tightly. The choice of material for stuffing is very subjective, so everyone will choose what they like or what they have.
- After the increase, the letter turned into a pillow. You need to carefully sew up the hole left for stuffing. You can use a so-called hidden seam, or a beautiful ribbon to match the color of a small width fabric.
- And finally, it is possible or even necessary to steam the letter. Take an iron with a steam function, set the steam to maximum, and go ahead. Until it gets the gift look you want.
We looked at a fairly simple example of a pillow letter. But that doesn't mean you should stop there. We attach photos to the options we offer for clarity.
Let's consider the option of a pillow for a girl, but every girl is a princess, but what is a princess without a crown? Here comes the letter pillow, the initial of the princess girl's name, with a crown. The crown must be soft, but otherwise there are no limits to your imagination.
A letter-themed pillow is ideal for decorating a holiday in a nautical style. Everything related to the sea: anchors, circles, compass, lighthouse, boats, oars, ships, whatever you want, can fit into your masterpiece.
Letters made from felt pillows can be especially delicate and soft. They are perfect for the smallest creatures, because they need it so much.
Individual pillows for men are also very unique. They are decorated with purely masculine attributes, which sets them apart from all other pillows.
By following each step of this master class, you can sew not only one letter, but also a whole word or name, using a letter on a pillow.
Video master class
For reinforcement and clarity, we attach a video selection on the topic.
sdelala-sama.ru
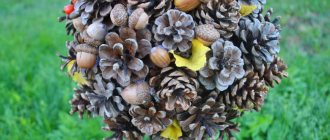
Crown made of wire and beads
A delicate and shiny accessory will complement the lush dress of a little princess.
To make it you will need wire, beads, seed beads, and pliers. To get a beautiful product, you need to create a base. If you need to make a princess crown with your own hands, you should measure the size of the child’s head.
After this, cut a piece of wire and make a hoop. Five or more parts with sharp corners must be attached to it. They are also made of wire.
Beads are strung on the tops and wire is secured. Now the simplest part of the work remains. Beads are strung onto pieces of wire, and then these elements are wrapped around the resulting base. Using this method, you can create amazing accessories that will not leave anyone indifferent.
Option from whatman paper
To make such a head decoration with your own hands, follow these steps:
- take whatman paper and draw a maple leaf on it;
- cut out the sketch and the same one from the fabric. The fabric should be autumn shades;
- then cut out a rectangle from these two materials that will correspond to the volume of the head;
- connect the two main parts with fabric cutouts;
- All that remains is to decorate. For this you can use sparkles and gold braid.
Related article: Crochet blanket with motif diagram
Even an adult can try on such a crown; it will look trendy and will last for several years. If desired, you can replace one large sheet with three small ones. The principle of operation is the same, only the stencil is different.
A simple crown in five minutes
Mothers often face the problem of how to quickly make a crown for a girl with her own hands. If there is very little time left before the matinee, and you need the accessory urgently, use a hair comb. A small crown is cut out of shiny paper. It must be glued to the scallop. Afterwards the decoration is attached to the baby’s hair. It looks great, just choose paper that matches the dress.
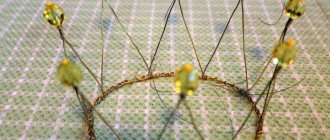
Element for rim
This crown will help complement your look as a decorative hair accessory at special events.
What will be useful at work:
- silver wire;
- pearl beads in three sizes (3, 5 and 7 mm);
- pliers.
When using a given size of beads and forming 9 tops, the height of the crown will be 3.5 cm. The diameter of the frame of the product is 3 cm. The product is created by weaving. To understand the sequence of actions, a diagram of work on the crown is presented.
A meter of wire is cut. Beads are strung on it in the following order: five small, a pair of medium, one large and one small. The beads are located in the center of the wire.
The thread returns through the large bead and is brought out through it.
Beads are strung onto a free wire, repeating the pattern of the elements on the adjacent thread, but there should be not 5, but 4 small ones.
The wire is pulled through the fifth bead of the adjacent thread.
The central top of the crown is made. The work is divided into two parts. First, the teeth are woven along one strand of wire. After this, a similar process is carried out at the remaining free end.
One large and five small beads are strung on one wire.
Its end is inserted into the hole of the second middle bead of the adjacent top.
Related article: Hyacinths made of corrugated paper. Master Class
The next crown tooth is formed, completely corresponding to the previous one.
In this way, weaving is carried out until the nine peaks of the crown are created.
Next comes the connection of the two parts of the product.
To do this, one medium bead is thrown on each edge, after which both ends of the wire pass through the next medium-sized bead.
The ends of the threads are separated and four small beads are strung on each of them.
Each wire passes through small beads of adjacent edges at the base of the product.
A large bead is thrown onto one of the threads, and the ends of the wire are twisted together.
The twist is hidden inside a large bead.
The finished crown remains to be secured to the rim.
The small size of the product is quite suitable as a decoration for a doll. This idea will appeal not only to little girls, but also to creators of collectible dolls.
If you use smaller beads, then such a crown will be the size of very miniature dolls. Using this technique, it is possible to create a tiny accessory even for Barbie.
Snow Queen Crown
For decoration, you can use white cardboard and light-colored beads. Decorate the product with cotton wool, bright ribbons, and rain.
We make the Snow Queen's crown with our own hands using a ready-made template or a self-created blank. The decoration should be combined with the outfit, so you can use some decorative elements that are on the dress.
Royal decoration
The following detailed description of the work will help you create such a crown.
To make the product you will need:
- thin copper wire (1-2 mm and 0.4 mm);
- large beads;
- medium size beads;
- large beads;
- glass beads
The color of beads and beads can be varied. It all depends on the palette of the main costume, to which the crown is created. The use of transparent elements in the product looks much more advantageous: glass refracts light and transparent parts sparkle like precious stones. Wire with a thickness of 1-2 mm is used to form the frame of the product. The other one is suitable for working with beads and beads.
Using a ruler, determine the height of each triangular element of the crown. Several pieces of wire are cut, the size of which corresponds to the double height of the product links plus 3 cm for the winding. The number of crown spiers is individually adjustable.
This master class includes 8 acute-angled parts.
A base is formed separately, the diameter of which is 12 cm. For strength, the frame in the form of a ring is wrapped with a layer of wire.
The wire circle is divided into equal parts, after which the prepared tops are attached to it. In order for the crown to have good strength, it is recommended to fasten the parts overlapping, as shown in the photo.
The next step will be attaching large beads to the tops of the triangles. To do this, take a thin wire, onto which a large bead is strung, then one bead. Then the wire is bent and inserted back into the hole of the large bead. The workpiece is wound in tight rings to the top of one of the triangles.
Related article: Beaded lilies: a master class for beginners with photos and videos
In this way you need to arrange all the sharp corners of the links. A thin wire is wrapped around the top of the triangle, and its two long ends go down. Prepared beads and beads are strung onto each of the wire threads. This is done in any form. Then, with fancy overlapping threads with decorative elements, they wrap around the area of the triangle to its base.
At the bottom, the ends of the wire are attached to a round frame.
Each wire link is framed in a similar way. The crown made of beads and wire is ready.
The crown is convenient to use not only for carnival. By creating a miniature decoration and attaching it to a headband, you can please your child with a new accessory.
Photo of a homemade crown
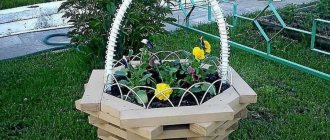
Craft in the form of a crown of leaves for the autumn holiday
And these interesting crowns with leaves were given to my daughter by her friend, who made them herself. Therefore, I couldn’t help but share such ideas. They are suitable for the autumn holiday in kindergarten or school. Of course, it can also be used for children's games.
It’s quite easy to make, twist a wreath out of wire and screw the leaves to it in a circle. Looks very harmonious.
A similar wreath can be made with the addition of flowers.
On this good note, I end today’s selection of master classes and ideas. Don’t forget to click on the social media buttons so as not to lose such valuable material. And I say goodbye to you, see you again online!