Weaving techniques
Crafts from beads and wire are woven using different techniques.
| Name | Purpose of weaving | Peculiarities |
| French | Flowers | String the beads onto the axle and onto the other edge of the cord that is used to weave the part. Place the working tip of the gimp parallel to the rod and fix it at the top with 1 turn. Next, also form more arcs. |
| Looped | Leaves, stamens | Thread glass beads onto a piece of steel, then make a loop and twist it at the bottom. Stepping back a little, put the beads back on and make a loop. Using similar actions, weave an object of the required length. |
| Needle | Branches | Place 6 beads on an aluminum thread, hold 1 bead with your hand, and pull the edge of the wire through the remaining 5 parts. Tighten the workpiece. |
| Parallel | Figures, leaves and petals | Pass the metal line through the glass beads towards each other according to the diagram. This creates shortened parallel lines connected to each other. |
| Monastyrskoe | Bracelets, patterns | On each section of the panel there are beads placed at an angle of 900 to one another and connected in 4 pieces. imitate crosses. |
| Mosaic | Brooches, ties, souvenirs, women's jewelry | The beads are arranged in a checkerboard pattern and at the same time form a dense fabric. |
| Brick | Earrings and brooches | The panel is created by passing the thread not in the middle of the glass grains, the fishing line clings to the thread of the previous tier. |
| Hand weaving | Complex flat patterns | The glass beads are placed strictly one above the other without displacement. |
| Ndebele | Jewelry, souvenirs | The canvas is made in the form of a Christmas tree or wheat ears. |
| Mesh | Braided products, necklaces | The cells are strung sequentially and connected through a bunch of beads, forming an openwork mesh. |
Subtleties of “baking”
First of all, preheat the toaster oven to a temperature of approximately 250 degrees. Then we take our tray with molds and beads and carefully mix it on the shelf in the oven. Make sure that the beads do not turn over or bunch up in one corner during this operation. Remember to wear gloves or oven mitts - the toaster oven gets very hot and can burn your skin. The melting time of the beads in the molds is approximately 10 minutes. But look at the crafts during the process - the melted beads should be evenly distributed throughout the mold.
The first online club of this kind in the city: older Muscovites will be taught how to write memoirs
According to folk wisdom and hygienic reasons: when to remove the Christmas tree
“What a pianist dreams of”: how celebrities congratulated Raymond Pauls on his anniversary
Another important point is that such bead crafts will not look aesthetically pleasing if you “boil” the original material. Do not allow bubbles to appear in future toys - they will ruin everything.
Earrings
Crafts made from beads and wire will delight lovers of original jewelry.
Step-by-step process for making simple earrings:
- Place alternating red and yellow beads on the wire.
- Connect the workpiece into a ring.
- String 10 mother-of-pearl beads onto the ends of a metal thread and form petals.
- Bring the edges through the yellow balls.
- Form 5 petals in a similar way.
- Finally, attach ear hooks to one side.
What you need
So, to make such crafts from beads, prepare everything you need, and this is:
Unique stained glass windows of the VDNH pavilion, which were considered lost for 60 years, have been found
The Real History of Aztec Crystal Skulls Goes Back to an Antiquarian in Mexico
Children helped a homeless man in difficult times. Soon the man decided to thank them
- The bead itself that you want to melt down.
- Cookie molds.
- Metal pan.
- Toaster oven.
- Drill with a thin drill bit.
- Fishing line.
You can participate in the process of making such crafts from start to finish with your child. He will not miss any of the stages.
Hair decoration
Hair clip design technique:
- It is recommended to make each segment of the decoration separately, then assemble them into a whole craft.
- First, a small and large inflorescence is formed from Czech beads according to the diagram.
- Each petal must be created using the brick weaving method. This process begins from the middle. You need to string 4 white and 6 pink beads onto a thin fishing line, then close them into a circle. After this, string the glass pieces one at a time.
- Petals are made from one shade or several colors.
- When ½ part of the leaf is completed, you need to return to the 1st bead, and from this point begin weaving the 2nd part.
- Next, you should walk the fishing line along the edge of the created part and attach several pieces of glass to level the shape. If the thread is slightly pulled, the petal will turn out to be curved.
- Using a similar method, you need to make 5 blanks. Use a cord to pass through the 3 outer balls of the leaf and sew them together.
- Collect flowers according to the pattern.
- Attach the made parts to the metal base for the hairpin and decorate it with artificial pearls.
Creating New Year's decor
After such a sharp cooling, you will not have problems getting the toys out of the molds - as soon as you hit the table, they will fall out by themselves. After that, we put a couple of pieces of wood and take the drill in our hands. With its help, you need to drill a hole in the top of each toy for a fishing line or rope. We carefully do this work and throw away the excess melted beads.
Now our Christmas tree decorations are ready. All that remains is to thread the fishing line through them and hang them on the branches. Also, using the same fishing line or a beautiful shiny rope, you can make a garland from such creations, hang it under the ceiling or on a window.
Flowers
Crafts in the form of flowers are made from beads and wire.
Step-by-step technology for making forget-me-nots:
- Cut 10 cm of wire (thickness 0.2 mm). Place 1 yellow and 5 blue beads on it. From the dark glass side, thread a steel thread through the first 3 pieces, then through the light ball. Twist the ends in the middle under the golden pearl, resulting in a small flower.
- Using similar actions, make about 100 such blanks, and then create inflorescences from them. It is recommended to do it this way: take 2 flowers and twist their wires, then weave other tassels to them. For a lush detail, it is advisable to twist about 10-15 flower heads.
- The leaves are woven using the parallel weaving technique. You need to take 30 cm of fishing line and green beads. String 3 glass grains and pierce 2 of them with the other edge of the wire in a cross pattern. There should be 2 bead tiers. Then put on 3 bugles and thread the base in the same way.
- Using the same method, weave rows No. 4 and 5, 4 and 5 beads each. Next, make 1 more line of 5 glass rounds, then reduce their number (4-3-2-1). Having inserted the last ball, you need to twist the wire edges.
- Small branches should be formed from the leaves, twisting 3 leaves together. It is advisable to leave several leaves one at a time.
- During the assembly process, foliage, inflorescences and branches need to be twisted with metal thread, placing them at your discretion. Wrap the stems with green braid.
- Place the finished bouquet in a small vase, which is covered with pebbles for stability.
How to make rowan with imitation snow
To make winter rowan you will need white beads and glass beads, wire and large orange or red beads. The weaving pattern for such a tree is suitable even for novice craftsmen.
- Take a small piece of wire and place one red or orange bead on it. Rewind the ends of the wire several times so that the twist is at least 7 mm.
- Place one more bead on the free ends of the wire and repeat the twist. As a result, you should have a bunch of berries (about 10-15 beads).
- Repeat with another piece of wire several more times.
- Connect several bunches together. You will get a voluminous sprig of rowan berries.
- Place several white beads on a piece of wire (you can alternate with glass beads). Make a loop.
- Repeat the process with the free ends of the wire so that there are several loops on one piece.
- Attach loops of white beads to the top of the rowan bunch.
- Twist the free ends of the wire together to form a barrel.
- Place the finished rowan in a pot or in a mixture of alabaster (plasticine, plaster).
- To disguise the wire, you can first treat the trunk and branches of a winter tree with PVA glue, and then paint them with black paint.
- Bead blanks can be screwed to a real branch, then the composition will look more natural.
One example of how you can make a winter tree with your own hands is shown in the video tutorial. Watching the video will not take much time, and after visually studying the bead weaving pattern, it will be much easier to do all the steps.
Be sure to write in the comments about your successes!
13 880
Animals
Beginning craftsmen can weave a crocodile-shaped craft:
- First, you should calculate the length of the fishing line, depending on the size of the beads used. For large bugles you will need at least 2 m of wire (0.3 mm thick), and for medium balls - 1.2 m (diameter 0.2 mm).
- When shaping the animal, the parallel weaving technique is used. This means that the total number of beads for the 1st and 2nd tiers are strung on a steel thread at the same time.
- Then draw 1 edge of the fishing line through all the glass of the 2nd line, towards the other end, then tighten them.
- Next, you need to place beads of the following levels on the steel thread, securing them with the 2nd edge of the thread in a counter action.
Beaded animal figurines
Beginning craftsmen love to make animal figurines most of all. They are easy to make and they turn out very beautiful. And they can be used well: key rings, children's toys, brooches for clothes, etc.
Crocodile
Depending on the size of the beads you choose, you need to cut the length of the fishing line (from 1 to 2 m). String beads parallel to the first and second rows at the same time. Then pull one end of the fishing line through the beads of the opposite row in the opposite direction and tighten. Then string the beads of the next rows in the same way, fixing with a counter step of the other end of the fishing line.
Dragonfly
Also done in parallel weaving. Step-by-step instruction:
- Head: in the middle of the wire we collect one large bead, one well-marked one, one large one, three small ones, connect the ends of the wire;
- Body: we pass another wire through three small beads, collect 4 small ones on any end of it, and thread the other end in the other direction;
- The next row is similar to point 2), but string 5 beads; repeat two more times;
- Tail: do the same as the body, first 3 beads, then 12 rows of two beads;
- Wings: thread a wire into a row of 4 body beads, string 26 beads on each side, thread the ends into the first ones, tighten;
- Pass the ends through 5 beads of the body, string 23 pieces for the second pair of wings, tighten and secure.
You can use the dragonfly as a brooch or as a hairpin.
The essence of the work
Just don't be scared - we will melt beads to make Christmas tree decorations. This is a very original solution, which is not described in books on needlework and which will definitely be prohibited in every school.
During the process of melting the beads, new shapes will be formed, they will become our toys, or we can weave a garland from them. Such New Year's decor can be of a wide variety of colors, thickness, texture and texture. Also, depending on the type of beads, the toys will turn out to be translucent or completely filled with color.
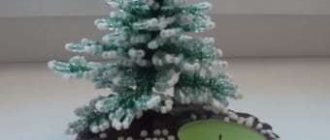
Trees made of beads
Such trees are a very good idea for a gift. They decorate the interior of the house and delight the eye with unusual shapes and a variety of colors. The weaving principle is almost the same.
Usually the twigs are cooked first. 8 small beads are collected onto a wire approximately 45 cm long, then a loop is made, twisted in half, thus making 8 loops. Then twist both ends together to create a bud. For a tree you need 150 of them, leaving 10 cm of free ends of the wire. We weave every three buds into one large one, there will be 50 of them.
Three bundles need to be connected to each other, then wrap a thread about 2 cm long around the base, you will get the top branch. Make two more such branches, connect them to the top one, retreating 2 mm downwards, this will be a large branch. This is how the remaining branches are formed.
The branches are connected with 3 mm thick wire, and wrapped with nylon thread on top of it. The bends of the tree are made as desired, depending on your imagination. The trunk can be painted. The tree is attached to any ready-made base, or you can make it from alabaster and glue and decorate it.
Winter crafts from beads
First of all, we associate winter with snow. Making snowflakes from beads is easy and simple. Experienced craftswomen, looking at such a snowflake, will easily determine what needs to be done and in what order. If you are new to this activity, use the step-by-step instructions and do everything as shown in the photo.
We will need:
- transparent blue beads;
- diamond-shaped blue beads;
- wire for weaving with beads;
- small wire cutters or pliers
- thin lace.
- We prepare all the necessary materials and tools.
- We start working on the snowflake from the middle. We collect 6 beads onto the wire. We thread the opposite end of the wire into the outer bead in the reverse order. We should have a circle.
- On the right edge of the wire we collect 1 bead, 5 beads and again 1 bead. We thread the opposite edge of the wire into the last bead in the reverse order.
- We string 5 beads and one diamond bead onto the right end of the wire, which we pierce with the other edge of the wire using the parallel weaving technique.
- Next, we weave a snowflake as described in the previous paragraph until we reach the starting point. We should get the following: an initial circular blank and 6 diamond-shaped beads framed by well-aimed beads.
- We continue work where we left off. Now we weave 3 crosses according to the pattern that is often taken as a basis when weaving “beaded bracelets.”
- Next, we thread the wire into the side beads of the previous cross, as shown in the photo.
- We collect 3 beads and again thread the edge of the wire into the side bead.
- We secure the wire with several turns around the bead and remove the ends with wire cutters.
- We thread the wire into the central bead of one of the segments of the last row of the future snowflake and weave another side fragment. There should be 6 of these in total.
- This is the simple New Year's craft made from beads that we have, the last step is to attach a cord, do this, guided by the photo.
You can make several of these ice snowflakes in different color combinations and decorate your Christmas tree with them . You can also show a little imagination and come up with your own versions of snowflakes.
New Year's beadwork: Christmas tree
You will need:
- beads and beads
- wire
- pliers
- wire cutters
* To make a white tree, use silver wire, and for a green tree, use copper wire.
* This small Christmas tree is woven using the “loop and twist” technique. Everything is quite simple, but this technique requires a lot of free time.
Each loop contains 6 green beads and 2 golden ones. To make it, collect beads in the following sequence: 3 green, 2 gold and 3 green. After this, twist the wire and repeat until you have collected the required number of pieces.
* From the top to the base the branch becomes larger, as does the number of loops.
* When you have created the required number of branches, start attaching them to the stem in a circle.
How to make a Christmas tree from beads (video)
Needle weaving of a three-dimensional Christmas tree - step-by-step video
What could be better than a step-by-step process? It’s great when everything is explained very step by step and even told. I decided to dedicate the video to this title, because this work is not so simple. Perhaps at first glance you will say that everything is easy, but you will have to work hard.
The result was unreal beauty. Be sure to use this technique to make a New Year's symbol. Let your family enjoy the awesome decor for your apartment.
Original tree from the cabin with toys
An incomparable version of a New Year tree with toys. This work looks absolutely beautiful. And the manufacturing scheme is accessible to every beginner. What is required of you, of course, is desire, perseverance and maximum effort. I promise if you have all these qualities, everything will work out.
This craft will become an original decoration for your home. By the way, you can use the finished product as a gift and present it to your loved one. Because you wouldn’t want to give such a toy to an ordinary friend. After all, so much work will be invested.
Cutting is one of the forms of beads. Which is made in the form of small tubes, cut off on both sides.
To make this forest beauty we will need:
- Green beads (cut) and a little brown
- Wire
- Beads of different colors
- Decorative stones
- Pot (small)
- Alabaster
- Scissors
Manufacturing technique:
1. Let's start making our Christmas tree. We will start weaving it from the very top according to the pattern. We cut the wire 50 cm long. We string the following combination of beads onto it: golden beads, glass beads, a bead of gold and silver shades, green beads.
Now that the entire combination has been assembled, we proceed to the next manipulation. We pass the thread through the glass beads and the remaining beads located below. Please note right away that our entire structure must run in the center.
If you did everything correctly, then the result should be two straight ends of the wire. Now we put 4 green beads on each side and twist the ends together (in two or three turns).
Now on each side we again put beads of the corresponding color (as in the photo) in the amount of 10 pieces. And twist it again in two turns. This way we will get two loops.
2. Repeat this manipulation again to get 4 loops. And we gradually begin to manufacture the second tier. We will prepare it separately and then attach it to the base.
We assemble a combination of beads as shown in the second part of the picture. We secure the loop again by twisting the wire 2-3 times. Then we repeat a similar process only on both sides.
As a result, we should get four branches like this. By the way, to make them you need to take a wire 25 cm long.
Please note that each of the loops is made at a different level. To make it happen for you, increase the number of revolutions in the right places.
3. Third tier: cut the wire 30 cm long. In this case, the whole process is similar to the previous one. The only thing is that the number of loops will increase by 2 pieces. We need 4 units of such branches.
4. Let's start making the fourth tier. We cut a wire 30 cm long in the amount of 8 pieces. We repeat the entire process similar to the third point. But since the number of ready-made branches has increased, now our task is to fasten them two at a time. This way we get 4 ready-made branches for the fourth tier.
5. The fifth tier is similar to the previous one. We cut the wire 35 cm long. We make 4 branches of 7 loops from it. We are preparing to make the sixth tier. We cut the wire into 8 pieces of 35 cm each. We braid 5 loops on each. Then we connect two at a time, i.e. took one ready-made branch and connected it to the second. And only then we wrap them with a common metal thread.
7th tier (shown in the second part of the picture) we make a loop in the very center of the wire. Then from it there are 3 more loops on each side. We repeat similar actions at the second end. It's okay if the metal thread becomes a little shorter. To make this tier, we will need 4 pieces of wire 60 cm each. On the last loop, twist the two ends of the thread two turns together. This way we get one whole.
6. Let's look at the last layer and then start assembling our beauty. We stock up on patience; here it will come in handy a little more.
8th, cut the wire in the amount of 4 pieces of 60 cm and 8 pieces. 30 cm each. From the length of the thread we make a branch similar to the 7th tier. From the shorter one we make five loops. Now we connect all the resulting branches, as shown in the figure above.
Congratulations on one task, you have completed it, it’s time to start assembling the finished product. Nothing complicated here. We just start connecting all the tiers together, starting with the smaller one.
To make the finished work look more beautiful, at the end additionally wrap all the joints with wire. Well, our beauty is ready. Let's put it in a beautiful pot. To do this, dilute a small amount of alabaster, fill the prepared pot with it and place the trunk evenly. Let the mixture dry completely, only then can you begin decorating the bottom.
If you are using a clay container. Before filling it with the prepared solution, fill it with unnecessary material (sponge, cloth or paper). This is necessary so that the pot does not burst during the drying process.
I remember that at the beginning of the article I promised you a Christmas tree with toys. Let's do them together, nothing complicated here. We take multi-colored beads and wrap a small amount of wire around them. We fix it on one side. The toy on the pendant is ready, you can hang it on the Christmas tree.
By the way, if you want the trunk of the finished tree to be green, you can use floral tape. It can be purchased at any craft store. Yes, and you can choose colors there to suit your taste.
These are the wonderful ideas for making forest beauties that we looked at today. Don’t delay, decide on an option and get down to business. There is very little time left. If you start now, you can get a lot done
Patterns for weaving volumetric bead toys
When you have mastered simple flat beaded figures, it’s time to move on to volumetric options. Such toys look less schematic. With high strength of weaving, the animals can even serve as children's toys, since the beads are harmless to the child. Any animals can be made from beads, as long as the child loves them. Let's start with the inhabitants of the waters - the dolphin. It is unlikely that the azure dolphin will leave anyone indifferent.
Beaded dolphin
Weaving a beaded figurine begins from the nose. Beads are strung on a wire over 75 cm long. Two blue beads and one white (transparent) are taken first. This will be the dolphin's nose. The farthest tip from the white bead of wire is inserted into it again. Next we weave a couple of blue beads, and again white. We make sure that the odd (blue) rows are on top, and the even ones are on the bottom, the last, 5th, row of the nose should go to expansion: five blue beads and two white ones.
Next, we work according to the scheme, not forgetting to send even and odd rows “to the address”. The white ones still continue with a small number of beads, the blue ones are undergoing a significant expansion: in the 7th row - 7 beads, in the 8th - 3, in the 9th - 9, in the 10th row - 4.
The 11th row is special: here you need to place the figurine’s eyes - made of black beads. The row contains 11 elements, the two outermost ones are made blue, and the beads adjacent to them are black. The blue ones continue in the middle.
The 12th row consists of 5 white or transparent beads, the 13th – of 11 blue. Further white rows continue unchanged, but in the 14th row additional wire for the fins is woven. The 15th row is similar to the 13th, and in the 16th row another wire is added, which is also brought out at both ends.
We continue to weave the dolphin's body according to the pattern. Now its size will decrease to the tail, at the transition to which one white bead remains. For the tail, only blue beads are used. The first row of the tail consists of two beads into which you need to stretch an additional piece of wire. The next row of parallel weaving is three beads, then five. Next, we pass the working wire into two beads of this row, and above them we make a half row of two beads, and the next one from one. We return, piercing the end of the wire in rows to the bifurcation point. We insert the wire into the remaining two outer beads and make the second part of the tail. We weave the end of the wire inside the tail and secure it there and bite it off with wire cutters.
We still have “whiskers” on the sides of our bodies. We weave fins onto them, similar to the tips of the tail. We remove the ends of the wires for work. They should also be well secured. Using another wire threaded under the back beads, you can make the upper fin of a dolphin. Having tried this scheme, you will understand how other inhabitants of the deep sea - whales, killer whales and other beaded animals - weave.
Beaded kitten
Children's favorite beaded animals are images of pets. Let's look at how to make a kitten in the form of a small keychain. To work, you will need colored and white beads to make the body, two mother-of-pearl beads for the eyes, and a similar pair will serve as the kitten’s earrings. The nose is made from a red or bright pink bead. The basis of the bead figurine will be a fishing line, the length of which should be more than 210 cm.
We start work from the bottom, from the body, assembling circles according to the diagram
:
- for the bottom (1) we collect five transparent beads, close them with a ring, pull both ends through the beads and weave further according to the pattern;
- on the 6th ring you need to go to a new level and weave according to pattern (2);
- similarly weave the third level, shown in diagram (3), paying attention to the presence of colored beads;
- Then we move the rows to decrease.
We weave the head in the same way, only starting from the point marked in diagram (3) with the letter E, we proceed to weaving the head with the muzzle of the animal according to scheme (4). The kitten's ears and paws can be woven separately, as your imagination dictates. Their frame can be made of either fishing line or wire.
Beaded dog
Another favorite is the dog. A very expressive figurine made of beads – a pug. For the puppy’s fur we will choose beige or pearl beads, for the face and ears – black. The upper tiers will be the back of the dog, the lower tiers will be the belly. The wire for the body is selected 120 cm long.
The first row consists of two tiers, each of 5 black beads. Between the two tiers a middle one is made using additional wire with three black beads. It is twisted into a ring, and the wire is tightened. Frontal and side views are shown in the photo:
Next you need to form the face of the beaded figurine with eyes:
We string 12 light beads in the upper tier, and 10 in the lower tier. We pass a wire through the four upper beads.
The next tiers of bead toys are made in the same way, but the top one already contains 14 beads.
Next is the weaving pattern
:
- top. yar. The 5th row consists of 11 light beads, the bottom one - of 16 beads;
- in the top 6 there is a wire 30 cm long;
- top. yar. The 6th row includes 10 elements, and the bottom one – 16;
- an additional wire loop is inserted into 6 medium beads;
- top. yar. The 7th row of the bead toy consists of 9, and the bottom – of 16 elements;
- 8th: 8 beads on top and 15 on bottom;
- 9th: 8 upper and 14 lower;
- The 10th row includes 9 top and 13 bottom;
- The 11th row consists of 9 - on top, and 15 - on the bottom;
- through the 5 middle ones you need to draw a 30 cm loop;
- The 12th row is formed from 8 beads on top and 12 on the bottom;
- The 13th row includes 6 beads on top and 8 on the bottom;
- a 20 cm loop is drawn through 2 middle ones.
The 14th row, consisting of 4 beads, into which a wire is inserted on both sides, closes the pet’s body. This row should be placed in the middle between the tiers of the previous row.
We have a lot of “whiskers” sticking out from our work, which are used to form the paws, ears and tail of the dog. The paws are woven in a zigzag pattern, two beads in a row, as in the picture below:
Each leg of a beaded figurine ends with a row of one bead. The pug's tail is also woven from rows of two beads, but not in a zigzag, but flat. The tail needs to be bent up.
To prevent the rows of the dog from falling apart, the work needs to be sewn with fishing line along the beaded figure.
Beaded frog
Another funny animal made from beads is a frog. You can try to weave it according to the rules for making another figurine from beads - a dolphin. For the back of the animal we choose an emerald color, for the belly - yellow, gray or white. The length of the figure should be reduced, and wire “mustaches” should be inserted where the legs are supposed to be made. The eyes of an amphibian can be made bulging by using pyramids of five black beads for them. If you want to depict a tree frog, then the tips of its fingers should be made of red beads or larger beads.
Christmas tree made of beads - master class for beginners
Let's start our master class with the simplest option. We will make a Christmas tree from glass beads. By the way, you can replace it with a regular type of bead. And decide the color yourself. Our forest beauty will be a beautiful white shade. As if under a snow coat.
For the lesson you will need a minimum of material. And maximum effort, if everything is already prepared, you can get down to business. Sit down in a comfortable position, this activity takes a lot of time. But this work can be done by any beginner.
We will need:
- White bugles
- Silver wire with a diameter of 0.4 mm.
- Floral ribbon
- Red beads
- Alabaster + water
- Shallow bowl
- Scissors
- Red wire
Manufacturing technique:
1. Cut the wire 40-50 cm. We collect 4 glass beads and twist them into a loop. Then we step back 1 cm to the side and again collect 4 bugles, repeating a similar process.
For this branch we need to make 9 loops. Now that everything is done, divide the wire exactly in the middle so that one of the leaves is in the very center. Carefully bend and twist the wires parallel to each other. One branch is ready.
2. We need to make the remaining branches in a similar way. The only difference between them will be the number of loops. The technology itself will not be any different.
1 type - 5 loops (number of finished 4 branches)
Type 2 - 7 loops (number of finished branches: 6)
Type 3 - 9 loops (number of finished branches: 11)
4 type - 11 loops (number of finished branches 8)
5 type - 13 loops (number of finished branches 6)
3. Now you can start assembling. We take a wire 20 cm long, the thickness of which is 2 mm. It will serve as a trunk for us, or even some kind of support.
We take a branch of type 1, which has 5 loops, place it at the very top and secure it with heat tape (floristic). It should be wrapped well so that no gaps are visible. Just below we fix 3 more branches of the first type. We also go through the tape.
We do the same with the remaining branches, observing the order by type.
Please note if the number of branches is 6-12 pcs. and more, you don't need to place them all in one line. Divide them into equal quantities, for example 1 layer 3 branches, then repeat the second.
I think at this stage there should be no questions. But if anything is not clear, write in the comments below, I will be glad to help you with an answer.
4. Now that our New Year's beauty is completely assembled, you can straighten its branches. Give it a more attractive look. Next we start making the stand. For this we need a shallow bowl. It can be made of any material. We put a plastic bag inside it and pour the diluted alabaster mixture on top. Don't make the mixture too thin. The consistency should be like porridge.
Fill the bowl with the prepared solution. And carefully insert our beauty, the barrel should touch the bottom of the dish. Hold it for a while until the solution sets. Then you can release it and let it dry completely.
Congratulations, half the job is done. When the mixture is completely dry, carefully remove our work. You should not pull it sharply by the top. Please note that the product is quite delicate and one awkward movement can ruin it.
Look at the barrel, do you agree that it is not quite finished yet? I think it needs to be slightly expanded towards the bottom. To do this, take a piece of gauze and dip it in the remainder of the alabaster mixture. We take it out from there and wrap it around the bottom of the trunk. Giving it some form of wood.
While the solution on the trunk has not dried, you can create grooves. To do this, take a small sharp skewer and walk along the trunk, drawing regular, uneven lines. Now let the work dry. Then you can start painting. We will paint with acrylic paint. You can use watercolor, but unfortunately it is not so rich and will have to be applied in several layers.
Let the paint dry, then you can varnish the barrel again. To make the tree look more realistic.
Well, all the main stages of manufacturing the work are completed. It's time to start decorating. We will start from the lawn of our Christmas tree. Apply colorless glue to a flat surface (for example, for ceiling tiles). Then carefully sprinkle with white glass beads. Creating some kind of snow.
Our beauty is almost ready, give it a little time to dry. For now, you can start making toys for decoration.
To create toys we will use bright red color and a similar color of wire. We string 6 beads and twist them into a loop. Then we collect two more beads on one of the ends. And we pass them through one located in the very middle. This way they will be in the center.
We put a small piece of wire on the finished ball, which will serve as a pendant. Then we attach them to the branches of the Christmas tree and cut off the excess ends.
Our product is ready, you can give it to someone close to you. Or leave it at home and decorate your apartment with it.
New Year's beaded toys: Christmas balls
It’s impossible to imagine the New Year without a Christmas tree - whether it’s made by hand, artificial or live, we try to decorate it beautifully.
Of course, the most recognizable toy on the Christmas tree is the New Year's ball. No matter what country in the world we come to, we will always find balls on the New Year’s tree.
They can also be made from beads, and all models can be divided into 2 groups:
- Small balls based on 3, 4 or 5 beads.
- Large balls made using a complex pattern based on a blank. Such models are made using a spherical base, so they turn out to be quite large - which means they can also be hung on the Christmas tree along with other toys.
Let's consider in detail all the possible options.
Small balls of 3 beads
Small balls acquire a rounded shape even without an internal base - thanks to tightly connected beads, they become spherical. This beautiful decoration can be used not only for the New Year, but also in everyday life, hanging balls, for example, as a keychain.
And making them is not as difficult as it might seem at first glance, the main thing is not to get confused and stock up on enough materials:
- actual beads of any color;
- thread or fishing line (special mono thread is also sold);
- scissors;
- bead needle.
Of course, it’s better to start with something simple. You can make a ball using 3 beads even with a primary school-age child. To do this, we will use the following scheme:
Here's a brief description of it:
Step A. 3 beads of the same or different colors (with symmetrical alternation) are strung on a thread and connected into a ring. As soon as it is as strong as possible, the thread is tied into a strong knot.
Step B. The next stage is to string 2 more beads, as shown in the diagram, into beads 1 and 2. We tighten the thread again - we get a hemisphere.
Step B. Finally, we go with the needle into the last bead, we get into 4, and then in the sequence as shown in the diagram. We tighten a strong knot, and hide the ends of the knots inside the beads - you get a dense, nice ball. Perfect for a souvenir Christmas tree, which can be made, for example, from fabric, cardboard or even pine cones.
Balls of 4 beads
Now let's move on to another option with a slightly more complex weaving pattern.
We proceed this way:
Step A. String 4 beads and make a tight ring out of them, tie a knot.
Step B. Now add 3 beads, tighten with a needle, passing it through beads 1 and 2, as shown in the picture. We add 2 more beads and get a hemisphere.
STEP B. We put on 2 more balls, pass the needle through the beads with serial numbers: 8, 3, 4 and 7. The last stage is to string the 12th ball, pass the needle through 10 and subsequent beads, as shown in the diagram.
Balls based on 5 beads
And here is the most difficult option, which, by the way, is also the most popular. If you practice on previous models, you won’t have any special problems making this ball. It’s just that our scheme of actions becomes even longer.
We proceed like this:
Step A. The first stage is similar - you need to put 5 balls on the needle and make a knot. Add 4 more beads, pass the needle through beads 1 and 2.
Step B. Similarly, add 3 balls each, resulting in the first row of the workpiece. In total, it requires 20 beads, as shown in the diagram. Similarly, we move to the 2nd and last row. Weaving begins with bead number 8, then the needle needs to pass through several beads in succession - from 19 to 12, as shown in the figure.
Step B. Now we string the 30th bead, moving sequentially from 28 to 22 beads. Tighten the knot and hide it inside.
Of course, it is better to see once than to hear a hundred times. Therefore, in addition to diagrams and descriptions, video material will certainly help needlewomen.
Large Christmas balls
And these toys are perfect for decorating large home Christmas trees, with their tops reaching up to the ceiling. These Christmas tree decorations are crocheted with beads, after which a ball-shaped base is inserted inside, which can be purchased at any decorative arts and hobby store.
This time you will also need beads of different colors, thread, as well as a set of hooks and a pattern - a ready-made pattern for knitting.
Selecting materials is sometimes not so easy, so novice needlewomen can use additional advice in the video.
To make such an interesting New Year's craft from beads, we will proceed as follows:
First of all, you need to thread the beads onto the thread using a needle. If we take the above diagram with a white snowflake on a blue background as a basis, you can collect beads from either end, because the pattern in any case will turn out to be symmetrical, closed in a circle.
After a set of beads, distribute them into groups so that the result is 5 m of free thread per 0.5 m of thread with balls. We wind it on a solid base.
Now it's time to arm yourself with a crochet hook and start knitting. We start with a loop called amigurumi. This is how it is done.
And then we make 6 identical wedges until we get exactly 11 rows, and each row will end up consisting of 66 beads.
Now you can insert the ball and continue working.
We make the final rows - decreases. Moreover, when there are only 2-3 rows left, we will put on a hat with a pin and then knit on top of it.
We tighten the end of the wire and make a loop using pliers - and you have a full-fledged Christmas tree toy, in no way inferior to store-bought balls. This is not only an excellent decoration for the Christmas tree, but also an original gift that is always nice to give to a dear person.
And here is another version of the New Year's ball made of beads.
Christmas tree top
We will start weaving the Christmas tree from the top. We take a wire 50 cm long, collect 1 bead and 1 white bead (a bead can be replaced with 3 beads). We place everything in the middle. The bead will be the top of the tree, but if you want, instead of a bead, you can make a star.
Holding the white bead with your hand, take the end of the wire and pass it through the bead (or 3 beads) in the opposite direction. Tighten well.
Next, we collect 4 green beads on the right and left ends of the wires.
Putting both ends together, string 1 bead on top. We move the ends apart so that the bead linen is pressed against the previous ones.
Now you need to put beads on the wire on either side in this order: 5 green, 3 white, 4 green.
Afterwards, the same end of the wire needs to be passed back through the first bead, moved close to the top, and tightened well.
Next, on the other side of the wire, you need to collect beads in this order: 5 green, 3 white, 4 green.
Then we pass the same wire in the opposite direction through the first bead and tighten it until it is pulled out to the end.
Then, following the same pattern, you need to make one more loop exactly like this on each side. When finished, twist the ends together.
Now we need to form the top of our Christmas tree. To do this, take the central loop and bend it so that it fits in the middle of the loops.
From pine cones and fruits
For such a delicate and useful composition, prepare a basket, 20 cones, a meter of fabric and ribbon, thin wire, and cinnamon sticks.
From the inside, we attach the fabric to the basket in several places with a thin wire so that it does not fall out.
Related article: Do-it-yourself stained glass painting: master class with video
We wrap the cones with wire, not forgetting to make a small leg. You can paint the cones with gold paint. We make bouquets from cinnamon, tying them with a narrow ribbon.
We make a bunch of cinnamon and pine cones, which we attach with thin wire to the edges of the basket. Fill the void with fruit or small gifts.
This is such a beautiful New Year's composition!
Beaded Christmas tree branches
We take a piece 40 cm long and string the beads in this order: 5 green, 3 white, 4 green.
Having placed it in the middle, pass the right end of the wire in the opposite direction through the left bead and tighten it. When tightening, make sure the wires remain the same length.
Next, we collect beads on the wire on the left side in order: 5 green, 3 white, 4 green. Now we pass the same wire back through the first collected bead and tighten it.
We weave a similar loop on the right side.
At the left and right ends we weave one more loop of the same type.
There should be 5 loops in total. This time we do not twist the ends together.
You need to weave 3 such pieces. When assembling, we will screw them to the trunk of the tree between the rows of main branches.
Let's start weaving the main branches.
On a piece 60 cm long, string the beads in this order: 6 green, 3 white, 4 green.
Let's mix everything in the middle. Take the right end of the wire, pass it through the left 2 beads and tighten.
Next, from either side we collect beads in order: 5 green, 3 white, 4 green.
After that, we pass the same wire in the opposite direction through the first collected bead and tighten it.
We weave a similar loop on the other side.
Next, we collect green beads on both wires. There are 3 pieces on the right side, 4 pieces on the left side.
Take the right tip and pass it through the fourth bead, which is on the left side. We tighten it. We got a small branch.
We twist the ends of each wire together. We need to make 4 such branches. This will be the first row of branches for the Christmas tree.
Next we make the same branches, but we just need to add another tier of loops to them. We also make 4 of these things. This will be the 2nd row of branches.
Using similar weaving and adding another tier of loops, we make branches of the third row for our Christmas tree. You need to weave 5 such branches.
For the fourth row of branches, we make them similarly to the previous ones, but don’t forget to add 1 more tier of loops. We make 7 such branches.
Christmas tree
Such a small Christmas tree can decorate any workplace.
To work you will need hard, thin wire, green beads, beads of different colors and sizes. You will also need to use pliers and a cone.
We make a cone blank from thick paper. You will have to make a Christmas tree shape using it. We bend the end of the wire so that we get a small ring.
Related article: How to make an envelope from A4 sheet for letters and money with video
We begin to string multi-colored beads, starting with the smallest ones.
Then start putting on green beads. Alternate green and multi-colored beads in random order.
If you did not make a cone, then twist the wire into a spiral. The next step is to pull up the crown, slightly adjusting the shape.
Here we have such a beautiful Christmas tree. It will perfectly complement your workplace. Don’t be afraid to make it as a gift for your family and friends. By attaching a ribbon to the ring, you can get a beautiful decoration for your Christmas tree.
Assembling a Christmas tree from beads
We take the top of the Christmas tree and begin to screw the branches of the first row to its trunk; we need to screw it 5 mm lower.
Then you need to wind the middle 5 mm lower. Next we wrap the second row of branches, we also place them 5 mm lower.
Then again the middle.
We continue in this order: we wind the 3rd row, which consists of 5 branches. Then the middle. Then the 4th, which already consists of 7 pieces. As before, we wind them at a distance of 5 mm from each other.
That's it, the beadwork of the Christmas tree is finished. In this master class, beginning craftswomen can easily repeat the weaving of such a New Year’s, slightly snow-covered beauty.
If desired, a beaded Christmas tree can be made consisting of five rows. To do this, you need to make 4 pieces of middle branches, 4 pieces of branches of the 3rd row, 5 pieces of the fourth row, and 7 pieces of branches for the fifth row with an added tier of loops.
New Year's beaded decorations: video instructions
You can also make amazingly beautiful New Year’s decorations from beads - they are suitable both for decorating a Christmas tree and for holiday gifts.
Earrings
A variant of New Year's decorations made of beads, which are also made on a spherical base, are earrings. They can be used both for their intended purpose and as a Christmas tree decoration: in any case, these decorations look quite impressive. Detailed instructions describing each step can be seen here.
Bracelet
Let's not forget about the bracelets that you can use to please your loved ones and friends for the New Year and Christmas. The manufacturing is based on the same principle, but the patterns, of course, are different. Here is one of the classic options with a flower.
Weaving a Snow Maiden from beads
For the New Year holidays, we suggest making an unusual craft with your own hands - a Snow Maiden made of beads. To work you will need:
- beads (white, blue, yellow, light beige, turquoise);
- wire, 120 cm long;
- scissors.
Progress of work: The voluminous Snow Maiden made of beads is woven in parallel weaving, just like Santa Claus. We put beads on one end of the wire, and pass the second end towards the 1st through the same beads. Modeling the body. To do this, you need to make 2 parts separately, starting from the top.
We braid the handles: they are made separately. The rows when weaving are laid according to the principle: even to even, odd to odd. Next, put on a bead, weave 5 circular rows and close with 2 simple ones. Afterwards, we put the ends of the wire in rows of the body. We weave the other handle away from the body in the opposite direction. Let's look at the diagrams:
To weave braids, we use the following patterns. We arrange the rows like an accordion, just like the handles. We thread the wire with the finished braid into the bottom row of the hat. The second braid is woven in the opposite direction of the pattern.
Christmas tree made of beads: how to make it yourself
Of course, we won’t ignore the main symbol of the New Year – a decorated Christmas tree. There are quite a few variations of this figure - both simple and more complex. Let's start, of course, with the first ones.
Flat Christmas trees
Let's start with a fairly simple craft, for which you will need beads of golden and green colors, as well as thin wire and 2 large beads for the crown. The sequence of actions is clearly shown in the diagrams.
These stages can be briefly described as follows. The craft consists of several branches and a crown, which are made separately. Each branch consists of branches that are assembled based on alternation: 3 green beads, 2 gold and again 3 green.
From the branches we made, we form a tree and attach the top of the head from large beads. And we can also advise replacing the golden color with silver - then the tree will look like it is covered with snow, which also looks very impressive.
And here is another diagram of how you can make a Christmas tree from beads with your own hands. The sequence of actions is presented quite clearly, so additional comments are perhaps unnecessary.
And one more type of craft, which also does not need explanation. It will take even a novice craftswoman no more than an hour to create it.
And the second and subsequent Christmas trees can be made in just 30 minutes. Let's spend one free evening and provide the whole family with original gifts.
Volumetric Christmas tree: a beautiful fairy-tale forest
You can also make voluminous beautiful figures from beads, which, without exaggeration, will become the hallmark of the New Year's table. And as a gift they can please anyone.
They are, of course, more complicated to make than the models described above, but the resemblance to a real Christmas tree is almost one hundred percent. The main thing is to understand each stage and strictly follow the instructions. A video describing the steps will certainly help with this.