- November 9, 2018
- Crafts
- Ksenga
Do you want to entertain and develop your child at the same time? Then you can invite your child to make a snowman out of paper. Working with paper helps develop fine motor skills, as well as perseverance and attentiveness. One of the simple materials can become the basis for a variety of crafts. This will help your child develop imagination and creativity. Find craft ideas below.
Snowman made of stripes
To make such a snowman out of paper, you will need to cut it into long strips 1.5 cm wide. Choose the length of the strips as desired. The size of the future product will depend on how long the blanks are.
How to make a simple snowman? To do this, create the first blank. Lay the two strips perpendicular to each other and glue them together in the center. Then you will need to glue two more strips diagonally. If you want an airy result, you can stop there. If you want to make a more stable craft with a small number of holes, then you need to glue two more strips diagonally. Lift all the strips up and glue them together. This technology allows you to quickly create a three-dimensional ball of paper.
Using the same pattern, build a snowman’s head. But this time, use shorter strips to give your balls different sizes. The snowman is almost ready. All that remains is to decorate the product with colored paper. Dress the toy in a bright scarf cut from a strip and a hat made from a cone. If desired, draw a face for the toy.
Volumetric paper snowman for New Year
You can make compositions of any complexity from paper; even a child can make his own masterpiece. An interesting holiday decoration can be a snowman made of crumpled paper sheets, which looks original and funny.
From materials:
- white and colored paper;
- glue;
- markers;
- tissue paper.
Step-by-step master class:
- We cut a colorless paper sheet in half, crumple it with our hands, then open it, level it and repeat the process several times.
- Next, we crumple two more sheets of white A3 paper with our hands, wrap everything in a large ball and get a lump for the snowman. The more sheets, the larger the lump.
- Similarly, we make blanks for the second ball and the head, making sure that the elements turn out to be different in volume.
- We also cut the paper sheet in half, crumple it with our hands and get two balls - these will be the snowman’s arms.
- Now let's make carrots. To do this, take orange paper, draw an 8x8 square on it, cut it out and connect the edges in the form of a cone, and glue it together.
- Collecting a snowman. Everything is simple here, glue the balls together, glue on the nose and handles.
- Let's move on to the bucket. To do this, take a red sheet of paper, draw a rectangle measuring 4x15 cm, cut it out, wrap it in the form of a cylinder and glue the edges, fix the part to the snowman’s head.
- We cut out a strip from blue paper and wrap it around the neck of the fairy-tale character - this will be a scarf.
- Now all that remains is to use felt-tip pens to draw the snowman’s hair, cheeks, eyes and place it under the Christmas tree.
Advice!
Long threads can be used to create an original and varied hairstyle for a snowman.
Read also: New Year's stencils for cutting out paper for windows 2019
Snowman made from napkins
You can make an interesting craft not only with school-age children, but also with preschoolers. It should be remembered that children under five years of age have a very limited attention span. Therefore, try not to overburden the kids with work. Keep the class duration to no more than twenty minutes.
What can be done during this time? Snowman made from napkins. To make such a craft, you will need round paper napkins with an openwork edge. If you don't have these on hand, you or your child can cut out snowflakes. It is advisable to use two napkins of different diameters so that the transition between the bottom and top of the snowman is more obvious. Glue the napkins to the bright base. To complete the craft, you should decorate it with bright accents. For example, glue buttons to a snowman, make a scarf from colored paper and glue beady eyes. Also, don’t forget to make a carrot nose and put black dots to indicate the mouth.
Melting snowman
Do you like making custom crafts? Then you will definitely like this version of an unusual toy.
How to make a three-dimensional snowman out of paper? To do this, you should take thick material and print the pattern attached above. Transfer the layout onto a sheet of paper, and then cut out the blank along the contour. On the resulting part, immediately draw the cheeks and eyes. Assemble the snowman's head by bending the workpiece along the fold lines. The resulting product should be fixed with glue. Cut out and assemble a cone or pyramid from an orange thick sheet. Glue the snowman's nose. When such work is completed, cut out an arbitrary shape from the remains of a white sheet, which should resemble a puddle in its shape.
Glue the completed assembled snowman head to the base. You can complement your product with buttons and branch paws drawn on a decorative puddle of snow.
Postcard
Any child can make such a paper snowman craft. To make a cute New Year's card, you will need thick cardboard for the base and white paper. Fold a piece of cardboard in half. Cut out three circles from white paper and ask your child to glue them on top of each other. Don't worry if the parts fly away from each other a little. This will make the work more dynamic. It will look like the snowman is dancing.
On the finished craft, draw black dots that will symbolize pebbles. If you want, you can glue beads or black rhinestones instead of eyes to the snowman. Hands can be made from branches or threads. How to decorate the background of a postcard? If you have a figured hole punch, then you can easily make snowflakes that will complement the card well.
If there is no hole punch, give your child a cotton swab. With the help of white gouache, a child will be able to quickly and accurately draw even round snowflakes next to a finished snowman.
Snowman made of plasticine
This craft will be voluminous and very similar to a real snowman. For this we will need:
- plasticine (white for the body, different colors for other parts);
- stack for plasticine;
- small square of cardboard.
Very often this craft is made by children of the 2nd junior group, as it is quite easy. See for yourself:
- First we prepare the balls for the snowman. Let's roll three balls from white plasticine, one (bottom) is larger, the middle one is smaller, and the smallest is the top ball, the snowman's head. Let's put them on top of each other.
- Let's put a blouse on the snowman. Roll out the blue plasticine on the table not too thin, then wrap the middle ball and smooth it tightly with your hands.
- Let's make boots for a snowman from green plasticine.
- Now let's make a face for our snowman. Let's roll beady eyes out of black plasticine, and a carrot nose out of orange plasticine. We carefully stick all this onto the top, smallest ball.
- We will also attach the arms and sleeves of the blouse.
- Let's make a scarf from a strip of green plasticine. Roll out a small strip so that it is not too thin, wrap it around the “neck” - the junction of the middle and upper balls. Let's apply the drawing in a stack.
Article on the topic: Recipes for barbecue - sturgeon kebab
- And the final step is a bucket on your head. Let's mold it from gray plasticine. Our snowman is ready! Let's put it on a cardboard stand.
Simple origami
Do you need something to distract your child? Then show him how to make a paper snowman with your own hands. A three-year-old child can do simple origami. How to create a similar product that can become a Christmas tree toy? To make a snowman you will need half an A4 sheet. Cut the sheet in half and then roll it into a tube. To fix the workpiece in this position, use glue or double-sided tape.
When the base of the work is ready, you can move on to the decor. Cut out a scarf from bright colored paper and glue it onto the neck of the future snowman. Armed with a black felt-tip pen, draw buttons and eyes for the figure. You can draw a nose, or you can cut out a triangle from orange paper. You can get creative and make your own figurine decor. For example, dress a snowman in a hat or make his arms out of branches.
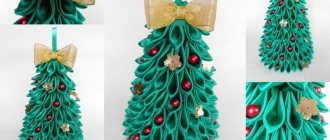
Volumetric snowman made of paper for the Christmas tree
A voluminous, cheerful snowman made from paper with your own hands will be the best decoration for the New Year tree. Even children can make such a craft for the New Year without the help of adults.
Materials:
- White paper;
- compass;
- pencil;
- scissors;
- glue;
- thin ribbon (string);
- markers;
- beads.
Step-by-step master class:
- On a sheet of paper, using a compass, we draw two circles on top of each other, the top circle will be smaller, that is, we draw the silhouette of a snowman together with the head. We draw and cut out two blanks.
- Now we draw 16 more circles, the diameter should correspond to the bottom circle of the silhouette. To simplify the work, fold the paper sheet in half three times, draw two circles and cut them out, we get exactly 16 blanks.
- Next, take a rope or ribbon, fold it in half and glue it to the top part of the silhouette so that the ends of the rope extend beyond the bottom circle; these will be the snowman’s legs, which need to be decorated with beads.
- We glue the second part of the silhouette on top of the rope, and the rope ends up inside the snowman.
- We take 8 circles, fold them in half and start gluing them together, that is, we put the halves next to each other and get a three-dimensional ball, which we glue to one side of the snowman.
- Now we take 8 more circles, also make a three-dimensional ball out of them and glue them to the other half, we get a three-dimensional round silhouette.
- We finish drawing the snowman's eyes, cheeks, nose and smile with felt-tip pens. We cut out a hat or bucket from paper and fix it to the head with glue. We also make a scarf from paper or other material.
Read also: Multilayer paper snowflake
Modular snowman
How to make a snowman out of paper? One very simple way is to assemble a snowman from circles. You will need to make 4-6 round pieces for one tier. A snowman can be made from two or three tiers. How to create interesting figures?
Fold the circles in half and glue the halves together. The volume of the tier will depend on the number of circles used in the tier. The more blanks, the more beautiful the snowman will look. To make a figurine, you can use standard white paper, or you can use designer cardboard with a texture. In the second version, the toy will look more interesting. Such a snowman should be decorated with a hat and scarf. The snowman's arms can be made from ropes pre-soaked in PVA glue. This way the snowman's arms will keep their shape.
Snowman made of corrugated paper
One option could be a snowman made of corrugated paper. The technique is simple and does not take much time. Let's look at step-by-step instructions on how to make a snowman.
First of all, you need to prepare strips of prepared material measuring 15 by 17. The paper is carefully stretched and on one side the familiar delicacy “Chupa Chups” is wrapped in it. It is better if the candy is packed in two layers.
The long sides are fixed with glue. On the other side you need to wrap a smaller but round candy, which will serve as the snowman's head. The edges are also glued together at the top of the craft.
It is better to make hands for a snowman from wire, which is also recommended to be wrapped in paper. You can use a satin ribbon for a scarf, and the width of the decoration depends entirely on your desire.
Beads or buttons of the appropriate size are perfect for decorating the body. It is better to make the nose out of thick cardboard; it can be covered with tape or decorated with paints. All elements are attached to the figure using PVA glue as shown in the photo of a paper snowman.
Snowman made of torn paper
There are simple crafts that look impressive due to their originality. A paper snowman is such an option. It's very easy to make. To make the work you will need thin paper. You can use something with texture, such as crepe paper or paper napkins. It is advisable not to use ordinary sheets like the “Snow Maiden”. Why? This type of paper is difficult to tear and wrinkles unsightly.
How to create a snowman applique from paper? To do this, you should take black cardboard and draw the silhouette of a snowman on it. Using a brush, fill in the pencil outline and ask the child to throw in pre-prepared scraps of paper in a chaotic manner. From such snow flakes you can make not only a snowman, but also snow under the snowman, as well as snow flakes that will fall from the sky. When the glue has dried, you should draw a snowman's face on top of the paper scraps, or you can make one from any available materials.
How to make a paper snowman with your own hands?
There are many options:
Volumetric figures. Volume can be added using cotton wool, padding polyester or corrugated strips.
Flat figures. This “Snowman” paper applique, decorated with sparkles, beads, rhinestones or tinsel, can be used to decorate door panels, wall surfaces, mirrors and windows.
Snowmen using origami technique. This Japanese art consists of the following: taking a sheet of paper and folding it in a special way. The result is a voluminous, air-filled, original figure.
Openwork carved snowmen. The process of creating such a New Year's accessory consists of cutting out a festive hero according to a special pattern.
It is appropriate to decorate not only the Christmas tree, but also the New Year's table with such decor. You can hang it in the nursery or place it on the fireplace mantel in the living room.
A variety of decorative elements make each handmade paper snowman exclusive. You can decorate the finished craft:
- colored beads, sparkles, rhinestones, buttons, beads;
- fluorescent paper;
- paintings made with felt-tip pens, gouache, watercolor;
- textiles, leather, fur, pieces of wood;
- threads, yarn, ribbons, braid, tinsel.
A variety of paper snowman templates can be found on the Internet. They are usually accompanied by detailed master classes. So there is simply no problem of how to make not just a New Year’s hero, but an original accessory.
Complex origami
Don't know how to entertain yourself? Create a paper snowman. Do you think such an activity can only captivate a child? Nothing like this. If you take a complex pattern, you will also enjoy cutting and gluing the parts together. The main thing is to find a beautiful template. One of the options for such templates is attached above.
To make an origami snowman out of paper, you need to print a template on a thick sheet of paper. Cut out the outline of the workpiece, and then merge the figure to make it three-dimensional. If you did not print the template on a color printer, then you need to paint your craft with acrylic paints. It is better not to use gouache for this purpose, as this paint will stain your hands. It is also better not to use watercolor paints, since they are very pale compared to acrylic.