Needlework
06/19/2018 Anastasia Prozheva
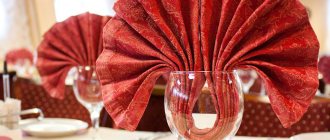
The arrival of guests is an opportunity for each hostess to show her skills and hospitality. In addition to original and unusual dishes, real craftswomen strive to surprise with their ability to beautifully set the table. In order to make the table setting memorable and non-standard, various improvised means are used, from which various accessories are made. A DIY water lily made from napkins will add elegance and beauty to any holiday table.
With the help of ordinary napkins, real masterpieces are created. Fortunately, nowadays you can find countless amounts of this material of various textures, colors and sizes on store shelves. Using her imagination and tips from the Internet, every housewife can add uniqueness and individuality to her table decor.
Regular tea drinking at a beautifully decorated table creates a wonderful mood and adds sophistication to an ordinary ritual. In this case, the water lily will not only serve as decoration, but will also become a useful and necessary accessory. The petals of the water beauty are easily removed and used for their intended purpose. By making this craft, you will not only create a festive mood for yourself and your guests, but also keep the hands and face of those present clean. In addition, there will be no need to purchase a special napkin holder, which will sit unnecessarily most of the time, taking up space in the cabinet.
Let's understand the basics of technology
Below are step-by-step instructions for making a voluminous water lily from napkins. It is not difficult to do, but you still need to have some skills in folding napkins.
To work, you will need 6 green napkins for the leaves - the base of the water lily and 36 napkins of white, blue or pink.
If a single-color lotus is made, then napkins of the same color are used. If you want to make a blue and white flower, take 18 white and 18 blue napkins. You can take 12 sheets of pink, orange and yellow colors, then the water lily will be three-colored. You will also need scissors, thread with a needle and a fork.
Related article: Bead scarf: patterns for beginners with photos and videos
We begin work by making the base. Fold the napkin diagonally and mark the middle.
We bend the corners towards the middle and turn the workpiece over.
We bend the protruding ends.
Fold the napkin inward with the corners.
In this way, six blanks are made. Next, take a needle and thread and fasten the leaves together.
Next, we connect the parts on the opposite side.
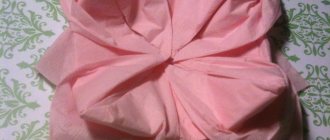
The end result is this base:
Petals are made from multi-colored napkins using the same pattern as the leaves for the base. After all the parts are ready, carefully insert the petals into the base using a fork.
After the first circle is completed, we begin to form the second row of petals, placing them on the voids of the previous row.
We do the same with the next circle, changing the color of the napkins.
We go through two rows like this, then change the color of the petals again.
The sixth row of petals becomes the final one. We straighten the finished product, giving it a realistic shape.
An impressive and useful accessory for table setting is ready. All that remains is to place it in the most visible place.
The simplest scheme
If making a flower using the technology presented above seemed complicated to you, you can first make simpler water lilies from single napkins and decorate each saucer with them at a tea party.
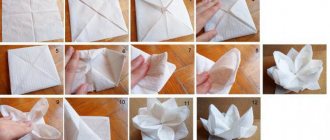
A step-by-step master class will help you understand the intricacies of making a flower. You will need a plain napkin in lemon, white, blue or soft pink. We unfold the paper into a large square and bend all the ends towards the middle.
The result will be a smaller square. We also assemble all the corners of this workpiece towards the center.
The workpiece will become even smaller. Fold the ends into the middle again. This manipulation must be performed 3 times. That is, we select the corners for the last time.
The workpiece is turned face down.
On the reverse side, bend the ends of the square again.
Now you need to take the blank of the future lotus in your hand so that the corners do not bend either from above or from below.
Article on the topic: Patent elastic band with knitting needles with diagrams and descriptions in a circle
Gently holding it, we turn the flower petals outward, as shown in the figure.
The top view of the work is shown in the following image.
Having straightened all four petals, we begin to form the remaining petals from the middle.
The same procedure must be repeated a third time, straightening the next row of petals.
The origami water lily is ready! These flowers can not only be used as napkins at celebrations, but also used to make an unusual three-dimensional panel.
DIY water lily from napkins
Decorating a home and giving it comfort is a step that every needlewoman goes through. The desire to make your home more comfortable is in every woman’s blood. Anyone can show their creativity and make an accessory for their home. For example, a DIY water lily made from napkins will decorate a holiday table and become an elegant accent in any interior.
Master class on creating a water lily
Water lilies are one of the most interesting and unusual flowers. Delicate, touching, with large quivering petals, water lilies attract and surprise.
To make such a flower, you will need material that is available in any home - an ordinary table napkin. If you want to make a delicate and neat water lily, then it is best to use white napkins, and if you want brightness, then you can use a bright multi-colored napkin, with a pattern or ornament.
Step-by-step instructions explain in detail how to fold a paper flower.
The napkin is straightened out on the table surface and folded into a basic “pancake” shape - for this, the corners are carefully folded from the edges to the center.
A second sheet is placed on top of the first sheet and the “pancake” is folded again.
Now the structure is turned over and the next layer of pancake is folded - two layers of napkins are folded at the corners towards the center.
The resulting model has a square shape. You need to take one corner of the square and pull it towards the center. The flap, which is located on the back of the square, should rise around the corner.
After this, the valve is pulled in the direction opposite to the center. In this case, the angle obtained after the previous step is pulled inside the resulting petal.
On the three sides that remain after this, this operation must be repeated.
On the reverse side between the petals there is another layer of valves, which also need to be turned out in the manner described above.
As a result of the manipulations, you get a nice water lily that will look great among the table setting.
Another option for folding a water lily from a napkin is to use a more complex type of origami technique - the rolling technique.
A square-shaped sheet of paper or napkin is placed on the table and straightened out. Using a pencil or visually, the sheet is divided into four even parts, also square in shape.
After this, a square is placed in the center of the sheet. You can use a pencil and ruler at first to practice, and then do all the manipulations by eye.
Then all the corners are bent one by one towards the center. The resulting folds must be carefully ironed with your finger to press them well.
After this, the leaf straightens, after which the corners are again bent towards the center.
After this, on each side the layer of paper at the top is pulled upward. You must pull carefully so as not to tear the capricious material.
This way the first leaf is obtained. Then the remaining three petals are pulled out in the same way. After this, the workpiece is turned over with the petals down and all the corners are bent outward. The flower is turned over again with the opposite side up, and all four corners located in the center are very slowly and carefully bent in opposite directions.
After straightening, the flower takes on its natural shape.
The described master class allows you to make a flower using only paper, without scissors or other auxiliary tools.
To make a water lily from corrugated napkins, you will need scissors, glue and a small piece of cardboard.
The petals of the future flower are cut out from a napkin of the chosen color. You need to make enough of them so that they tightly cover a piece of cardboard - the base - in several layers.
The cut out petals in the middle are carefully straightened with your fingers from the center to the edge.
The petals are glued in a circle, layer by layer, onto a round cardboard base using glue. It is necessary to glue so that the next circle covers the previous one, in a checkerboard pattern.
A strip about 2 cm wide is cut out of a napkin of a different shade. The edge of the napkin is cut into a fringe and rolled into a roll. The roll should not be too tight so that it is possible to carefully straighten the middle.
The resulting center is glued to the center of the circle with petals.
Below you can glue a sheet of green paper, which will imitate the green leaves of a water lily. Or you can use a green napkin, from which you cut out large leaves, slightly straighten them in the same way as the petals, and glue them in a circle on the underside of the flower.
To make a voluminous water lily, you will need two round-shaped blanks of different diameters.
The circles are folded in half, and then in half several more times. Then the workpiece is straightened and cuts are made towards the center so as not to cut the center.
Then the resulting cuts are twisted into cones and glued together.
The center of a circle of smaller diameter is smeared with glue and glued to a circle of larger diameter. In this case, the open sections of the petals should be at the bottom of the blanks.
A piece of contrasting color is glued into the middle, and green petals are glued down.
More ideas on rolling paper water lilies in the video on the topic of the article.
Video on the topic
sdelala-sama.ru