Necessary materials and accessories for work
Creating a lotus from napkins with your own hands is quite simple; it requires a minimum of available materials. Thanks to this, you can decorate the table not only at home, but also in a restaurant or at a picnic.
To create an unusual figure you will need:
- Thick paper or fabric napkins for leaves - 12 pcs.
- Napkins for petals – from 36 to 96 pcs.
- Knife and regular scissors.
- Thick needle.
- Thick thread or silk floss.
In addition to napkins, you will need scissors and other materials and tools.
It’s better to try your hand at creating such original decorations using thick paper napkins. Then you can move on to creating fabric models. It is more convenient to work with starched fabric.
Advice. If you take material of different shades, you can create picturesque leaves and a flower. Additionally, you can make stamens from paper napkins of a different color and install them inside.
Additionally, you can make stamens from another material.
Napkin flower
Everyone knows the purpose of serving napkins; with their help, you can beautifully decorate any feast. But most often, serving napkins, folded in an original way, are laid out on plates. But from them you can create a larger decorative element that will decorate the festive table. For example, you can make the flower shown in our master class.
To create such a flower we prepared:
- 10 light pink paper napkins;
- 1 dark pink paper napkin;
- stapler
From each light pink napkin we will make a petal of a future flower. Let's start our work by making the first element. To do this, fold a light pink napkin diagonally. Photo 3.
Now we bend one of the corners of the napkin down. Photo 4.
On the left side we do the same. Photo 5.
We turn the blank of the future petal over to the other side. Photo 6.
We need to bend the corners protruding from below upward. Photo 7.
Now fold the pink petal blank lengthwise. Photo 8.
Carefully straighten it, it should look like this. Photo 9.
Similarly, from another light pink napkin we fold the second petal of the future flower. Photo 10.
We will connect them using a stapler. We do this from the wrong side. Photo 11.
This is how we connected 2 petals together. Photo 12.
We continue to work on creating a flower from paper napkins. Photo 13.
As a result, we must connect 10 petals from the wrong side, each of which is made from one paper napkin. Photo 14.
And on the front side, our decorative decoration is almost ready. Photo 15.
For the core of the flower we will use a dark pink napkin. We fold it as we did the petals earlier. You just need to further straighten the layers. Photo 16.
After this, we bend the opposite side of the workpiece down. Photo 17.
Place the resulting core in the center. Our table decoration - a flower made from paper napkins - is ready. Photo 18.
Video on how to quickly make a beautiful rose from napkins:
Another option for folding napkins with flowers:
On the New Year's table, it is better to fold napkins in the shape of a Christmas tree:
In order not to forget the page address and share with friends, add it to your social network:
More interesting:
Tags: Useful tips, DIY flowers
Discussion: there is 1 comment
- Alina:
February 5, 2021 at 02:01 pmMy mother always folds napkins on the holiday table, she loves everything to be perfect, and she taught me to)
Answer
Making a lotus from napkins
After all the materials have been selected, you can begin folding the lotus. Step-by-step instruction:
Creating a base stand
- First you need to create the base of the product. It will consist of leaves. Green napkins will look the most picturesque, but you can use materials of a different color. A total of 12 elements need to be created.
- Fold the napkin diagonally.
- Fold the sides from the top corner to the center, as is usually done when folding an airplane.
- Turn the structure over and fold the small ears up.
- Fold the triangle along the center line. One part is ready to make 11 more of these.
- Gather all the elements in a circle using thread from the wide side. Tighten the thread and straighten the leaves picturesquely. The stand is ready.
The process of creating a bud step by step
- Now you need to collect the flower itself. To do this, you need to prepare the petals. They are created in the same way as leaves.
- The petals need to be straightened from one edge to make them more vibrant.
- Using the ears, which are small triangles with a wide edge, the petals need to be tucked into the slits of the leaves by hand. For convenience, you need to use a regular knife. It is more convenient to work with a table knife, as it is safer and does not injure thin napkins.
- The petals are tucked into the leaves in a checkerboard pattern. That is, the corners of one petal are tucked into the slots of two adjacent leaves.
- The first row will have 12 elements.
- In this way, it is necessary to perform another 3 to 8 rows. A 3 row lotus will look quite simple and flat. It takes a long time to assemble an 8-row lotus, but this decoration is worth it. This product will look like a lush ball.
Advice. To begin with, it is better to collect 36 petals, then assemble a flower from them. You need to try on the figure to see how it will look on the table. After this, you can collect the required number of elements. Collecting all the elements at once may seem like a boring task. And the beautiful view of the flower on the table will inspire the craftsman to assemble the following parts.
You should not make more than 8 rows, as the flower will turn out too bulky and will crumble. After the structure is completely assembled, it is necessary to straighten all the petals and slightly bend them upward. Option for straightening the petals: bend the first row down and the rest up. This will make the flower more vibrant. The table decoration is ready.
Don't make too many petals, otherwise the flower will fall apart.
Let's get started
The process of making a lush lotus can be traced using the example of a do-it-yourself master class. In order to make such a flower, you will need scissors, paper napkins of two colors, thread and a needle. You can use many more shades of paper napkins, show your imagination!
Step-by-step instructions are provided for each photo. In total, twelve green blanks and ninety-six other bright colors, such as pink, were needed to create a three-dimensional lotus. To start with the details, a stand made of green parts. Take a napkin and fold it diagonally.
Then we draw the height to the bottom edge of the triangle and bend the sides to this line.
Turn the product over and fold the remaining corners up. Shown in more detail in the photo.
Next, we fold our workpiece outward, hiding the corners. This is the first piece we got.
We make twelve such blanks.
We pull the finished parts together in a circle, securing them with a thread and a needle. We do this as shown in the photo.
This is such a cute stand.
Now you need to make ninety-six pink modules. We make them in the same way as the green details. After you make the pink modules, we begin to assemble the flower. Using a tablespoon or fork, use a pink petal to secure the two sides of the green modules. The main thing is to take two different modules!
In this way we collect eight layers of lotus. Next, lightly bend the flower petals upward, straightening them along the way.
Related article: DIY pumpkin cat
This is such a lush lotus.
Scheme for creating a lotus from one large napkin:
What can be used for decoration
Although a lotus made from napkins is an independent table decoration, it can be brightened with the help of additional decorations. DIY lotus decor options from napkins:
- A napkin core in the center. To do this, create a ball of paper. The paper napkin is straightened into one layer and folded like an accordion. The accordion needs to be tied with thread in the middle. Then cut the paper along the folds and ruffle it. You will get a fluffy ball. It must be placed in the center of the lotus, where it will symbolize the stamens.
- The core is made from napkin tubes. Another technique for creating a core from napkins is to make small tubes out of them and insert them into the center. To do this, the napkin is cut into 4 parts, from each you need to twist a tight tube. After this, all parts are inserted into the core of the product.
- Decoration with beads or rhinestones. These elements will look colorful on a flat flower with few rows. It is enough to collect 1-3 rows of petals. After this, beads are laid out in the center of the petals of the last row, as in the photo. The color of the parts should contrast with the color. Mother-of-pearl or metallized beads or large sparkling rhinestones look most striking.
- Lotus decoration with shells. For each flower you need to select 1-2 medium-sized shells, which are placed in the center of the petals. Shells can be combined with beads. Such natural material will make the products more lively and romantic.
- Sisal decoration for flowers. You can cut a romantic lace lotus stand from sisal. From this material, cut into small strips, you can also create the core of a flower. To do this, the sisal needs to be cut, crumpled and placed in the center of the product.
How to make a lotus flower from a napkin?
At first glance, it may seem that setting the table is a simple procedure. In fact, it requires certain creative skills. To create an unusual festive mood, you need to show all your imagination and apply certain skills. The original design makes guests involuntarily rejoice at any celebration, friendly meeting and join in the general fun. For example, napkins standing in ordinary stands are unlikely to surprise anyone. Therefore, today we will look at master classes that describe how to make a lotus flower, a peacock’s tail, a Christmas tree, a pocket or a pineapple from a napkin.
Features of festive table setting
For many, a napkin seems like a very insignificant detail, but it can have a lot of colors, shapes, sizes and designs. Externally, it can be absolutely simple or original, sophisticated, bright, miniature or huge. Previously, they were used only for hygienic purposes, to wipe hands after eating or to clean things. Today it is customary to decorate tables with them, in a variety of ways.
Important! The main principle of decorating with napkins is that when folded, the product should look unusual and interesting; if necessary, it can be quickly unfolded and used for its intended purpose.
The basics of creating decor from napkins
- Openwork napkins simply look amazing when folded into a tube, triangle or envelope.
- There are table sets on sale with special serving rings, with which you can thread a napkin and place it near the plate. It looks aesthetically pleasing, original, stylish.
- If you don’t have time, but you need to set the table quickly, then you can beautifully fold napkins in the shape of a lotus, an envelope, an exotic fruit, or even an animal. This activity won’t take much time, but you will decorate the table in an unusual way. For this purpose, use paper or fabric napkins.
Important! There are several nuances that relate to:
- The edges of the napkins. It is better to use items with hemmed edges for decoration; at tea and coffee feasts, decorative items with fringes are more appropriate.
- Color combinations. Everything should be appropriate, restrained, harmonious. So, if the table is covered with a double tablecloth, then the napkins should be selected to match the tone of the main fabric. It is very important that when folded they match the dishes.
How to fold napkins in a beautiful and original way yourself?
As we have already found out, there are many design options for these products, the main thing is that every detail is appropriate and ideally combined with other elements of decor and festive table setting. Now let's take a closer look at each method.
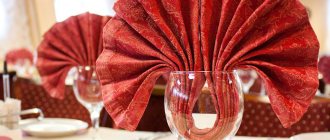
Decorate the table with an original fan
The first step is to make a holder to place the finished napkins. It can be made from cardboard, which would best suit the overall serving style in color, pattern or texture:
- From it you need to cut an oval oblong shape, approximately 6-8 cm long.
- Using a hole punch and special scissors, we make holes on both sides and stretch a beautiful ribbon through them.
- Fold the required number of napkins like an accordion, starting from the middle with the corners, then insert them into the holder.
The decoration for your table is ready! These fans can complement any celebration.
Peacock tail made from napkins:
- Fold each napkin in half, then place it on the surface with the right side out.
- Fold with an accordion about ⅔ of the length of the folded product.
- Fold in half again so that the accordion is on your left.
- Pick up the napkin by the unfolded part, then carefully straighten the tail.
- Bend the free part of the accordion with a corner so that you get a kind of stand.
Making a Christmas tree for the holiday table
As a rule, all napkins are sold in packs and folded in four. To make a Christmas tree:
- First you need to bend one side, not reaching the edge by about 1 cm.
- Do the same actions with the remaining parties.
- Then the napkin is turned over, the left and right sides are tucked under. Moreover, the right side is tucked to the middle, and the left one covers the curved right side.
Lotus flower made from paper blanks
Do you want to decorate a feast in an original way or add a touch of romance to dinner? The idea of how to make a lotus flower from napkins, brought to life by you, will help you do this without difficulty. Such a beautiful delicate flower will decorate even an ordinary meal. The huge advantage of this technology is the low cost of consumables, their availability, and ease of use. In addition, using such a napkin for its intended purpose is not a problem, because it straightens out in a matter of seconds.
Prepare napkins in two colors, pink and yellow. Scheme for making a flower:
- Take a yellow napkin and fold it diagonally.
- Determine by eye the middle from the uppermost acute corner.
- Fold the sides towards the middle.
- Turn over, then fold back the protruding parts. You will end up with something like a boat.
- Fold in half again to form a triangle.
- You will need 12 of these blanks, do them all at once.
- Using thread and a needle, sew them together at the ends. First from the side where the two ends stick out, then from the opposite side. Pull it well and secure it. The base is ready.
- Using the same pattern, make 98 pieces of petals.
- To assemble the first row of flowers you will need a fork or spoon with a round end handle. Take a pink petal and connect its two ends with the yellow one. Push it deep with a spoon. Insert another one next to it and do this procedure all around the circle.
- The second row differs from the first in that it is made up of pink petals.
- The remaining rows are added by analogy.
- As a result, you will have 8 rows of pink petals.
Your charming flower is ready!
DIY paper pineapple
Are you planning a Hawaiian party? Then your guests will definitely be surprised by the paper pineapple decorating your table. Now we will tell you how to make a napkin holder from napkins in the shape of this exotic fruit.
To work you will need:
- 60 pieces of napkins measuring 20*20 cm;
- bowl;
- stapler;
- ribbon.
Step-by-step production looks like this:
- To make the first row you will need 8 blanks. Fold each of them into a triangle.
- Fold the left side of each triangle in the middle.
- Fold the right side in the same way as the left into the center.
- Turn the workpieces over.
- Bend the protruding ends upward.
- Fold the right side to the left to form a triangle again. Turn it over and straighten it to form a boat. Make 8 such blanks and sew them.
- Take a bowl and cover it with a towel on top.
- Place the first row in the bowl, then insert 6 blanks of a contrasting shade into it.
- In the same way, assemble all subsequent rows.
- Roll the napkins to imitate pineapple leaves and insert them into the finished product.
Video material
That's how many interesting, original, bright ideas there are for decorating any holiday or celebration. To implement them, you won’t need a lot of money or free time; the main thing is to carry out all the actions slowly and scrupulously, not forgetting to use your imagination.
Features of location in the interior
Lotus napkins can be used not only as a general napkin holder. You can find many more interesting uses for it:
Individual plate decor
Small flowers on each plate will delight guests and make the table setting bright.
You can decorate plates with lotus.
Additional decor for bread products
Buns decorated in this way look interesting and appetizing. To do this, you need to assemble a variant from 1 row of leaves and 1 row of petals. Place the bun in the center and fold the petals over. This decoration method is well suited for a picnic, as it keeps the bread fresh and protects it from street dust.
Coffee cup decor
The lotus can also be placed on a cup of coffee. This way it will maintain the temperature of the drink and the aroma. Drinking this coffee is doubly pleasant.
Lotus candlestick
A fabric figurine can also be used to decorate a glass candlestick. The product is assembled in the usual way, and a glass glass for a tablet candle is inserted into the center.
You can decorate a candlestick with a lotus figurine.
Important! Under no circumstances should a tablet candle be inserted into a product without a glass candlestick, as this will inevitably lead to a fire.
Surprises for a children's party
Some of the dishes on the children's table can be replaced with fabric figurines, where candies, fruits, and cookies can be placed. You will get a real Thumbelina table. Children will have fun taking sweets out of the figures.
You can put sweets for children on a flower made from a fabric napkin.
Gift decoration
If you plan to present a small gift at the table, then the surprise can be hidden in a flower. A box with an engagement ring will look especially romantic in this packaging.
You can put a small gift inside the voluminous flower.
Ideas for ready-made products
In addition to the classic two-color lotus model, you can create many more options in different colors.
Lotus can be made in completely different colors and shades.
An option of layers of different colors in pastel shades will create a rainbow mood.
For a romantic dinner, you can make a flower from napkins in burgundy, red and pink tones. The bottom layer is made from the darkest tone, and the top layer is made from the lightest tone. You can put a cute gift or engagement ring in this flower.
The boiling white model will emphasize the cleanliness and freshness of the table decoration. It is perfect for the summer.
A white lotus will highlight the beauty of a summer table.
Whatever material is used, a do-it-yourself lotus made from napkins looks soulful, warm and cute. In any case, it will delight guests and owners.