African Hydnora
The appearance of this flower evokes thoughts that it arrived on our Earth from distant planets, it is so unusual in its shape. According to this indicator, it rightfully deserves the title of the strangest flower in the world.
In addition, among predator flowers, Hydnora is the largest plant. With its unpleasant aroma it attracts beetles, which participate in pollination. But the plant feeds on insects, acting as a trap. The petals, growing up to 15 centimeters, slam shut and digest the prey inside the bowl.
It grows in arid regions, spends most of its life underground and only dares to appear on the surface of the earth after heavy rains, so it is rarely seen.
The most unusual flowers in the world.
1
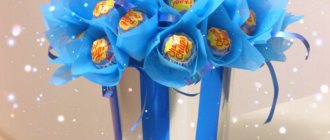
Flowers made of colored paper. Bright circles.
You will need:
- hole punch for large circles (or scissors and pencil)
- glue
1.
First you need to make several circles. This can be done using a special hole punch or manually by drawing circles and cutting them out with scissors.
2.
Fold all your circles in half.
3.
Mark the middle on one circle and begin gluing the blanks neatly folded in half to it. In this case, one folded circle must be placed inside another (see picture).
You should end up with a sun like this.
*If you want a fuller flower, use more circles.
You can also make a blooming flower. To do this, you need to put several blanks into a folded green circle (see picture).
If you fold the green circle in four, you can make a flower like this, in which the diameter of the petals can be different.
Flowers from napkins
Crafts are very easy to make - flowers from paper napkins.
Napkins can be cut and fluffed, as shown here: Bouquet of flowers from napkins - master class
These crafts are very simple and easy for children. Photo and step-by-step description by Elena Ermasheva on how to make a bouquet of napkins with your own hands.
For such an original bouquet you will need:
- paper napkins: yellow and pink (35 pieces);
- bamboo kebab sticks (13 pieces);
- PVA glue;
- bronze acrylic paint with glitter;
- green paint;
- brush;
- scissors;
- felt-tip pen or pencil;
- plastic jar;
- decorative shavings;
- satin ribbon;
- linen fabric;
- 0.5 liter plastic bottle;
- small pebbles.
Paint the sticks with green paint and let dry.
For a bouquet of 13 roses, you will need 117 circles of napkins with a diameter of 8 cm, 9 pieces per 1 flower. Cut out the required number of petal blanks.
For 1 flower you need to fold 7 circles in half.
Grease the edge of the fold of each circle with glue. Place the stick on the semicircle and twist the petal onto the stick.
In this way, carefully glue the remaining petals.
Pierce two circles in the center with a stick.
Lubricate the upper circle with glue in three places. Glue to the finished petals.
Glue the last circle in the same way, the flower is ready.
Let's make a vase for the bouquet.
Cut the plastic bottle in half.
Wrap a plastic jar with linen cloth. Secure the fabric with a satin ribbon. Place some decorative shavings inside the jar.
To stabilize the vase, wrap the stones in napkins. Place them at the bottom of a plastic bottle.
Insert the bottle with pebbles into a plastic jar.
Place decorative shavings inside the finished vase and insert roses. When arranging a bouquet, shorten several stems of roses.
Paint the edges of the flowers with pink petals with bronze acrylic paint with glitter.
The original bouquet is ready!
Or you can use paper napkins to make a festive table decoration: how to fold paper napkins in the shape of a flower - step by step.
***
Paper chamomile
What do you need
- Scissors;
- ruler;
- pencil;
- white corrugated paper;
- yellow corrugated paper;
- green corrugated paper;
- wire;
- glue gun.
How to do
Cut out 10–12 strips measuring 4 × 1 cm from white paper, one piece 15 × 1.5 cm from yellow paper, and two rectangles 4 × 2 cm and one piece 5 × 1.5 cm from green paper.
Fold each white strip in half lengthwise and round the sides, cutting off the excess. On one side, cut off a corner so that the open petal has two corners. Spread the resulting petals.
Stretch the yellow piece slightly and fold it in half three times. Make a lot of cuts on it, as shown in the video, and unfold it. Screw the strip to the wire, periodically lubricating it with glue. Glue the petals to the core in a circle.
Take a green rectangle measuring 5 x 1.5 cm and fold it in half twice. From one narrow edge, cut the paper with a zigzag. Straighten and glue with a zigzag upwards under the petals. Wrap the wire in a thin strip of green paper.
Using the remaining identical green parts, make leaves as shown in the video and glue them to the top of the flower. Gently straighten the chamomile petals.
Daisies can also be made from plain paper. Here is a detailed master class:
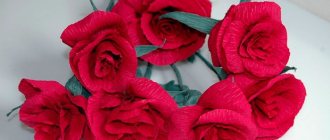
Red crepe rose
Corrugated paper allows the master to create the most realistic figures and images. To work you should prepare:
- Red corrugated paper.
- Green crepe leaf.
- Threads, needles.
- Scissors.
- Iron.
To create an original rose, you must follow the instructions:
- Cut small squares from red crepe. From green corrugated paper, cut out blanks in the shape of a standard sheet in the amount of 2-3 pieces.
- Treat each piece with a warm iron, lightly pull the edge of the workpiece and immediately release. The result of the work is wavy edges, a realistic look.
- The bud is assembled from red parts, sequentially sewing them together. The upper edges of the petals are lightly glued to the adjacent elements, creating the effect of an unopened bud.
- For an additional effect of the flower bed, you need to sew green petals to the lower edge of the inflorescence.
- You can decorate a pink bud with a scattering of beads or rhinestones on the inner leaves.
Paper rose
What do you need
- Sample;
- White paper;
- scissors;
- pink paper;
- wire;
- glue gun;
- green paper;
- napkin or toilet paper;
- floral tape;
- green wire.
How to do
Print the template onto white paper and cut it out. Cut out four flowers from pink paper and make holes in the center. Using scissors, slightly curl the petals of one flower. Thread a wire into it. For reliability, the fastening area can be lubricated with glue.
Glue the edges of one petal. Then attach all the other petals to it to form a bud. Place the second flower on the bottom of the wire and secure with glue.
Glue its petals to the bud in a circle and straighten the edges. Attach the remaining flowers in the same way. The video shows in great detail how to do this.
Cut out a piece with four petals from green paper. Pierce the center and curl the edges with scissors. Insert the piece from below to the rose and glue. Wrap the wire under the flower with a napkin or toilet paper folded into a strip, and distribute floral tape on top.
For the branch, cut out several leaves from green paper. To make them resemble real ones, use scissors to make ribbed edges and folds. Glue the resulting blanks to pieces of green wire and wrap it with tape. A sprig with leaves can be attached to a rose or inserted into a bouquet.
The second half of the video shows how to make an unopened rosebud.
Roses made from corrugated paper also look lifelike. Each petal is glued separately:
Here is a much simpler, but no less effective method. The whole rose is made from one long strip of paper:
Price guide
Prices for main sizes.
Purchase. The flower is delivered in a box unassembled. The cost of mounting the flower is separate. Accordingly, there are 2 purchase options: with and without installation:
50 cm. Cost – 1,730₽ (including flower, stem and stand). Installation and assembly of roses – 1500₽. 70 cm. Cost – 2,431₽ (including flower, stem and stand). Installation and assembly of roses – 1500₽. 90 cm. Cost – 3,050₽ (including flower, stem and stand). Installation and assembly of roses – 1500₽.
Rent. The rental price includes flower rental, assembly, installation, dismantling and removal. You cannot rent without assembly:
50 cm. Cost – 2,330₽. 70 cm. Cost – 2,870₽. 90 cm. Cost – 3,350₽.
The production time for roses is 1-2 days. If the order is made in less than 2 days, we consider it urgent +30% to the cost of the order. Delivery is paid separately. The cost within the Moscow Ring Road is 1200₽.
Prices for main sizes.
Purchase. The flower is delivered in a box unassembled. The cost of mounting the flower is separate. Accordingly, there are 2 purchase options: with and without installation:
50 cm. Cost – 2,704₽ (including flower, stem and stand). Installation and assembly of roses – 1500₽. 70 cm. Cost – RUB 3,210 (including flower, stem and stand). Installation and assembly of roses – 1500₽. 90 cm. Cost – RUB 3,731 (including flower, stem and stand). Installation and assembly of roses – 1500₽.
Rent. The rental price includes flower rental, assembly, installation, dismantling and removal. You cannot rent without assembly:
50 cm. Cost – 3,080₽. 70 cm. Cost – 3,470₽. 90 cm. Cost – 3,870₽.
The production time for roses is 1-2 days. If the order is made in less than 2 days, we consider it urgent: +30% to the order cost. Delivery is paid separately. The cost within the Moscow Ring Road is 1200₽.
Prices for main sizes.
Purchase. The flower is delivered in a box unassembled. The cost of mounting the flower is separate. Accordingly, there are 2 purchase options: with and without installation:
50 cm. Cost – 2,890₽ (including flower, stem and stand). Installation and assembly of roses – 1500₽. 70 cm. Cost – 3,470₽ (including flower, stem and stand). Installation and assembly of roses – 1500₽. 90 cm. Cost – 4,030₽ (including flower, stem and stand). Installation and assembly of roses – 1500₽.
Rent. The rental price includes flower rental, assembly, installation, dismantling and removal. You cannot rent without assembly:
50 cm. Cost – 3,220₽. 70 cm. Cost – 3,670₽. 90 cm. Cost – 4,100₽.
The production time for roses is 1-2 days. If the order is made in less than 2 days, it is considered urgent: +30% to the order cost. Delivery is paid separately. The cost within the Moscow Ring Road is 1200₽.
Full size rose with bud
You can decorate the room with a stylish rose of full human height, which will itself stand on a graceful curly leg. Making such a flower, large and beautiful, from ordinary crumpled paper with your own hands is very simple and quite quick. Here's what you'll need for your work.
Prepare everything in advance:
- Crinkled paper in bright colors for roses. You can also choose a pastel shade, this is at the request of the master and according to the idea, and green paper for the leaves.
- Wide green tape, matching the color of the paper for the petals.
- Thick A4 paper.
- Metal-plastic pipe for a climbing rose base with a diameter of 16 or 20 mm.
- Floral wire.
- Glue gun, ruler and scissors.
- Newspaper to form the base of the bud.
Now you can start working:
- First you need to cut out petals of the same shape, but of different sizes: large, medium-sized and small, like a real rose.
- After all the petals are cut out, we round them and bend them with our fingers, forming a beautiful shape. We bend small and large petals in different directions. Crumpled paper lends itself very well, the main thing is not to overdo it and tear it, do everything with little effort.
- We make the leaves as follows: cut out 2 triangles for 1 leaf, glue them to the floral wire along the long edge, overlapping so that the wire is between the triangles. We trim the edges, forming a leaf of the correct shape. Use your fingers to shape the leaves, squeezing and smoothing them from the middle to the edges. We make several of these leaves of different sizes, or the same ones.
- For the main rose and buds, take a branch with two or three branches for the buds. We begin to collect roses from small petals, moving on to large ones. Glue them in a circle. From below we glue sepals from strips of green paper with rounded edges. We attach buds to the branches. We make a bud like this: we apply compressed newspaper in the shape of a drop to the branch and wrap it with thread or tape, and wrap it with crumpled paper on top. Next we attach the sepals.
- We assemble the whole rose onto the base. To do this, we attach the branch to the base in the form of a metal-plastic pipe with glue or tape, then we wrap the leaves to it.
Now we wrap the entire structure with tape from above, from the flower and buds, moving down to the very end of the pipe.
Using this description, you can make full-size flowers of any variety:
- peonies;
- chamomile;
- tulips;
- chrysanthemums;
- gerberas.
The main thing is to cut out the petals of the desired shape and suitable size according to the patterns prepared in advance.
Paper hyacinth
What do you need
- Blue corrugated paper;
- scissors;
- toothpick;
- glue;
- long wooden stick;
- floral tape.
How to do
Fold a large sheet of paper in several layers and cut in half. Cut each part along the side folds above the middle. Then make several vertical cuts up to this mark. Straighten the pieces and twist each strip using a toothpick.
From each piece, cut half a straight piece as shown in the video. Lubricate the parts with glue and wrap around the stick. Wrap the stick itself with floral tape.
If you have enough time and patience, make a hyacinth using the quilling technique. It is indistinguishable from the original:
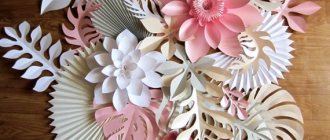
Paper flowers with diagrams and templates for cutting
You can take a shortcut and download a ready-made template, transfer it to paper and cut it out. It is better to refuse the temptation to make origami; flowers are complex shapes that are difficult for beginners, and needlework can turn into complete disappointment. After failure, you are unlikely to want to cut flowers in the future.
Take corrugated paper, it is better suited for such compositions. You need to make a template for cutting out of thick cardboard; if you don’t know how to draw, then download the picture from the site and just trace it on the cardboard. If nature has not deprived you of artistic talent, then draw the image and cut it out along the contour.
Now is the time to get the kids involved, give them the templates and let them trace it on paper! It’s exciting and develops the child’s perseverance, and the knowledge that they are helping parents in such an important matter gives the child self-confidence. If you entrust the cutting to children, stock up on children's scissors; sharp adult scissors may cause the child to cut himself.
Also cut the wire into pieces yourself; it is dangerous to trust children with such an action. Once you're done with the templates, start cutting.
Wrap the resulting petals around a pencil to give them shape and glue them together. The splendor of the bud is limited only by your imagination. We make a hole in the center through which we string the roses onto the wire. The stem can be wrapped in green paper for greater realism. Such flowers will look appropriate in any room; their bright and unusual appearance will lift your spirits on a chilly autumn day.
These are the easiest ways to make paper flowers for beginners; then we will tell you several ways for more advanced crafters.
Cornflower made of paper
What do you need
- Scissors;
- ruler;
- pencil;
- lilac corrugated paper;
- blue corrugated paper;
- wire;
- glue gun;
- floral tape.
How to do
Cut two rectangles of approximately 9 x 2.5 cm from lilac paper. Fold each of them in half twice and make many cuts approximately to the middle. Unfold the pieces and twist the cut strips with your hands.
From blue paper, cut out a piece measuring approximately 4 × 3 cm. Make many cuts on it to the middle and twist it. Wrap the wire with floral tape. Glue the lilac parts together, coat them with glue and screw them to the top of the wire. Glue the blue piece around it.
Cut out a lilac rectangle measuring 10 x 4 cm, stretch the paper and fold it in half lengthwise. Then fold it in half crosswise twice. Cut the paper as shown in the video. Unfold the part completely and glue it together to the wire.
Wrap this wire around the middle of the prepared bud. Bend the wire down. Wrap the stem with floral tape starting from where the two parts are attached. Align the cornflower petals.
Beautiful paper flowers: exotic Australian flowers
You will need:
– quilling strips
– colored paper and scissors (can also be used as an alternative to quilling strips)
- glue
– quilling tool or toothpick
- scissors.
1. Prepare paper quilling strips of different widths or cut these strips from colored paper.
2. To make the leaves, cut them out of colored paper and bend them (see image).
3. For one flower you will need two strips - one wide and one narrow. Cut the fringe into a wide strip and glue it to the narrow one. Twist them using a toothpick or a special quilling tool, starting with a narrow strip. Glue the ends together after wrapping them around a toothpick.
4. Straighten the petals onto a wide strip. You have a flower that can be glued to a postcard, for example.
5. Make several of these flowers in different colors, glue them and add leaves.
Paper tulip
What do you need
- Scissors;
- ruler;
- pencil;
- red corrugated paper;
- newspaper;
- glue;
- threads;
- green corrugated paper.
How to do
Cut out a rectangle measuring 25 × 15 cm from red paper. Fold the narrow edge 5 cm and fold the piece into an accordion shape. Cut along the fold lines. You will get five stripes.
Fold each one in half, straighten it and gather the paper at the fold. Twist the piece in the middle and fold one edge towards the other. Then curl the straight edges of the paper and straighten the resulting petal. Find details in the video.
Cut a rectangle measuring 43 × 11 cm from newspaper. Roll it into a thin tube diagonally and secure the edge with glue. Trim the workpiece from the sides. Tie the petals on top, as shown in the video. Wrap the stem with a strip of green paper.
To make a leaf, cut out a piece measuring 30 x 4 cm from green paper. Fold it in half crosswise, wet your fingers with water and slightly curl the corners on the fold.
Fold the piece in half lengthwise, slightly crease the edge and straighten the sheet. Glue it to the stem with the flower. If you are making a bouquet of tulips, you can glue the leaf onto a separate newspaper stem and insert it into the bouquet.
Petals can also be attached to a base of toilet paper or napkin. Then they will turn out straight:
Tulips made from plain paper will be no less beautiful and realistic:
Bouquet of white flowers
A great gift for your beloved mother or grandmother are cute flowers that will never fade. Delicate decor will delight the hearts of your nearest and dearest women for a long time. It is best to place such a bouquet in a tall vase that hides the stems.
You will need:
- Several sheets of thick green and white paper; - Long skewers or thin wooden sticks; - Liquid glue; - Gold glitter or glitter glue; - Scissors; - Pencil; - A spatula or a dull butter knife.
How to do:1. Draw a five-petal flower on paper, then cut it out and use it as a template for other flowers.2. Draw as many colors as you want on the back of the white sheet. For our bouquet we made 9 flowers. Therefore, we drew and cut out 9 flowers for the green stem and another 18 for the real flowers.3. Now you need to make the flowers voluminous. To do this, use a spatula, butter knife or wooden stick. Draw a fold line from the center of the outer edge of the petal to the center of the flower. There should be a total of 5 folds on each flower. Fold the flowers along the fold lines.4. Make one cut on each stalk - from the point between the petals to the center. It will be possible to fix the flower stem in it.5. Connect the parts: squeeze a drop of glue into the center of the stem and fix a white flower on it, and another one on it
Please note that the petals of the top flower should be located between the petals of the stalk and the other flower, respectively.6. Also put a drop of glue in the center of the top flower and sprinkle it with glitter (or just use glitter glue)
Once the center is dry, gently shake the flower to remove any excess glitter. 7
Glue three-dimensional flowers to the tips of thin wooden sticks. Ready!
Paper lily
What do you need
- Scissors;
- ruler;
- pencil;
- yellow corrugated paper;
- glue;
- white corrugated paper;
- red or brown corrugated paper;
- thick green corrugated paper;
- threads;
- green corrugated paper.
How to do
Cut out six pieces measuring 10 x 4 cm from yellow paper. Fold each of them in half and cut out the petal so that its middle falls on the fold of the paper. Glue them in two rows as shown in the video. Then glue the edges of the shape together to form a flower.
Cut eight strips measuring 8 × 0.5 cm from white paper, and eight pieces measuring 2 × 1 cm from red or brown paper. Coat each white strip with glue and twist. Screw one colored rectangle on top.
Cut out a piece measuring 20 x 3 cm from green paper. Attach white pieces to the narrow edge and roll up the green paper. There is a visual demonstration of the process in the video. If you don't have thick corrugated paper, glue several layers of thin paper together.
Place the prepared flower on the bottom and tie it with thread. Wrap the stem with green paper. Using a pencil, bend the lily petals, and then lightly adjust their edges with your hands.
For what events can you order full size flowers?
These flowers are called growth flowers for one simple reason - together with the stem, they have a height of 150 to 250 cm. Adults next to them look like Thumbelina and beautiful elves. The voluminous buds look fabulous in daylight and artificial light; all guests of the event must take pictures in such a photo zone.
This is what large flowers look like on stands:
- Weddings, anniversaries, children's parties, graduations, corporate events, city holidays.
- Conferences, fashion shows, presentations of cosmetics, perfumes and other products for women, wedding and jewelry exhibitions.
- Window decoration.
- Stage design for reporting concerts of music and dance studios, etc.
Material
The materials most often used for the flower itself are paper (chalk, corrugated and other varieties), fabric, thin plastic and foamiran (foamy decorative material). In additional work (creating the stem and leaves), you can use wire, iron and wooden rods or plastic.
As a rule, the chosen material determines the technique used to create the buds. Decorations made of plastic and fabric require the greatest expenditure of materials and time. Having chosen them, you will need not only to stock up on an impressive list of tools, but also to have considerable experience in processing capricious raw materials.
In the case of paper or foamiran, such problems do not arise. Schemes for making large flowers can be easily found on the Internet, and to create a masterpiece, you just need to strictly follow the instructions.
Advantages and disadvantages
For many years, window sills were the only place in the house where indoor flowers could be placed - only there they received bright sunlight. Any movement deeper into the apartment immediately threatened the death of the flower from lack of lighting. That is why our mothers and grandmothers acquired small green plants that could be placed on a rather narrow windowsill. Large flowers were grown mainly in schools, art centers, libraries, public canteens, and research institutes.
However, in recent decades the situation has changed radically. Apartments with spacious halls appeared, cottages and private houses were built. All this led to a surge of interest in winter greenhouses and an inevitable demand for tall house plants.
Indeed, these representatives of the home flora have many advantages.
A large plant can advantageously set off a particular piece of home decor or, on the contrary, distract attention and thereby hide some defects in interior decoration. Such crops are rightfully considered a godsend for designers, since they allow the implementation of a variety of solutions for arranging a living space. Large flowers look harmonious in spacious rooms with high ceilings, while small green pets simply get lost in such rooms. The vast majority of large houseplants are unpretentious and easy to care for. And due to their impressive dimensions, they always have the necessary “margin of safety”. Finally, large flowers effectively saturate the air in the house with oxygen - small flowers cannot cope with this task.
Amorphophallus titanica
This unique plant with an incredibly large inflorescence was discovered at the end of the 19th century in the western part of the island of Sumatra. But in the wild it has almost disappeared, and you can only admire it in greenhouses.
The smell of this unusual plant during flowering has the “aroma” of rotting meat. But even this unpleasant circumstance does not discourage thousands of tourists and nature lovers who come to see the miracle of nature, which has a flower that reaches up to 2 meters in height.
Note that this is not only a large, but also the tallest flower on the planet, and because of its characteristics, the plant is also called the “corpse flower” or “snake palm”.
4
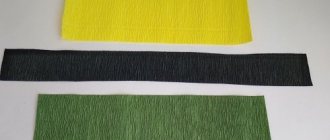
About the paper
The most popular type of paper for making flowers is corrugated. It has an original texture and easily retains the shape given by the master. Corrugated paper (creped) is made using a special device through which the canvas is passed by turning a handle. At the exit, the material is decorated with specific “folds” - small “accordion”. Plain (office) paper produces rougher, more angular flowers. For example, almost everyone folded a simple origami tulip. Newspaper and book paper are considered slightly less dense. It’s easier to work with, but the inscriptions will have to be masked with paint, unless, of course, the book’s lines are part of the composition. It is better not to use magazine paper at all for making flowers with large petals. The glossy surface cannot be painted with gouache or tempera, which will be noticeable on large details. But small buds collected from colorful paper “fringe” will look bright and festive. Textured paper and embossed sheets are more suitable as a backdrop for a stunning flower arrangement than for making buds. Embossed inflorescences will look tacky, oversaturated with small details. Whatman paper, craft paper is another type of available material. Due to the high strength of the sheets, the finished composition will not be as fragile as from corrugated sheets. The paper is easy to paint. It is usually used to make roses.
From book pages
It’s easy to make a whole bouquet of beautiful roses from book sheets and sheet music. To work you will need:
- a few pages from books;
- paper tape;
- PVA glue;
- wire.
Oval petals of various sizes are cut out of paper, which are then twisted in a certain way and attached to the tip of a wire pre-wrapped with paper tape. To make the roses more interesting, book leaves are artificially aged by soaking them in tea and coffee.
Chamomiles are made in much the same way. Notches of sufficient length are made on a wide strip of paper to obtain petals. The strip is rolled into a roll, the petals are bent to the sides and the entire structure is attached to the wire. A yellow button or paper circle is glued to the middle. A bouquet of three to five or more flowers is placed in a vase.
Made from craft paper
To work, you will need curly scissors, which can be used to cut a strip at least three centimeters wide. On both sides of the strip, transverse cuts are made approximately to the middle, every three to four centimeters. The upper corners of the cuts are screwed diagonally onto an awl, the lower corners are glued together in the shape of a bowl. Then the strip is twisted into a tube, the petals are bent. The resulting flower can be sprayed with glitter varnish from a can, and the tips of the petals can be painted by hand.
If you cut out several shaped flowers of various sizes from craft paper according to a template and fasten them in the middle with glue or a stapler, and glue a circle of cardboard or a bead in the middle, you can get a believable bouquet of carnations, daffodils, and asters.
Corrugated paper
This is the best material for making flowers - bright, thin, textured. To make them you will need:
- corrugation - red, yellow, blue, pink - for buds. Green corrugation - for leaves, stems;
- wire, floral sleeve for stems;
- scissors, sharp bread knife;
- cardboard;
- PVA glue;
- fishing line, threads.
First, cardboard templates of the petals are made and traced on paper. For one flower you will need five to six small petals, as many medium and large ones. They are cut out in compliance with the texture of the corrugation. Afterwards, the center of the bud is assembled from five to eight twisted petals glued together, which should be slightly bent. The structure is put on a wire, tied with thread for strength, then the remaining petals are glued on. A floral sleeve is placed on the stem wire, which is decorated with green corrugation and crepe fabric from which the leaves are made.
Paper dahlia
What do you need
- Scissors;
- ruler;
- pencil;
- orange paper;
- glue;
- green paper.
How to do
Cut six 7cm squares from orange paper. Fold each square as shown in the video and cut off the tip. Unfold the piece little by little, making cuts on the folds and rounding the ends. Fold the petals of each flower in half lengthwise. Glue the flowers to each other so that all the petals are visible.
Cut a strip of orange paper measuring 29 x 3 cm and fold it in half twice. Make many vertical cuts and cut off the corners of each resulting strip. Lay out the piece and bend the strips using a pencil.
Loosely twist the part, lubricating it with glue, and glue it to the middle of the flower. Gently fluff it up.
Cut out one piece of green paper measuring 21 × 7 cm and 9 × 4 cm. Roll the large piece into a tube and make a leaf from the other. Bend it as shown in the video. Cut the edge of the tube, straighten it and glue it to the flower. Attach a leaf to the middle of the stem.
Types, sizes, materials
Life-size flowers are made from 4 different materials: corrugated paper, designer paper, isolon, foamiran. You can choose the color, size of the bud, and what material is best to make flowers from, see in the table:
Corrugated paper
Roses, peonies, ranunculus, poppies, eustomas, tulips, bells. Size of buds: 50 cm 70 cm 90 cm The stem is made of metal plastic, the support is a stand. Packing: box for each bud, box for stem and stand.
Pros: corrugated paper is the cheapest material. A huge color palette, many shades, which make beautiful flowers with gradient darkening or lightening. Single-color buds will cost even less.
Cons: such decorations cannot be used outdoors, as the paper quickly deteriorates from moisture and bright light.
Designer paper
Roses, peonies, ranunculus, poppies, eustomas, tulips, bells. Size of buds: 50 cm 70 cm 90 cm The stem is made of metal plastic, the support is a stand. Packing: box for each bud, box for stem and stand.
Pros: glossy thick paper creates light reflections very effectively. It is smooth, and this differs from the texture of corrugated paper. They don’t wrinkle as easily and hold their shape better in low humidity, but they can also only be used indoors.
Cons: expensive
Izolon
Roses, peonies, ranunculus, poppies, eustomas, tulips, bells. Size of buds: 50 cm 70 cm 90 cm The stem is made of metal plastic, the support is a stand. Packing: box for each bud, box for stem and stand.
Pros: isolon is quite easy to process, it is best to make urgent orders from it - it will be done quickly. This material does not fade and withstands weather conditions well. These are the flowers that are ordered for weddings and city celebrations in the fresh air.
Cons: More expensive than paper flowers. Izolon is produced in a limited range of colors, so decorators will offer the most popular colors. The quality of this material resembles foamed polyurethane.
Foamiran
Roses, peonies, ranunculus, poppies, eustomas, tulips, bells. Size of buds: 50 cm 70 cm 90 cm The stem is made of metal plastic, the support is a stand. Packing: box for each bud, box for stem and stand.
Pros: The most impressive material that looks most impressive in photo zones. Foamiran is quite thick, but at the same time it can be given any shape, the flowers look very natural. Flexible, no creases, beautiful velvet surface, large color palette.
Cons: Foamiran fades in bright sunlight, should be used indoors. This is the most expensive material for making life-size flowers.