Recently, clothes knitted with motifs and elements of Irish lace have become fashionable. Eye-catching things look unusual and beautiful. Unique lace products are highly valued by the most demanding modern fashionistas. You can use knitted details to decorate clothes, handbags, and shoes. It consists of many separately knitted parts connected to each other by a mesh.
The complexity of making the parts of the typesetting lace varies, but all the fragments – both complex and simple ones – look great in the product.
Learning to knit simple patterns for beginners
Craftswomen create lace products from wonderful interweavings of plant patterns, surprising with the unusualness and subtlety of the painstaking work of needlewomen who create openwork crochet compositions. The technique of creating ornaments is varied, there are many ways, but the result is striking in the uniqueness and delicacy of the created pattern. Clothes made using this technique look elegant and extravagant.
To learn how to knit, it’s best to start with simple ones:
- ribbed leaf
- round sheet
- openwork leaf
- simple flower
- flower
- twig with leaves
- cord
Today we will look at the technology for making beautiful petals and leaves on a branch.
By learning simple motifs, you can create the custom pieces you want. The main thing is to have patience, perseverance and a well-developed imagination. If you have all this, you can knit unusual colorful plant compositions.
We analyze detailed and understandable patterns and elements of Irish lace
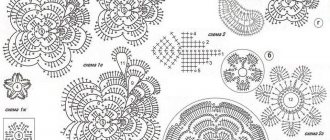
All those who know how to crochet even a little know that the Irish lace technique is quite difficult to perform. But if this technique is mastered, then there will be no difficulties in knitting complex patterns. The elements of Irish lace are also quite diverse. The following photo shows elements of Irish lace with patterns, which, having mastered, you can take on knitting various products:
Irish lace is best started by knitting one common piece, which is done in a mesh. At the same time, you need to leave spaces in it in order to fill them with individual elements. You can also choose a specific model, where the elements of Irish lace will be located along the edge, in the form of a border. The pattern is made in natural size, along the contour of which a flat edge is knitted. The knitting is tight. The finished knitted edge is secured to the pattern. After this, the inside of the canvas can be filled with lace elements. The elements are secured together with a mesh. Next they are attached to the knitted edge of the fabric.
The classic element of IR is the trefoil, knitted quite tightly. Performed with a single crochet stitch. Also considered a classic element is a rose, a simple leaf, a leaf with a vein in the middle, a round leaf.
Irish lace crochet patterns for beginners can be seen below:
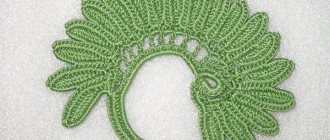
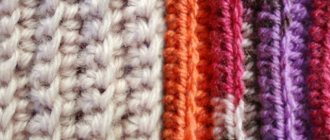
Knitted ribbed leaf and trefoil according to patterns
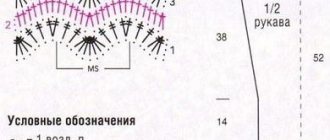
In Irish knitting, the most famous fragment of the pattern is the ribbed leaf. There are many different schematic drawings for creating leaves, which for some reason scare away novice needlewomen. But beginners should not despair as much as by following the conventions and carefully studying the step-by-step description of the work being performed, everything will work out - you will make beautiful and neat leaves.
Knitting of this element consists of a monotonous thread wound in a half-loop or from melange yarn in two half-loops. The size of the leaf is set by the needlewoman herself, taking into account the unfinished row, creating a narrow leaf shape. Loops are not always counted, at the request of the master.
Instructions for creating a relief sheet
| We cast on 12 air loops. |
| From the second, 9 single crochets, finishing the process with 3 chain loops. |
| The second side of the sheet is identical, at the same time tying the end of the thread. Knitting ends without knitting one loop to the end of the row. |
| One chain stitch is knitted, the workpiece is turned over, and then 11 stitches, single crochet and 3 ch. The other side of the leaf is identical. |
| When knitting the last one, at the end of the row, we grab it in two half-loops to avoid stretching the leaf. |
| Using this method we make the entire leaf. If you do not knit along the column in all rows, you will get beautiful cloves. In the final row, 7 tbsp are knitted in place of the loops. without a crochet. |
| The leaf is connected. Cut the thread, removing the end. |
We create the planned number of identical parts of the future masterpiece.
Crochet shamrock
The next famous motif is the trefoil, used in almost all handicrafts.
To knit it, you need to strictly follow these steps:
- Using a hook of the appropriate size, six air ones are collected and closed into a ring
- Three identical arches are knitted from six similar loops
- The finished arches are tied with two single crochets, sixteen with a double crochet and two more single crochets.
- Having completed the procedure, we cut the fiber, hiding the tail
We get a nice shamrock. A branch with leaves, used in all kinds of homemade products, looks no less nice.
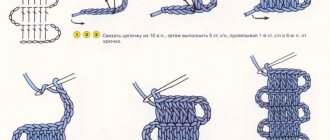
Before we begin to carry out creative manipulations to create a branch with oval leaves, we carefully examine the schematic representation of the presented drawing and consider all further methods in order to avoid making various types of mistakes.
Looking at the picture we see that the process occurs from the bottom up. Let's figure out how to complete the first sheet of a given pattern.
- We collect seven air loops (hereinafter VP ) and ten more.
- We turn this section and knit a connecting loop, one - without a crochet, three - with a crochet, one - without a crochet, one connecting loop, fixing the connecting loop in the seventh loop of the beginning of the chain.
- At the base of the forming leaf, the knitted part is turned from the VP of the leaf being created, and twenty-two half stitches are cast in a circle.
- The work piece is turned, the emerging sheet is tied in a circle with half-columns until the sheet begins to form.
- We collect nine VPs and, in the same way as before, form the next sheet. We monitor the quality of the work procedure; we do not over-tighten or loosen the thread so that the knitted parts keep their shape.
- The workflow then continues as before. The main thing is to carefully read the diagram and correctly count the symbols.
Having further familiarized yourself with the patterns of leaves, you can learn to create other interesting details of lace art.
2.
3.
4.
5.
6.
Crochet Irish lace for beginners
The article will give a step-by-step description of how to knit a T-shirt in the Irish lace style for beginners. To work, you will need directly threads of different colors and different thicknesses. Hooks are selected depending on the thickness of the threads. You will also need pins, a needle, scissors and two buttons. The base for the work is made of foam plastic. You can make the product depending on your imagination.
First of all, you need to make a pattern for the entire product, which needs to be secured to the base. After which you can think about what the drawing will be and what colors to use for it. The motifs are knitted in several copies. You can knit leaves, circles and much more. All motifs must be made from threads of medium thickness and a suitable hook. When all the parts are connected, you can assemble the product. To do this, they need to be secured with pins to the base, face down. The elements are connected with an openwork mesh, for which a thin white thread is used. The front and back parts are connected first. Then you can start connecting the side parts. In this case, the patterns need to be positioned so that the finished product expands at the bottom.
The upper part of the product is also made of mesh, but it is necessary to form straps. The neckline and all armholes must be tied with a single crochet. The buttons are sewn to the finished straps, and loops are made for them on the reverse side.
The lower part of the T-shirt is also tied with a single crochet. The ends of the threads can be trimmed, and the finished product must be slightly moistened and ironed. Thus, the T-shirt is ready. Step-by-step photos of the implementation are attached below:
Connecting knitted parts
Having learned to knit various fragments, they can be connected to each other:
- with a needle
- grabbing the loops of the last row of two parts
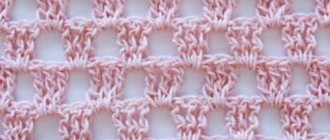
- using an irregular mesh, honeycomb mesh or fillet mesh
- knitting a mesh separately and sewing details onto it
Ready-made miniature motifs are used to decorate blouses, skirts, cardigans, hats, and handbags; from them you can create chic and beautiful paintings, panels, or create a fancy napkin that decorates the living room.
To recreate unique things with a charming weaving technique, you need to have developed imagination, patience and a great desire to create without limits.
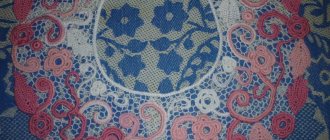
Joining Irish lace for beginners: patterns
elements of Irish lace are attached to the mesh.
This stage is perhaps the most difficult, requiring attention and patience from the needlewoman.
To connect related fragments into a common fabric, there are several ways:
- connecting them together during the creation process, that is, you connect a finished element with another ready-made one as they appear,
- filling the voids with a mesh with arbitrary cell sizes, since the details of Irish lace have different sizes and geometric parameters,
- attaching them to a pre-crocheted mesh - suitable for beginner craftswomen,
- using nylon or cotton tulle as a basis for patching,
- stitching with a needle - this method is convenient only for homogeneous fragments of equal size.
Below we add a number of diagrams for connecting elements of Irish lace.
wiring diagrams for crochet Irish lace motifs for beginners, example 1 wiring diagrams for crochet Irish lace motifs for beginners, example 2 wiring diagrams for crochet Irish lace motifs for beginners, example 3 wiring diagrams for crochet Irish lace motifs for beginners, example 4 wiring diagrams for Irish crochet lace motifs for beginners, example 5 connection diagrams for crochet Irish lace motifs for beginners, example 6 connection diagrams for crochet Irish lace motifs for beginners, example 7 connection diagrams for Irish crochet lace motifs for beginners, example 8 connection diagrams for crochet motifs Irish crochet lace for beginners, example 9 connection diagrams for Irish crochet lace motifs for beginners, example 10
We knit amazing patterns of motifs in master classes
The method of working in Irish technology is distinguished by assembling a product from several separately connected “puzzles” connected to each other by a mesh. The main thing is to feel the work being created, select the correctly combined shades of threads, and combine fragments correctly. Having a creative approach to performing interesting and exciting work, the result will please the craftswomen with a masterpiece. Having carefully studied the process of knitting individual motifs and mesh, beginning knitters will be able to knit their first composition.
Cords and curls, flowers and petals connected by a mesh look great in lace. On clothes the curls look a little better in better light. Needlewomen use the original curled yarrow.
Video lessons or how to knit yarrow mk.
Let's look at step-by-step instructions for creating a yarrow motif. The element is performed using a bourdon - a thread in three folds. The same thread is used as the working thread.
| Motif illustrations | Step-by-step instruction |
| For bourdon we dial 18 s. b. n., forming a ring. | |
| We continue to dial 60 s on the bourdon. b. n. | |
| Turn the knitting, pulling the bourdon threads tighter and knit 20 tbsp. b. n., laying the bourdon over the loops of the underlying row. | |
| Knitting the last loop, we tighten the bourdon, giving the shape of the part. | |
| The bourdon thread is set aside. We knit 3 in. p., 1 tbsp. With. n., 2nd c. p. We do this in this way before the leaf begins to round and along it. | |
| The knitting is turned, we tie the arches with three single crochets. Bourdon remains aloof. | |
| We reach the end, turn the product over, knit 15 tbsp on the bourdon. b. n. | |
| The work is turning around. we also do bourdon, 2 st.b.n., 2 half-columns, 7 st.s.n., 2 half-st.b.n., 2 st.b.n. | |
| We skip 2 loops of the underlying row, knit 1 tbsp, the work is turned, placing the budon on top of the petal, knit 8 tbsp. b. n. | |
| Next, add 7 tbsp to the bourdon. b. n. | |
| The work is rotated, the next petal is formed. The procedure is repeated until the end of the row. It turns out to be a beautiful curl. |
Having learned how to perform one fragment, we begin to perform other parts. Following the schematic images, we create the curls, leaves, and caterpillars we like. Yarrow diagram for beginners
Often, when creating lace dresses, all kinds of cords are used together with floral ones to emphasize the created ornament. One of these is the caterpillar cord.
We invite you to see a detailed step-by-step description of the thick braid used in creativity.
| Illustration | Description |
| An air loop is knitted, the hook is inserted under the thread of the first knot, the thread is brought out and a loop is made. | |
| There are already two pieces formed on the hook, through which the third is pulled. | |
| Let's turn the work around. | |
| Turning the knitted piece, we find two threads. | |
| We create a loop through the discovered threads. There are two on the working tool. | |
| Let's tie two loops together. | |
| We are expanding the work. | |
| We pull one loop through two threads. | |
| The work process is repeated. We tie a lace of the required length. |
Irish lace - true works of art, crocheted
View > Home / Master class, Openwork knitting
27 Sep 2021 Category: Master class, Openwork knitting
your feedback
Irish lace is an ancient crochet technique whose history dates back to the 14th century. It was in those times that Irish typeset paintings were born, the relevance of which has not been lost today. On the contrary, products decorated with Irish lace or completely knitted from motifs of this technique reflect current trends in knitted fashion, while at the same time adding a luxurious twist to a woman's look.
Many needlewomen avoid lace crocheted based on Irish motifs, because the work on it is incredibly painstaking and requires the craftswoman to have masterful crocheting skills. However, you shouldn’t shy away from Irish fabrics, the main thing is to try it once, fortunately, today needlewomen are offered a huge number of master classes on knitting products with Irish lace. The basic principle of Irish lace fabric is to make it from individual motifs (leaves, flowers, openwork cords, paisley cucumbers, other plant elements), which are subsequently combined into a single composition using an openwork mesh (regular or irregular).
Before you start Irish knitting, you need to carefully select the materials: yarn and hook. You need to choose a thread taking into account its stiffness and thickness. To knit Irish lace, it is better to immediately stock up on three types of threads in thickness: thick (for making dense voluminous patterns), medium (for knitting most lace patterns), thin (for tying a future product with a net).
If the lace is knitted from silk or thin cotton yarn, it is better to take a hook with a diameter of no more than 1-1.2 mm, this is the only way to forget about the need to constantly monitor the tightness of the loops. In order to get larger motifs and thick yarn, it is better to use a hook No. 1.5-2.
The pattern of any product made using the Irish lace technique is knitted from motifs that are connected to each other using a thin openwork background (mesh), forming a typesetting fabric.
To get to know Irish lace better, and at the same time practice knitting the most popular motifs, we suggest picking up a hook, thin yarn and following the detailed instructions given in the master classes presented below.
Volumetric three-tiered flower using Irish knitting technique
Volumetric multi-row flowers are one of the most popular motifs in Irish knitting; for many they are an indicator of the use of this technique on the finished product. This floral element is called “Irish rose”. There are countless variations of the knitting motif, and if you understand the principle of its knitting, then anyone, even a novice needlewoman, can easily modify the shape of a flower, changing the shape of the petals and increasing/decreasing the number of tiers.
The flower is knitted from soft yarn; to make the edge of the petal more rigid, you should crochet a number less than the thickness of the thread, or use a bourdon (a thicker base thread).
Knitting pattern:
Conventional abbreviations in the text:
- VP – air loop;
- runway – lift runway;
- СС – connecting column;
- RLS – single crochet;
- Dc – double crochet;
- C2H – double crochet stitch;
- C3H – double crochet stitch;
- PR – previous row;
- PS – half-column.
1) We collect a chain of 5 VPs, connect them into a circle using a SS, tie the ring with the 8th sc.
2) In each PR loop we knit 2 Dcs - in total you should get 16 Dcs.
3) We knit with rapports: 5 VP + 2 RLS in the next 2 PR loops. We finish the series. We get 8 petals.
4) We make a binding for each petal: 1 sc + 5 sc + 1 sc, in the jumper between the petals - 1 PS.
5) To give the flower volume, the petals are knitted with embossed columns. Densely arranged petals overlap each other, thereby creating a voluminous effect. So, we knit the second tier of petals: 7 VP + a relief column, capturing the PR column at work. We repeat the row with rapports until the very end.
6) We tie all the resulting arcs of the second tier with rapports: 1 RLS + 7 RLS + 1 RLS; We knit 1 PS into the loop between the arcs. The second tier is ready:
7) We knit the third tier of petals: an arc of 10 VP + a relief column, capturing the PR column at work. We repeat the row with rapports until the end.
 We tie each resulting arc of the third tier with rapports: 1 sc + 10 sc + 1 sc; We knit 1 PS into the loop between the arcs. The third tier is ready:
9) We tie the edges of the petals of the third tier with rapports: 1 PS + 1 VP. The motive is complete!
In order to familiarize yourself with the process of knitting voluminous Irish flowers in real time, we suggest viewing a vibrant selection of video tutorials on floral motifs:
Fantasy leaf with lush columns
Elements of Irish lace such as leaves are in demand no less than floral motifs. They can be very different - both openwork flat and ornate volumetric. We bring to your attention step-by-step instructions for knitting such an original leaf:
Progress
1) We assemble a base chain of 18 VPs (more or less is possible, the actual size of the sheet depends on this).
2) We knit a row of sc along the chain from the VP, but skip the last VP.
3) Turn the knitting over and cast on a chain of 8 VPs.
4) We perform C3H, skipping two loops in the base chain. We do not knit the last stitch of the post and loop.
5) We make eight twists of thread around the column.
6) We drag the main thread through all the entanglements, but in order to get a fluffy column, it is better not to tighten the thread too much.
7) We knit two loose loops together.
We collect 3 runways, we do this after each volumetric column.
9) Knit the next C3H, skipping 2 loops at the base of the leaf.
10) We repeat all the steps with entwining the thread around the column. By analogy, we knit two more such lush columns with 8 entanglements.
11) We knit the fifth volumetric column with a double stitch and make 6 twists of thread on it.
12) We knit the sixth column with PS + 5 twists.
13) Finish the row: 5 VP + SS in the last loop of the base of the leaf.
14) We tie the second part of the base of the sheet similarly to the first part, but in the opposite order.
15) We finish with a chain of 8 VP + SS.
16) Then - we tie the arches between the posts - we knit RLS.
17) We collect a chain of 18 VPs, using it to create a leaf stalk.
18) Turn the knitting over, tying the handle with a sc.
19) We tie the leaf itself with the following rapport: 1 SS + 1 VP. Ready!
In Irish technology, there are a huge number of options for knitting leaves, detailed master classes on how to make them can be found in the following videos:
Openwork heart motif
Such an unusual Irish motif will definitely attract attention. It not only gives the Irish canvas incredible relief, but also adds an exquisite gloss to it. The shape of the motif resembles a heart or a horseshoe, and can be used to decorate formal dresses, including evening and even wedding dresses.
Progress
1) We collect a base chain of 16 VPs. Using a SS, wrap the chain into a circle.
2) We tie the circle with 22 sc, inserting the hook inside the circle.
3) Turn the knitting over and cast on 4 VPs. We knit with the “corn” pattern, skipping 2 PR loops. We finish the row with 1 VP + 1 Dc.
4) Turn the knitting over, tie the arches from the VP with the 5th RLS.
5) Turn over and tie next to each other using RLS.
6) The next step is to knit a row of sc, in this case, you need to insert the hook into the back half loop of the PR.
7) Next we knit a row of sc, insert the hook into the free half loops of the PR.
We complete the motif by knitting a “crawfish step”.
9) Turn the knitting over to the front side, knit arches of 4 VP along the upper edge. And the last step is to tie them with the 6th sc.
We offer a detailed video tutorial on how to crochet another type of Irish heart:
Fashionable paisley lace motif
Paisley cucumbers are widely used to decorate women's clothing - their curls complement the design of blouses, skirts and dresses. Irish lace offers us an original version of knitting paisley cucumbers - this work is not at all difficult, and the result is breathtaking.
Progress.
1) We collect a base chain of 6 VPs, enclose it in a ring using a SS, and tie the 8th RLS.
2) Next - 4 runways, and knit a dc for each PR loop, knitting 1 runway between them.
3) Close the ring using CC. We knit 4 VPs, skip one DC PR, and knit a SP in the next column.
4) Next, we knit the combination: 2 VP + C3H + 2 VP + C2H + 2 VP + CCH + 2 VP + CCH + 2 VP + CCH + 2 VP + C2H + 2 VP + C2H + 2 VP.
5) Attach bourdon threads (4-5 threads folded together), tie the entire RLS element.
6) As soon as the knitting has reached the sharp end of the bourdon, cast on 20 sc, connect them in a circle, retreating from the end of the motif by about 6 loops.
7) We continue to tie the RLS.
We knit the final row with RLS, but with the following repeats: 2 STB + picot from 4 VP. The cucumber paisley motif in Irish style is ready!
Video master classes on knitting Indian cucumbers using the Irish lace technique:
Irish lace knitting patterns
For professional craftswomen who are fluent in crocheting, we provide a large selection of patterns of Irish motifs:
Undoubtedly, Irish lace is one of the most difficult crochet techniques. In order to master it perfectly, you need days and even months of hard training in knitting lace motifs. However, it is definitely worth it - works made with Irish lace are highly valued not only aesthetically, but also financially.
Note that the Irish lace technique is used for knitting all kinds of women's wardrobe items: light blouses, blouses and tunics, airy sundresses and romantic floor-length dresses, as well as all kinds of accessories - stylish handbags, lacy gloves and exquisite collars. Irish lace also looks interesting in interior decor - they are used to knit openwork napkins and tablecloths, tie vases and even photo frames.
We also recommend:
- Calculation of the amount of yarn - table for calculations
- Knitting trends 2021: patterns, materials and new things
Like? Press!
Tags:
Irregular mesh for knitting in video tutorials
Fastening fragments with a net is a fairly simple type of knitting, which consists of laying out parts on a pattern, filling the empty space with fillet mesh.
Read also: “Irregular mesh in Irish lace”
A void of unequal size is filled with an irregular network.
The procedure is simplified by knitting a mesh pattern and attaching finished elements to it. Most lace products are assembled using an irregular mesh.
Crochet instructions, its elements and motifs
The pieces of Irish lace are connected by an irregular network. We first attach the sections connecting the fragments with stitches, fill the space with an asymmetrical network created by changing air arches and columns with different numbers of crochets.
The prepared motifs are placed on a pattern placed on a foam rubber backing and secured with tailor's pins so that the fabric does not wrinkle. They are laid out face down.
Having settled on the space between the elements, we knit an asymmetrical mesh. To do this, the hook is inserted from above into the warp, catching the working thread and pulling.
We hook the short end of the thread and pull it through the resulting loop. The thread is secured by pulling up the long working end and tightening the knot. The tail is hidden in the canvas.
We collect 4 air loops.
To determine the location of fixation, apply a stretched thread to different parts and find the junction by knitting a double crochet stitch into it.
Then 2 air loops.
Now a stitch with three crochets.
Since the element is located too close, a double crochet is knitted, clinging to the base.
Next is an air arch of four loops.
We perform a double crochet stitch.
We hook two air loops to the base.
Let's knit an air arch of four loops.
We knit a double crochet stitch.
This technique fills the empty space, alternating air arches and columns with different amounts of double crochet.
Having finished the work, we cut the thread with scissors and hide the tip between the posts.
Using this method, lace puzzles are assembled together.
Having learned the simplest knitting techniques, new knitters will be able to create unique, extraordinary products themselves, knitted in the style of Irish lace, and conquer the modern fashion world with excellent clothes. How individual lace fragments are knitted can be clearly seen in the video below.
Crochet lace, a selection of patterns and patterns
How to crochet lace, master class from Valentina Litvinova
Very beautiful ribbon lace. This lace can be used in knitting and finishing children's clothing, for finishing various interior items: tablecloths, curtains... 1. 9 chain stitches, 4 double crochets in the last 4 chain stitches. 2. Turn knitting
Read more…
Master class on lace knitting
Master class on knitting beautiful ribbon lace from flowers. This lace can be used for knitting children's and women's clothing. Can also be used for finishing children's and women's clothing and interior items.. Dial 7 vp, one
Read more…
Lace scarf Crimson
Elena's work. The openwork scarf is made with crochet No. 2 from wool mixture using the “ribbon lace” technique (knitting pattern is attached) and looks elegant and intricate. It can be draped in various ways, using decorative pins or removable brooches.
Read more…
Crochet lace
"Filigree lace." The lace is crocheted No. 0.7. Used in women's clothing and for decorating bed linen, curtains, tablecloths. Yarn 100% cotton (spool threads). My first competition entry. Then I knitted such lace for the people of Europe. Lace knitting pattern:
Read more…
How to crochet lace - master class!
Crocheted ribbon lace patterns
Crochet patterns for Bruges lace
Master class by Natalia Sukhikh from Fashion magazine. Start by making a regular Bruges braid (see diagram). Cast on 10 VP, perform 4 C1H in the 7th, 8th, 9th and 10th loops from the hook, 6 VP, turn the knitting (1). Tie the braid in this way from
Read more…
Crochet snowflakes and Christmas trees, Bruges lace
Decoration for the New Year - a knitted Christmas tree and snowflakes. The Christmas tree is made using the Bruges lace technique. Knit the bottom of the Christmas tree in tight rows. To expand the braid at the bend, add 1 double crochet. Complete the rest of the Christmas tree
Read more…