Needlework
05/24/2018 Anastasia Prozheva
Beadwork is back in fashion. This material allows you to create many wonderful objects such as bracelets, jewelry, paintings, flowers and even trees. Today we will talk about how to create a real tree - rowan from beads. The diagram and step-by-step instructions will be presented below. Don’t be afraid of the complexity of the work; you will see that even a child can make such a masterpiece. The process will be clear even for beginners, and the result will be unsurpassed.
Bunches of rowan
So let's get started.
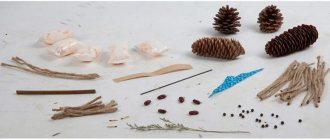
First of all we need beads, green and bright red, at your discretion. It is better to take size 10 or 12. Also select two types of wire - thin 0.3 cm and thicker.
You will need thick threads to wrap the barrel. Let's not forget about alabaster and acrylic paints. Our work plan is shown in the figure.
Let's start with our rowan berries. Each bunch will consist of five small ones.
Cut a wire 33 cm long and put 3 beads on it. Move them about 5 cm and twist the wire under the beads several times, as in the picture.
We continue, collect three beads again and twist the wire.
Let's do the same thing ten times, connect the ends of the wire together and get the first bundle.
You need to wind five such bundles and connect them into a bunch. To connect, simply twist all the wire together. The result was the first lush bunch of rowan berries.
Weave eleven such bunches.
Weaving rowan from beads using photo and video tutorial
Not only adults, but also children like to create crafts from beads, since some of them can not only be admired, but even played with. Beautiful figurines made of beads are used to decorate the interior of a home or work office or as a gift. The most common gift is a tree, symbolizing the hearth, and if it is also a money tree, then it will accordingly help to attract wealth to the house.
Even a beginner can weave a tree from beads, as it is not at all difficult to do. We recommend that you first take a simple tree, such as rowan, as a basis. This will be discussed in our article, in which you will learn how to weave branches, trunk and bunches of rowan with your own hands based on a training master class with step-by-step photos. You can show your imagination and come up with your own elements that will complement this tree.
The process of making rowan from beads
On the Internet you can find quite a few training workshops on weaving rowan berries from beads, but we would like to offer you, as an example, a completely simple lesson that will be accompanied by step-by-step photos. So, let's find out what you might need in your work:
- plain and aluminum wire;
- green and red beads;
- thick thread;
- container or stand, you can take a ceramic pot or stone.
Rowan beading begins with foliage, which is formed from 9 small leaves. The weaving pattern for such a small leaf will consist of 5 rows. Place one green bead on the wire in the first and fifth rows, and two in the rest. When the blanks are made, they must be assembled into one large product. You must twist three small leaves together at the base with your own hands. Spread them out and weave in the remaining 6 leaves in pairs. Now you have the first leaf for the rowan tree.
To work, you will need only fourteen of these blanks, which consist of one hundred and twenty-six leaves, as shown in the photo presented.
After this, we move on to weaving rowan bunches from beads. Each bunch will consist of ten scarlet berries. Cut the wire, leaving a length of sixty-five centimeters. The first piece of glass needs to be strung onto the base material, ten centimeters away from the edge. Secure the beads and twist the edges of the wire, one and a half cm long. Add another bead, only at a distance of 10 cm from the one that has already been twisted. Twist the wire again near the base of the newly drawn wire.
Similar actions should be carried out with the remaining eight beads, as shown in the photo. Now twist the scarlet berries and get the first bunch of rowan berries. From three such blanks you need to twist a brush.
Combine three bunches and twist near the base of the workpiece. Weave seven such elements from beads. When you have everything ready, you can begin the main assembly of rowan branches. Start rolling the clusters and leaves together. Leave a little space and screw the second leaf again.
Make 7 similar branches by wrapping thick thread around their base.
To form a tree trunk, take a thick wire and attach the first piece to it near the very base, winding the threads in dense layers. Then attach all the other branches one by one, organically forming the rowan itself. Wrap all the places where fastening took place with thread again, and then trim off the excess edges.
Place the rowan beads in a pre-prepared container, having first filled it with a plaster solution or plasticine. Let the craft dry. To be more similar to the original, try experimenting with creating natural curves in the branches and trunk.
Video: Master class on rowan weaving
rukodelnichaem.ru
Let's move on to the leaves
To create leaves you need to string several rows of beads.
Cut a wire 25 cm long and place one bead on it. Thread the end of the wire back into the bead and tighten the knot.
Go ahead. We put two more beads on the wire. Now we pass the second end through these two beads. Tighten it into the second knot.
Related article: DIY fabric yo-yo flowers for the interior
And then three rows of three beads each. We string three pieces, thread the end through all three and tighten.
We made five rows in total. From the next row we weave one less bead in the row, that is, two pieces.
And the final row is again with one bead.
It turned out to be one leaf. You need to knit a lot of such sheets - up to 100 pieces, then the tree will be picturesque.
Now we will weave the main sheets from these mini-leaves. First, twist three leaves together.
Then we will screw two more in parallel and two more below. In total, the large leaf consists of nine leaves.
Wood assembly
Let's collect rowan branches. Take a bunch of berries and a large leaf, twist them together, as in the photo.
Then another leaf and another bunch, also curled.
Our branch will come out of two clusters and three large leaves. Let's assemble the remaining branches from all the remaining blanks.
And all we have to do is assemble the tree trunk. To do this, you will need a thick wire, to which we attach each branch one at a time.
We attach each branch slightly lower than the previous one.
You can wrap the trunk with floral tape or tape. Prepare a tree stand (this can be a small pot filled with plaster or other weighting material) and carefully set up our work.
The colorful beaded rowan is ready and can bring joy to you and your loved ones.
The trunk can also be wrapped with thick thread.
Rowan beads: how to make it yourself
Have you ever wanted to create a fake with your own hands? Making a small tree, such as rowan, using beadwork is a fun process. Weaving trees with beads is not limited to strict instructions; you can always get creative and add something of your own.
Features of beading
If this is your first experience creating a small craft with your own hands, then it is better to refer to the video instructions. It is better to choose larger beads for work, because you do not yet have the dexterity that is required for filigree small work. The material comes in various colors, which will allow you to realize your fantasies; in addition, budget collections of beads are available for beginners, which is also important. Schemes of a variety of ideas can be found on Internet sites, or, when you have more experience and your hand is full, come up with it yourself.
How to make a rowan from beads with your own hands
Beaded rowan is a simple decoration that makes an excellent gift. To create you will need the following items:
- beads of different sizes;
- dense thread;
- wire;
- decorative stand.
Let's get started:
- For each leaf you need to build nine small parts. You should start by creating small parts. Each leaf will be built on five rows. Only one green bead is used for the first and last rows, and two for the central ones.
- The nine resulting parts must be combined into a sheet. To do this, you need to twist three small parts at the very base, and then attach other elements to them in pairs.
- We repeat the above 14 times. The beaded leaves are ready.
- It's time for the grapes. You need to take the wire, measure the length - 65 cm, then step back ten cm from the edge, attach the first bead. To secure it, you then need to twist the ends.
- After two centimeters we string the next bead, then re-twist it. In this way you need to put on ten beads.
- All berry beads should be twisted.
- Repeat steps 4-6 to get three identical bunches.
- Then assemble a brush from them. To do this, place them one on top of the other, then twist them at the junction.
- Complete seven red clusters.
- The completed parts must be wrapped with thread to form the branches of our tree.
- The clusters and leaves should be connected carefully, twisting their bases.
- After making a small indent, you need to attach another bunch of leaves.
- We collect seven such branches. At the base of each part you need to add a winding with a beautiful thread.
- Take part of the wire, which will be the trunk, and gradually attach branches to it.
- Each attachment point should be closed with threads.
- Make a stand: for this you can use plasticine or plaster, then “plant” the finished tree there.
Beaded berries
Do-it-yourself bead trees are assembled gradually. Any craft made from small beads is reminiscent of origami: you need to repeat the same steps. First you need to string the beads onto the wire, then twist it. Having put on ten beads like this, they should then be connected to each other, creating original bunches. They are already gathering in clusters. You need to weave 10-11 such bunches.
Leaves
The next step is to create leaves using green beads. The parallel weaving technique is used. One bead is strung on the first row, then two, and one again on the last row. There should be seven rows in total. Then these details are combined into a single piece of paper, familiar from childhood. First, three elements are combined, everything is twisted at the base, and then the remaining ones are attached in pairs.
Rowan branch
The penultimate stage is the creation of tree branches. You need to take the finished leaf, along with one bunch. Place them on top of each other and rewind the base. Then put the next leaf and attach it again, and after that take a bunch. The final step is to repeat everything again, ending with a piece of paper. You should get a neat branch. In order to hide the wire, you can use brown threads.
Wood assembly
The finishing line is the formation of the trunk. Thick wire will become the basis of the future tree. You need to wrap branches around it from top to bottom. You shouldn’t stop at the standard arrangement of branches and berries; you can experiment and try to bend the branches in different directions and evaluate how it looks. Having found the ideal angle, secure this position with threads. The beaded rowan is ready!
Find out more ideas on how to create your own beaded jewelry.
Video tutorials on weaving rowan from beads
Complex instructions are not suitable for beginners in this kind of weaving, so it is better to refer to video tutorials on making cute crafts. Masters of their craft will tell you how the work should be done, what size of wire to measure, and how many beads to take. What techniques can be used to convey the effect of a winter or autumn tree and how to create its chokeberry variety?
See also step-by-step photos and video tutorials on beading for the very beginners.
Step-by-step master class for beginners
How to make a rowan tree from beads
How to weave rowan in the snow
Check out tutorials on how to create other beaded trees.
sovets.net
Picturesque winter option
We continue the master class.
Everyone remembers how beautiful and contrasting the rowan tree looks at the beginning of winter, when the first snow has already fallen, the leaves have fallen off, and the scarlet berries are still hanging. Such a miracle of nature under the snow can also be made from beads. Here you will additionally need small white beads.
Let's make the bunches using the same method as in the first version of the tree.
Article on the topic: Openwork beret, knitted with knitting needles
You need to make more bunches, about 50.
Let's move on to the snow. We randomly collect beads (6-7 pieces) onto the wire, twist them into a loop and do this several times until we get a white flower.
We connect the clusters with white flowers.
Using a thick thread or tape, we fasten all the branches to a trunk made of strong wire. We plant the tree in the form. You can fill the mold with a mixture of alabaster and water and wait until it sets. You can also coat the entire tree with the same mixture with glue. If desired, paint the barrel with paint.
The snow tree is ready!
How to make a rowan from beads with your own hands according to diagrams with videos and photos
Rating: No rating
The content of the article:
The art of beading allows every woman to find her own style note. Working with beads is fascinating, and a wide selection of materials allows you to bring to life original ideas for creating bead products. Wicker jewelry - brooches, bracelets, necklaces, beaded lariats - can become a unique gift for loved ones. If you are just learning the basics of bead weaving, you are probably thinking about what you can make from beads. We invite you to make a very easy-to-work tree - rowan. It amazes with its beauty and ease of manufacture. Where weaving begins and how to properly make rowan from beads with your own hands, read our article.
How to do it right
Watch our master classes with step-by-step photos and you will find out what materials and tools you will need to create a rowan tree from beads.
Beaded rowan branch
Our detailed master class with step-by-step photos will help you make a rowan branch from beads. To work, prepare small green beads and large red ones, scissors, wire and floral tape.
Autumn sprig of rowan from beads
To weave an autumn branch of rowan, you will need green beads of different shades (or add yellow beads to the weaving), red beads and wire.
- Weave the branches according to the pattern, collecting beads in random order. This weaving method is used to make many beaded animals. How to make a small craft in the shape of a dog from beads with your own hands, see here.
- Pass the wire through 1 bead and move it to the middle. Then put 2 more beads on either end of the wire and pass the other end of the wire through these beads. Tighten the wire.
- Next, collect 3 beads through one end of the wire and pass the second end of the wire through them. Place and tighten the next 4 beads in the same way.
- We finish weaving the rowan leaf, reducing the beads in each row.
- Make the desired number of leaves and twist them into a twig.
- Make the required number of clusters from red beads or beads.
- Form a rowan branch from several branches with leaves and “berries”, wrap with floral tape. By using different shades of green beads or splashes of yellow, a realistic autumn rowan leaf is obtained.
Winter branch of rowan from beads
In winter, rowan loses its leaves, leaving behind ripe berries, so weaving such a tree from beads is very easy. White and silver beads are suitable, as well as orange beads for “berries”.
- Mix the beads for “snow” and place them in random order on the wire.
- Form a loop of 10 beads and twist. Make another one nearby. In order to generously cover the bunch with “snow”, make 8 loops. Make the required number of such branches, leaving 6 cm wire tails.
- Using the same principle, make bunches of rowan berries from orange beads.
Wrap the resulting bunches in “snow” and twist. Wrap with brown floral tape. The sprig of winter rowan is ready.
Rowan beads
In our master class we will show you how to assemble rowan from beads. To make it you will need green beads and larger red ones, 0.3 mm thick wire, green floss threads, alabaster, glue and a stand for the tree.
Green twigs
Measure 60 cm of wire and thread 9 green beads through the middle. Twist the loop. Back off about 5 mm and twist 9 beads into a loop. Weave a total of 6 loops on each side.
- Make the required number of branches.
Leaves for beaded birch (which can also be woven in the autumn version) and beaded wisteria are woven in a similar way.
Red bunches of rowan
- Place 1 bead on the wire, stretch it to the edge and secure the “berry” by twisting 1 cm of the wire. Then thread 1 more bead and twist.
- Make about 10 of these loops with “berries”.
- Make rowan bunches half the number of branches.
Making twigs
- Wrap a bunch of rowan berries with green floss threads. Attach the finished green twig, twist the ends of the wire and wrap it around it as well. Add another branch. Make indents of about 5 mm between branches.
- Form future branches at your discretion.
Making side trunks
- Screw the finished branches to a thick wire and wrap them with threads.
Forming the main trunk of the tree
- Connect the side trunks and wrap them with thread. Mix PVA glue with alabaster. Apply the solution to the trunks with a brush. Fill the bottom of the tree with a solution of glue and water and let dry.
- When the tree is dry, paint the trunk with brown paint.
- Paint the bottom of the tree with green paint.
Winter rowan from beads
The rich red berries of rowan berries look especially beautiful under a layer of snow. Let's weave a rowan tree from beads in the snow with our own hands. Prepare silver or white beads, red beads (or large red beads) and wire.
- Let's make grapes. Place a red bead on the wire and make a 1 cm twist. Thus, make the required number of “berries”.
- Now we create “snow” on the grapes. Make a loop of 8 silver beads and twist into a loop. Also make 2 loops on each side. Framing the bead with “snow”, twist the parts.
- Make the required number of snow-covered bunches and screw them to thick wire. Wrap with brown thread. Fold the edges of the branches downwards.
- Make a solution of water and alabaster and fill the tree. After the solution has dried, dilute the alabaster with water and PVA glue and apply it with a brush to the trunk and branches.
- When the rowan has dried, paint it with brown gouache and varnish it. An artificial snowball can be made from a mixture of water, white gouache, alabaster and glue. This winter beauty will undoubtedly become the pearl of your collection.
Video with master class lessons
We have prepared for you several video tutorials on how to create a rowan tree with your own hands.
- For a master class on weaving winter rowan bunches from beads, watch this video. To work you will need wire, large red beads, a mixture of white and silver beads.
- The lesson from our video will show you how to make rowan from beads with your own hands. The clusters are woven from black beads and beige beads.
- Weave an unusual autumn chokeberry with your own hands using the following video tutorial. See the stages of making tree branches and clusters.
Bright beaded rowan will be a wonderful gift or home decoration. Share your work and skills with our readers.
www.joxin.club