Dressy shoes - what are they?
A funny and charming shoe will completely replace bouquets of sweets that have become familiar. Of course, due to the small size of the product, you cannot place a lot of candies on it; only 2-4 pieces can be attached to the toe of an elegant shoe. But the souvenir looks very unusual and elegant. It can be presented as a stand-alone gift or attached to a box with the main gift.
A correctly made shoe looks very natural, but real shoes are not used in the work. The shoe is completely made by hand. The easiest way to work is to use light and durable cardboard, which can be easily shaped into any shape. An open high-heeled sandal looks most elegant, but using the proposed technology you can make a pump, a baby-doll style shoe or a beautiful ballet flat.
There is no limit to imagination. Once you start experimenting with candy compositions, you will probably come up with something of your own, unusual and original.
DIY paper shoe
Author of the text:
Karandashova Yana Ivanovna
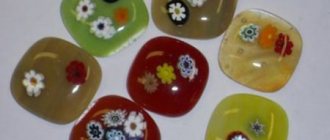
We will make flowers for topiary from corrugated paper.
Using a cup or saucer, draw many circles on crepe or colored paper. You can make each craft using paper and decorative items you have on hand.
For even greater resemblance, it can be lightly primed and tinted with acrylic in “bone” colors. It's no secret that today in stores you can find a gift for every taste, a lot of banal things.
What if you make a book out of paper with your own hands?
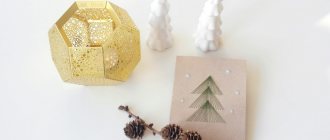
Beautiful paper snowflakes will be a good home decoration for the New Year. They will create an atmosphere of a snow-white, winter fairy tale in the apartment. The ruffled flowers are a work of art in themselves.
Here are some examples of using paper feathers to decorate gifts and gift wrapping.
To make your own paper flowers look as similar to real ones as possible, you need to take a 20 cm long wire and wrap it with a strip of green paper, then make a thickening at a distance of 5 cm from the edge, wrapping the wire several times.
To dress up our paper doll in different luxurious outfits, we draw clothes and accessories for it (dresses, skirts, hats, handbags, shoes, etc.), and then cut it out with scissors, leaving small protrusions to hook onto the paper doll when we dress her.
An equally beautiful DIY paper carnation (photo attached) is made from ordinary paper napkins. This will be the stem of the flower. This is already a certain type of creativity.
If you have a daughter, then you can make Quilling cards, Quilling flowers or interesting paper crafts in the form of rings and bracelets with her. After all, while working on its creation, you inevitably put a piece of warmth, kindness, and love into it.
This is a great way to decorate your home and give it freshness and charm. The more color tones you use, the brighter the window decoration will be. The famous journalist Oskina Agniya Antonovna, who knows where you can buy an apartment, spoke about this.
Become a fashion designer of doll shoes, surprise your girlfriends and friends, take orders from your friends, in a word, create and play for fun. All you have to do is learn how to create it yourself.
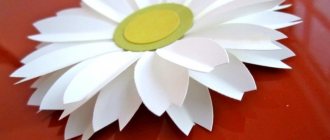
Form flower buds: you need to take 2 circles, add white on top - for the core.
We print the template https://www.skiptomylou.org/wp-content/uploads/2008/10/witchshoe.pdf on A4 sheet. (unfortunately, the pictures don’t want to load, so I’m giving links) If the cardboard from which you are going to make a shoe is exactly this format, then you can print it directly on it. If not, then transfer the printed template onto cardboard. This activity does not require large material costs. It is enough to show a little creative ingenuity and imagination.
Place corrugated paper on the table and fold each piece like an accordion. You will definitely need simple tools such as tape and scissors.
You also need to take care of the design of the stem. However, handmade flowers are especially nice!
Make as many colors as you need. For the New Year's holiday, we invite you to make a lot of snowflakes and, moreover, in different shapes.
Purchase all necessary tools and materials. The size of the circles is at your discretion.
Thursday, 16-Apr 15
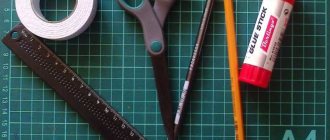
Everything you need for crafts
Before making a shoe out of candy, decide what color the product will be in. White, pink, golden, silver or cream shoes look very elegant. You can also make a bright contrasting shoe in blue, red, emerald green and even black. Sequins, lace, transparent ribbons, braid and soutache are used for decoration.
Designers do not recommend combining more than 3 colors in one product.
To create a do-it-yourself candy shoe you will need:
- corrugated cardboard;
- thin cardboard;
- double sided tape;
- shoe insole for patterns;
- scissors;
- pencil;
- fine-grained file;
- thin wire;
- glue gun;
- corrugated shiny paper;
- decorative wrapping paper;
- floral mesh;
- silver foil;
- silver twisted cord;
- transparent or colored rhinestones made of glass or plastic;
- plastic tip for balloons;
- silver braid;
- round chocolate candies in candy wrappers.
Floral corrugated paper is ideal for work; it retains its shape well. If you can’t find a plastic blank for the heel, you can cut it out of polystyrene foam. Decorative paper can be replaced with any beautiful fabric.
Manufacturing technology
To make a shoe with your own hands, you don’t have to attend a master class from professionals in this type of needlework in person. The work process is simple and quite understandable even for beginners. It is important to take your time; it will take at least 4 hours to create the craft.
Place the shoe insole on the cardboard and trace it with a pencil. The toe of the workpiece needs to be sharpened. Cut out 2 blanks from thick corrugated and thin cardboard. Attach a strip of double-sided tape to the corrugated cardboard insole and place a thin wire on top. It will help fix the bend of the insole at the desired angle. For reliable fastening, three rows of wire are enough.
Using a glue gun, connect the thick cardboard insoles so that the wire is inside. Cut a rectangle from decorative wrapping paper, glue it to the bottom of the cardboard blank, tuck the ends under and trim. Glue them on top so that the workpiece is completely wrapped in decorative paper. It is important that there are no sloppy folds left on it.
Wrap thin cardboard blanks in contrasting corrugated paper using the same technology. Cut a semicircle from the floral mesh. Connect blanks of thin and thick cardboard using a glue gun, securing a semicircle of mesh in the heel area. Give the resulting sole of the shoe the desired bend.
From foam plastic, cut out a platform that follows the toe of the shoe until it bends. Treat it with a fine-grained pedicure file for perfect smoothness, wrap it in corrugated paper and glue the shoes to the workpiece. Cut out a piece in the form of a drop from foil and glue it to the blank in the heel area.
Wrap a plastic blank for the heel or a blank cut from polystyrene foam in corrugated paper. Make a heel from a strip of a contrasting color by gluing it at the bottom of the heel. Attach the heel to the sole with a glue gun.
Modular origami
We make modules according to this principle:
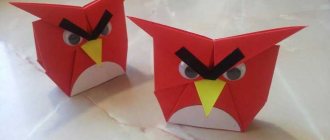
This is the kind of shoe we will make:
To create it we will need:
- 18 sheets of yellow paper;
- 2 sheets of red paper;
- adhesive moment “Crystal”;
- scissors and a stationery knife.
To create such a shoe, you first need to make modules. We will need 279 yellow modules, 21 red modules of standard size. We will assemble the sole of the shoe separately; the heel, straps of the shoe and the flower will also be assembled separately. Then the separately assembled parts are glued together.
Assembling the sole. It is assembled from yellow modules. Red modules for collecting soles are not used. In the first row we have 7 modules. The second row is already one more module - 8 modules.
In the third row: 9 modules. Fourth row: 8 modules.
Fifth row: 8 modules. Sixth row: 8 modules.
Seventh row: 9 modules. Eighth row: 8 modules. Ninth row: 9 modules.
Tenth row: 8 modules. Eleventh row: 9 modules. Twelfth row: 8 modules.
Thirteenth row: 7 modules. Fourteenth row: 8 modules. Fifteenth: 7 modules.
The corners of the previous rows should not stick out; we hide them in the pockets of the modules of the next row.
Row 16: 6 modules. Row 17: 7 modules. Row 18: 6 modules.
Row 19: 7 modules. Row 20: 6 modules. 21 row: 5 modules.
Row 22: 6 modules. 23 row: 5 modules. 24 row: 6 modules. Row 25: 5 modules.
Due to the bends we make the sole realistic.
Let's continue to create. Row 26: 6 modules. Row 27: 5 modules. Row 28: 6 modules. Row 29: 5 modules. Row 30: 6 modules.
31 row: 5 modules. Row 32: 6 modules. Row 33: 5 modules.
Here we have the sole of our shoe.
Now we need to make the heel. In the heel we will have 15 rows of modules.
Article on the topic: Knitted hat with a lapel for women: master class with video
From the 1st to the 13th row, the number of modules in the rows changes: 2 and 1, and so the alternation continues
From the 14th row to the 18th row, the number of modules in the rows changes. 3 and 2 modules alternate.
The fifteenth row consists of 4 modules and our heel ends with this row.
Glue the sole to the heel.
Let the glue dry and assemble the straps. But we will now use both yellow and red modules.
One strap needs to be made 2 rows longer.
Now let's glue the straps.
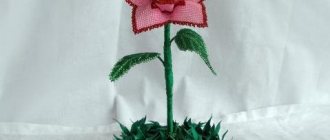
Let's decorate our shoe with a flower. We assemble it from red and yellow modules, as shown in the photo:
We glue the finished flower onto our shoe.
The shoe is ready!