A little about hooks
There are a variety of hooks: metal, wood, plastic and even ivory (I have one, a gift from my aunty knitter. Honestly, the tool is not suitable for knitting, but as a beautiful souvenir it’s very good, and also as a reason to show off to girlfriends with their “treasures”).
But for those who want to learn and are just starting to knit, such delights are useless, although you can immediately choose a hook from the material you like.
The most important feature by which hooks differ is the size of their head, or rather, the slot into which the thread falls when knitting. The thicker the thread, the larger this slot and the head, respectively. And this difference is indicated by numbers. Napkins and collars from thin threads are knitted with hooks numbers from 0.5 to 2.
And hats and scarves are numbered from 2.5 to 6-7.
To start knitting and learning, a hook size 3-3.5 is suitable. And any yarn of medium thickness.
A few words about choosing yarn for training.
The yarn also varies. And this is a topic for a separate article. At this stage, I would advise you to take a thread with a good twist, so that the hook does not separate the thread during knitting and does not create unnecessary inconvenience.
How to hold a hook.
Something else needs to be said about the position of the hook in your hands. Here everyone chooses the option that is most convenient for him/her)).
The figure below shows a method called "pencil". Simply grip the hook the way you would grip a pencil for writing.
The following picture shows the "spoon" method, in which the hook is held like a spoon while eating.
As you can see, everything is very simple.
Thread position when knitting.
Where the thread should be placed while knitting is shown in the figure below. A working area for the hook is formed between the index finger and thumb. The thread going to the ball is located under the middle, ring and little fingers. And the little finger lightly presses the thread against the palm so that it does not dangle. The free end of the thread is 4-5 cm. More is possible. When finished, I thread this end through a large eyed needle and carefully thread it into the work.
The basic elements of crochet are chain stitch, single crochet and double crochet. Let's look at how they are done one by one.
Crochet mesh pattern for beginners
Before knitting a full-fledged product with this pattern, we suggest you knit a small sample. So, we assemble a chain from to. p., their number should be a multiple of 4 + 5 p. for the edge + 1 p. of symmetry.
Scheme
1 r.: knit a bunch of 3 s. from 2 n. in the 6th century. p. chain, 1 v. p., skip 3 p. on the chain, *3 s. from 2 n. in 1 p., 1 v. p., skip 3 p. on the chain*, 3 s. from 2 n. for both segments of the loop.
2 p.: 3 v. p. to form the edge, *3 p. from 2 n. in the arch under the v. p., 1st century p.*, 3 p. from 2 n. to the regional c. p. Repeat the second row to create a pattern.
Start of knitting. Air loop.
So, you have a hook and a ball of thread in your hands. Where to start?) Any product begins with a chain of air loops. And it starts with the first air loop. We cross the thread with our fingers to form an ordinary loop and insert a hook into it, as shown in the figure.
Next, place the hook under the thread.
We grab the thread with a hook and pull it into our ordinary loop.
Congratulations! You've learned how to make the first loop, and that's half the battle!)
Next, all the loops of the chain are knitted according to the same principle. Insert the hook into the loop, grab the thread from below and pull it through the loop. This is what a chain of air loops looks like:
At first, my hands will not obey you, my fingers will be tense, but this is a normal phenomenon for all novice needlewomen. With each new approach it will turn out better and better.
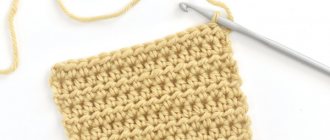
Simple dense crochet pattern
This pattern is knitted very simply - using s. without n. Due to its density, it holds its shape perfectly.
We start, like any knitting, by setting a chain of... p. We knit the 1st stitch and knit it in the 2nd stitch from the cr. (thus, we get 1 v. p. p.).
Scheme
- 1 p.: 1 v. p.p., *1 p. without n. for one piece of loop*, from * to * to the end of the row.
- 2 p.: 1 v. p.p., *1 p. without n. for both segments of the loop *, from 8 to * to the end of the row.
To create the pattern, repeat the second row.
The second element is a single crochet.
As with any knitting technique, stitches are added at the beginning of each row. When knitting a single crochet, one chain increase is made. Therefore, the hook is inserted into the second air loop from the hook.
Insert the hook, grab the thread and pull it through the loop.
Thus, there are now two loops on the hook. And now we grab the thread again and pull it through two loops on the hook.
Congratulations! You have mastered single crochet! Now the same needs to be done in the next loop and all other loops of the air chain.
This is what a row of single crochets looks like:
And this is what the pattern looks like, knitted with single crochets:
Simple curvy crochet pattern
This crochet stitch is done using long double crochets. They are knitted in the same way as the long ones. Art. with nak. (initial chain from ch. p., knit the 1st st. in the 4th p. from the cr.; Yarn over, insert cr. into the p., grab the working thread and pull it through the p. = 3 p. on the edge We knit a ch through the 1st stitch on the edge, knit a stitch and yarn over, finish the stitch by knitting the remaining 2 stitches on the edge). However, here after knitting it will complement. V. n. all three loops located on the hook are knitted at once. The finished canvas will be quite dense, even harsh. Therefore, it holds its shape perfectly and is ideal for knitting a variety of women's handbags, slippers, wallets...
In the process of work, we check the diagrams:
To knit a small sample, we assemble a chain from c. p. (pure loops should be a multiple of 2 + 1 symmetry p. + 3 v. p. p.).
- 1 p.: 3 v. p.p., *2 extended. half-column with n. in the 5th century. p. from cr. for both walls of the loop, skip 1 in. p. initial chain*, 1 extended. half-column with n. in the last p. chains.
- 2 p.: 3 v. p.p., *2 extended. half-column with n. in the arch between two s. previous row*, 1 half-column with nak. in in. p.p. previous r.
To create a beautiful knitted fabric, repeat the second row.
And the third important element is the double crochet.
If the row begins with a double crochet, then you need to make four lifting loops. Because the double crochet is higher than the single crochet. To make a yarn over, simply yarn over the hook. And after that, insert the hook into the 4th free loop from the hook.
Next, grab the loose thread with your hook and pull it through the loop.
Next, grab the loose thread again and pull it through the first two loops on the hook.
After this, two more loops will remain on the hook. And they also need to be knitted by grabbing the thread with a crochet hook and pulling it through these two loops!
Congratulations! You have mastered knitting an important element - double crochet!
This is what the pattern looks like, knitted with double crochets:
Well, you have mastered the basic elements of crochet for beginners! In this article I talked about which hook and yarn to take when starting to learn knitting. And she provided diagrams showing how to knit a chain of chain stitches, a single crochet and a double crochet step by step.
I hope you found this article helpful! And now you can easily learn to knit! Good luck with your creativity!
Author of the publication
offline 4 years
The simplest patterns for all occasions
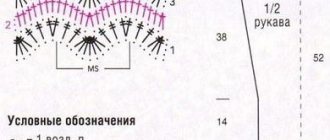
Openwork pattern “Shell”
This type of openwork pattern is very beautiful and versatile, as it can be placed in any position. The pattern consists of one shell element, which combines five double crochets, knitted in one loop.
To get a beautiful pattern, you need to imagine the pattern in your head as a finished product and calculate the number of loops in advance. Next, we knit a chain and make a rise by the number of loops that is necessary based on the product. Having skipped several loops, we knit five table in the same loop. with double crochets. Then the pattern is repeated.
If the shells are placed tightly, then this knitting is suitable for cool weather. If you place the shells freely, you can get a light summer item.
"Network"
The following “Braided” pattern can be found among a wide variety of children’s and adult clothing. Cardigans and jumpers are knitted this way.
The “Braided” pattern with squares is both complex and simple at the same time for beginning craftswomen.
To begin, we knit a row of table. with one crochet, do not forget three lifting loops and the first stitch in the fourth loop from the hook.
For the first and second rows we knit three instep stitches, then three knit stitches, three purl stitches, repeat, finishing with a double crochet. And so we knit until the end.
Waffle pattern
An interesting and unusual waffle pattern is suitable for creating large and warm works, such as a blanket or winter sweaters.
To obtain a waffle mesh, you need to use embossed posts in knitting.
As usual, we collect a chain of v.p. in multiples of 3+2, so that the pattern is symmetrical. We knit the first row alternating two chain stitches. and one table.b.yoke. Don't forget two or three lifting loops. Into the first arch from the voz.p. we knit two tables. double crochet We hook the working thread under the arch. The next double crochet table will be embossed. The hook wraps around the table.b. Yarn over the previous row and catch the working thread and pull it up towards the table with the yarn over. Next we knit three loops on the hook like a table. double crochet This created a relief table. double crochet
Then we knit two tables. with a double crochet in an arch of two items. We finish the second row alternating the relief table. double crochet with two table. with a crochet in the arch. We knit the final column in air. lifting loop of the previous row.
In this order, alternate even and odd rows to the desired size.
The wide variety of simple patterns presented and their accessible description will undoubtedly be of great help in such a difficult task as crocheting. This type of needlework requires perseverance, patience and perfection of skill, both for beginning needlewomen and experienced craftswomen.
Handmade products are beautiful masterpieces of love and care for your family and friends.
https://youtu.be/chrrs6GI1achttps://youtu.be/U9PQ2rG6Z0c
_
How to learn to crochet from scratch using a pattern
The use of patterns when crocheting makes it easy to understand even the most complex patterns, without the use of additional verbal description. The sequence of knitting rows in the diagram is indicated from bottom to top. When knitting flat, the diagrams indicate front rows - from right to left and purl rows - in the reverse order, that is, from left to right. This designation is explained by the fact that the flat technique requires turning the knitting either right side or wrong side each time at the end of a row. In circular knitting, all rows are knitted clockwise - in a circle or in a spiral, without turning to the wrong side, so in the pattern they are all knitted and knitted from right to left. How the main elements are crocheted and how they are indicated in the diagrams is shown in the photo below.
Examples of the designation of basic crochet elements in the diagram are also shown in the video lesson
Examples of patterns of crochet patterns using basic elements - ch, st s/n and st b/n.
How to learn to crochet toys, using the example of a simple toy step by step
To knit a pig figurine, as in the photo above, you will need:
- remnants of yarn - pink, green and black;
- hook No. 2;
- filling material - synthetic winterizer or holofiber;
- a pair of small beads instead of eyes;
- ribbon for bow;
- needle and thread.
The toy is knitted in the round, from top to bottom, the body and head - together, legs, snout and ears - separately.
Change pink threads to green ones. 11 rubles: - 24 st. b/n. 12 p.: decrease 1 st every 2 st b/n = 18 st b/n. 13 r.: 18 st. b/n. 14-16 r: perform 6 decreases in each row. As you knit, fill the toy with synthetic padding or other filling. Finish knitting with green threads, completely filling the toy and closing the hole.
Tie the ears. Having made a ring with a sliding loop, knit 4 tbsp on its base. Turn the knitting, make an increase: the first - in the first loop of the row, the second - in the last loop of the row = 6 tbsp. Turn the knitting and knit the last row without increasing.
Tie the front legs. To do this, make a circle of threads with a sliding loop and knit 6 tbsp on its basis. In the next row, increase through 1 loop. Knit rows 3-5 without increases. Change the pink thread to green and knit 6 rows, decreasing through 1 loop. Fill the finished part and sew it to the figure.
Tie the back legs. To do this, knit 6 tbsp on a ring with a sliding loop. At 2 p.m. perform 3 increases at intervals of 1 loop = 9 sts. b/n. Knit 9 sts in rows 3 and 4. b/n. Fill the details and sew them at the bottom of the figure.
Tie a patch. To do this, knit 6 tbsp on a ring with a sliding loop. In the next row, make 6 increases = 12 sc. In the 3rd row, knit 12 single stitches on the back walls of the previous row. In the last row, knit another 12 sts, inserting the hook in the usual way.
Fill the part and sew it to the muzzle. Sew on the eyes. Embroider nostrils on the patch. Make a bow from a ribbon and sew it to the pig.
In more detail, how to crochet a pig is shown in the video.
How to learn to crochet a circle
The circle is a motif often used in knitting tablecloths, napkins, rugs, dresses and other items. Its knitting begins with a chain of 3 or more chain stitches, which closes in a circle. In addition, circular knitting can begin with a thread twisted into a ring and a sliding loop. In the first case, a through hole is formed in the center, in the second, there will be no hole in the center if the free end of the sliding loop is tightened. The first row is usually knitted in st. b/n or st/n. Starting from the second row, increments are made evenly in knitting - 2 stitches are knitted from one loop:
- if the circle is knitted from st b/n, then it is necessary to increase 6 times;
- if the circle is knitted from half-stitches, increases are made 8 times;
- if the circle is knitted in st/n, increases are made 12 times;
- if the circle is knitted from st. with 2 double crochets, increases are performed 16 times.
In the 3rd and subsequent rows, increases are made at increasing intervals - after 1, then after 2, then after 3 and so on loops.
The process of knitting a circle of st/bn is shown in detail in the master class
Circle knitted with double crochets (dc)
In each subsequent row, the increment interval increases by 1 stitch until the circle reaches the desired diameter.
The process of knitting a circle of st/n is shown in detail in the master class
Using the same principle, increases are knitted and the circle is worked in a spiral. The only thing is that with this technique, circle knitting in a new row is not performed in. lifting point, and the place of transition from one row to another turns out smooth and is marked with a marker so as not to get confused when counting the rows.
Beautiful embossed crochet pattern for beginners
To knit a small sample of this pattern, we will need to cast a chain of c. p., the number of which is a multiple of 16 p. + 10 p.
Under the “bundle of lush half-lengths.” we mean the following knitting: in 1 p. we knit 3 lush half-stitches, separating them with two sts. n. In other words, 1 lush half st., 2 v. n., 1 lush half-st., 2 v. p., 1 lush half-st.
Scheme
Description
- 1 p.: 1 s. without n. in the 2nd century. p. from cr., *1 c. p., skip 3 p. chains, a bunch of lush. semist., 1st cent. p., skip 3 p. chain, 1 s. without n.*, from * to *.
- 2 p.: 2 v. p., 1 p. from 1 n. in paragraph last With. without n. prev r., 2nd c. p., *1 p. without n. in the village central. of 3 lush. With. prev r., 2nd c. p., 3 p. from 1 n. in p.s. without n. prev r., 2nd c. p.*, 1 p. without n. in the village central. of 3 lush. With. prev r., 2nd c. p., 2 p. from 1 n. in the extreme village without n. prev R.
- 3 p.: 3 v. p., s. from 1 n. in the village of extreme s n. pre-r., 2nd c. p., 1 lush. semi-st. in the same paragraph, *1st century. p., 1 p. without n. in p.s. without n. pre-r., 1st century. p., a bunch of lush. semi-st. in the village central. from 3 s. s n. pre-r.*, 1st c. p., 1 p. without n. in p.s. without n. pre-r., 1st century. p., 1 lush. semi-st. to the extreme. n. before the river, 2nd century. p., 1 p. from 1 n. at the same point
- 4 p.: 1 v. p., 1 p. without n. in the village of extreme s n. pre-r., *2nd c. p., 3 p. from 1 n. in p.s. without n. pre-r., 2nd c. p., 1 p. without n. in the village central. of 3 lush. semi-st. pre-r.*, 2nd c. p., 3 p. from 1 n. in p.s. without n. pre-r., 2nd c. p., 1 p. without n. in the village of extreme s n. pre-th. R.
- 5 p.: 1 v. p., *1 p. without n. in p.s. without n. pre-r., 1st century. p., a bunch of lush. semi-st. in the central section of 3 villages. s n. pre-r., 1st century. p.*, 1 p. without n. in the village of extreme without n. pre-r.
We repeat the pattern, starting from the 2nd row.
We hope that today's simple crochet patterns will please your taste and add to your piggy bank.
Happy knitting and smooth stitches!
Simple crochet products for beginners
A knitted scarf or stole is an excellent option for the first serious product. Usually this is a rectangular canvas made of some kind of pattern or simply columns. There are no additions or abbreviations, so it is impossible to get confused or ruin the project.
For more daring and self-confident knitters, a simple sweater or pullover can be an opportunity to express themselves. Modern fashion allows you to wear wide shoulder items with a primitive cut, so modeling and implementing ideas becomes quite simple.
In fact, you can even skip the neckline and armholes and knit 4 rectangular pieces (front, back and 2 sleeves). However, clothes with armholes look better, even if they have minimal depth.
Any pattern is suitable for this model: from elementary columns to complex openwork patterns. The parts of the front and back up to the armholes can be knitted in a single piece in the round or immediately separated and knitted separately. The sections from the beginning of the armholes to the top of the parts must be done in straight and rotating rows.
If desired, you can knit a round, V-shaped or rectangular neckline. The boat neckline also looks great when the top of the part is closed evenly and very short shoulder seams are formed (the front is sewn to the back along the shoulders on both sides).
Another model for beginner knitters is a summer top with an open back. Thanks to the technical drawing, you can easily understand what the finished top should look like.
Straight sections of the fabric are knitted with double crochets. The central part must be knitted according to patterns A.1, A.2, A.3. At the beginning of the row you should use scheme A.1, then work according to scheme A.2 and complete the row according to scheme A.3. The final part of the top should be knitted according to pattern A.4.
When the part is ready, you need to tie a long cord. Fold and hem the edges of the piece so that the cord can be tucked inside. For the original top, 100% cotton yarn with a thickness of 200 m/100 g was used. The knitting density was 18 Sts per 10 cm and 9 Rd per 10 cm. Size SML will require 150 g of yarn.
Operating procedure:
- Link TsVPt from 42-44-44 Pt. Perform the first row of dc, adding one dc on each side.
- Knit the second row according to patterns A.1-A.3. When the patterns are knitted once in height, you need to continue knitting with this pattern, adding stitches on each side. The total height of the part should be 13-14-14 Rd. And the width is 71-77-77 Art.
- On each side of the fabric, knit 27-30-38 VPt and in the next rows knit a DC from these loops. At the same time, in the central part of the canvas, make a pattern according to scheme A.4.
- Knit until the total height of the piece is 24-26-28 cm in the center.
- Cut the thread, hem the edges of the part inward by 2 cm.
- Knit 140-150-160 VPt for the ties, turn the work and perform one PlSt in each VPt.
At the final stage, you need to wash and dry the product on a horizontal surface, then thread the ties into the top. This is a fairly simple, but very effective and relevant model. Even a beginner who has just recently learned to crochet from scratch can handle it.
Author: Anna Ocean
Article design: Natalie Podolskaya
Crochet heart
Any thread and a hook of a suitable diameter will suit you. Thick fluffy threads, plush, melange or terry balls look interesting - this way the heart will also have a texture. To make it tight and even, take a hook one unit smaller than the recommended size.
Wrap the end of the thread in a ring around your finger, bring the hook through and knit 3 chain loops. Directly into the ring, knit 3 double crochet stitches and 3 single crochet stitches. Make a chain stitch, another double crochet stitch, a second chain stitch, 3 double crochets and 3 double crochets. Make 2 air loops, a regular stitch, close the part and tighten the base loop.