What could be more exciting for children than the process of making something interesting with their own hands? Creativity for any child is an opportunity for full-fledged all-round development, the formation of imagination and fantasy. Just imagine how proud your baby will be if, with your help, he can make a three-dimensional paper toy for himself and his friend, brother or sister. In our article we will tell you in detail everything about this exciting activity, and also present several options for the paper toys themselves.
Paper as a reason for fantasy
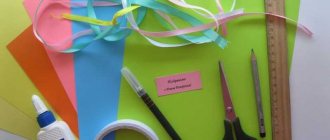
The appearance on sale of a large assortment of paper for handicrafts with a wide choice of not only colors, but also textures, allows modern craftsmen not to limit their imagination. A huge number of techniques, as well as the availability of patterns and patterns for products for every taste, paved the way for the almost daily creation of small masterpieces that carry not only the elegance of execution, but also the warmth of their master.
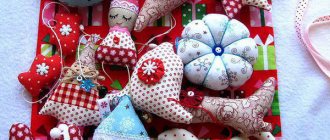
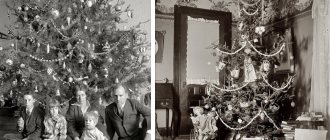
A festive interior decorated with crafts becomes very homely and cozy. Often, handmade New Year's toys become real family heirlooms.
How to make a three-dimensional paper toy, master class
For beginners in the business of making paper crafts, we suggest that you first try your hand at creating such a cute bird:
Step-by-step instructions for making crafts:
- We have immediately attached a template of this bird for you. It is intentionally made colorless so that you can color it yourself with gouache paints and felt-tip pens, and then cut and glue it:
- After you color and cut out each element, the most difficult stage begins - correctly folding all the parts and gluing them together:
- First you need to glue parts of the beak to each side of the bird:
- Then glue the back of the bird on the side of the beak:
- The next step is to attach the bird's wings:
- Now you need to take that part of the craft that should be the bird’s breast, fold it into a triangle and attach it:
- You need to glue the bird's breast not at a right angle, but at an angle of 45 °:
- Next, fold the bird’s legs according to the template, align them and attach them to the body of the bird with glue:
- The resulting legs should look like this after you attach them:
DIY crafts from stripes
New Year's toys made from pieces of paper will turn out elegant and airy. Colored paper, cut into strips of different lengths, will become the basis for creating a wide variety of decorations. Traditional New Year's lanterns, Christmas tree pendants, romantic hearts are very easy to make with your own hands.
For a Christmas tree decorated in bright colors, as well as for creating a New Year's interior in a romantic style, hearts made of paper strips are suitable. To make one heart about 10-11 cm high you will need:
- red, green and orange paper strips 20, 25 and 30 cm long and 1.5 cm wide;
- stapler;
- glue stick.
Progress:
- Fold each strip in half.
- Place the bent sections so that the place where they are folded coincides, and they themselves are located from larger (outside) to smaller (inside).
- Glue the ends of all three strips first on one side, let dry a little and glue the ends of the strips on the other side. Let it dry.
- Secure the glued ends with a stapler. If necessary, give the heart a round shape.
As a New Year's compliment to a colleague or as a cute addition to a gift, homemade Christmas trees are perfect, which can be made from green or any other paper in just a couple of minutes.
It will take a little more time to create another spectacular craft. To create a round lantern you will need:
- multi-colored paper pieces 30 cm long and 1.5 cm wide;
- 2 mugs made of colored paper (diameter 3 cm);
- Needle and thread matching the color of the paper strips;
- Decorative beads or balls.
Manufacturing:
- The paper strips should be placed on the surface in the desired order.
- Bend each one in half.
- Attach a bead or ball to the end of the thread.
- String all the pieces in accordance with the chosen color order from one end, then, without cutting the thread, string the strips from the other end, choosing the length of the thread so that the strips are bent.
- Place a bead or ball over the stripes, fasten the thread and make a loop from the remaining thread so that the toy can later be hung on the Christmas tree.
- The middles of the stitched strips should be separated, placing them in the shape of a ball.
If the previous craft requires a needle and thread, then the next toy can be made right at school or office. To create a beautiful New Year's pendant, you will only need a few colored paper pieces of different lengths and a stapler, which will need to be used to fasten all the strips first at one end, then at the other. They should be arranged so that the shortest one is in the middle, and the longest ones are at the edges.
Fantastic Christmas tree decorations
You can create beautiful toys for the New Year from paper. A festive ball using the decoupage technique, paper Christmas trees, voluminous snowflakes, New Year's garlands, pine cones, candies and snowmen will look great on the Christmas tree.
New Year's angels
Decoupage of a ball with a picture
The process of decorating the ball is as follows:
- Sand the entire surface with fine sandpaper and wipe off the dust.
- Prime the ball with glue in two stages using a sponge.
- Choose a napkin with a thematic motif and cut out the design.
- Remove the bottom paper layer and soak the photo in water for a short time.
- Using a needle, remove the top layer.
- Dilute the glue in a 1:1 ratio and glue the picture.
- Smooth out the image from the center to the edges.
- Sand the edges and paint the rest of the ball.
- Coat the finished New Year's ball with varnish.
You might be interested in this: Paper giraffe for children - make origami yourself
Note. There is a reverse decoupage technique. In this case, the motif is glued on the inside.
Decoupage of Christmas balls
Christmas tree made of snowflakes
Necessary materials:
- paper snowflakes of different sizes;
- scissors;
- glue;
- wooden stick for the base;
- beads;
- small pot.
Creation stages:
- Prepare snowflakes.
- Place each snowflake on the base, alternating with one bead.
- Secure the finished Christmas tree in the pot.
- Fill the pot with rain.
Note! Each snowflake and bead placed on the base must be secured with glue.
Garland "snowmen"
Stages of creating a garland in the form of snowmen:
- Cut out three circles of different sizes from paper.
- Bend the circles in half and coat 1 half with glue.
- Glue the second folded circle to one folded half.
- Connect half of the third and fourth with glue.
- Pass the tape in the middle, glue the fifth circle, closing the ring.
- Assemble medium and small mugs in the same way.
- Glue the smaller circles above the largest one.
- Hang several voluminous snowmen on the ribbon.
Material for creating snowmen
Note. To make the garland more beautiful, it is recommended to attach bright additional elements between the snowmen.
Beautiful candy
What you will need:
- serpentine;
- cardboard;
- wrapping paper;
- scissors;
- ruler;
- scotch;
- satin ribbon.
Creation stages:
- Cut a piece of wrapping paper measuring 30x30 cm.
- Form a “candy” in the form of a cylinder from cardboard.
- Place the base in the middle of the edge of a sheet of wrapping paper.
- Start rolling the “candy” by wrapping the shape into a roll.
- Secure the edge with tape.
- Wrap the tails on both sides and tie with a serpentine.
- Decorate the “candy” with any available materials.
New Year's decor made of paper and cardboard
That is, this is all that does not hang on the tree, but with its presence creates a feeling of celebration. What decorations can be made from paper? For example, making gnomes is very easy.
DIY New Year's gnomes made of paper
To create these New Year's gnomes, we took a couple of sheets of scrap paper. She is ideal for this type of work because she is very bright and interesting. And in the right combination we get such stylish beauties.
For work, we also used a piece of faux fur, which is well suited not only for sewing Teddy bears, but also for the beards of all sorts of fairy-tale characters. However, if this is not the case, feel free to cut the white paper into fringes; it is better to prepare 2-3 layers. And curl your beard. Same with the eyes. If there are artificial ones for toys, ok. No - that means cardboard and a marker will help)))
Now watch the master class itself, how we made New Year's gnomes from paper
If you don’t want to mess around with glue, then origami will come to the rescue. Yes! Dwarfs, as well as Santa Clauses and much more can be rolled up from one or two sheets of ordinary office paper. I will not insert other people's master classes here. If you are interested, there are quite a few video lessons that are easy to find.
DIY Christmas tree made of cardboard
On the topic of green (and not only) beauties for the New Year and the fact that there are never too many of them - I have already done a separate master class here: DIY Christmas trees . But I have long been eyeing the plywood Christmas trees that usually decorate tables in coffee shops and restaurants. They are stylish and environmentally friendly.
However, with a little handicraft thinking, it would be too easy to buy such a ready-made Christmas tree in a store. Therefore, I decided to build a similar one, but from my favorite bookbinding cardboard. How a Christmas tree was born from cardboard with your own hands - see in the master class below:
Options for crafts in the origami style
The most popular and easy-to-make paper toys using the origami technique:
- butterflies;
- house;
- boats;
- rocket;
- airplane;
- crane;
- rose;
- heart;
- swan;
- flower.
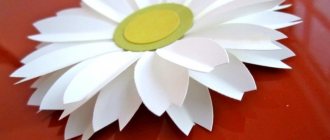
Origami rose for beginners
When spring comes, you want to decorate your home with something beautiful. Below is a master class on making a simple rose:
- Fold the original square in two, unfold it and make the transverse side in the same way.
- Fold four corners towards the center to create a basic pancake shape.
- Rotate the square 90 degrees, fold the workpiece again in the form of an envelope, which should turn into a “double pancake”.
- Fold all the corners, iron the folds well and begin to unbend the petals.
- Sequentially bend the vertices of the triangles of each layer, screw the edges onto a pencil.
- Give a sheet of green paper the shape of a “kite” - bend it in half diagonally and straighten it.
- Fold the upper and lower sides to the central axis, connect the origami toy along the longitudinal line.
- Bend the sharp corners of each side up, straighten and glue the leaves to the back of the flower.
You might be interested in How to knit a baby doll jumpsuit using knitting needles, crochet
Finished origami rose
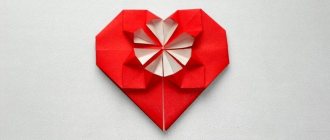
Origami heart
Step-by-step instructions on how to make a 3D origami heart:
- On a paper base, using a pencil and a ruler, draw a rectangle in a 2:1 ratio.
- Fold the sheet diagonally and unfold it - you should get two cross-shaped lines.
- Fold one of the sides along crossed lines towards the center point, and do the same at the other end.
- From the center, wrap all the elements to the edges, open the resulting flaps and tuck one of the sides.
- Turn the workpiece over, bend each corner, and turn it over again.
- Open the additional eight valves one by one and carefully tuck them in.
Origami heart