Chamomile is the flower that is ready to awaken tenderness and evoke a serene smile. The yellow center and white petals look equally beautiful both in a bouquet and on a card as decoration. In our article we will look at how to make a daisy out of paper. Involve your child in this activity, and you will not only have a good time, but also be surprised at the results.
Paper chamomile
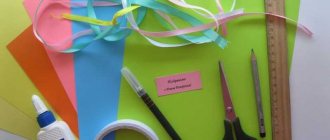
If you decide to get to work immediately, have the following ready:
- yellow paper;
- white paper;
- glue.
Option 1
- Cut out several yellow circles, about 3-4 cm in diameter.
- Cut out 9 white stripes, up to 1.5 cm wide and 9-10 cm long.
- Fold the strips in half and glue them together.
- Glue each loop in turn to the yellow core. After all the petals are glued, apply glue to another yellow circle and place it on top of the first one, pressing down.
Chamomile is ready. Approximate time spent on work is 10 minutes.
Option 2
Place the following materials and tools at your workplace:
- white paper;
- yellow paper;
- a simple pencil;
- ruler;
- scissors;
- glue.
How to do?
- Cut out a circle from white paper.
- Find the center and put a point there.
- Using a ruler and pencil, draw a circle. These will be the petals.
- Trim the ends into a semicircle. Using some non-sharp object, lift the middle of the petal, pressing it in this place. Then use a brush to twist each of them a little to give them volume.
- Cut out several squares from corrugated paper, crumple them into balls and glue them in the middle.
Approximate time spent on work is 20 minutes.
Option 3
Prepare:
- yellow paper;
- white paper;
- scissors;
- toothpick;
- millet.
Progress:
- Trace the cup several times on white paper.
- Cut out the resulting circles.
- Fold each of the circles several times, and then cut out a heart-shaped figure on the edge and make cuts to form the petals.
- Twist the petals onto a pencil to make them more voluminous.
- Apply a little glue to the middle and sprinkle with millet. The middle will look like a real flower.
The middle can be made in another way. For example, cut a long strip of yellow paper and make a fringe. Then twist the strip onto a toothpick and pull it out. Glue the ends (on the side where there are no cuts) in place of the core, straighten the fringe.
Chamomile is ready. Approximate time spent on work is 25 minutes.
Option 4
Grab some watercolor paper, scissors, and a steamer and get to work.
- Draw a circle on a piece of paper, cut it out and cut a little at the top, bottom and sides.
- Divide each part into an equal number of lines and make cuts again.
- Use scissors to form petal shapes from the cuts.
- Place the flower on medical oilcloth. Place the rounded lid on the steamer and gently roll over each petal until it is slightly rounded and raised.
- Turn the other side of the workpiece towards you, press the middle with a steamer.
- Take watercolor paints and add a bluish tint to the edges of the petals.
- Cut a circle out of yellow paper and glue it into the middle.
The work is done. The approximate time spent on making chamomile is 30 minutes.
Step-by-step instructions with photos
So, let's begin our step-by-step master class on making paper daisies with your own hands. Go!
Step 1: Cut out the pieces
Using the template, cut out shapes from white and yellow paper. To create one flower you will need two large circles of white petals, two small circles of yellow petals and one yellow stripe.
Step 2: Make the fringe
Using scissors, create a thin fringe on the yellow strip. Twist the fringe into a curl and glue the ends together with glue.
Step 3: Make the Middle
Adjust the fringe by cutting off its top and sides. The most realistic looking fringe is in the shape of a dome. Fold the fringe strips from the center to the outside.
Step 4: Cut the Petals
Cut the circles of yellow petals into 3 equal parts as shown in the photo. In total, for one flower you should get 6 such parts.
Step 5: Glue the Pieces
Glue the yellow petal pieces into the center of the circle of white petals. Place the yellow pieces overlapping each other. Glue a curl of fringe to the center of the yellow parts.
Step 6: Glue the Center
- Glue the fringed petals to the center of the second white circle of white petals.
- Cut out a circle from white paper. Make a cut in this circle until it reaches the middle.
Step 7: Make the Stem
Apply glue to the back of the flower and glue the wire. Cover the wire with a white circle with a notch.
Corrugated paper chamomile
To make a daisy from corrugated paper, prepare the following for work:
- corrugated paper (white and green);
- yellow threads for yarn;
- sewing yellow threads;
- thin wire;
- scissors;
- paper clips.
- To make the center, take the yellow yarn and draw it 15 times around 2 fingers. Then remove it from your fingers and tie it with thread. We cut off one side of the core and stretch the wire through it. We wrap all this with green corrugated paper.
- Let's start with the petals. Cut out rectangles of white paper, 15 cm long and 5 cm wide. Fold them in half and secure using clamps. From petal to petal there should be at least 0.6 cm, while their length is at least 3.7 cm. Remove the clips, cut out the petals and use scissors to give them the appropriate look. Wind the strip onto the stem and secure with glue.
- Make a sepal from green paper. Cut strips 1 cm wide, 5 cm long, wrap the stem near the base.
Approximate time spent on work is 30 minutes.
From a paper accordion
In this tutorial we will show you how to create a daisy using an accordion.
Everyone knows how to fold an accordion; to do this, you need to draw the paper into equal parts using a ruler and pencil, and then bend the paper along the resulting lines, first in one direction and then in the other direction. To get a shaped part from a paper accordion, you need to straighten the sheet and create a fold in the right place.
After this, fold the accordion again, setting the direction at the desired angle from the fold line. Its size may vary.
Related article: DIY candles from wax crayons at home
By rotating the accordion plane, the direction of the folds is reversed.
Another option and description of the work step by step. It will require:
- white, green and yellow paper;
- wire;
- scissors;
- glue stick.
Take a white sheet and cut out a rectangle ten by eighteen centimeters. We fold it like an accordion and then level it.
We take yellow paper and cut out a strip of three and a half by eighteen centimeters, glue it into the middle of the white sheet, as shown in the photo above.
Now we assemble the sheet into an accordion again. Take scissors and trim the edges, rounding them.
We take our workpiece with two fingers in the middle, and then glue the edges alternately on each side. It turns out to be chamomile. Now you need to make the stem and leaves.
Take green paper and cut out two squares six by six centimeters, eight by eight and nine by nine. We fold the leaves using the same method and attach them to the wire.
The length of the wire should be approximately 25 centimeters; you need to wrap it with floral tape in advance. Then we attach the flower and leaves to it. This makes a wonderful chamomile.
Modular origami
To make a daisy using the origami technique, prepare white modules (64 pieces) and yellow modules (42 pieces). Their length should be approximately 5 cm and width about 3 cm.
When starting to work on the first and second row, you will need a total of 28 pieces of modules (14 for the first row and 14 for the second row). Next, combine them along the longer side. We dial the same amount for the 3rd row, we act on the same principle, but this row needs to be closed. This will give you the center of the flower. For the 4th row, you will again need 14 white modules.
The petal will consist of 7 pieces of modules. First, take 1 module, put 2 on it, and then 1 again. Repeat the steps. Make 7 petals and place them in the middle of the module. Wrap green paper around the wire and insert it into the core.
The approximate time spent on making chamomile is 30 minutes.
Simple application
Creating such daisies using the origami technique is very simple, and this activity will not take much time.
To work you will need:
- squares with sides five centimeters made of white paper;
- green paper;
- brown paper;
- colored cardboard;
- yellow paper napkin;
- scissors;
- glue.
This kind of work will be very interesting for children.
First, fold the sheet in half.
Fold the resulting triangle in half and unfold it back.
We turn the workpiece so that the corner faces down.
We fold both sides, connecting them to the fold line.
Then we turn the workpiece and bend the corners.
We turn the workpiece back, and now the first petal is finished. You will need eight such petals for one rose.
Related article: DIY felt angel for a Christmas tree: master class with patterns
Then we take a napkin and form a yellow core out of it.
Now all that remains is to collect the flower.
We assemble the entire composition on cardboard and glue it.
Below are diagrams for creating daisies using this technique.