Crafts paper angels, photo 5 options
Paper is the most affordable material, and it will be the easiest to make angel figures from it. These can be flat or three-dimensional angels made in different techniques.
You can do them using:
- napkins;
- standard writing paper;
- paper for crafts - colored, velvet or embossed;
- cardboard;
- blanks for quilling.
Who invented paper angels
At the beginning of the twentieth century in Russia, the artist Vladimir Andreevich Favorsky voiced the idea of cutting out figures of angels from writing paper
. The material, very thin and light, made it possible to create truly airy figures, which was a very beautiful and symbolic decoration of the house before Christmas. Angels represent love and kindness, warmth and light, so creating such a toy for the Christmas tree quickly became a family tradition in many homes.
Today, the original patterns of angels made from cutting paper have not only acquired new features, but also acquired many different interpretations.
How to make an angel out of paper master class
To make a figurine of an angel out of paper, as in the photo below, you need:
- cut a circle from thick paper using scissors with curly blades;
- cut it into 3 segments, so that one has the shape of an isosceles triangle, and the other the shape of a wing;
- glue the wing parts to the triangle;
- cut a small circle from flesh-colored paper and glue it to the top of the triangle. The angel is ready.
Another version of the angel can be glued from colored paper. To do this, you need to prepare parts similar to those shown in the figure below.
It's even easier to make an angel by printing the template below. Transfer it to cardboard and cut it out. By making notches along the lines located on the back of the figure and on the wings. Attach the wings to the angel's back.
You can make a cute garland yourself from paper angel figures by cutting them out in sufficient quantities according to templates and stringing them on a thread.
Another garland option that does not require stringing. It is enough to fold the paper like an accordion and transfer the design from the template onto it. Cut and stretch the garland.
The video below demonstrates how to make a charming envelope in the shape of an angel.
DIY New Year's angel figurine
An interesting master class will allow everyone to make an elegant figurine of an angel with their own hands. To do this you will need two openwork napkins, a beautiful golden thread (twine or iris) and a little patience.
Step-by-step master class (MK) for beginners:
- Fold one napkin and glue it together to form an even cone.
- Cut the second napkin into 6 pieces.
- Roll up the two small pieces and make two cones out of them. These are hands.
- Leave the other pair of small parts unchanged. These are wings.
- All that remains is to make the head. Roll one of the remaining small pieces into a round ball and wrap it in the second piece (the last one).
- Glue the head to the upper sharp part of the large cone.
- Glue the arms to the sides and the wings to the back.
- Tie a golden thread around the angel’s head, then pass its ends under the wings and under the arms.
- Secure the ends of the thread under the wings so that they are not visible.
Instead of napkins, you can take two round pieces of corrugated paper. Some craftsmen glue colored paper or pieces of foil to the bottom of the cone. A large white bead can replace a paper ball, but it must be secured well.
You might be interested in making your own butt dolls from nylon
If the napkin turns out to be too soft, you need to make a frame for a large cone (skirt). You will need solid copper wire. It needs to be rolled up in the shape of a triangle, suitable in size.
Attention! There is no need for a frame for the arms, but it is very important to glue them tightly to the figure.
Multi-colored paper angels
Paper angels templates for cutting, print and cut out photos 5 options
The process of making angels will become even easier if you use ready-made templates. To do this, you need to print them on a printer using colored, embossed or plain white paper, and then cut out along the contour. You can decorate a window or wall with individual figures and use them to create cards and garlands.
DIY angel wings, step by step with photos
Wings are an invariable attribute of an angel costume, used for children's matinees, school plays, New Year's masquerades, and photo shoots. You can make them yourself by making a wire frame and covering it with white fabric or cutting out a template from cardboard and pasting it with paper. For the wings you will need:
- wire or 2 wire clothes hangers;
- a pair of white stockings or tights;
- white feathers of varying lengths;
- hot glue;
- pliers;
- wide elastic band.
The manufacturing process is not complicated and does not take much time
- Make a base for the angel wings using wire or wire hangers. To do this, you need to bend them with pliers, giving them the desired shape. Fasten both halves of the wings together.
- Pull the stockings onto the wire form and secure them. Instead of stockings, you can use thin fabric.
- Use hot glue to secure the feathers, placing them in rows and working from bottom to top. For the bottom row, use the longest feathers, then go up, use smaller feathers.
- Sew fixing straps of the required size to the underside of the wings, using a wide elastic band.
The diagram below for the step-by-step production of wings for an angel will serve as a hint and help you navigate.
In the absence of real feathers, to make angel wings, you can use strips cut out in the shape of feathers from paper or white fabric, as shown in the photo below. If the wing feathers are cut out of fabric, they can not be glued on, but hand-sewn with stitches to the base.
If angel wings are part. children's costume, they can not be covered with feathers, but decorated with beads and patterns made using paint or decorative glue.
Another version of wings for an angel can be made using a cardboard blank as a base, onto which pre-cut paper feathers are glued on top.
Volumetric angels
The next most difficult are voluminous paper angels. When making them, you already need to show some ingenuity. Here, there will probably already be a clear sequence of actions, the implementation of which is necessary to obtain the result.
First of all, you will need to print out a paper angel stencil on a printer or draw it by hand directly on the sheet that you are going to use. Then, carrying out strictly sequential actions, such as cutting, bending, folding, gluing, you will ultimately give the angel the necessary three-dimensional shape.
In the end, all that remains is to decorate the angel at your discretion and carefully glue a loop of lace or ribbon to it.
To make such angels you will need:
- template, stencil crafts;
- scissors;
- thick paper, whatman paper (or any paper you like);
- a beautiful ribbon or cord for hanging;
- paints, pencils, crayons;
- multi-colored glitters;
- tape (transparent and colored, with pictures).
As mentioned earlier, there are many more ways and options to make an angel craft. There are complex and cumbersome designs that combine many paper elements and parts, requiring extraordinary knowledge and skill from their creator. We have already looked at two simple types of crafts that even a child can handle.
In any case, whatever type of paper angel craft you choose, it is guaranteed to be a wonderful time spent. Fantastic opportunities will open up for you to decorate your personal angel as your heart dictates.
The main thing to remember is that you are not just making a craft, you are creating an angel. It is unlikely that anyone will dare to challenge your vision of the image, unless he is the one who saw a living angel with his own eyes or is one himself.
Origami paper angels, detailed instructions with photos
Origami is the art of folding various paper shapes. The photo below demonstrates the possibilities of creating angels using this technique.
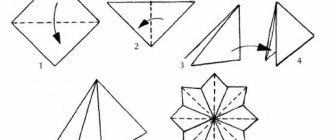
To fold an angel figurine yourself using the origami technique, you can use the following diagram.
To create such an angel, you will need to take a square sheet of paper and fold it diagonally - you get an isosceles triangle. Bend this triangle once again diagonally, and then unfold the last fold. The fold line visible on the part indicates the center line of the triangle.
Fold the corners of the triangle towards the center, forming a square.
Turn the square piece over, with the folded corners facing down. Using a pen, mark the points at the top corner so that they are located between the edge and the center line.
Fold the right corner, directing the edge to the intended point and releasing the previously folded triangle.
Return the triangle to its original position and repeat the operation, but with the left corner.
Make a fold by pulling the corner of the right triangle so that the left edge of the fold lies directly on the center line. Repeat the same on the left side.
Bend the right triangle so that its bottom edge lies on the center line. Repeat the same on the left side.
Fold the resulting side corners, directing them towards the center, but not reaching it by 0.5 cm.
Unbend the right corner and bend the side triangle inward. Do the same on the left side
Turn the workpiece over and fold the top right piece so that the fold line runs from its top to the edge. Then do the same to the left. In this case, it turns out that their free edges overlap.
Bend the corners of the overlapping parts, aligning the fold along the center line.
Taking the paper craft in your hands, bend the edges of the wings on both sides.
Turn the workpiece over and bend the triangles at the bottom inward.
Place the workpiece on the table, turn the wings up and bend them, pointing the lower parts of the wings towards the center.
Lower the wings down. Turn the workpiece over. stretch the folds at the top of the workpiece, forming an angel's hood.
Use your fingers to add volume to the figure and spread the wings. The angel figure is ready.
Using the origami folding diagram presented below, you can independently make another original angel figurine.
In the video below you can watch an origami angel.
Paper Christmas Angel
The easiest way to make an angel out of paper is accessible to all ages. To make your next Christmas angel, you only need scissors and an A4 sheet of paper. The resulting figures can be used to decorate a room by hanging them on windows, walls, or even on a chandelier. To make such an interesting decoration
You can use a special angel stencil, which will make cutting faster, or show your imagination and create your own unique angels. Whatever method is chosen, the instructions for making the craft are the same:
- A sheet of paper of the selected format needs to be folded in half and on one of the resulting sides draw half of an angel: a wing, part of a halo and a dress.
- If desired, the dress and wings of the figurine can be decorated with small stripes at the ends, which can later be wound onto a pencil and make the angel more voluminous. There are no restrictions in choosing the shape of the wings: everything depends only on the imagination and skills of the person making the craft.
- After cutting out the parts, unfold the piece of paper and lower what was supposed to be the halo down. Thus, the halo will turn into hands folded in front of the angel's face. The resulting decoration will look interesting together with several more of these angels flying on a thread under the chandelier.
You can also hang Waldorf angels
, whose stencils can be easily obtained on the Internet or drawn yourself.
In such angels, a small incision is made in the back area, as well as on the wings, which are subsequently connected, and the angel looks three-dimensional. To make crafts,
cardboard is usually used, which is famous for its higher strength, but paper can also be suitable for a Waldorf angel.
Paper angels stencils for cutting, print, 5 options
Using the stencils presented below, you can easily make a variety of angel figures. To do this, stencils can be transferred to paper or immediately printed in the required quantity, and then cut along the contour. Such figures are an excellent decor that can be used to decorate windows, create postcards and panels.
Everyone's favorites
Everyone likes angels, everyone loves angels. They are always welcome both on the New Year tree and when decorating a room for a birthday celebration. There is nothing to think about Easter and Christmas. Here, as they say, God himself commanded.
Even on weekdays, you see, a charming angel floating carefree under a chandelier or cornice will add tenderness and warmth to your everyday life and make you smile once again.
There are a huge number of varieties of these cute heavenly creatures. Just look at photos of paper angels on the Internet. The number of them can make your head spin.
Huge variety: from angels of very complex designs, the production of which takes several hours, or even days, and requires a master class, to very simple little angels that can be made in a few minutes.
Angels made of colored paper, step by step with photos
Quickly and easily make a stylized angel figurine, similar to the one shown in the photo below.
To do this you will need a sheet of colored paper, glue, pencil, ruler and scissors.
Using a ruler and pencil, draw on a sheet of paper 2 squares measuring 12x12 cm and 2 strips with a length equal to the length of the sheet and a width of 0.5 cm each. Cut them out with scissors. These are the parts from which the angel will be made. Bend each square in the form of an accordion with a step width of 0.5 cm.
Place both accordion squares together. Stepping back from the edge by an inch, bend both parts, thereby separating the wings from the angel’s skirt.
Putting one of the parts aside, glue the inner edge of the wing and skirt together for the remaining one. Repeat the same operation on the second part.
The next stage is making the angel's head. To do this, roll one of the thin strips into a spiral, periodically covering the strip with glue. When it is completely twisted into a spiral, take the next one and gluing it to the edge of the previous one, continue twisting the spiral. When a piece of strip 10-12 cm long remains untwisted, make a loop 2-3 high, as can be seen in the photo below, and fix it by gluing the rest of the strip to the twisted spiral so that a free tip about 5 cm long remains.
Glue the 2 halves of the angel's skirt together, placing the free tip of the spiral between them. thus fixing the head above the skirt and wings.
After the glue has dried, straighten the angel's skirt and wings. The figurine is ready.
The video below demonstrates how to make an angel figurine without using glue.


