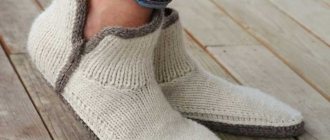
House slippers made from an old sweater
A thrifty housewife never wastes a single old thing. Especially, such a multifunctional item as a worn sweater, from which, among other things, you can sew cute slippers-boots.
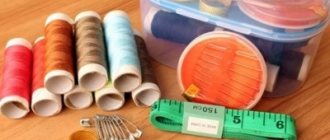
To work you will need:
- Basic cutting and sewing tools
- Sheet of cardboard and pencil
- Double-sided tape (optional)
- An old sweater (it is advisable that the fabric does not fray too much when cutting)
Place your foot on the cardboard and trace its outline with a pencil. Add 1.5 cm along the perimeter of the outline to the seams and cut out the patterns. Do the same with the other foot. When both pieces are ready, place them on the sweater and cut out similar pieces of fabric. To prevent the cardboard from slipping while working with the material, it can be secured with double-sided tape.
Now measure the length of the top of your future boots. To do this, insert your leg into the sleeve of the sweater and pull it to the required height, then carefully cut the sleeve off near the floor. Do the same with the other leg.
Next, fasten the fabric foot with the corresponding sleeve boot using sewing pins. First, connect the blanks where the big toe should be, then at the heel, and then stretch the bottom of the boot as far as necessary to pin together the sides of the slippers. Sew as shown in the photo below:
Master class No. 2
From the same sweater and a piece of felt you can make more familiar, “classic” slippers.
Exactly as in the previous case, outline and cut out patterns for the feet from cardboard. Then transfer them to felt and cut out 2 blanks for each leg - one of them will become the sole, and the second will become the insole.
Next, place the patterns on the sweater, stepping back from its bottom edge by about 3 cm, and outline them as shown in the photo. The distance between the line and the top point of the insole (where the big toe will be) should be about 2 cm (more on the sides). Do the same manipulations with the remaining patterns.
Glue the felt blanks to the front and back sides using double-sided tape.
Try to keep the edges of the felt insoles as close as possible.
Stitch or stitch in the round, placing right side up.
Now you need to sew the upper part of the slipper (the one that covers the top of the foot). Measure approximately 12 cm of the sleeve, starting from the cuff, and cut it off. Sew up the cuff and round the opposite side of the piece so that it is shaped like half an egg.
Make another similar blank. You should end up with two pieces of fabric with felt insoles sewn on both sides and two “caps”. This is where the preparation ends and you can start stitching the fragments together.
Place the cap on the front side with the sewn insoles. Its top should coincide with the center of the rounded side. Sew them together at this point.
Then slide the cap down 2.5 cm and sew the corners of the cap and the sides of the fabric with the insoles together. Make a couple more stitches halfway from the top of the cap to the corners.
Next, sew both pieces in the round, moving from left to right and evenly picking up the excess fabric around the insoles into the stitch. Thanks to the stitches you made earlier, this will be easy.
Turn the resulting structure inside out so that all the seams remain inside the sneaker, and make two cuts on both sides of the heel. The cuts should end a few millimeters from the felt insole.
Now form the heel from two side flaps, carefully straightening the central one from the inside. Make two vertical stitches about an inch apart to secure the side pieces of the heel, and then another along the insole. Repeat the same with the second slipper.
And finally, the final touch is the lapels.
Trim the bottom edge of the sweater in a circular pattern. Fold the raw edge under so that the ribbon is approximately 5cm wide. Then cut it in half, preferably along the side seam lines. Secure a few pieces of double-sided tape to each half.
Wrap the strip around the edge of the sneaker and secure with a couple of stitches so that it does not slip or dangle. Accordingly, fasten the second strip to the second sneaker. Ready!
How to make a pattern for boots
After the block is ready, you need to start creating a pattern.
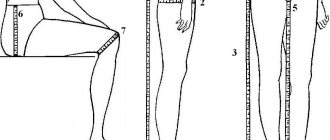
The easiest way to make an insole is to draw it along the contour of the foot. It is important to take into account the shape of the sock and the fact that the finished shoe should be slightly longer than the foot itself. The construction of the pattern for the upper part of the boots begins with measuring the foot in several places. For this, it is best to use a flexible tailor's meter. Having the results of measurements before your eyes, you can draw a shape. It is also necessary to measure the height of the backdrop.
The external and internal parameters must coincide with the external and internal contours of the insole; if this is not followed, it will be difficult to sew the shoes. To build a cutout you need to measure the depth from the toe to the instep. To construct a schematic image of the boot, you need to measure its width in several places, taking into account the lock, and then draw a part of the required length.
Important! Paper patterns need to be applied to the foot or last. If you need to make a looser fit, the pattern can be made a little wider. In this case, you will need to select a lining under the top layer of leather.
Felt slippers
Using a similar set of tools, you can sew slippers only from felt. Moreover, you will not have to process the seams, since this material does not fray when cut, which means the work will take even less time than in the case of a sweater.
So, stock up on a piece of colorful felt, some laces, and some basic sewing supplies.
First, cut out the insole from cardboard, as described above. Don't forget to allow seam allowance (approximately 1 cm). After this, place the insole on the felt, outline and cut out the workpiece according to the following pattern:
- The distance from the top of the insole (i.e. the big toe) to the edge of the fabric is 2.5 cm
- The distance from the sides of the upper part of the insole to the edges is 3.5 cm
- The distance from the insole to the sides of the rectangle is about 8 cm
- The distance from the bottom point of the insole (i.e. the heel) to the edge of the fabric is 1.5 cm
Remember, it's better to leave a little extra material that can be removed later than to cut it off end-to-end and ruin everything!
Proceeding in this way, make two identical blanks.
Next, roll them up as shown in the diagram:
- Fold the piece in half, staple and stitch the two halves along the heel and curved part of the toe.
- Now you need to round the heel. Without turning the slippers right side out, press and stitch the right angle between the foot and the heel (see photos 3 and 4).
- Turn right side out and fold back the top of the boot. (see photos 5 and 6)
- Fold the very tip of the sneaker up so that the corner coincides with the middle seam, and secure it with an X-shaped stitch.
To thread decorative laces into the boot, make a few marks with chalk or a disappearing tailor's marker, about 1 cm from the top edge of the lapel. Then pierce the cuffs along with the boot, following your marks, and thread the laces through them. Large wooden or plastic beads can be attached to the ends of the laces to give the entire structure a finished look.
Your slippers are ready!
DIY bunny slippers
Bunny slippers are a classic, but do they all have to look the same? Why not take a common model as a basis, but make something of your own as a result?
For example, here are these cute house boots with applique:
During the work you will need:
- Old wool sweater
- Patterns (finished samples can be found here)
- White and pink felt
- Thick, non-slip fabric for hemming sneakers at the bottom
- Thread, needle and other basic sewing supplies
At the link above you will find samples of patterns for cutting out applique details. They can be proportionally increased or decreased if necessary, just do not forget to leave seam allowances (approximately 1 cm on all sides of the part).
The sweater should first be washed in hot water and then dried in the dryer (or directly in the washing machine) so that it shrinks and feels as much as possible. If after drying you still see loops under the pile, repeat the entire procedure again.
Materials for making home slippers
You can make your own slippers from a wide variety of materials: thick fabric, old jeans, felt, felt, fur, leather, even from an old sweater.
These materials will go to the top of the slippers and insoles.
For slippers you will also need:
- linoleum or thick leather for the soles
- foam rubber 10 mm thick.
- corrugated cardboard from a box
- awl
- scissors
- pen and marker
- glue
- hook and thread.