Rating: 4.67/5 (3)
If you want a truly exclusive decoration, make it yourself! Today we will talk about earrings, or more precisely about how to make earrings from beads and beads with your own hands, using weaving patterns.
When doing beading, you can use a thin needle for bead embroidery or just use thread, depending on what is more convenient for you. When creating earrings, you can choose any color of beads you like so that the jewelry harmonizes with certain clothes, shoes, handbags and other accessories.
Features of beading and jewelry creation
Beads are small beads made from various materials, it can be glass, plastic, or metal. In addition to the most familiar, round beads, in the assortment of specialized online stores that sell everything for creativity, you can also find oblong tubes or bugles.
The variety of geometric shapes and different sizes, shades and color schemes helps you choose the necessary materials for creativity. In addition to fishing line, strong threads and silicone rubber bands (for stretchable wrist bracelets or rings) can be used to form the finished product.
You can reproduce the original design and create a unique decoration using thin metal and decorative wire. And to complete the jewelry, you will definitely need special fittings, hooks and nails, locking rings and chains, pendants and other accessories.
Choosing a design for earrings made of beads
Making beaded earrings with your own hands is not difficult, but mastering simple techniques will require a little practice. This will help you quickly and easily implement any chosen idea, and it could be the design of similar products, or a truly exclusive idea from a master.
Each pair of earrings created by craftsmen at home is distinguished by its originality and uniqueness. It is quite difficult to match other jewelry with such jewelry, but using beads and acquired skills, you can create masterpieces that will become a full-fledged set.
Bead selection
When visiting a store selling weaving products, you should control yourself, because the wide selection of products can make your head spin.
Matte, with sparkles, long, short, small, large, like pebbles and pearls have different colors with unusual coating - the choice of material can take a long time.
To make your search easier, you should turn to professionals; with their help, you can choose beads faster. Accessories for needlework are divided into:
- bugles (elongated tubes);
- beads (standard round shape);
- Charlotte (round with a flat side);
- cutting (short faceted tubes).
After purchasing everything you need, you can begin to study patterns for making beaded earrings.
Read here DIY kite - diagrams and step-by-step instructions on how to make a kite. 115 photos, diagrams and drawings of kites
Different techniques for using beads in work
Working with beads is very simple; it is an amazing material that opens up new possibilities for the creative process. There are several simple and easy techniques that any home master can master in a fairly short period of time, after a little practice:
- weaving on regular fishing line, thread or thin elastic;
- using wire and glue to create compositions;
- gluing beads to a pre-prepared base.
Finished beadwork, earrings and other jewelry can be additionally decorated with decorative elements. But the most beautiful decoration for such products remains a geometric or elaborate pattern, formed by alternating different colors and shades of the material itself.
Peacock earrings
What makes these earrings different is that the quality of the beads you use will determine the beauty of the earrings. Ordinary beads will not suit us, because the peacock will look more like a chicken. Therefore, we will need Czech cutting or other higher quality beads.
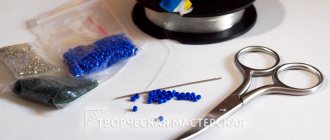
For our earring we will need:
- white Czech cutting or Japanese beads;
- bicones red;
- gold beads;
- blue cabin;
- bottle-colored cutting;
- bead needle;
- white nylon thread.
Weaving will consist of two stages. The first stage will consist of the peacock itself. The second stage we will sew on his tail. We start weaving from the bottom up.
We collect two white beads and lower them closer to the beginning of our thread. Next, we pass these two beads with a needle from the same side. We tighten the thread and fold the two beads so that they are side by side. Then we pass the needle through one bead again and again through the second. Next, we collect one white bead and pass the second bead from the bottom with a needle. We tighten the needle and get three beads in a row, which touch each other on their sides.
Then we pass the needle into the bead that we collected. We collect one white bead again and thread the third bead from the bottom with a needle. Next, we pass the last bead with a needle and tighten the thread. We get four beads in a row. We collect a white bead again, pass through the fourth bead, then through the third, second and to the first bead in a zigzag. We covered the first row of our peacock.
Let's move on to the second row. We collect two beads and thread a needle under the thread that connects the first and second beads. Next, we pass the needle through the second bead of the third row. We tighten the thread and get the base of the second row. Next, we string one bottle-colored bead and thread a needle under the thread that connects the second and third beads of the first row. Now we thread the needle through the bottle-colored bead.
Next, we string one white bead and thread a needle under the thread that connects the third and fourth beads of the first row. Then we thread the needle into the bead that we collected. We string one white bead again and thread the needle under the next thread. Then we tighten the thread and thread the needle through this bead. We complete this row by picking up one white bead and threading the needle through the last bead of the first row. Without picking up a single bead, we return to the last bead of the second row.
We are expanding our ranks. Therefore, first, two beads are collected. We collect white and bottle and do everything the same. Next, take the white ones one at a time and weave them in a row. When there are two beads left to weave, we pick up one bottle bead and weave it into a row. Then we take the white one and finish this row with it in the same way as the last one. We start the fourth row with two beads. This series is also being expanded. Insert bottle beads as in the photo. Also do the fifth row. It is also undergoing expansion. We do the same on the sixth and seventh rows.
We make the eighth row with the same number of beads as on the seventh. Visually, the row will be shifted to one side. On the last bead of this row, we thread the needle under the thread that holds the last two beads, and pass the needle back through the same bead.
Let's move on to the ninth row. We start again with two beads and then everything follows the pattern. This series is again being expanded.
The tenth is only decreasing. We take only one white bead and pass the needle under the thread between the first two beads of the previous row. And we thread the needle through our bead. Then you continue according to the old scheme.
The eleventh row is the same as the tenth row in terms of the number of beads, but is slightly shifted to the side. And add the appropriate colors, as in the photo. The next row is descending. At the beginning we string only one bead. The thirteenth also comes with the same number of beads as the tenth. With an offset on the last bead.
The fourteenth and subsequent rows only go in descending order until there are three beads left in the row. Next we need to make several rows of three beads per row. To do this, we string first two beads according to the pattern, and then one. On the next row we string one at a time. On the new row we again dial two, then one.
Next we make a row with the beak. We start with one bead. We make a row of six beads. Then we go through the entire row with a needle in a zigzag pattern. Then a row of five beads in descending order. The row runs down the center. The next row is also in descending order. Consists of four beads. Then a descending row of three beads. Next we make the crown with decreasing, expanding and again decreasing rows. The crown consists of five rows.
Next, we sew the earring ring to the thread on the last row and close the thread along the contour of the peacock and burn its end.
Unusual and original ideas for earrings
To create bright and stylish beaded earrings, you need patterns and design ideas that can represent different styles. When choosing an idea, you need to understand which ensemble they fit into and whether they will match the style and image of the person, especially if you are creating a gift with your own hands.
The brighter the design of the jewelry, the more attention it will attract to its owner, which is why it is so important to choose interesting and unusual ideas for the creative process.
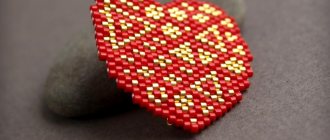
Large diamonds with a pattern
Large earrings are suitable for high hairstyles and raised strands that expose a girl’s neck and shoulders, and they can be worn to any event. Such decorations are made using the weaving technique; the size and shape of each model can be different; the canvas itself can be decorated with an interesting and thematic pattern.
Geometric earrings with fringe
Triangles and circles, ovals and crescents with beaded fringe look exquisite in the image of a modern girl or woman. Depending on the chosen shape and color of the material, you can emphasize the delicacy and sophistication of the style, give it dynamism, due to darker shades and additional length of the fringe.
Wire earrings of different shapes
Well-bending wire allows you to create airy and graceful decorations, and the base itself can be completely covered with beads. Beautiful stars, ovals and voluminous balls, intersecting figures can be easily decorated with beads with a metallic sheen; decorative and colored wire is chosen for such decorations.
Beaded earrings using simple manufacturing techniques
When creating a gaitan, earrings and a beaded bracelet with an authentic theme, you will have to use all your skill and perseverance, strictly following the patterns. Before starting such a large-scale work as making gerdans and ogalals, it is better to practice creating simpler and lighter jewelry.
Simple jewelry looks no less attractive than complex products, and after mastering the basic techniques for working with available materials, you can move on to creating complex crafts.
Stacked stripes
The simple design of these earrings will fit into any look, and carefully selected color combinations will help enhance their aesthetics. Wide and narrow strips of beads on a fishing line can be decorated with geometric patterns with a combination of different shades of beads, most often this is a decor of spades.
Beaded beads
An ordinary round blank or a fairly large wooden bead can be glued with small beads of the same color. This painstaking task will help you create original and incredibly attractive jewelry with a classic design that fits any style of clothing.
Delicate pendants
You can replace fairly massive and heavy beaded tassels on a fishing line with delicate and sophisticated earrings in the form of pendants. At the end of each pendant you can attach small beads of a certain shape, it can be a cube or a heart, which will emphasize the elegant design of the finished product.
It is easy to weave beads into blanks for making earrings of different shapes and sizes, distinguished by an exquisite exclusive design. Beads go well with decorative materials such as beads and ribbons, special wire for crafts and creativity.
It is easy to experiment with and reuse in other jewelry, and after the creative process is completed, the finished products can easily replace expensive jewelry.
https://youtu.be/WH9r8o_wEy0https://youtu.be/dbe5RT8sors
_
Patterns for weaving earrings from beads
Have you tried creating such a decoration yourself? Start creative experiments by studying the simplest patterns of beaded earrings, which are supplemented with photos for a better understanding of the task. Having mastered the basic techniques, try to cover external elements from the outside or sheathe them, work with several types of base (thread with fishing line, etc.). The number of schemes suggested below is enough for the initial stage and development of your imagination. Playing with the color of the beads will help add variety to these earring options.
Beaded earrings for beginners
What pattern should you use to take your first steps in the fascinating world of beadwork? Planar techniques are ideal for training. Try to weave a rectangular or square fabric from beads first, and to make it more attractive, combine several colors to create a pattern. When simple patterns are mastered, you can play with the form, and then move on to mastering volumes. Before starting work, experts recommend sketching out a diagram on paper - this will make it easier to follow.
An easy version of earrings on a fishing line and hooks:
- Cut the fishing line into pieces of 12, 15 and 19 cm.
- String 6, 8 and 10 cm long beads onto each row.
- Gather the ends to make 3 drops. Clamp and secure in the hook. Do the same for the second earring.
Simple rhombuses with a pattern can be woven like this:
- Thread a bead onto the center of the thread.
- Put 1 more on the left end, and on the other side put the right one through it. Tighten.
- Repeat the previous step until you get a row 7 cm long.
- Move in the opposite direction: pass the end of the thread with the bead through the second one from the end. Do the same for the next one and beyond.
- Continue to increase the rows until you get a square. Fix it on the hook.
Earrings Oscar
This decoration has captivated fashionistas all over the world - elegant clips on which there is a dense ball of beads, and from it a voluminous element extends - a tassel, a pyramid, a cord, an oval. Weaving Oscar earrings with your own hands is not as difficult as you might think by looking at them - the main thing is to buy good clips that have holes: through them the earrings themselves will be sewn to the mount. For voluminous parts, professionals advise not to weave them, but to sew them from felt, and then decorate them tightly with beads on top.
The technique for creating Oscar De La Renta earrings looks like this:
- Place long threads with single rows of small beads on a piece of narrow tape or cardboard. For these earrings, it is recommended to take Czech Charlotte 13-15/0. The length of the threads is selected arbitrarily. When you reach the end, you need to bring the needle back to the tape.
- Having made 17-20 threads, twist the ribbon and stitch it to form a tassel. Do not skimp on stitches - you need to secure the base well.
- Next you need to sheathe the cylinder from the tape: again collect beads on the thread in 1 row, wrap them around the base of the tassel. Secure with stitches between beads. Repeat this step until the entire tape is covered.
- The last step is a flat bead that will be attached to the clip. It is better to do it on a fishing line. Cast on 4 beads and thread the needle in the same direction through the first one. The result is a closed ring.
- Tighten the line in a knot. Moving in the same direction, take a new bead, place it between the 1st and 2nd, thread the needle into the 2nd. “Snail” add beads into the gaps one at a time according to this pattern, increasing the number of rows.
- Applying a bead of the size you need to the workpiece, “tighten” it with this bead element. The number of rows needs to begin to be reduced by adding 1 piece at a time. after each pair, when the bead is covered to the middle.
- Sew the resulting bead with a clip and the main decorative element of the earrings.
- Business ideas for beginners with minimal investment are profitable projects. How to start your own business from scratch
- Nogtivit - instructions for use
- Step-by-step wool felting for beginners
Beaded tassel earrings
Large and long earrings, similar to a broom, have become a fashionable decoration of the last year. They can be seen in the collections of famous designers, but it is much more interesting to weave tassel earrings from beads with your own hands. There are 2 ways here: make a decoration with fringe, or use only beads and seed beads. The latest version is a little more labor-intensive, but is perfect for beginning craftswomen.
To work you need to use:
- a thread;
- thin needle;
- small plain beads;
- earrings, holders;
- glue;
- narrow ribbon matching the color of the beads.
Earrings are woven very simply, since the main action you need to carry out is to string beads onto the thread. The algorithm is like this:
- Having chosen the length of the brush that is convenient for you, collect the required amount of beads onto the thread. The thickness of this part of the earrings is determined arbitrarily, but experts advise using at least 20 threads.
- Each part of the future tassel needs to be hemmed to one of the long edges of a narrow ribbon to create a fringe.
- Twist it into a brush and sew a tube of ribbon.
- Pour glue inside the holder and insert the ribbon edge there. Press and let dry.
- All that remains is to attach the earring to the holder ring, and the earrings are ready.
Long beaded earrings
This interesting piece of jewelry is reminiscent of the famous silver model from Swarovski, only there will be no stones on it. These long earrings can be woven with your own hands in an evening, and if you use several contrasting colors (green and orange, yellow and purple), you will get a great accessory for the summer. Be sure to work on thread, because... the hanging element must be flexible. The technique is like this:
- Start weaving the warp from the middle - place a bead on the center of the thread. Crossing the ends, pull them from different sides through the second one. Repeat this step until you have a row of 17 beads.
- Using a needle, thread a new bead, but pull the thread between the 1st and 2nd through the loop. Repeat to get a row of 16 beads.
- Moving along this pattern, reach a row of 2 beads. You should get a canvas in the form of a triangle. Secure the end to the earring ring.
- From the wide middle, similarly, begin to reduce the rows, but only on one side and retreating from the edge by 2 beads. On the opposite side you need to continue to increase 1 piece at a time.
- When you only have 1 bead left, you need to pull both ends of the thread through it, make a knot and pull its “tails” through the holes above.
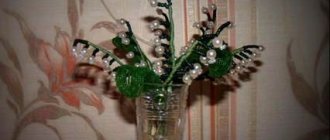
Beaded snowflake earrings
If you don't like heavy and long elements that pull down your earlobe, try making neat, light snowflakes from beads. To weave them, professionals advise using wire - with it, even the most elegant elements will retain their given shape. The beads for these earrings can be white and gold, or blue and dark blue, or tones that are not typical for snow.
Scheme of work:
- String 6 beads onto the wire, and the last wire should cross crosswise inside.
- Place a large bead on either end of the wire, and then again collect 5 beads in a row and make a circle, stretching the base through the first one.
- Repeat this step, put on the bead again and stretch the wire through the bead that is adjacent to the very first of the 6. A snowflake begins to emerge in your mind, the center of which is a circle of 6 beads, and the smaller one (5) is a ray.
- Continue steps 2 and 3 until you have a completed snowflake. Twist the ends of the wire and fix them in the earring ring.
Earrings made of beads and beads
Combining several elements always gives a very beautiful and interesting result, although the skill of combination needs to be developed in order for it to turn out harmoniously. As a practice, try weaving simple round earrings from beads and beads that look like suns or flowers. For greater attractiveness, professionals advise combining 2 sizes of beads and several shades of the same color - brick, orange, salmon as an option.
The technology is like this:
- Place enough beads onto the thread in one row to create a bead belt. Pull it into a ring and pass the needle through the hole of the bead to fasten the 2 elements together.
- For a new row, you need to string 1 (!) bead on a thread and fix it with a loop between the beads of the first row.
- According to this scheme, increase the number of beads in the rows and the rows themselves until the last number is 5-6.
- Complete the last circle with smaller beads - the row will become loose.
- Attach these “suns” to the earrings and the earrings are ready.