How to fold paper for a snowflake
The secret of this New Year's decor is to fold the sheets of paper correctly, and then cut out the snowflake with a knife or scissors. The main rule is that white sheets must be taken as thin as possible. Although many people cut out snowflakes from cardboard, putting a lot of effort and time into it. This is because the sheet needs to be bent several times and then cut with scissors or another sharp object. Colored paper works great for creating snowflakes, as do tissue paper or low-weight office paper. Snowflakes differ in the number of rays. There are hexagonal snowflakes, as well as tetrahedral and octagonal ones. Round snowflakes are also common.
There are two main ways to construct paper for making snowflakes.
The first method is suitable for creating hexagonal products:
- Make a rectangular piece of paper and fold it in half.
- turn the top.
- mentally draw a triangle, bending first one edge and then the other.
- bend the triangle in half, cut the outer part strictly along the fold.
The folding of the snowflake according to the pattern is completed! Then from such a blank you can cut out rays, zigzags, semicircles, triangles, squares and other patterns.
The second method will help create octagonal and tetrahedral snowflakes:
- Take a rectangular piece of paper and fold it in half.
- turn it upside down, and then fold it in half again.
- bend one of the corners, cut off a piece of extra rectangle of paper from the bottom.
- If you start cutting out a snowflake at this stage, it will turn out to be tetrahedral.
- To create an octagonal snowflake, you need to fold the blank again and then cut off the excess paper.
The second method is simpler, it just requires a little more effort to cut out the elements when creating octagonal snowflakes.
Let's look at the options
The first option is the simplest. First, you need to fold a piece of paper five times. Four times in half, and the last fifth time diagonally. The ornament will be beautiful, but angular.
Very important! In order for the snowflake to be smoother at the end of the work, you should immediately cut off all excess parts.
Once you have mastered the simple method, you can move on to more beautiful and complex options.
Second option. Below is a diagram that shows a clear example of the correct folding of sheets of paper for a pentagonal product.
Third option. It's a little more difficult to fold a hexagonal snowflake.
- Take a square piece of paper and fold it diagonally. Then fold in half. Straighten out the last bend. Now you should take a compass and draw a circle. The maximum radius that will fit on the workpiece.
- Leaving the radius the same, place the compass needle on the edge of the circle where the leaf bends and make a notch. Do the same on both sides of the triangle.
- Fold the edge so that it is the same as the notch on the left.
- Turn the product over and bend the edges on the right side in the same way.
Fold it in half, if the extra tails are in the way, then cut them off, and if not, draw a beautiful ornament on them. There is another option to roll the paper for a six-pointed fluff. Take the paper and fold it diagonally, then trim off the excess paper. It should come out square. Fold diagonally a second time. You will get a triangle that needs to be divided into three halves, fold one half, trim the ends, fold the other half. Everything is clearly visible in the picture.
Related article: How to cut a beautiful snowflake from paper with photo diagrams
Simple paper snowflakes - cutting patterns
Beautiful snowflakes - patterns for cutting
How to make a big paper snowflake
It will not be possible to print such a large decoration. It needs to be glued or stitched from several elements.
Do-it-yourself giant volumetric snowflake made of paper - step-by-step MK
To make a giant snowflake you will need: A4 paper or paper bags, scissors, glue or a stapler.
Large snowflake made from paper cones
Here's how to make a big snowflake from paper cones.
DIY large snowflake made from paper rings
And from this master class you will learn how to make a snowflake with your own hands from paper rings. For greater strength, you can use toilet paper rolls, cut into rings of the same size, but if there are no rolls, you can glue paper strips into rings and make a snowflake out of them. The thicker the papers, the better!
Home fairy tale
For lovers of fairy-tale ornaments from animals and trees, a snowflake called “Forest Round Dance” will suit you. Children will especially like this version of the winter beauty. Having folded the paper blanks in the already familiar way to obtain a decoration with six rays, images of a spruce tree and a hare are applied to the outline. When applying a design to the edges of the triangle, it is necessary to depict only half of it, since when unfolding the finished snowflake, the intended ornament will look complete.
Volumetric snowflakes
Do-it-yourself volumetric snowflake from strips of paper step by step
For this craft you need: paper, scissors, glue, ruler.
For one snowflake you will need 12 strips of paper of the same length and width. The snowflake consists of two parts. For one blank, fold 6 strips of paper in a checkerboard pattern (three vertically and three horizontally). Then glue the edges of the outer strips (vertical to horizontal). When the two blanks are ready, glue them together also in a checkerboard pattern.
Volumetric paper snowflake in the shape of a flower - how to make
For this craft you need: paper, scissors, glue.
The snowflake is made from two blanks. In order to make one, you need to fold a square sheet of paper in half into a triangle and in half again into a triangle. Cut out the center piece to create a bird-like shape and make cuts on each side. Unfold the workpiece and glue each central part to the middle. In the same way, make another blank and glue them together in a checkerboard pattern.
DIY 3D snowflake made of accordion paper – step-by-step master class
For work you need: paper, scissors, stapler.
Fold the paper like an accordion, staple it in the center, and cut out a pattern along the edges. After this, unfold the workpiece and fasten the edges with a stapler or glue.
Volumetric snowflake from paper cones - how to make it yourself
For this snowflake you need: paper, glue, glitter for decoration.
Make cones of two sizes from paper. Glue larger cones onto a pre-prepared round base, and glue smaller cones on top. Decorate the middle with sparkles, sequins or beads. The snowflake is ready!
Do-it-yourself geometric paper snowflake - step-by-step MK with photo
A beautiful geometric snowflake will be made from paper strips. For work you need: paper, scissors, ruler and glue.
For one snowflake you need 12 strips of paper (6 large and 6 smaller). Using a ruler, make diamond shapes from the strips. Glue smaller diamonds into larger diamonds. Glue 6 double diamonds together and the snowflake is ready!
Creating a New Year's mood
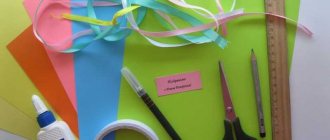
There are many technologies that allow you to understand how to fold a snowflake out of paper. Fans of this exciting activity know how to create four- and six-pointed winter beauties. Also, having figured out how to fold paper to cut out snowflakes, you can create twelve-pointed masterpieces from scrap materials. To start winter creativity, you need to prepare the following items:
- paper;
- scissors;
- ruler;
- pencil.
Having freed up space on the table, you need to arrange the listed attributes in a convenient order. Then you need to take a sheet of paper, cardboard or foil (it depends on what you decide to make snowflakes from) and fold it in half. The easiest way to correctly fold a snowflake is from a square sheet, so it is advisable to give the rectangular paper the required shape using a ruler, pencil and scissors. After this, the square is folded in half, then the resulting rectangular strip should be folded in half again.
Now a triangle is created from the resulting square by adding its opposite ends. Holding an isosceles geometric figure in your hands, you can begin cutting. If you already have experience in this matter, then drawing a drawing on paper is not required. For those who are new to this business, it is recommended to take a pencil and apply the desired pattern (for example, semicircles or crescents) to the edges of the triangle.
When starting to cut, you need to remember that there should be some distance between the elements of the ornament on the workpiece so that you don’t end up with just through and shapeless holes. The longer the cuts are, the more delicate and delicate the snowflake will be.
Snowflakes using quilling technique
Incredibly beautiful snowflakes can be made from ordinary paper using the quilling technique. To work you will need: paper, glue, a ruler with circles of different sizes.
To make the snowflake neat, it is better to prepare a template in advance. It is done quite simply: place quilling elements on a round blank in a certain sequence. And then you need patience and accuracy.
Gallery of snowflakes using quilling technique
DIY paper decoration
You can make a paper snowflake from a simple sheet of paper with your own hands, and there is nothing complicated here, because even a child can do it. With such a snowflake you can perfectly decorate your home during the New Year holidays, create a fabulous atmosphere and comfort in your apartment. You can do this together with your child. This way you won’t just make a decoration, but also spend quality time with your baby, teaching him how to work with paper and scissors. This activity will bring joy to both of you. The main task is to teach the child how to work safely with scissors. And in order to make a wonderful snowflake from a simple sheet of paper, you will need a set of colored paper, glue and scissors, and the desire to cut is already present in every child and adult.
If you cut out snowflakes from colored paper, they will turn out multi-colored and will attract more attention due to their brightness. Prepare a large number of these snowflakes with your child to decorate the windows in the apartment and the room itself where the Christmas tree is located for the New Year. The child will be happy that his snowflakes decorate the house and Christmas tree on such a wonderful holiday. You can cut out snowflakes even in the summer, if you really want the New Year holidays to come soon. And even though the garden outside the window is green and flowers are growing, the baby will be happy to prepare for the day when the good wizard will bring him a gift for working so well and preparing New Year's paper snowflakes.
You can fold the sheet for the snowflake and cut out patterns in absolutely different ways, as you like, but the standard sheet is folded 5 times: four times in half and one final time - diagonally.
You can draw with a pencil the lines along which to make the cuts. This method is suitable if you already have a template or some ideas.
To make a three-dimensional snowflake, you need to cut out six standard snowflakes from thick paper, which you then glue together, and you will get a wonderful product that will look even more impressive and elegant.
Did you like this kind of handicraft? Then we suggest you take a closer look at kirigami.
Snowflakes using origami technique
Very beautiful snowflakes are made using the origami technique. For this craft, you only need paper and strict adherence to the instructions.
Snowflake using simple origami technique
A snowflake using the simple origami technique is a clear and simple craft. It will be a great decoration for your home or an original craft for school.
Snowflake using modular origami technique
Here is a master class on making origami snowflakes from modules. First you need to make a lot of simple modules, and then assemble them in a certain order. Please note that this craft requires only paper and no glue!