A simple heart based on the origami principle
To construct a heart using the origami method, you will need rectangular paper of any color.
Manufacturing work:
(Step 1)
- mark the middle on the sheet;
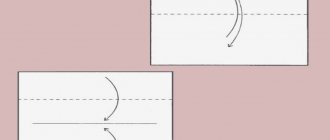
(Step 2) - we fold the material as in the manufacture of an airplane;
- bend the workpiece and repeat the second step on each side;
(Step 3) - after bending, a pressed diamond forms in the center of the material;
- fold the corners a few centimeters;
(Step 4) - fold the material along the marked lines.
The heart is ready. It can be used as a greeting card or as an addition to a bouquet of flowers. A heart like this with paper flowers would look perfect. We talked about how to make them in one of the previous articles.
Scrap hearts
We are gradually moving from Papier-mâché to Scrapbooking. A paper blank can be decorated with numerous decorative elements often used in scrap:
Most scrap hearts are characterized by multi-layering:
In pastel colors
Subtle combination of colors and gloss
Hearts with flowers
Card with lace
If you like more practical crafts, then make a photo frame in the shape of a heart...
...or photo album:
MASTER CLASS ON THE TOPIC "Teddy Heart" Valentine or how to make an album with your own hands
Making a photo album with your own hands
If you don’t like or don’t yet know how to create organic, complex scrapbook masterpieces, then use these examples:
The AmyFamily DIY channel shows how to make envelope-cards with a heart:
A figured hole punch can help beginner scrapers:
And a video from AmyFamily DIY on how to create a heart in 5 minutes:
Volumetric origami paper heart
Before making a three-dimensional paper heart, take a standard set of origami materials.
We follow the following instructions:
- Take a paper base. Using a pencil and ruler, draw a rectangle, the ratio of which to the paper will be two to one. Fold the paper in a diagonal direction. We unfold the material, you should get two cross-shaped lines.
- We are working on one side. Using the resulting crossed lines, we fold the paper towards the center point. We do the same at the other end of the material.
- Now from the center of the material we turn all the elements towards the edges. We open the formed valves and tuck one of the sides of the future heart.
- Turn the craft over. We bend the corners and turn the heart over again. We open the resulting additional valves (eight pieces) one by one. When they are open, carefully tuck them in.
On February 14th you can make many other interesting Valentine's cards
Beautiful DIY paper valentines
Of course, the easiest option for making beautiful hearts is confessions made from paper. Moreover, you can use any paper: regular, colored, cardboard and other types. Making such a gift is quite easy and simple, and the costs are minimal, and most importantly, such valentines always turn out to be very sincere.
Well, let's quickly see what and how you can do on Valentine's Day.
And the simplest option is a heart-shaped card. I suggest you read the step-by-step photo instructions.
We will need: colored paper, colored cardboard, scissors, glue, wooden stick.
Manufacturing process:
- Take red cardboard and fold it in half. Cut out the heart.
- Now take pink paper and cut thin strips. They need to be cut in half in the form of “grass”.
- Using a wooden stick, wrap pink paper to create a flower.
- Now cover the base of the heart with paper flowers and write a message inside.
You can also make a big heart. To do this, take cardboard as a basis, for example from any box, and stick a lot of small hearts of red, pink or scarlet on it.
Or, for example, you can create a whole picture. Take a white sheet of paper, stick on hearts of different shapes, bend some of them and insert them into a frame. Everything is brilliantly simple.
Or make a voluminous valentine. To do this, we cut out several hearts of different sizes, then glue or sew a small one to the large one, and so on, decreasing in size, bending it in the middle. All is ready!!
Well, or a very simple version of volume:
You can show your imagination and supplement the confession with Cupid’s arrow:
Or glue pieces of corrugated paper onto a paper base, wrapping them in different directions.
Here’s another great idea for a 3D Valentine, watch the video, maybe you’ll want to make just like this.
Origami bookmark in the shape of a heart
You can make not just an origami heart out of paper, but a useful bookmark for books. Such a gift will definitely be appreciated by a book lover or someone who works in the book industry. An origami bookmark in the shape of a heart will provide an opportunity not only to record the desired section of a book, but also to decorate your favorite literature.
We offer you several manufacturing methods:
First way
For the first production you will need a paper square of any color. Let's get started:
- Fold the square in half and then fold the bottom edge. Let's expand. There should be a line in the center of the material, to which we apply one edge of the square. Turn over the paper.
- We wrap the corners located at the bottom so that they connect to the central vertical. An angle is formed at the bottom. Turn the material over again.
- We press the corners to the top. The extreme point of the triangle should lie in the upper middle of the sheet. Turn the workpiece over again.
- We bend the strip at the top and you can see the triangles. Let's straighten them out. First we bend the small corners, and after them the two lower corners.
- We turn the resulting product over and wrap the side parts towards you.
Origami paper heart in the form of a bookmark is ready.
How to make a voluminous card with your own hands for Valentine's Day?
How to make a voluminous card with your own hands for Valentine's Day?
Where can I watch a video on how to make a three-dimensional card for Valentine's Day?
How to make a three-dimensional postcard (step by step with description)?
Volumetric postcards and books always look very impressive and deserve worthy attention for their beauty, originality and the feeling of something truly magical!
On Valentine's Day, it is customary to give valentines, cards of different sizes in the shape of hearts, so I think the most relevant would be to make a three-dimensional card for this holiday using hearts.
Popular Articles Month
You can also make a postcard with voluminous hearts like this.
Step-by-step scheme.
There are also options for postcards with templates on how to make them.
You just need to cut out the template and carefully push out the design and you're done!
Making such a postcard at first glance is only difficult, but in fact it’s simple, underneath it is a template on how you can quickly create it yourself!
A couple more ideas on how to make a voluminous postcard in an unusual way.
Bouncing heart - rainbow.
A postcard with a heart in flowers made from paper is simple to make, but looks very beautiful and delicate.
Love and be loved on this wonderful romantic holiday and ALWAYS!
It would seem that it could be easier than buying a ready-made Valentine card. But will there be as much warmth in it as in one made with one’s own hands?
Therefore, I offer you several options for creating voluminous valentines. For example, the “Volcano of Hearts” postcard.
You need to prepare colored paper, cardboard, scissors, and glue.
First of all, you need to print this template.
Remove the large heart from the middle (it's right on the fold).
Cut out the hearts, leaving only their folds intact (see picture).
Make cuts on the hearts shown in the picture (gray lines on opposite hearts), this way you can fasten them.
The card will close better if you cut the paper at the center fold and glue them individually to the base (the base is thick red paper that serves as the background for the card).
Glue the halves to the base and connect the hearts in which you made cuts. The sizes of the hearts on both sides are the same.
The blue line in the diagram shows that the distance from the fold in the middle to the cut is the same, and the red lines indicate the same distance between hearts close to the middle of the card.
This is how quickly and easily we got an original present for our other half.
You will find several more options for voluminous cards for Valentine's Day in this video:
Love each other and appreciate every moment spent together! Happy holiday!
There are a lot of interesting, cute three-dimensional cards for Valentine's Day. These cards with hearts and inscriptions symbolize the holiday and will delight the one for whom they are intended. It’s not difficult to make and a nice gift and surprise for Valentine’s Day is ready. Such a card can be attached to a gift, or simply given to a dear person from the heart on a romantic day.
For example, you can make such a postcard with letters, it’s not difficult. It is made using the kirigami technique, that is, a “folding postcard” with a three-dimensional image inside. Many three-dimensional postcards are made using the kirigami technique, that is, using a template, the design inside the postcard is partially cut out and becomes “convex” and folds out along with the postcard:
More ideas for voluminous Valentine cards:
Also an example of a postcard in the video:
Second way
Now let's look at the second way to make a book heart out of paper. For manufacturing we will again need a square.
We do the work based on the following instructions:
- cut the prepared square into two identical parts;
- fold one piece lengthwise;
- bend the resulting figure from right to left, unfold the folds;
- fold the two corners located at the bottom towards the center to form a corner;
- turn the product over;
- fold the top edge a few centimeters and turn the corners;
- turn the product over, you should get a heart.
Origami paper hearts can sometimes get the corners caught on the pages. To prevent this from happening, we recommend fixing each corner with glue. This can also be done with the core of the craft, where the center line diverges.
We described many more interesting options for bookmarks in a separate article.
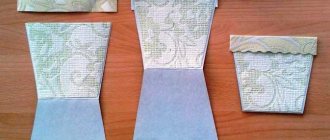
Heart-box
Almost any gift can be placed in a heart-shaped box. For example, candy, jewelry, a toy or a watch. You can make a box using several options:
Option one
Prepare for work:
- fairly thick paper;
- glue;
- pencil;
- ruler;
- stationery knife or scissors;
- sample.
We have already prepared a template for this box for you.
You can do your main job:
- transfer the drawing to thick paper and cut it out;
- Coat all joints with glue and glue them together;
- wait until it dries completely (this depends on the type of substance used, if it is PVA, just wait half an hour).
The box is ready. The beauty of this design is that it can be made to any size.
Paper Valentine's Day Crafts
Paper is an excellent and accessible material for everyone, from which you can make easy crafts for Valentine's Day with your own hands. They are not only easy to make, but also look very aesthetically pleasing.
Popular articles “100 reasons why I love you”
DIY postcard for Valentine's Day
On this wonderful holiday, every surprise will certainly be accompanied by a beautiful postcard with poems or confessions. We suggest creating a three-dimensional postcard with your own hands. To do this we need:
- Sheets of white paper in A-4 format;
- Colored paper;
- Glue stick;
- Stationery knife and scissors.
We start making a postcard by selecting a template, which can be found on the Internet or use the stencil presented below.
Having selected a template, you need to print it on colored paper and using a stationery knife, carefully cut out all the elements along the contour. Then glue the resulting composition onto a clean white sheet. And your craft for Valentine's Day 2021 is ready!
Below we present other ideas for voluminous cards for Valentine's Day.
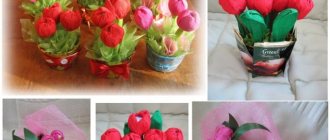
Bouquet of paper roses for Valentine's Day
Present your beloved with a bouquet of beautiful roses made of paper. To make this we only need colored paper. Below you will find step-by-step video instructions for creating a bouquet of roses using the origami technique.
DIY Valentine card made from craft cardboard
If you don’t know complex techniques, don’t despair, because you can also make simple crafts for Valentine’s Day from paper, for example using craft cardboard. It will turn out to be a Valentine card no less stylish and aesthetically beautiful. To make it, prepare:
- Craft cardboard;
- Paper;
- Glue;
- Stationery scissors;
- Decorative elements;
- Photograph.
First, take a sheet of thick cardboard and draw a rectangular shape on it. Then, using stationery scissors, carefully cut out the element along the contour and fold it in half, making the basis for the future valentine.
Next, we also cut out any shape (heart, rectangle, star or circle) from a sheet of paper, but smaller in size than the previously made base. Then we attach it to the base using glue.
All that remains is to decorate the Valentine's card with decorative elements and you can insert a romantic photo. It made a wonderful gift for Valentine's Day!
Option two
Now we’ll tell you how to make a paper heart box using the second method. You will need the same materials as in the previous master class.
Let's start making:
- draw a template on the base material;
- Mark the lines where folds need to be made with a dotted line;
- draw the outline of the craft with a felt-tip pen with a color several tones darker than the base material;
- We fold the product along the dotted lines and connect everything with glue.
The box is ready. When everything is dry, you can write a few warm words on the front side of the product and put a pleasant surprise inside. For example, a paper crane, which we talked about in previous articles, and several candies.
Heart for Valentine's Day
Very soon is Valentine's Day, popularly known as Saint Valentine, and we are already preparing gifts. On this day, it is not at all necessary to run headlong to the store and look for some kind of gift, just think a little and make a souvenir for the holiday with your own hands. Today's master class will suit us very well for this.
So, what kind of materials do we need:• Two foam hearts;• Napkins for decoupage with images of Teddy bears;• White acrylic paint;• Coffee beans, about 20-30 grams;• PVA glue;• Acrylic varnish for decoupage;• Glue “Titan” or “Dragon”;• Brushes for decoupage and acrylic paint;• Two bamboo sticks;• Gold acrylic paint;• Two bowls and a plate;• Red ribbons, half beads, glue ladybugs, red shiny hearts;• Plastic bag ;• An ordinary kitchen sponge;• A pair of ear glue sticks.
We cover the table with a bag, pour white paint into one bowl, then take a sponge, dip it in the paint and paint the hearts on one side. We give it time to dry, about 40-50 minutes, and then apply a second layer and also let it dry.
In a second bowl, dilute water and PVA glue in equal proportions and mix thoroughly. Prepared the adhesive mixture
Now we take a napkin for decoupage and carefully tear off the two bears that we will need for the hearts. On one side we will decorate the hearts using the decoupage technique, and on the other we will paste the hearts with coffee beans
Now we separately remove the topmost layer from each drawing.
The drawings are ready, the surface of the hearts is completely dry, let's start decorating. Place one bear on the heart and use the glue mixture to glue the design onto the heart. We start gluing the drawing from the middle.
Also, glue the second bear onto the second heart. The drawings are glued, let the surface dry. Then we take acrylic varnish for decoupage and apply a layer on the hearts, let them dry again.
Now pour the coffee beans into a plate, insert a bamboo stick into each heart from below, take the “Dragon” glue and glue one bean along the edge of each heart and also the back side of the heart. We leave the hearts to dry, preferably overnight, of course.
After the hearts have completely dried and the beans have stuck tightly, we take acrylic varnish and a brush and completely cover the entire heart with varnish, both where the pattern is and on top of the coffee beans. Cover with 2-3 layers of varnish to make the surface shiny. Now we prepare the decor. We tie small bows from red organza ribbons. We paint the bamboo stick gold with acrylic paint. We take red shiny hearts, ladybugs, half beads.
Using a glue gun, we glue an organza bow at the bottom of the heart, in the center we glue a shiny heart, and on top we tie a small red bow from a narrow satin ribbon and glue it with a gun, and in the center we glue a ladybug and a half-bead. All hearts are ready. Thanks everyone and happy creating.
Popular articles Sewing a children's apron: master class, ideas and 70 photos for inspiration
https://www.bolshoyvopros.ru/questions/1311980-kak-sdelat-serdechko-svoimi-rukami-na-den-svjatogo-valentina.htmlhttps://all4decor.ru/article/30-idej-dekora-ko- dnyu-svyatogo-valentina-kotoryj-neslozhno-sdelat-svoimi-rukami/https://sdelaysam-svoimirukami.ru/1287-serdechko-ko-dnyu-vseh-vlyublennyh.html
Origami heart in the form of an envelope
If you want to confess your feelings to your loved one in an original way, then presenting pleasant words in an envelope in the shape of a heart is what you need. We take red paper and consider how to make a heart envelope out of paper:
- Fold the corners into a triangle. Iron the folds. We unfold the material and repeat the steps on the other side. Unbend the workpiece again.
- We take one corner and lead it towards the center. Turn the sheet over. We fold the lower part so that the lower part is even with the border of the top.
- We bend the left side of the craft. Make sure that the edges meet the extreme point of the large angle. We repeat these steps, but on the other side. You should now have something similar to an angular heart.
- We turn the product inside out and carefully bend the corners located on the side. Then we bend the upper corners no more than one centimeter. Turn the product over.
The themed origami paper heart envelope is ready. Put a note in it and make your loved one happy.
Master class on paper valentines for children
Undoubtedly, in schools today there is still such a tradition as setting up mailboxes and throwing anonymous wishes in there, which everyone then receives. You will agree that this is so cool and tempting that it makes this holiday unique for everyone.
Therefore, most schoolchildren, and just preschool children, love to create magnificent cards, and then give them to all those whom they love and adore.
Therefore, if you have children, then you can easily give them such a gift.
For children in kindergarten and at home, by the way, you can use this type of work as a group to make such a drawing, crumple a heart shape from ordinary toilet paper containers, and then dip it in paint and fill the entire Whatman paper. Even a 2-3 year old child can cope with this task.
And if you still haven’t learned how to draw a heart, then you can use this stencil.
After all, children can simply decorate it with felt-tip pens or pencils and draw their own patterns, or use nothing else. Anti-stress drawing, or as it is called coloring.
You can find various ideas if you want a bunch of such anti-stress products, of course this work will be more addressed to high school and schoolchildren. I have several coloring books in my piggy bank, if you are interested, write to me.
Or make a bookmark for this topic, cut out the hearts from paper yourself, and the child should glue them on as an example, but something like this.
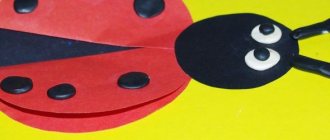
I also want to share the idea of making valentines in the shape of ladybugs that will hide a love message; you can give such a charm to a friend or girlfriend.
You can also make origami, because such an activity will certainly delight the kids. Make a boat with them, and instead of a sail, a symbol of lovers on a stick.
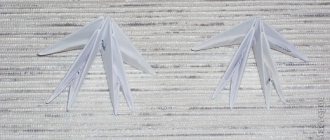
Paper heart with wings
Now we will tell you how to make a winged heart out of paper. This craft will take its rightful place on a shelf at home or can be used as an original gift. Prepare square paper for work measuring twenty by twenty centimeters. The finished product will be half the size of the original paper dimensions.
How to make this craft:
- fold the main material in half, straighten it and repeat this action on the other side, you should get lines;
- bend the top and bottom of the paper so that the edges touch on the center line, turn the workpiece over;
- apply the strip to the center, press the upper part back, straighten and iron the corners;
- fold triangular shapes at the end of the strip, turn the material over;
- mark the corners at the top of the heart.
The craft is ready. You can admire it.
Paper heart for beginners
The flat model folds in a few minutes.
The size can be chosen at your discretion. Prepare a square sheet of paper. Step-by-step instruction:
- Fold the sheet diagonally in half and unfold.
- Fold diagonally in the other direction and unfold.
- Fold the top corner towards the center.
- Fold the bottom corner towards the top edge.
- Bend the right one often upward along the center line.
- Repeat with the left side.
- Turn the workpiece over.
- Fold the corners.
- The heart is ready.
It is better to use such models for decorating postcards or photo frames, paintings, since the reverse side of them cannot be called beautiful.
Video on creating a similar heart:
Happened?
Not really
Paper ring with heart decoration
Ring with a heart
Of course, a finished paper ring will not last long if you wear it on your finger. But if you put it on a pen or pencil as a decoration, its service life can be long. Yes, and you can always replace the product, especially since it is done very quickly.
Let's get started:
- Take a colored paper square and draw four lines on it with a pencil. The first two lines should be 1/8 wide of the total size of the square. The third line should be 2/8 wide, and the distance from the third to fourth line should be 1/8 of the total size of the square.
- Fold the sheet vertically. We unfold the material. Now you need to bend the first strip that was drawn earlier. Turn the paper over with the different colored side facing you.
- Fold the triangle at the top. Now the blank resembles a future airplane. We turn the corner in the opposite direction from us.
- Carefully bend the border from the center of the product in opposite directions. We lower the corners that stick out down. The “ear” elements should remain at the top; we remove their tips.
- We roll up the part of the material that remains into a tube or accordion. Turn the product over. We connect the resulting belt and fix it.
It turned out to be a charming ring. Even if it is not diamond, be sure to give it to your soulmate.