DIY furniture made from matchboxes
Share on social media networks:
You can probably find matchboxes in every home. But few people know that they are an excellent material for creativity, and without any problems you can easily make furniture from matchboxes with your own hands. Such creativity will be especially interesting for a child, because every child loves to play with dolls, and they also need furnishings. Like real ones, only in miniature. In this article we will tell you how to easily and simply make original pieces of furniture from such an affordable and cheap material.
Matchbox chest of drawers
Such a simple and affordable material as a matchbox can be a great idea for creating doll furniture. You can use them to make a table with chairs for tea drinking, a sofa with armchairs, or even a chest of drawers for dolls in pink. So collect the required number of matchboxes and other improvised materials that may be useful in the process of work, and start making.
Required materials: - three matchboxes; - double-sided half-cardboard in pink shades; - small half beads; - office glue; - white acrylic; - synthetic brush; - Double-sided tape; - a simple pencil; - scissors; - ruler.
Stages of making a small chest of drawers from matchboxes: 1. In order to make a chest of drawers for dolls, we need 3 matchboxes. We attach pieces of double-sided tape to them and, removing the top layer, fasten the boxes together.
2. The basis for the future chest of drawers is ready.
3. Now let's start decorating it, since it is not very attractive in appearance. Take a light pink shade of double-sided half-cardboard and cut out two rectangles with sides 5 x 3.5 cm.
4. Attach double-sided tape to them.
5. Glue one piece to the top of the chest of drawers and the other to the bottom. Thus, we will also make the side parts of the chest of drawers, where the pieces of light pink half-cardboard will have dimensions of 5 x 4 cm.
6. It’s time to decorate the drawers. To do this, take a brush and white acrylic.
7. Paint over all the boxes so that the gray material of the matchboxes is not visible.
8. We will cut out three 3 x 1 cm rectangles from light pink thick paper. We will also need three 2 x 0.5 cm rectangles from a brighter shade of pink half-cardboard.
9. Glue the light pink pieces onto the drawers of the chest of drawers using office glue.
10. Glue bright pink rectangles on top of them.
11. So that the dolls can open and close the drawers, it is necessary to make handles. To do this, take three white half-beads and glue them to each cell.
12. From bright pink double-sided half-cardboard, cut out two rectangles 4 x 3.5 cm and one with sides 4 x 2.5 cm.
13. Glue a 4 x 2.5 cm rectangle to the very top of the chest of drawers.
14. Glue two identical rectangles of a bright pink shade to the sides.
15. Here is a cute chest of drawers made from matchboxes for your cute dolls, ready to use. Surely they will like this furniture and will use it in your daughter’s games.
Source: sdelaysam-svoimirukami.ru
Master class “Making doll furniture from matchboxes”
Master class “Making doll furniture from matchboxes”
Target:
development of constructive model actions in children.
Tasks:
1. Introduce children to the world of technical and artistic invention.
2. Practice design using graphic models.
3. Develop visual-figurative perception.
4. Improve memory, fine motor skills, thinking, perseverance, and creativity.
Methods and techniques:
Equipment:
samples of matchbox furniture - tables, chairs, etc.;
material for practical activities - matchboxes ( modules
), glue stick, scissors, colored paper, ruler, pencil.
Progress of the master class:
Good afternoon, dear colleagues. The topic of today's master class: “Making doll furniture from matchboxes.”
You can make beautiful doll furniture with your own hands from ordinary matchboxes. These include sofas, chests of drawers, tables, and even armchairs. Thanks to simple materials and tools, even a child can make furniture for dolls. This will serve as a wonderful time when he will develop creativity, imagination, hard work, and accuracy.
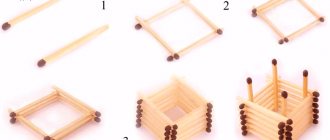
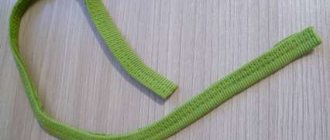
Stages of making a chair: 1. Our matchbox chair will have a green color. When making it, we cannot do without green paper.
2. On a sheet of paper, measure the width of the box 5 cm and cut it out. 3. Carefully cover each matchbox with green paper. 4. Take two matchboxes. Let's put one horizontally, the other vertically. 5. Glue at the point of contact with glue. 6. Place the remaining matchboxes vertically and glue them to the other two.
Stages of making a dressing table:
- Our table will be made of pink colored paper.
- On a piece of paper, measure the width of the box 5 cm and cut it out.
- Carefully cover each matchbox with pink paper. 4. Take two matchboxes. Let's put one horizontally, the other vertically. 5. Glue at the point of contact with glue. 6. Place the last box vertically and glue it to the other two.
Thus, from individual modules we get the intended real product (in our case, an armchair and a table). As a result of our work, we:
- We practically learned the properties of geometric figures and spatial relationships;
- They developed spatial imagination, spatial orientation and imaginative thinking (the idea of space consists of specific signs of shape and size);
- We practiced the correct use of concepts (tall - low, long - short, wide - narrow, large - small, above - below, right - left, down - up, back - front, etc.)
- They developed sensory and mental abilities, aesthetic feelings and creative qualities.
- And it is very important: Model-constructive activity creates conditions for organizing a children's team and nurturing cooperation and interaction among children.
Dear Colleagues! Thank you for your interest and active participation in the master class. Thank you for your cooperation.