You can buy a mask in a special store, or you can be creative and make a mask yourself from papier-mâché
Before the holidays, it's time to think about the right outfit. And if it’s a children’s New Year’s party, a carnival party or even a masquerade ball, then perhaps the most important accessory of the created image should be a face mask. Today you can find many bright and colorful masks on sale and choose the one that matches your chosen outfit. But papier-mâché masks created with your own hands from available materials will look much more harmonious and interesting.
Papier-mâché mask base
“Papier-mâché” is translated into our language as “torn paper,” which fully reflects the essence of this material. Papier-mâché is nothing more than paper pulp with the addition of PVA glue or paste to hold the paper together. It is best to use old newspapers to prepare the mass with your own hands, the paper of which is most suitable for papier-mâché, but in the absence of the proposed material, they can be replaced with toilet paper, paper napkins or towels.
First, before you start creating a face mask with your own hands, it is important to worry about choosing a base for it.
If you have an old mask, you can use it as a base for a new papier-mâché mask.
For this purpose, a number of methods for producing various bases can be proposed.:
- Old mask according to the shape of the face. A simple mask without any unnecessary irregularities can be used as a base. Just remember that before covering it with papier-mâché, you should wrap the surface of the old mask with cling film to prevent the material from sticking to the base.
- Inflated balloon. The most suitable basis for beginners. Thanks to the smooth rubber surface, making a mask will be easy, since papier-mâché will not stick to the base and after the material hardens, the balloon can be easily removed.
Modeling from paper pulp
The video shows the preparation of raw materials from gray toilet paper of the lowest quality. It is torn into pieces, poured with hot water and left for 2-3 hours. You can also use newspapers and even cardboard egg boxes to prepare the mixture.
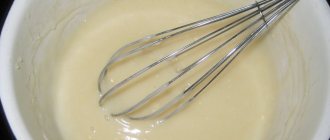
Knead the mixture, squeeze out excess water, chop it and spread it out to dry a little.
Add PVA glue, putty, soap and mix the paper pulp, which can be used to create any masterpieces with your own hands, even this original mask.
It is not clear from the video what material the papier-mâché mold is made of. How and what to make it from can be found below.
Papier-mâché face mask
The problem with many purchased carnival masks is that they do not fit tightly to a person’s face, which in turn leads to its constant slipping. But during the holiday, you want to have a good time, and not constantly adjust an annoying accessory. Therefore, an accessory made with your own hands based on a cast of your face will be an excellent solution, because the mask will not only look original, but also fit well, which means it will cause less inconvenience.
To make a face cast yourself, you can use sculpting plasticine.
If possible, you should use plasticine without dyes.
A sufficient amount of material must be thoroughly kneaded in your hands and given the shape of a pancake with a layer thickness of about two centimeters. After this, the resulting pancake is applied to the face (before this procedure, it is recommended to lubricate the skin with a cream with a greasy texture) and carefully give the plasticine the outline of the shape of the face.
Remove the plasticine form from the face very carefully so as not to damage the result of the procedure performed, and place it on the work surface. After this, the base for the DIY mask is ready.
But this method has one undoubted disadvantage - not every person has sculptural plasticine at hand. Therefore, the base for manufacturing can be made from a more affordable material - food foil. The foil must be folded several times so that the resulting sheet is sufficiently hard, but at the same time easily takes the required shape. After this, we apply the resulting piece of foil to the face and, using finger pressure, give the foil the shape of the face.
You can also use clay to form the shape of the mask.
The almost finished base must be removed if there are any unevenness to be corrected and slits made in the foil for the eyes and nose. The resulting shape can be adjusted by adding plasticine to it in the right places. After this, the base is wrapped in cling film and it is ready to apply papier-mâché.
Creating a product on the face
Many commercially available carnival masks do not fit well enough. For this reason, some artists prefer to create products directly on a person’s face. They do not slip and provide comfort while wearing. In addition, this author’s solution will look original. How to make a mask with your own hands step by step:
- Take the required amount of base in your hands.
- Provide the mass with an oval shape approximately 2 cm thick. The resulting material is applied to the face. Pre-lubricate the skin with a rich cream.
- The finished plastic mass is applied carefully so that it takes on the contours of the face.
- Remove the plastic form carefully so as not to spoil it.
- After this, the product is placed on the working plane.
From this moment on, you can consider the basis for a homemade product ready. True, not every person is able to give such sculptural plasticine the correct shape. Therefore, it makes sense to use food foil as an alternative. This is a more accessible material. It is folded several times so that the resulting canvas is solid. At the same time, it must take an ideal shape.
A piece of foil is placed on the face. Press with your fingers and ensure the shape of the face. The finished base is removed and unevenness is corrected. After this, slits are made for the nose and eyes. The resulting product is adjusted by adding plasticine in the necessary places. Wrap the base with cling film. Now you can apply papier-mâché.
Do-it-yourself Venetian masks are made using a similar principle. The master class involves all the same actions, but using more decorative materials: sparkles, feathers, stickers. They must be arranged in accordance with the selected template. To do this, take a printed image of a Venetian mask.
Papier-mâché masks: manufacturing instructions
During a short master class, you will learn how to make a mask yourself and several options for its design.
In order to make the desired mask, you need to collect some materials and tools that will be needed during the creation of the accessory, namely:
- Base for the mask.
- Paper (newspaper, toilet paper or paper napkins).
- Water.
- Glue (preferably use PVA).
- Brush.
- Paints, ribbons, feathers, beads or other material for decoration.
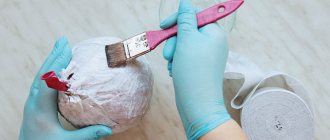
To make the necessary accessory from papier-mâché, you need to follow the general instructions step by step, which will help you carry out the entire process from kneading the paper pulp to decorating the finished mask.
Instructions:
- Finely tear the paper into small pieces and soak them in a solution of water and glue. In this case, glue and water are taken in a ratio of one to one.
- Cover the mold you made yourself with the resulting papier-mâché and wait until the mixture dries completely.
- After drying, the resulting workpiece must be carefully removed from the base so as not to spoil the outline.
- We make the necessary holes for the ties so that the mask can stay on the face.
- Then you can decorate the mask according to your wishes and the chosen outfit.
After a few days, you can remove the mask from the model: after that you can use it
Further in MK we will give several options on how to make a holiday mask design with your own hands.
How to properly apply a collagen mask with biogold
Let's look at the technique of applying a mask using the example of a composition containing microparticles of gold, collagen, vitamins C and E, as well as a potent anti-pigmentation agent - arbutin.
For the mask to have the best effect, you need to steam your face with a damp, hot towel.
Let's describe the process point by point:
- Before the procedure, it is necessary to clean and steam the surface of the face. This will open the pores, making it easier for nutrients to be absorbed. Therefore, after cleansing the skin of the face, place a towel moistened with hot water on it for 10 minutes.
- Before printing the mask, in the summer it needs to be cooled somewhat. To do this, place it in the freezer for several minutes at a temperature of -2 to -6 degrees. In winter, on the contrary, the bag with the mask is first immersed for a minute in water heated to 50 degrees.
You can also increase the effectiveness of the mask by using a mesoscooter.
- To achieve better infiltration of active substances, before applying the mask, the skin surface is often treated with a mesoscooter, with a micro-puncture depth set at 0.3 mm. Let us note that it is wiser to carry out this operation, at least for the first time, under the supervision of a specialist.
- After this, unpack the mask and apply to the face the side that is saturated with the active composition.
- Then the mask should be spread over the surface of the face.
You should remove the mask after at least half an hour, but for best results it is recommended after an hour
- Having assumed a horizontal position, you need to remain in it for 30 to 60 minutes.
- After this time, remove the remaining composition using a paper napkin.
Please note that these masks are disposable. Their repeated use is unacceptable.
The procedure can be repeated several times a week until satisfactory results are achieved.
How to paint a papier-mâché mask
Before decorating the resulting blank, you need to draw the outline of the desired shape onto its surface using a pencil or felt-tip pen. Next, carefully cut out the final shape of the mask along the outlined contour. After this, you can apply the necessary paints and decorations.
The most common design option is the Venetian mask, made in the Italian style. When decorating a mask, you can use combinations of several colors for the background of the mask, various feathers and ribbons as decoration.
Another of the most popular design examples is a cat mask, which will look trendy at any themed party.
The main attribute of a hand-made accessory is the ears, which can be made from any material or immediately given the appropriate shape to the workpiece.
You can make a mask of any shape and on any theme from papier-mâché. For example, fantasy and fairy tale characters have become popular lately.
You can also use regular feathers for decoration or faux fur to imitate animal fur.
For boys, the most current outfits are images of superheroes (Batman, Spider-Man), the main attribute of which is a mask. After looking at the faces of the characters, you can try to make their masks using the papier-mâché technique, the main thing is to use an identical color scheme.
The listed examples are not the only options for decorating carnival masks with your own hands; for example, you can choose an African style, using a brown color palette and elongating the shape of the mask, or create your own, embodying your imagination and sense of style.
Machining
This is pasting of any shape with small pieces of paper in several layers. If we make a carnival mask with our own hands from papier-mâché for a specific person (for ourselves, for example), the face itself can become the shape.
To make a mask using this technique we will need:
- newspapers;
- napkins;
- culinary film;
- gauze or thin cloth;
- PVA glue;
- putty;
- scissors;
- paint, brush, braid, elastic band.
Work order
- Lubricate your face with greasy cream or Vaseline. Place a thin plastic film on it. Secure the edge with a hoop or headband. Be sure to make breathing holes in the nostril area.
- Place the first 3 layers on a film of napkins soaked in water. Then you need to make another 10 layers of small pieces of newspaper coated with glue. This should be done gradually: 2 layers of newspaper, then dry with a hairdryer and again 2 layers. Both napkins and newspaper cannot be cut, you can only tear it with your own hands.
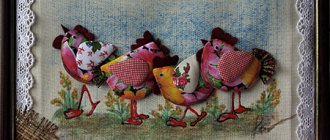
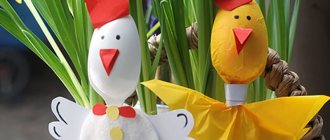
INTERESTING: Making a rooster mask with your own hands
- After the papier-mâché has dried, remove the workpiece from the face, remove the film and trim the edges. To make slits for the eyes where they should be, place it again on the face and outline the contours with a pencil. Carefully cut along the drawn lines.
- Cover the mask on both sides with gauze. In this case, it is necessary to wrap the ends with cloth to smooth out roughness. Let the product dry. Putty and polish.
- Now all that remains is to do the decoration yourself. Paint the mask and glue on various pretty things. Sew on braid or elastic.
Papier-mâché masks from the USSR
In the Soviet Union, carnival masks were an attribute inseparable from the New Year trees, children's matinees and carnivals. Most often at these celebrations one could meet various animals (bunnies, foxes, cockerels, bears, wolves) and fairy-tale characters (Baba Yaga, Koshchei the immortal, Chipolino).
As a rule, such kind masks are used at children's matinees and holidays.
A special feature of these masks were the bright, saturated colors used to decorate the accessories.
DIY papier-mâché masks (video)
Today, such masks are very rarely found on store shelves; most often they can only be purchased from private individuals who still have such masks. But if you really want to make a splash at an upcoming event, then you can try to reproduce this accessory yourself. All you need is a little free time and the ability to work with your hands, and papier-mâché masks in the style of yesteryear will create a sensation at any thematic event.