The accelerated pace of modern life has led to the fact that many values have become a thing of the past. Today, giving birthday cards, whether purchased or homemade, turns out to be strange and unfashionable. It is proposed to dispel the stereotype that a postcard is an inappropriate gift or an accessory to it directly in the process of creative work.
Making a postcard with your own hands means showing maximum imagination, turning on your imagination and turning off prudence and cynicism. The postcard will turn out bright and unforgettable only if you reflect part of your own soul in it.
A worthy reason to give a handmade postcard
Postcards are a classic option for birthday greetings. Children and adults, mothers and grandmothers, classmates and neighbors - everyone will be happy with such a simple surprise.
A postcard can be made specifically for the holiday of February 23 or March 8, for the New Year or Christmas, or for September 1 or Mother's Day.
Handmade has many followers and fans who do not care at all about what to get inspired by. The reason for creativity is the world around us and life itself, flowing smoothly or running without looking back.
Postcard making techniques
You can make “Happy Birthday” cards with your own hands using the following technique:
- applications,
- cutting,
- quilling,
- decoupage,
- drawing,
- scrapbooking, etc.
The combination of several techniques in one work will give it additional originality. Surely no one else will have such a postcard. You can’t buy it in a store or on a social network. They are exclusive and unique.
Photos of master classes on postcards
Read here - Master class on snowmen - basic methods and step-by-step description of how to make a snowman figurine with your own hands (105 photos)
Did you like the article?
0
Additional materials
As additional materials for making your own birthday cards, you can successfully use:
- - dried herbs,
- - natural materials - beautiful stones, parts of cones, shells,
- - cereals of different textures (rice, buckwheat, millet, beans, peas),
- - foil or gold leaf,
- - magnets,
- - buttons,
- - beads, rhinestones, sequins,
- - crocheted details - flowers, petals, faces.
Strong defenders
Men, by their nature, do not particularly like to accept various souvenirs. But the only time, besides their birthday, on which all men wait for them is Defender of the Fatherland Day. Therefore, it is extremely important to prepare appropriate crafts for husbands and sons. Knowing how to creatively decorate a postcard for Defender of the Fatherland Day, you can please your husbands with an unusual souvenir. You should not depict weapons and other attributes of military life on such crafts. It is best to depict peace and love throughout the land, which is protected by men.
This card requires a lot of time to make a large number of butterflies and glue them. But creating something beautiful is worth it. They can be pasted not only on the front, but throughout the card, as a symbol of freedom and joy. If the white background of the craft does not suit someone, then it can be replaced with any other one.
Manufacturing stages
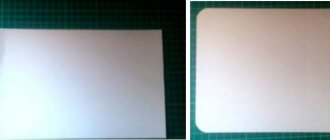
You should start making a postcard by choosing an occasion and thinking about the plot. The ideal option to start creativity is to draw a sketch of the future postcard.
It is important to take into account the specifics of the holiday, the age and favorite colors of the recipient, the possibility of delivering it in person or sending it by mail, the need for an inscription, and internal contents.
Thinking through and developing a sketch is a responsible matter; it is better to do it in advance, giving yourself a day or two, or better yet, a week.
Note!
How to make a paper lantern with your own hands step by step: an easy master class with photos and descriptions (new designs)
Do-it-yourself topiary step by step: instructions, photos, assembly diagram, master class for beginners
How to make a florarium with your own hands - step-by-step instructions with a full description of all stages (120 photos)
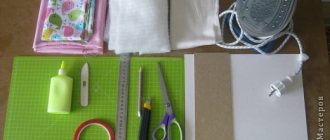
The next stage is a practical approach to the matter. You need to choose what exactly will be used in production, what will be needed - glue, colored paper, stapler, tape, additional materials. Preparing everything you need can take from half an hour to a whole day.
Then the creativity itself begins. It requires a workplace free from other things, as well as a sufficient amount of time. To make a postcard neat and similar to a sketch, you need to put in a lot of work, diligence and patience.
Complex components that add chic and shine
When making your own “Happy Birthday!” You can use unusual design details that will decorate it with their surprise.
For example, attach a small envelope inside the postcard or on the back so that you can insert a bill there. Or glue another card of a smaller format on the inside, which also includes congratulatory inscriptions.
You can place flowers made of corrugated paper inside the card, so that when you open it you get a 3D card: the flowers will “bloom”! This option is possible for making any other three-dimensional postcards with your own hands.
Note!
Learning to make a cat house with your own hands: easy instructions for creating simple and complex options (130 photo ideas)
DIY piñata at home: master class for children of any age (125 photo ideas)
How to make a smartphone stand with your own hands: a review of the best ideas, as well as step-by-step instructions
There is inexhaustible scope for imagination about what kind of paper figure to place inside - a boat or an anchor, a cake with candles or a kitten, the Eiffel Tower or an Egyptian pyramid.
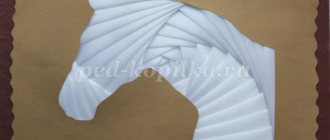
How to make birthday cards with a butterfly
YouTube channel Tonni art and craft
What do you need
- White paper;
- a simple pencil;
- scissors;
- stationery knife;
- raspberry double-sided paper;
- pink double-sided paper;
- double-sided bulk tape;
- pink or red pencil;
- self-adhesive rhinestones;
- peach or pink ribbon;
- simple double-sided tape.
How to do
1. Fold a sheet of white paper in half crosswise. Draw the outline of a butterfly on it, as shown in the photo and video below.
YouTube channel Tonni art and craft
2. Cut out the shape. Open the butterfly and divide it into two equal parts with scissors. One of them will serve as a template.
YouTube channel Tonni art and craft
3. Draw a pattern on the template as shown in the photo or video below. Go over the pencil sketches with a utility knife and remove any excess paper.
YouTube channel Tonni art and craft
4. Attach the template to the raspberry leaf and trace the outlines inside and outside. Cut out the piece with scissors and use a knife to remove excess paper to create a pattern. Make the second wing in the same way.
YouTube channel Tonni art and craft
5. Place one wing on the pink paper and trace the outer and inner contours. Place the second wing next to it and do the same.
YouTube channel Tonni art and craft
6. Cut out the pink parts along the outer contours. Color in the edges of the patterns with a colored pencil.
YouTube channel Tonni art and craft
7. Glue the crimson parts to the pink ones using bulk tape. Details are in the video instructions below. Decorate the wings with rhinestones.
Cut a piece of tape and attach simple double-sided tape to the edges. Glue the wings to them.
YouTube channel Tonni art and craft
8. Along the edges of the tape, on opposite sides, make a small vertical cut. Write your congratulations on white paper and roll it into a tube. Wrap it with tape and “fasten” it at the cuts.
What other options are there?
Here is another similar composition:
Here's how to make a card with an elegant carved butterfly:
And another cute option with a voluminous butterfly and an unusual cover:
10 ways to make beautiful gift boxes with your own hands
20 ways to make beautiful cards for March 8 with your own hands
10 original postcards for February 23rd with your own hands
25 fun gifts to keep your kids entertained
Postcard-topiary
With your own hands, you can actually make not just a three-dimensional card with flowers or a real panel, but also a topiary card. This “flower on a leg” is perfect for congratulating you on March 8 or the New Year (in the form of a Christmas tree).
If you make the topiary large enough, you can write congratulations and wishes on paper “petals” or on a flowerpot stand.
Made from paper, the topiary will resemble an independent craft. Whereas the author will know that his creation is nothing more than a greeting card for a birthday or other holiday.
How to Make Birthday Cake Cards
YouTube channel Red Ted Art
What do you need
- Thick blue or turquoise double-sided paper;
- scissors;
- ruler;
- a simple pencil;
- thick white paper;
- colored paper with drawings and patterns;
- glue stick.
How to do
1. Cut a rectangle measuring 15 x 11 cm from blue or turquoise paper. Fold it in half crosswise. Cut a rectangle measuring 14 x 10 cm from a white sheet.
YouTube channel Red Ted Art
2. Fold the white piece in half crosswise. On the fold side, make four cuts at equal distances from each other. The first two (at the bottom of the paper) should be the same. The third is about 1 cm shorter, and the fourth is even slightly shorter in length.
YouTube channel Red Ted Art
3. Fold the cut pieces as shown in the photo.
YouTube channel Red Ted Art
4. Unfold the strips and open the paper. Bend the cut pieces inward along the marked folds.
YouTube channel Red Ted Art
5. Cut out three rectangles from colored paper according to the size of the layers of the future cake. They should be quite a bit taller than the white stripes. Fold them in half and glue them to the sheet.
YouTube channel Red Ted Art
6. Bend and straighten the white sheet again so that the lines on the cake are more clearly visible. Cut out several candles in the form of small rectangles from bright paper, and the same number of droplet figures from yellow paper. Glue the droplets to the candles and them to the cake.
YouTube channel Red Ted Art
7. Apply glue to the back of the white paper and attach it to the blue base. The card can be signed next to the cake or outside.
What other options are there?
Incredibly beautiful card with a voluminous round cake:
This option hides a piece of festive dessert inside:
Print the template, cut along the lines and create a card like this:
And here is, perhaps, the easiest option: with a drawn cake. It looks simple, but very cute:
Postcard with a lock
Such an original thing can be made by analogy with a notepad with a lock. All you need to do is glue a tiny lock to the edge, hang the key on a chain and give it along with the card.
A postcard with a lock serves as an intimate gift. It is intended for those closest to you, not for prying eyes, and can help express your deepest feelings to a person who is very dear to you.
Postcard on the computer
Today it costs nothing to master Photoshop. It gives additional opportunities for the flight of creative thought. You can model any landscape and insert a figure or face of the birthday person into it, then print it on thick paper and turn it into a postcard. This approach to business can also be considered the process of making a gift with your own hands.
Postcard with a voluminous bouquet of paper flowers
A voluminous bouquet for a postcard, made from paper with your own hands, will become an original gift and will bring joy to the recipient. To do this, you will need colored double-sided paper, flower templates of different sizes, a cardboard base for the card, scissors and glue.
The technique for performing the work is as follows:
- Draw or print flower patterns on colored paper, then cut them out.
- Each petal needs to be bent along the middle towards the inside of the flower.
- Place flowers of different sizes together, gluing them in the middle so that the largest flower is on the bottom and the smallest on top.
- Decorate the middle with a bead, colored paper or ribbon.
The base for the card is decorated or colored cardboard is used for the base. Congratulations should be written in advance, because it is inconvenient to do this at the end of the work. Flowers are glued onto the finished base and leaves cut from paper are added.