Now a needlewoman can find various devices for working with threads. One of them is an organizer for floss. It allows you to carefully store the threads so that they do not fray or gather dust, protects them from spooling and ensures their convenient use during work.
Despite the huge selection of organizers, embroiderers actively invent them with their own hands, because this method allows you to take into account all the wishes of the needlewoman.
Plastic thread organizers
A plastic organizer for floss is quite popular due to its availability (sold in any sewing store), low cost, and is also designed for reusable use. This device is indispensable for embroidery. For ease of use, it has a special hole that allows you to fix the tip of the thread so that it does not unwind. To distinguish bobbins in a timely manner, it is recommended to stick the number from the thread package on the floss organizer, or sign it with a marker.
This organizer for floss is very easy to make at home. To do this, you can cut it out of a plastic object.
According to well-known folk wisdom, order in things is order in the head! And although the concept of “artistic disorder” also has a right to life, it is difficult to argue with the fact that it is best to keep working tools and accessories in perfect order so that you can find what you need without difficulty and loss of time.
If you really love to embroider, then at some point you will inevitably discover that there are so many multi-colored skeins of floss, completely unnoticed by you, that storing them as before - be it in a bag or in a cardboard box - becomes inconvenient. And then you finally wonder how to store embroidery threads so that the storage organization is not only neat and convenient, but also aesthetically pleasing.
Bobbins
One of the most common ways to store floss is in bobbins made from different materials, from plastic to cardboard. You can find them in any craft store, and once you try this method of storing floss once, you are unlikely to want to give it up: plastic bobbins are light, compact, durable, and also have special notches for securing the thread so that it does not unwind. You can write color numbers on adhesive stickers, buy ready-made stickers, or write them directly on the reel.
Be prepared for the fact that you will need a lot of bobbins. If you don’t want to spend money on store-bought ones, you can make thread spools with your own hands.
How to make bobbins for floss
Materials:
- One plastic reel (as sample)
- Cardboard
- Paper scraps for scrapbooking
- Scissors
- Pencil
- Rubber glue
- Hole puncher
Step 1
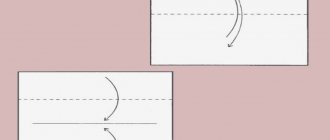
Trace a sample reel on cardboard. Leave a small space between diagrams for convenience.
Step 2
Cut the cardboard into squares, coat the reverse side with glue and stick the workpiece on the inside of the scrap paper.
Step 3
Trim off excess paper.
Step 4
Using handy scissors, cut out the workpiece and make holes with a hole punch.
Source: thistleandleaves.com
If ordinary bobbins seem too boring to you, even for your discerning taste there is an option, ranging from curly bobbins made of the same cardboard to... ice cream sticks! It is enough to show a little imagination, and then even banal clothespins can turn out to be quite a convenient way to store floss.
Photo: sugarcookie, Minted Strawberry, Wild Olive, Little White Whale
Bones
This method of storing threads has one undeniable advantage - you do not need to rewind the threads. Otherwise, the option is very similar to bobbins.
Some companies, for example, DMC, offer convenient organizers-albums for floss with bones.
Holder for floss
In English, such a “device” is called more precisely - project card, that is, “project card”: such a holder is most often used in direct work on a specific embroidery - you transfer the necessary colors into it in the right quantity, so that when you return to work, you will not each time you were forced to re-find where you put the necessary threads.
By the way, embroidery machines often come with a wooden panel with drilled holes for the same purposes. There is also a more advanced version of this project card, for example, the Pako organizer.
Such a holder, firstly, is designed for a large number of colors, which is very convenient, secondly, hard foam allows you to securely fix the threads, thirdly, you can provide each color with special symbols corresponding to the symbols on your pattern (if you cross-stitch) , and, finally, fourthly, you can keep the needles and threads in place, and they do not stick in, they are carefully inserted next to each symbol. With such a device you will definitely save time, but at the same time its cost is quite high.
Containers and boxes
Perhaps the most common method, since in handicraft stores you can find a huge variety of plastic containers with dividers, with which storing even large volumes of floss becomes simple and convenient.
As a budget option, boxes (from shoes or, say, from IKEA) into which you can insert homemade dividers are quite suitable. Alternatively, you can use a tool box.
Chests
Formally, this is a variation of a standard container, but here the aesthetic component comes to the fore! Large manufacturers of handicraft goods, for example, the same DMC, offer luxurious wooden chests, which, of course, are exactly as expensive as they seem from the outside.
Cork board
Photo: whimsiology
Do you prefer more extravagant methods? Then try making storage an element of interior design. This means that you do not need to hide and put away handicraft supplies in the closet, but, on the contrary, place them in the most visible place. A cork board (or better yet, several at once) on the wall will do the job perfectly.
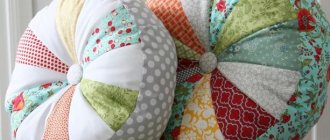
Pencil case
Its principle is similar to a project card, since it is most convenient to use such pencil cases for working on individual projects. Suitable for boned floss.
Open wardrobe
Photo: Judy Nolan
You are unlikely to find such a cabinet on sale, so you will either have to work hard yourself or make it to order. A stunning decoration for your sewing room!
Files and packages
A simple and affordable way in which your threads are always separated by color and do not gather dust. To do this, you will need special files for coins, divided into segments.
Glass jars
Rather, it is suitable for those threads that are somehow out of your main collection - old, without numbers, running out, etc.
Whatever option you ultimately choose, the main thing is to have fun working, even if you are working in complete creative chaos!
Photo: pinterest.com
Author of the material: Red thread
Making bobbins
Cardboard bobbins for floss are made as follows:
- Take a tea bag or a box of chocolates;
- Cut it into oblong rectangles, about 6 cm each;
- Round the edges;
- Make a small notch to fix the thread into it;
- The floss organizer is ready.
This organizer for floss is very popular, but needlewomen prefer to print ready-made templates from online resources on cardboard and cut them out. Then the organizer for floss turns out more beautiful and faster.
To distinguish shades, you can use an organizer for floss:
- Sign with a pencil, pen, marker, etc.
- Stick thread labels, etc.
This floss organizer is easy to use, but it is less durable than a plastic one. To improve it, it is recommended to cut small holes and assemble the bobbins into a single ring.
It can be made from wire or use an old, unnecessary large earring. Then the organizer for floss (bobbins) required for a specific picture will always be at hand.
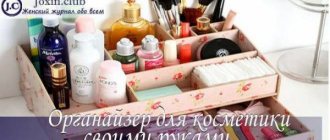
Decorative box
Some needlewomen are so successful in creativity that they can compete in skill in various fields. They are good both in embroidery and in beading or knitting. For such craftswomen, it will not be difficult to make an organizer for floss with your own hands from scratch, using available materials to create it.
Thanks to the detailed master class presented below, the work will seem surprisingly simple and will bring a lot of pleasure.
To make an organizer you need any free cardboard box with a hinged lid, beautiful fabric for covers, hooks, braid, beads for decoration, old vinyl wallpaper, small clothespins, scissors, threads, needles, glue.
We take measurements from the box. From a material (it’s better to take an elegant and thick one) we sew a cover over them.
It can be decorated with ribbons and lace or stripes and rhinestones.
Next we sew the inner cover. We sew pockets and braid onto it, on which clothespins and floss will later be attached. Instead of an inner cover, you can use old vinyl wallpaper and cover the inside of the box with it. But then there will be no way to sew pockets.
Hooks are sewn onto the lid. It will be convenient to use them instead of hangers on which embroidery patterns will be located.
We string small clothespins onto the braid. Instead, you can use curtain clips, which are sold in any hardware department.
A number is attached to each clothespin indicating the color of the floss. The numbers can be written on masking tape or plain paper. It's more convenient to use tape - it's easier to stick it on and replace the number if it's no longer needed. The paper version is more labor-intensive. To do this, you need to print the numbers on a sheet of paper, cut them out and attach them to the clips with glue. Wait until completely dry.
To prevent the lid from falling back, we secure it with tape. Instead of braid, you can use any decorative cord, attaching it to buttons.
Related article: DIY chiffon scarf
The elegant thread organizer is ready! You can also store other embroidery tools in it, which is very convenient.
Reel Organizers
Any organizer for floss requires its own storage conditions. All spools of thread must be in a certain order and in one place. A specially designed bobbin organizer for floss is sold for this purpose, but it is expensive, so it is not particularly in demand. For these purposes, you can use any thick box with a lid, or a tin box for fishing gear.
Before placing the bobbins in the selected floss organizer, you need to determine the order in which they will be laid out. Some craftswomen believe that it is better to keep the threads in order of shades, while others - in numbered order. This is at the discretion of the needlewoman herself.
Boxes and boxes
On sale you can easily find plastic boxes or containers for storing threads and needlework. As an alternative to a container, an oblong box is also quite suitable, which can be improved specifically for floss.
In order to decorate the box like this, you need to cut strips of cardboard holders. If you want the cardboard to last longer, you need to glue it with transparent tape.
We make holders from cardboard or plastic. We fill the prepared holders with threads. We cut the threads 65-70 cm long. We fold the threads in half and pass them through the holes made with a hole punch or scissors.
On the bobbins it all looks something like this, only instead of ribbons, threads are wound onto the bobbins.
See what other options for organizers for embroidery, sewing threads, spools, needles can be made from scrap materials:
Even from simple, ordinary boxes, if you sand and paint them, you can make a container for storing boxes of floss and knitting and sewing supplies:
DIY floss organizer
- Initially, you need to print on A4 paper all the symbols and numbers corresponding to the diagram;
- Fold the sheet in half and cut 11 identical holes;
- Next, divide the future organizer for floss into 2 parts, each containing 11 holes for threads (if it is possible to laminate the paper, it will last longer, you can also wrap it with tape);
- Next, stick the thread symbols opposite the 11 cut holes;
- Between the two cardboard parts you need to put small pieces of foam rubber or sponge. It should be cut so that the pieces do not completely cover the cut holes;
- Glue the foam to the paper;
- Insert tailor's needles from the 3 side parts where the threads are not placed;
- The floss organizer is ready to use.
Next, you should thread the threads into the prepared floss organizer. Initially, you will need to wait for the glue to dry and cut the threads, approximately 60-70 in length. If the embroiderer is comfortable with a different length, then she should build on that. To put thread on a floss organizer, you should: join the cut pieces in place, fold them in half and push them a little into the hole (bend), and then pull the remaining long tail into the resulting loop.
If the designation symbols are for 1 color, then 1 color and one loop should be placed in the thread organizer (hole), and if for 2 symbols, then 2 shades and 2 loops
When a large embroidery organizer is made, it is worth putting it in a box. In this case, the tailor's needles will cling to the edges of the box and hang on it, which is convenient for work. It is also good to hang small threads on them that are left after finishing working with this shade.
Using such an organizer, it is not necessary to completely remove it from the box. If you need to use a different color, you should remove the tailor's needle from it, remove the thread, and then return the needle back.
A thread organizer is a very convenient device for working with a large number of colors. Thanks to it, you can reduce the time spent searching for the right shade, and also restore order after finishing the work in a matter of seconds.
The simplest option
Those craftswomen who love order to the point of perfectionism, but for some reason do not want to spend a lot of time and effort on creating a place to store needlework tools, will appreciate a very simple idea for creating a catalog for threads. Yarn in such a place will be stored like books in a library - each in its own compartment with its own number assigned to a specific color.
To make such a storage case, you don’t need to put in a lot of work. All you have to do is buy a plastic container with compartments at any hardware store and a couple of thin plastic boards for modeling in the office supply department. The boards will be useful for cutting out bobbins on which threads will be wound.
Below is an example of how to correctly lay out the board in order to get neat, comfortable bobbins.
After the future thread spools are ready, we put numbers on them corresponding to the yarn color numbers. This must be done in such a way that the numbers are on top of the reels and are visible when opening the box. We put the floss into a plastic case according to color.
Now the threads will get tangled and they can always be found by number. Another interesting option for making such an organizer is presented in the video.
Article on the topic: Schemes for cutting out paper snowflakes for the New Year and a rabbit for Easter