Reads: 733
Reading time: 16 min.
no comments
Factory-made decorations for the New Year cannot replicate the energy of handmade products. Perhaps the handmade is not so flawless, but the master puts his soul into it. In this master class we will tell you how to make a New Year's ball with your own hands, so that you can proudly decorate the interior of your own home with it.
In addition, you can engage your children with this creativity. Making jewelry in the family circle develops children's motor skills, brings loved ones closer together, and also allows you to get a lot of beautiful jewelry much faster.
Christmas balls made of threads
The method of making balls from threads has long been used. The products are spectacular and lend themselves to additional decoration. It is possible to vary the size.
To make it you will need: threads (with a large percentage of natural fibers in the composition for good impregnation with glue), PVA glue, a disposable glass, round balloons. Manufacturing stages:
- Prepare glue for work. Dilute very thick mixture to the consistency of sour cream.
- Inflate the balloon to the desired size of the toy.
- Soak 1 meter pieces of thread in glue.
- Wrap using the “gossamer” method so that the free holes do not exceed a diameter of 1 cm.
- Allow the glue to dry (12 to 24 hours).
- Remove the ball from the product by carefully bursting it and removing it through the hole of the ball.
- Decorate the product. For this they use: glitter, paper cuttings of various shapes, sequins, beads, semi-beads, etc. Products made from threads can also be painted with paint from a can or acrylic. Watercolor and gouache are not suitable, as they can soak the product and lead to its spoiled appearance.
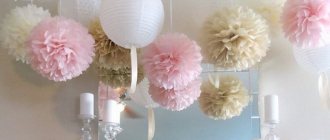
Having made New Year's balls of different diameters, you can decorate any corner of the house with them: a Christmas tree, candlesticks, compositions in a vase, on a windowsill, etc. Balloon decor can be done like this: place a light garland on a tray and place items of different sizes but the same color on top. When the garland is turned on, they will be illuminated and create an interesting effect.
Christmas balls made of jute
Now the fashion is eco-style, which is as close to nature as possible. The most commonly used material is jute or rope.
And they make cool Christmas tree decorations.
Let's do this.
Let's take:
- base ball,
- Titan glue,
- jute or rope,
- scissors,
- decorations.
Starting from the tip, wind the rope in a circle. It needs to be fixed with glue.
When the ball is completely wrapped, we form a loop.
We decorate the craft as you wish.
Option number 2. Here we need to make a hollow craft, but without using a balloon.
Let's take:
- rope,
- cling film,
- toilet paper,
- PVA glue,
- decorations.
Cut a piece of film.
Tear off a couple of meters of toilet paper and crumple it into a ball.
We wrap this blank with film.
Take PVA glue. We poke a hole in the upper “reach” and pull a rope through it. This way it will be evenly saturated with glue.
We wrap the coated rope around the workpiece in film.
Let the pieces dry for a day.
Then carefully unfold the film and pull out the toilet paper.
Use your finger to tear off the film from the surface of the craft.
Here are our Christmas tree decorations.
Just make a loop from the ribbon and tie it to them. So that they hang well on the tree.
Below I will show examples of decorating such jute toys.
The white rope looks very nice.
Simple but very stylish.
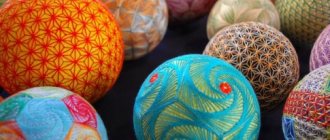
From beads
Balls made of beads will look very beautiful and impressive on the Christmas tree. In this case, the foam spheres of the blanks will be decorated. In addition to the foam blank, you will need beads, pins (sewing needles with heads like those on nails), and ribbon.
The manufacturing method is very simple:
- Thread one bead onto one pin.
- Attach a pin to the foam base.
- Repeat until there is no free space left on the base.
- At the end, attach a ribbon loop for hanging the decoration.
It is advisable to take beads of the same size to avoid empty spaces on the base. The color scheme is chosen both in one tone and in different ones. It all depends on individual preferences and the overall style of decorating the room. Instead of a foam base, you can use plastic factory balls. Only in this case the beads will be attached not with pins, but with hot-melt glue.
Master class on creating a New Year's ball from satin ribbons using the kanzashi technique
And now I’ll tell you and show you how to make a real toy not only for the Christmas tree, but also for interior decoration in the kanzashi (artichoke) style.
This is what should happen in the end.
And as usual, I’ll give you more options for making them from satin ribbons.
From buttons
Balls made of buttons will look no less original and unique on the Christmas tree. Old unnecessary buttons do not have to be selected in the same color scheme. After all, you can always repaint them and achieve the desired shade. They look impressive in gold, bronze, silver shades, as well as all colors with metallic coating.
To make this decor for New Year's balls, you will need: buttons (can be with through fastening or hidden), hot melt adhesive, foam or plastic blank, ribbon.
- Apply a small amount of hot glue to the inside of the button.
- Attach the button to the base.
- Carry out the steps in step 2 until the entire surface is covered with buttons.
- Attach a ribbon so that the ball can be hung.
When placing them on the tree, you need to make sure that there are not too many of them concentrated in one place. It is better to dilute such decorations with others.
Kimekomi technique master class
I use a modern adaptation of the kimekomi technique, which uses polystyrene instead of wood composite as the base material. Note that polystyrene is an ideal material for this technique as it is easy to cut, especially when the design contains curved cut lines. Surprisingly, due to its light weight, it is also the most environmentally friendly option. In addition, polystyrene is water-repellent and therefore mildew-resistant, which contributes to durability when making a kimekomi Christmas tree ornament.
Due to the fact that I often use delicate fabrics such as satin or turf/cotton, I cannot use glue to secure the fabric, it will seep right through. I use a glue stick between the base and the decorative fabric. I apply decorative cord along the cut lines. For example, cords that are not glued, but simply pinned together. Because they help hold the fabric in place in the finished products. In addition, they highlight the pattern by separating the different fabrics and give the jewelry a neat and sophisticated look.
Christmas balls made from scraps
If you have bright scraps of fabric, then it's time to put them to work. We will make New Year's balls from polystyrene foam and fabric. First you need to make a foam base yourself or buy a foam ball in advance.
Watch the video: how to make a foam ball in just 4 minutes
To make a toy we will need:
- Foam blank ball.
- Fabric in two matching, contrasting colors. It is desirable that one type of fabric be used as the main pattern-motif, and the second as the background.
- The edges, in my case, are gold in color.
- Thin satin ribbons.
- Various beads or sequins decorations.
- Stationery knife and nail scissors.
- Wooden skewer or how I use a fabric ripper.
- A stroke for filling in extra lines if your fabric is even a little see-through.
- Clove pins, ballpoint pen, glue stick, Gel-Moment or Crystal-Moment glue.
First of all, you need to find the middle, usually this is not difficult, find the meridian. The meridian is visible on the ball if you look closely. After this, divide the ball into shares. It is most convenient to divide the ball in half, then in half again, and then each share in half again. For this I use a narrow measuring tape.
An example of a kimekomi technique diagram is in front of you. Perhaps you think that drawing a ball is difficult? Try it and you will succeed, just draw the ball as in the photo, stepping back 3-4 cm from the top, marking them with dots.
Now paint over the extra lines with a stroke so that they do not show through the fabric.
After this, make templates from polyethylene foam and cut them out taking into account allowances of 0.5 - 0.7 cm.
Also cut out 8 pieces from fabric in two different colors.
After this, when making Christmas tree decorations using the kimekomi technique, we make cuts along the marked lines with a stationery knife of about 5-8 mm. On the other hand, if you have a small ball, you cannot cut deep.
Next, apply a glue stick to the foam area. After this, apply the fabric so that there is an equal allowance on all sides. Now, using a ripper or skewer, we tuck the edges of the fabric into the slots of our Christmas tree decoration. In addition, you need to start tucking the fabric from the middle on both sides in parallel, gradually moving towards the edges. Then we will cut off the excess fabric with nail scissors. We'll handle the rest.
This is how we did it.
We close the resulting joints with gold cord, which we glue with “Moment” glue. Using a needle, carefully pick up a small amount of glue and apply it to the joint. We tuck the tip of the cord inside and then begin to glue the rest of the cord, pressing slightly.
With the help of decorative elements you can hide imperfections.
We make a bow on top and attach it with a decorative pin.
Our kimekomi balls are ready!
Depending on the length and location of the lines when drawing the cutting pattern, we get different balls.
See also: making Christmas tree decorations from various materials
From paper
Original New Year's balls can be made simply from paper, without using any base.
Ball of colored paper
To do this you will need thick (approximately 120 g/m2) paper, scissors, pins, and tape. Making the blank yourself is very simple.
- Cut 12 strips of paper measuring 15 mm x 100 mm
- Fasten all the strips on one side and the other with pins, retreating from the edge by 5-10 mm.
- Spread the strips in a circle, forming a sphere.
- Attach the ribbon to the base of the ball.
The strips can be cut not straight, but with other uneven lines. You can use curly scissors.
Corrugated paper
Corrugated paper will also come in handy. Pom-pom balls are created from it. For this you will need: corrugated paper, glue, scissors, tape.
- If the paper is new and packaged, then measure 5 cm from the edge and cut it off. Then measure 5 cm again and cut off.
- Cut two blanks into a “scallop” with an interval of strips of 1 cm without cutting to the base 1.5 cm.
- Unravel one piece and begin to twist it into a “flower” in a circle, gradually gluing it together. You will get a fluffy pompom. Repeat the same steps with the second workpiece.
- Connect two pompom blanks with glue at the gluing site. You will get a fluffy ball. Attach a loop tape to the gluing area. Fluff the resulting pompom.
Made from double-sided colored paper
You can also make a ball from double-sided colored paper. To do this you need: colored paper, scissors, glue, a round object (a cup, for example), tape.
- Trace the cup on paper 8 times. You will get 8 equal circles. Cut them out.
- Fold each circle into quarters.
- Cut an additional circle with a smaller diameter.
- Glue the blanks to it with the corners to the center on one side (4 pieces will fit), and on the other side the same.
- Open each fold and glue it together at the joint. You will get a ball with “petals”.
- Attach the ribbon.
Paper balls, as a rule, do not last long and are used for one season. You shouldn’t place them in large numbers on the tree; it’s better to “dilute” them with other decorations.
From felt
Soft and pleasant to the touch, felt is simply adored by small children. To develop fine motor skills in your little ones' hands, encourage them to help you make jewelry. To work, you will need several sheets of paper, squares of felt, tracing paper, scissors, a needle, thread, decor of your choice, a glue gun and silicate glue sticks.
Instructions:
- To begin, draw templates of flowers of different sizes on A4 sheets.
- Take tracing paper, place it on pink felt and draw a large flower.
- Repeat the previous step as many times as necessary.
- Next, do the same with felt of a different color, trace a small flower in the same quantity through tracing paper.
- Cut out all the pieces.
- Sew the flowers into one, stick a bead in the center to hide the knot.
- Glue the resulting flowers with silicate glue to the New Year's foam ball with your own hands.
The finished product can be used not only for the New Year holidays to decorate the Christmas tree, but also as a decor for photo zones for birthdays, corporate events and even weddings.
From fabric
If you have an old blouse in your closet that you hate to throw away, then not recycling it was the right decision. You can make a cute Christmas tree toy from it. For production you need: knitted fabric, scissors, sewing needle and thread, cardboard, tape.
- Cut the longest strips of fabric 1 cm wide. Stretch each strip so that it curls the edges.
- Cut cardboard measuring 10 cm x 20 cm.
- Wind the resulting strips onto the cardboard along the width.
- In the center on one side and the other, connect the strips with a needle and thread. Pull out the cardboard.
- Cut the resulting loops along the edges.
- Fluff and attach the ribbon.
There is another method that involves decorating a foam or plastic blank with fabric. You need any fabric (can be of different colors), hot glue, scissors.
- Cut the fabric into rectangular pieces measuring 3 cm x 4 cm.
- Fold them like this: fold the two top corners towards the center of the bottom.
- Glue to the workpiece in rows, with curves inward, starting from the bottom.
- Cover the entire ball. Attach the ribbon.
Fabric appliqués can be made in a variety of ways, using additional improvised means - beads, braid, rhinestones, ribbon.
Kusudama technique
Making balls using the kusudama technique is a godsend for creative people. The results are very interesting and original products. It may seem difficult at first glance to make them, but even a beginner can cope with this task. This type of art came to our country from the Far East - Japan, where children learn to work with paper from a very early age. The result is beautiful balls, which are made from readily available materials. Kusudama is also a type of origami where you can create a ball using modules. Our master class will show you how to make a ball in this style in the shape of a lily flower.
What you need to prepare:
- thick paper of different colors, we need three;
- needle and thread;
- ribbon and beads.
At the first stage we will make a flower. We will need a leaf from which we will make an equilateral square of 9 by 9 cm. We bend the resulting figure in half and smooth it thoroughly with our fingers.
Related article: DIY birthday crafts: best ideas with photos and videos
We align the leaf and now you need to fold corner to corner in the form of a scarf, iron it. Then, we align and repeat the first two steps again. Press the middle of the leaf and fold the leaf so that we form a double square. Look at the photo below for the sequence of actions. Now we unbend and iron each edge of the figure, as shown in the picture, thus doing the same with the four corners.
Now we bend the corners of the resulting product to the center. Straighten the resulting pocket, while bending the lower part of the pocket upward. We do this with all four corners.
Now the product needs to be turned over so that the flat side is on top. Now fold the corners towards the middle. Spread the resulting petals so that they look down. All that remains is to straighten it and use scissors to make it rounded. The flower is ready. To create a ball you need to make 36 lilies.
When everything is ready, you need to sew three lilies together using a needle and thread. We do this with everyone else, in the end we should get 12 inflorescences, which we connect into one ball.
For decoration, you can attach a ribbon in the middle with beads strung on it, and the ball will be finally ready.
With embroidery
Decorating New Year's balls with your own hands is also possible in this way. Decorating Christmas tree decorations with embroidery has become a new trend. To do this, use a pre-embroidered image. You also need fabric, a piece of foam or plastic, and hot glue.
- Attach the embroidered image using glue.
- Decorate the remaining area of the ball with a fabric appliqué.
Instead of appliques, you can use the same fabric on which the embroidery was made. Alternatively, you can make a pattern from fabric, where one of the parts will be embroidery. You can also decorate each part of the pattern with separate embroidered images and secure them. After these steps, you can additionally add beads, rhinestones, sparkles, and sequins as decoration.
Tips for decorating Christmas balls
The final result depends on the chosen material. The phrase is simple, but when faced with the need to create a beautiful craft, many people get lost. We'll show you how to choose original decor and surprise everyone in the coming New Year.
Beads, beads
Beads and beads will be a stunning decoration for Christmas tree balls for your home decor. There are several ways to create an interesting design using this material: depending on what you choose, you will need fishing line, thread or a heat gun.
You can simply wrap a toy with a garland of beads, securing everything with hot glue
Real pictures are woven from beads, but such work may not be possible for a child
Using bead weaving patterns, a non-standard decorative Christmas tree toy is obtained.
Sequins will add brightness and sparkle to the tree. Their cost is not particularly high; they are attached to the ball with glue
This type of braiding requires time and attention. But preparing for the celebration together only strengthens family relationships.
A simple warp braiding pattern
Showing your imagination and surprising everyone with special beauty is not so difficult: it is better to attach beads and beads not to a fishing line, but to a thin wire
The toy is like wearing a cape of jewels. Looks especially elegant
Buttons and pasta
Button decor will appeal to children: bright buttons are easily glued using ceiling tile adhesive and do not require painting. Although, if you wish, you can paint the entire toy at once from a spray can.
Bright and beautiful, and most importantly - easy
Pasta has long been receiving increased attention from Handmade lovers
The various shapes of pasta are original in themselves. Painted, they make fun decor
With filling
Such specimens will look spectacular both on the Christmas tree and as part of balloon compositions. To make unusual balls, you need to stock up on transparent plastic blanks.
By opening the cap holder, you can create various compositions inside:
- Pour acrylic paint of different colors inside, shake the ball so that all the inner walls are painted, and let dry. The pigment will color the inside of the workpiece and it will acquire a unique color.
- Fill the inside with small colored feathers and beads.
- You can also pour confetti of different colors inside.
- Pieces of old tinsel are used for filling.
- Favorite photos are also placed inside. To do this, you need to twist a small photo into a tube (look at the diameter of the ball) and straighten it inside. Add confetti or sequins.
- The interior is filled with colored cotton wool and complemented with beads. You can choose different colors. It is better to paint with acrylic paint. Fill after the cotton wool has completely dried.
- Multi-colored sisal can be placed inside and enjoy the color and originality of the decoration.
Fantasies about filling a transparent ball can be different. They all relate to personal preferences and mood during needlework.
Thread products - knitting and gluing
A New Year's ball made from thread is very popular. The inside of the toy is hollow, it is not difficult to make, and such products look original and festive. Such a ball can be used to decorate a Christmas tree, or as an additional decoration for an apartment. If decoration is necessary to complement the New Year's design of the room, then the toy should be made larger. In addition, you can create a New Year’s character or a whole garland from several balls; you just need to use your imagination.
Christmas balls made of threads will look original on the Christmas tree.
Required materials:
- starch;
- shiny threads of different colors;
- balloon;
- PVA glue;
- brush.
Making a toy:
- Before you make Christmas balls with your own hands, you should prepare all the materials and tools. The balls do not have to be large if they are intended to decorate a Christmas tree; it is enough to choose a size with a diameter of 10 centimeters.
- Pour one and a half cups of PVA glue into a bowl, and add 1/2 cup of starch there. Pour 1/4 cup of water into the mixture. The resulting composition is thoroughly mixed.
- The selected thread is dipped into the bowl and then carefully wound around the inflated balloon. The winding process occurs in random order.
- Since the thread may stick to the surface of the ball, it is first lubricated with a layer of Vaseline. Vaseline will allow the thread to move away from the surface of the ball faster.
- Leave the workpiece in this form for several hours so that the glue dries and the thread hardens.
- The balloon is pierced with a needle and carefully removed from the finished toy.
Using this technique, you can make several products, and then consider options for how to decorate the New Year's ball using sparkles, beads or sequins.
Another option for creating such a ball, but in this case the toy will already be additionally decorated with details. This ball can be hung on the Christmas tree or given to loved ones.
Required materials:
Variant of Christmas balls made of threads.
- PVA glue;
- satin ribbon;
- balloon;
- multi-colored tinsel;
- dense threads;
- Super glue;
- multi-colored sparkles;
- needle;
- baby cream or Vaseline;
- sequins.
Making a toy:
- To make original New Year's balloons with your own hands, you need to inflate the balloon to the desired size.
- The prepared ball is lubricated with thick baby cream or Vaseline.
- A prepared thread is taken, threaded through a large needle, and then a bottle of glue is pierced with the needle. A thread is pulled through the bottle, thereby lubricating it with glue.
- The needle can be removed, and the thread begins to gradually wind around the ball. The winding process and the amount of thread vary as desired.
- The glue dries quickly, so while the thread is still wet, sprinkle the toy on all sides with sparkles of the chosen color.
- Leave the workpiece in this form for a day or more so that it dries well. As soon as the toy is dry, the ball is pierced with a needle and removed from the toy.
- Now you will need a thin satin ribbon; you can use it to make bows or flowers. The blanks are attached to the product using super glue. You can use as many bows as needed.
- Sequins are placed between the flowers and bows; they are also attached with super glue.
- So that the finished toy can be placed on the Christmas tree, a string is attached to it. It is better to use a satin ribbon or shiny lace.
Balls of thread can not only be made using this method. If the craftswoman knows how to knit, then making a beautiful Christmas tree decoration with her own hands using knitting needles or a hook. To make the product look festive and bright, the yarn must be shiny.
With varied decor
You can attach anything to the blanks. Here are some ideas:
- Ribbons. You can make various patterns from ribbons (geometric themes, monograms, stripes, etc.). They are secured with hot glue.
- Sequins. The sequin braid is wound around the circumference and secured with hot glue. You can choose several colors to combine.
- Braid. Various braids from any material are also suitable for decorating Christmas balls.
- Lace. It can be complemented with semi-beads or rhinestones. Organza ribbon will also be combined with lace.
- Paper cuttings. Various figures made using a figured hole punch will decorate any ball.
- Felt cuttings. Attached cut-out figures of various themes will be conveniently placed with glue from a hot-melt gun.
- Old jewelry. Lost earrings or unnecessary brooches in combination with other decorative elements will add special chic to the decoration.
DIY New Year's ball from kanzashi ribbons
It is not necessary to create complex patterns to get a beautiful New Year's toy. Take a round blank, wrap it with a satin ribbon and decorate it with decorative elements - snowflakes, stars, beads or beads. The original Christmas ball is ready.
We will need:
- satin ribbon 5 cm wide;
- thread with needle
- beads
- wire
- lighter;
- 40 cm soft wire for crafts;
- end switches (bead huggers);
Progress:
We fold the ribbon into triangles into petals. We fix each corner with a needle and a nickname. The most important thing is not to cut it off, but to fold it from a whole strip - 12-14 leaves. We cut the ends of the tape and solder both ends using a lighter.
We stitch the back side of the bud. Leave a small hole. We must make 2 of these buds. Then we connect them to each other alternately by inserting beads between them. We twist them together in the middle (approximately 7-8 cm). We insert the ends of one side of the twisted wire in the middle between the petals of the halves. We fasten them with news. We do the same with the other half. Next, we take the part from both sides with both hands. We twist the wire several times so that the petals twist into a spiral. We adjust the petals so that they lie flat. Finally, we string the end switches onto the wire on both sides. We twist the wire and hide it inside (or cut it). Petals can be curled in different ways, so feel free to experiment.
Kanzashi technique in artichoke style
You can make many wonderful Christmas tree decorations from ribbons. Despite the apparent complexity, they are easy to make. You will need to be patient, but skill will come with experience. For beginners, it is better to start with simpler models.
Ball of ribbons and beads
The tapes are wound according to the principle that we have already discussed.
Jewelry made from ribbons looks very beautiful and original. What is most important is with a small amount of financial investment. You can involve children in making toys, so step by step we will develop their perseverance and ability to develop.
Results
Anyone can buy regular Christmas tree balls to decorate a room for the New Year. But these will be just decorations, like everyone else’s. Only decorating New Year's balls with your own hands can bring a bit of uniqueness and soulfulness to the interior. To do this, you just need a desire and some materials that are likely to be found in every home. Making New Year's balls with your own hands is not only pleasant, but also fashionable. “Handmade” has gained even more popularity in recent years. Therefore, making Christmas balls is not only popular, but also useful for your own home.
Coloring pages for the New Year - Christmas balls
Perhaps coloring books will also be useful for creativity. Therefore, below is a selection.
Option for Christmas with an Angel.
It turned out to be a long article, but there are a lot of ideas. Save the entry to your bookmarks so that you always have it at hand.
All the best to you and a happy New Year!
Rhinestones and sequins for Christmas balls
Decorating New Year's balls with the help of decorative details is often used by craftswomen, since on sale you can find ordinary plain balls that can be easily decorated to your liking. Small and large beads, as well as beads, sequins and sparkles are attached to the glass blank. This craft doesn’t require any skills, just use your imagination.
Required materials:
- sequins;
- rhinestones;
- beads;
- plastic or glass ball;
- PVA glue;
- brush.
Making a toy:
- To get beautiful New Year's balls, you can select several blanks. Glue is applied to each ball using a brush.
- While the glue is still wet, sequins, beads, beads or rhinestones are poured onto it. You can combine these decorative details to create unusual designs.
- In order for the surface to be completely covered with beads or rhinestones, they must be lightly pressed against the surface of the toy.
- The toy is given time to dry so that the small parts can grip better.
- After this, the product is complemented with an openwork ribbon so that you can hang the craft on the Christmas tree.
Helpful advice! The method has a disadvantage, it lies in the fact that small parts glued to PVA may crumble after a while. To prevent this from happening, you can fix the decoration with a special varnish. Another option is to use decoration inside the ball if it is transparent. To do this, the walls of the ball inside are smeared with glue, and then sequins, rhinestones or beads are poured inside.
Felted wool balls
New Year's ball made of wool for the Christmas tree.
The master class on making handmade New Year's balls is not difficult; this wet felting technique is suitable even for beginners.
To create a toy you will need:
- wool for felting;
- felting needle;
- padding polyester;
- a thread;
- nylon socks.
Making a toy:
- Making a New Year's ball is not difficult; you should start by preparing the base. To do this, make a ball from padding polyester, which is tied with thread; it is necessary to obtain the most even workpiece.
- Once the ball is ready, it is covered with the first layer of wool, and then the wool is lightly felted using a thick needle.
- There must be at least five layers of wool, and they must be perpendicular to each other.
- The prepared balls are placed in a golf ball and tied tightly so that the wool does not tangle.
- Place the blanks in the washing machine and wash with powder.
- The finished toys are removed and dried.
Decoration of New Year's balls is done after they have dried. Glitter varnish, small beads and seed beads, and various ribbons can be used as decoration.
Note! Felting with a needle is difficult for beginners, so you can do without this procedure. However, if you roll it onto the ball, the toy turns out more even and beautiful.
Painted curls - working with paints only for artists
This is another simple way to decorate Christmas balls and decorate the Christmas tree with them. Dot painting is popular and is suitable for both beginners and professionals. Small dots merge into a single composition, and they also create an unusual texture.
Required materials:
- Christmas ball preparations;
- multi-colored acrylic paints;
- fine sandpaper;
- wide brush;
- acrylic gloss varnish;
- acrylic contours in the required colors.
Making a toy:
- On the New Year's tree, toys in gold, silver and bronze shades will look more festive. Therefore, the base should be chosen in exactly these tones.
- When the coloring of the ball is completed, its surface is coated with acrylic varnish.
- As soon as the base is dry, you should start decorating. To do this, use multi-colored contours, in our case they are gold and silver.
- The outlines are made so that small dots can be made. Decoration can be done symmetrically using a sketch of the design. Or the craftswoman can apply the design in a chaotic manner.
- The design of the ball with dots in a circle looks beautiful; for each next circle, a separate color of paint is used.
- To further decorate the product, you can use large rhinestones and beads.
When drawing dots, you need to make sure that the dots are the same size and there is the same distance between them. To make it easier to work with this technique, you should draw rays along the cardinal points. Additionally, three-dimensional decor of New Year's balls is used; for this purpose, the paint is applied in several layers, creating relief.
Painted balls are a real masterpiece for the New Year tree.