The history of the tradition of using baba for a teapot
The history of the tea ceremony in Rus' began more than 300 years ago. The event often took place at a strictly defined time:
- morning hours;
- noon;
- at 16 o'clock in the afternoon.
During the tea drinking period, life slowed down, and a period of quiet conversation with relatives, neighbors and friends began. The drink was served with gingerbread, honey, rolls, bagels, and crackers. According to tradition, tea was drunk on a grand scale; most houses had a samovar with a service set for welcoming dear, honored guests. Simultaneously with samovars, the history of a teapot with a special doll or hot water bottle begins. Since the beginning of the 18th century, a hot water bottle, a tribute to the beliefs and idolatry of the ancient Slavs, has become a mandatory accessory in every Russian hut.
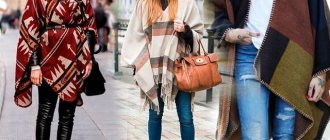
Europeans also had an analogue of a woman for a teapot. The product was called Tea cozy. The appearance and manner of use differed from the Russian one. It was worn like a cover and was not removed even when pouring tea into a cup. Tea cozy was designed to retain heat for as long as possible. The product first appeared in Great Britain thanks to the Duchess of Bedford, 1867. The noblewoman became the founder of the fashion for afternoon tea. The British aristocracy of the 19th century loved to get together and discuss the latest news with gossip. The case kept the drink warm for the entire duration of the call. At the end of the 19th century, most families in England adopted the fashion and had products at home. During the same period, Tea cozy was also known in America, where it was no less popular among ladies.
In Russia, a simple item was a kind of cap made of warm material. The appearance of the heating pad depended on the creative abilities of the master. Manufacturers created dolls in the shape of bears, roosters, and nesting dolls. The tea accessory was treated with great care; it became the pride of the housewife. Dolls for teapots were made for personal use or as gifts for friends and relatives. The product became the embodiment of the creative skills of craftswomen, and not an object of industrial production.
The woman on the teapot in Russia played a practical role - it served as a heating pad, had an aesthetic, decorative meaning - it decorated the hut and had a sacred purpose.
According to the beliefs of the Slavs, the object served as a talisman; the doll was the Bereginya of the home and family. It was placed on the windowsill or above the front door and it was believed that it protected children's sleep and family well-being. The status of the doll was equal to that of the samovar.
During Soviet times, the tradition of using baba for a teapot was preserved. The head of the product served as a handle, and the skirt served as a heating pad. With the advent of electric kettles and tea bags, the item began to lose its functional significance and gradually became a thing of the past. Today, the accessory is rarely found among residents of megalopolises and small towns; it has become a collectible or handicraft item.
Modern varieties
In the 21st century, the subject of the tea ceremony has not been forgotten. A wide variety of teapot dolls have survived to this day. It is possible to make a woman for a teapot with your own hands at home and anyone can do it if they have basic sewing skills. The lower part - the skirt is always sewn around the circumference. The main difference between the products is in the upper part. Among the original teapot warmers, there are several types:
- traditional;
- tilda-warmer;
- from stockings and threads;
- Baba Bereginya.
Each variety has its own distinctive features and manufacturing features. The product will test the skill and creativity of each needlewoman.
From stockings and threads
Bereginya
Traditional
Tilde
Traditional
The traditional type of doll is a quilted cap made of wool or fabric. The product is stuffed with cotton wool and sewn in accordance with the size of the teapot. A similar heat preservation accessory is available for self-production at home. The product should be put on at the end of the brewing procedure, otherwise the drink will lose its pleasant aroma and will stink. The product was popular at the beginning of the 19th century; today needlewomen rarely choose it for sewing themselves. For sewing, they often choose a product in the form of a chicken or a woman in traditional Slavic clothes.
Tilda warmer
Tilda dolls are especially popular today in different parts of the world. The product appeared in 1999 thanks to the Norwegian needlewoman Toni Finnanger. The creator came up with the first patterns and built a real manufacturing business. The name is associated with the girl’s first work; the doll’s first name became a term for the whole brand.
The product has a number of distinctive features:
- using only natural materials - linen, calico, cotton, wool, fleece, flannel;
- simple cut;
- symbolic facial features;
- large length of arms and legs relative to the body;
- presence of blush.
A completely rag product has been used as an idea for a teapot warmer. Tilda heating pads are in demand today among many needlewomen and are suitable for making at home.
From stockings and threads
Dolls made from stockings and threads are in high demand today. The reason was the availability of materials and ease of manufacture. The original designer product is durable. Nylon is much more reliable than cotton, calico or any other material. Nylon is easy to deform without losing its shape. With the help of bends it is easy to model any shape of the nose, lips, arms, legs. Every representative of the fair sex can master the technique of making dolls from stockings and threads. Making products at home is not difficult, and every girl has most of the necessary materials.
Baba the Bereginya
The Bereginya doll served as a talisman to protect the family hearth and the well-being of the family. The product is a symbiosis of masculine and feminine principles. Initially, rags that were unsuitable for wear were used for production. Such a choice provided strong energy. But often they choose any natural material. Red threads are used for sewing; this color increases the power of the amulet.
The main distinguishing feature of the Beregini doll is the absence of a face. Otherwise, it is similar to a traditional teapot warmer. It's easy to make at home. Today it has lost much of its popularity; master classes on its production are often held in local history and ethnographic museums.
DIY doll for a teapot: master class and diagrams
A teapot toy with tea leaves, or baba, as it is also called, has always attracted the attention of children and adults. This is an important element of a home tea ceremony, which is not only decorative, but also has practical applications.
Most often, this is a textile doll with a long fluffy skirt, which hides underneath a petticoat made of padding polyester or other insulation. Thanks to this petticoat, the toy prevents freshly brewed tea from cooling quickly.
The culture of using a heating pad for a teapot originates in England in the 19th century, but it was in Russia at that time that this element of tea drinking began to be created in the form of a buxom beauty. During the Soviet period, teapot toys were popular not only in everyday life, but also represented the country as souvenirs.
Warmers can look like not only dolls, but also animals or fairy-tale characters. They can be created using different types of needlework and tools. They can also be made in different styles and techniques.
You can create such a heating pad yourself or purchase it from craftswomen. Many of them offer teapot toys among their finished works. Each toy is unique and reflects the unique energy of the needlewoman who created it, the love and strength invested.
Usually the process of creating a woman for a teapot does not require much time. But how much delight and joyful emotions it can bring! Using very few materials and imagination, you will definitely be able to create a unique masterpiece!
You need to prepare:
DIY crafts
Simple advice on how to sew a heating pad for a teapot
It’s getting colder outside and you’re increasingly drawn to drinking tea and bagels? Wonderful. Let's go to the kitchen and begin the process. Oh, what a shame, you have to heat the kettle again, which means you have to wait.
Why waste time. I suggest we get down to business. We are opening a master class. So, let’s sew a teapot warmer with our own hands. You can, of course, get by with a bath cap or an old ski cap.
But I suggest you use your imagination and depict, for example, a rooster, or maybe a chicken. And if he does, then it will be a Russian woman in a national costume or an important merchant’s wife.
I assure you, it will not be much more difficult, but much more interesting.
First master class
Hotty cock
For the base you will need:
- cotton fabric;
- padding polyester;
- buttons - 2 pcs.
This is all. Even a sewing machine is not necessary if you have the desire and skillful hands. And I’m sure you will always find scissors and thread with a needle in your home.
1. Let's start making a simple paper pattern . To do this, you need to measure the circumference of the kettle, including the spout and handle, as well as its height. We take these dimensions as a basis.
Take the simplest version of the drawing first. I found it on the Internet.
2. Selecting fabrics . The pattern can be absolutely anything, from colorful to monochromatic. If you find extra waffle or terry towels in the house, the cockerel will be irresistible.
If there is no padding polyester, then batting or any other insulation will do.
For the reverse side, you need a thinner, but again, cotton material, cambric or chintz. For the manufacture of small parts, such as a comb, beak and beard, try to find dense, preferably red, fabric. But this is also not a prerequisite. It is convenient to use felt, fleece, drape or any dense material that does not require additional processing.
3. Transfer the design from the paper base to the fabric , not forgetting to add 1.5 cm to the seams. We cut out small details (comb, beak and beard) separately. And cut it out. All parts need to be cut out in two pieces.
4. We add three layers of our future heating pad in the sequence: top, padding polyester and lining. We pin it with pins. The result was two identical blanks.
To ensure that the blanks do not fall apart and have a finished look, we sew or hand-embroider decorative seams on each of them. This will emphasize the volume.
It’s also best to sew an eye button to each separate half right now.
5. We fasten the resulting two blanks with pins or basting to each other , with the seam inward, not forgetting to first place the pre-sewn small elements in their places: the comb, the beak and the beard.
6. Before stitching completely, turn the sample inside out and try it on , placing it on the kettle. At this stage of our needlework, we need to make sure that the heating pad will fit just right. Sew the two side elements of the heating pad together using a final seam. And don't forget to finish this inner seam by hand or with an overlocker.
7. If the height of the product allows, fold the bottom edge inward and simply stitch . If not, then use braid, piping or leftover fabric to form a decorative welt for the product.
The heating pad in the shape of a rooster is ready. Now you can put it on the kettle and not worry about it cooling down quickly.
Using the same principle, you can sew a chicken , excluding one element. Yes, it's a beard. Therefore, we will not repeat ourselves, although chicken will also come in handy, since you also have a teapot. And this is already a whole family. Also consider a mitten and potholders in the same color. No doubt, your household will love it.
If you master the simple task of making such an improvised rooster warmer or chicken warmer, then believe me, you will be unstoppable. For this reason, I propose to depict something more delightful in the next master class.
Second master class
I hope you have heard about the woman on the samovar? Here. Let's make a hot water bottle doll. Believe me, this is also not difficult, since we will use only affordable materials available in every home, which means we won’t have to buy anything special. You are already quite an experienced master.
Baba on a samovar or hot water bottle doll
So. Are we sewing a peasant young lady, a merchant's wife or a society lady? The less we guess, the more interesting the result. In addition to the materials that were used for the base of the previous craft, we are looking in the house for everything that could be useful for an exclusive and truly magnificent work.
We will need:
It's simple.
1. Sew according to the pre-measured dimensions of the base . You already understand how this is done. But I propose to simplify the task even further and, as a pattern, draw a regular rectangle, the length of which is equal to the diameter of the teapot, including the spout and handle. The height is also known. Don't forget to add 2cm for seams. This will be the base, also known as the underskirt.
2. You need to stitch together the folded parts of the base with just one seam.
3. Carefully hem the bottom of the skirt , and gather the top into a gather, not forgetting to leave a hole for sewing in the body.
Now the underskirt is ready. You can leave everything in this form, additionally placing a nice apron on top of the finished doll, which can always be removed and washed if necessary. Which, of course, is very convenient.
But, if all this seems not enough for you and your imagination continues to run wild, do not deny yourself the pleasure of amusing your imagination and start sewing a chic overskirt.
4. Overskirt.
If you decide that your product is not a simple woman on a samovar, but an exclusive work of art, then do not limit your possibilities.
Use beautiful bright fabrics, lace, ruffles, flounces, artificial flowers and all sorts of fashionable accessories. Anything is good. Sew the finished top skirt along the side seams. Fold the bottom.
Once again, evaluate whether all the details are applied and fasten with a cotton base.
That's not all. A little patience.
5. To complete the masterpiece, you will have to find or make very important parts . For them, you can use elements of an old rubber doll.
Of particular value is the head, where everything is already there: eyes with eyelashes, lips, rosy cheeks and even hair. If there is no extra doll in the house, then you will have to work a little more and sew the head, torso and arms separately. Or you can link it.
Experiment. Old knitwear, socks or tights can also help out here.
6. We sew up the sewn or knitted head , turn it inside out and stuff it with filler. The pattern for the head is simple and depends on the size of the doll. I suggest using the following.
7. To create hair and style your hair, use any yarn, including bright and colored ones. You can use a soft base to embroider a smooth hairstyle with a parting in the middle, and then braid voluminous braids or tie funny ponytails with bows.
Or you can immediately create a full head of hair by first loosening an old scarf, which will give volume and a curl effect. If you decide to dress the young lady in a knitted hat, turban or a spectacular deep hat.
In this case, you won’t have to bother with making hair.
8. Cut and cut the arms and torso according to a simple pattern that does not require exact dimensions. One condition is that all parts of the body must correspond to each other. Each part requires two pieces. Sew them together with neat seams, turn them inside out and stuff them with filling. It is convenient to use knitted materials.
The patterns are so simple that you don’t have to look for them on the Internet. You can easily draw them yourself:
9. The arms, torso and ready-made head must be connected to each other to form a whole workpiece.
10. Finishing touches . Embroider funny eyes, nose and smile. Dress the doll in a smart blouse. All you have to do is carefully fasten the workpiece to the base (lower and upper skirt). All.
Just great. The result was not a woman at all, but a charming girl. But as soon as you put a crown on her head, she will already be a princess. And with a rose in your black hair you can end up with a beautiful gypsy.
Experiment. Believe me, there will be no limit to the delight of family and friends. Now you know how to sew a heating pad for a teapot with your own hands. Have no doubt, the ability to make such souvenirs will definitely come in handy. You can now give a master class to anyone.
Moreover, the issue with gifts has now been resolved once and for all. Moreover, such textile products are now in fashion. This is also a functional gift. After all, it not only decorates the kitchen, but also allows you to retain heat inside the kettle for a long time. That's what we wanted.
Enjoy your tea.
Source: https://myhobby.guru/vykrojki/grelki-na-chajnik-svoimi-rukami.html
What is needed to make a hot water bottle doll?
To make a woman for a teapot, you need to prepare a workplace. The required material and tools will depend on the chosen technique for making the doll. To create a tilde warmer for a teapot you will need:
- Two or three types of natural material. Calico, linen or cotton are suitable as a base.
- Insulation. Used to maintain the brewing temperature, padding polyester is suitable.
- Pencil and paper for creating a pattern. A printer for printing the finished template.
- Floss for making hairstyles - braids or ponytails.
- Needles, scissors, basting pins, thread, pattern chalk, sewing machine. Tools will be required to make any type of baba for a teapot.
- Accessories for decoration - beads, buttons, lace, braid,
The number of decorative elements depends on the imagination of the needlewoman. When choosing a Bereginya heating pad, the number of parts should be minimal. In other cases, everything depends on the manufacturer’s intentions.
Choosing the right material
Materials play an important role in creating a teapot doll. To make the classic version of the product you will need:
- Insulation and filler - you can use synthetic winterizer or batting.
- Cotton material for making the back side. Preference should be given to finer fabrics - chintz, cambric.
- Floss, thick thread for a doll's hair.
- Small parts of the front part are a more rigid material. Suitable drape, fleece, felt.
- For decoration - fringe, lace, braid.
The amount of material needed will depend on the size of the kettle. To understand the approximate amount of fabric, you should take measurements of the teapot - height, width, spout dimensions. To create a classic model, a small amount of materials is required. When choosing, you should give preference to wrinkle-resistant fabrics. To check, just crumple the material and look at the result.
There is a second option for creating a heating pad for a teapot. The product of the pillars is crocheted. Knitting patterns in most cases do not contain complex elements and can be made if you know the basics of knitting.
Batting
Felt
Floss
Sintepon
Cotton
master class with photos and videos on patterns
Teapot dolls have always been in demand. This is one of the attributes of the tea ceremony. Such a doll is usually an insulated doll whose skirt is quilted with insulation. She preserves the warmth of the tea that is under this skirt for a long time. In the USSR, such dolls were sewn in the form of young ladies with a full body and a skirt and represented a real woman. A master class on a doll for a teapot with your own hands will tell you how to make such a find.
Nowadays, almost every needlewoman who sews dolls makes such dolls for a teapot. Each one gets its own unique copy, precisely with the energy of the needlewoman herself, her love invested in the doll. These dolls are made using different techniques: using a sewing machine, knitting needles, or crochet hook. This may not necessarily be a doll in its truest sense. Animal warmers, tildes, etc. are often sewn onto teapots. Not much time is spent on sewing such a doll, but it brings a lot of joy and warmth. With a small amount of materials you can make a real masterpiece with your own hands.
Tilda doll
It’s easy to make such a doll yourself, you just need to prepare some materials:
- Natural fabrics, such as cotton, linen, calico or satin, as well as fleece;
- Insulation, padding polyester or holofiber;
- Yarn, floss for hair decoration;
- Equipment: needles, scissors, thread and sewing machine;
- Decorations: lace, braid, ribbons and beautiful buttons.
A master class on a doll for a teapot is worth considering based on the tilde doll.
How to sew a doll:
1) First you need to measure the parameters of the teapot, after which you need to draw up patterns for a hot water bottle doll for the teapot and cut out the patterns.
2) Place the patterns on the fabric, outline with chalk, taking into account allowances of about 1 cm on each side, and cut out the parts.
3) Sew the parts without sewing the bottom. Then turn it onto your face.
4) Stuff the doll with stuffing and sew it up.
5) Then cut out the lining according to the pattern and make the same parts from padding polyester. Sew the lining together with the padding polyester, leaving a hole.
6) Sew the doll blank together with the lining around the circumference, then turn it inside out through the hole and sew it up.
7) Cut a piece of fabric and gather it, sew it along the bottom of the doll.
 Cut out the details for the doll's dress from fleece. Sew them together.
9) Make a wig for the doll from yarn or floss and glue it to her head. Shape the face: brown the cheeks and draw in the eyes.
10) Put the finished dress on the doll. Decorate the dress with ribbons and a button.
11) Sew an apron and put it on over the dress. Decorate with ribbons.
The doll is ready. Now you can always enjoy hot tea and not be afraid that it will quickly cool down.
Plastic heating pad
If your children left behind an old doll, but you don’t want to throw it away, then you can use it to make an exclusive doll for a teapot. Not only modern dolls will look great, but also dolls from the USSR. Almost everyone has one of these. If the doll has no limbs, it will still be suitable for making a heating pad.
You need to take two rectangular pieces and a wire. Sew the material to form a cylinder. Sew the lining skirt with padding polyester and combine it with the main skirt.
Make two rings from the wire, the diameter of which should be equal to the top of the skirt and its bottom. Connect the rings using the same wire. Place inside the skirt. Sew the upper circle to the top of the skirt, folding its edge. Sew an outfit for the doll and the heating pad will be ready.
From nylon and bottle
How to make a teapot doll from tights? You need to take an ordinary plastic bottle, wrap it with padding polyester and a piece of nylon tights, the length of the bottle blank.
Shape the face. The photo shows how to do this. To do this, roll up a ball of filler, place it in a bottle and use a needle and thread to decorate the nose. Then add more filler and shape the cheeks, chin and forehead. Draw or glue eyes, embroider a mouth. Tighten the place where the neck should be with threads.
Pull the rest of the tights up and out through the neck. Give the doll hair.
Make hands for the doll from a piece of wire, prepare the wire for the fingers. Wrap your fingers with filler, connecting them to each other. Then wrap the doll's palm and arm completely. Cover with nylon tights. Decorate the fingers, highlighting them with threads.
No legs are needed as this is a teapot doll.
All that remains is to sew an outfit for the doll. Sew a jacket, then a long wide skirt, insulating it with padding polyester. Decorate clothes with ribbons and lace. You can tie a scarf on the doll’s head and then you will get a chic granny doll for a teapot.
Instead of a bottle, the base of such a doll can be made of wire. Then cover this frame with nylon and sew the outfit. Make the head and arms separately and connect all the parts.
Video on the topic of the article
Based on the videos presented, you can easily make a doll for a teapot; even a beginner can do it.
Similar articles:
knittochka.ru
Selecting a pattern and cutting fabric
When choosing a pattern, you should decide on the appearance of the heating pad. To simplify the work, you should take a universal option that is suitable for any type of woman for a teapot. The pattern consists of four parts:
- torso;
- collar;
- lining;
- dress.
For the body, you need to immediately make two identical blanks. Lining parts are also made in the amount of two pieces at once, leaving allowances of 0.7 millimeters on the sides and 15 millimeters at the bottom. When working on a pattern, you need to leave one centimeter of margin for the seams.
step-by-step master class with detailed instructions, patterns and photos
Today we will tell you how to make a baba for a teapot. The step-by-step master class that will be given in the article will help even a child cope with making this toy.
The tradition of covering the samovar with something warm and wrapping it up came from old Rus'. This was done purely for practical reasons: nowadays these kettles are electric, and they boil after a short time, but to warm up a large Russian samovar, it took a long time. Try boiling a full kettle on gas - it takes much longer to heat up than an electric one, and a samovar will take even longer to heat up.
And then samovars became a thing of the past, but the lovely tradition remained. This is probably why they like to make dolls for teapots in the form of girls with curvaceous figures, or in common people – women. A teapot baba, made according to all the rules, will be the main decoration of your tea parties and will keep the teapot warm for a long time.
Well, or in a teapot, if a regular one runs on electricity and there is no need to keep it warm for a long time. For lovers of very hot tea in the form of boiling water, this is just the thing.
With all this needlework, it is not necessary to have any special materials; the doll can be sewn entirely from material, without the use of plastic or anything like that. Like this:
Or this one, like “Tilda”:
Or you can take a real doll as a basis, or just its head, or its head and body.
Our article examines a completely rag doll. Or rather, step-by-step instructions for its manufacture. You don't need much fabric, but try to choose one that doesn't wrinkle too much - you can check this by crumpling the fabric in your hand. What else is needed:
- Thick knitting threads for doll hair. Floss threads are suitable. If you want to make her braids, weave ribbons into them.
- A filler that will also serve as insulation, so it should be selected especially. Sintepon will do just fine. Or batting. It should also be a lining.
- For decoration, take a few beads - you can decorate the doll with them, making beads and earrings for her (sew them directly to the doll), as well as lace and/or fringe or braid on the hem of the dress. Stock up on beautiful small buttons and beads.
- Well, it’s unnecessary to talk about the need for needles, threads and scissors, but we can remind you.
And here is the pattern for the doll for our master class. Please note that the pattern is suitable for any doll, this is not for a specific model, but in general. It is customized to fit the size of your teapot, meaning you can make it any size you want. Don’t forget to allow for seam allowance, and the heating pad itself should not fit too tightly; on the contrary, ideally it should be able to rotate freely around the kettle.
The body should have 2 parts, do not forget the seam allowance - exactly 1 cm. Sew both parts, except for the side where the bottom will be. Facing inward. At the folds, we cut with curly scissors or cut out the corners with regular scissors.
We unfold all seams along the seams and iron them or, if the fabric allows, simply straighten them with our fingers.
Now turn it inside out.
Fill the doll with stuffing to the waist - head and arms, that is. Not too tight, but not so tight that the stuffing would flop around. Sew below the arms, right along the right side.
The lining piece should also be made in duplicate. There are 0.7 mm allowances on the sides and 15 mm at the bottom. We cut out the lining material in the same manner. The fabric is folded together with the lining, sewing together on the sides, leaving the bottom with a hole.
Next, you need to sew all the available finished parts (blanks) from the inside out.
Now place the bottom layer, the insulation layer, into the main layer. Grab it in several places by hand so that it does not fall out.
Then it all depends on your imagination - how exactly you will dress your heating pad doll. You can make a skirt or dress:
Using the dress pattern, we cut out 2 parts from any material at hand, possibly fleece. You can sew it the way you want. And sew any details to it - from frills to pockets.
The face is usually not drawn completely, only the eyes. These are already superstitions, actually, but they just somehow became a custom everywhere. The eyes are made from the smallest beads or stitched with a “cross” with black threads.
The heating pad is ready, but to make another model, from nylon, watch the video tutorial:
Craftswomen who know how to knit also got down to business and showed with examples that a heating pad for a teapot can even be crocheted.
True, it is a rarity for it to be a doll. Probably because it's really difficult! Here is a photo of such an example:
And if your imagination is at full speed, even more can be accomplished!
The most skillful and imaginative craftswomen come up with and make true masterpieces!
If you want to try to do something equally unusual, keep the diagram, and then everything depends on you:
Look at a few more options for hot water bottles, no longer in the form of a doll, for inspiration, so to speak:
What is the main thing in needlework? Try it! And even when it seems to you that it turned out crooked and not the way you wanted, know that you did something, tried, and everyone else who didn’t dare, thinking that nothing would work out for them, can only admire your talent!
Video MK
webdiana.ru
Stages of sewing a classic model
Every representative of the fair sex can make a woman for a teapot if she wishes. For the simplest option, you will need to prepare a frame. You need to find an old doll and cut off the lower part of its body, leaving only the waist part. Sewing a classic model consists of several stages:
- We take measurements of the doll for sewing a jacket. We cut out a shirt. We do the tailoring at our own discretion, the main task is to make the top the right size. It does not play a functional role and performs only an aesthetic task. It is advisable that the color of the sweater matches the skirt.
- We make a pattern for the lining, insulation and outer decorative side - all details must correspond to the size of the teapot. It is convenient to make all parts rectangular.
- Transfer the pattern to the fabric. Add 1.5-2 centimeters to the resulting dimensions for the seams.
- All three parts must be sewn together on the long side. We turn the product inside out, the insulation should be in the center.
- We connect the skirt with the upper part of the product. It is convenient to make a bundle using the straps of a sundress.
Baba for a teapot has not lost its relevance in the 21st century. There are different types of products, but each is available for self-production at home. The appearance of the product depends on the imagination, preferences and skill of the needlewoman. The product will become an original gift and will create an atmosphere of family comfort in the home.
Stitched blank
Stuff your head and hands with filler
Lining
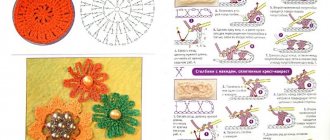
Knitting a dress
Row 1: we knit a row with double crochets, which looks like braids, formed when we knitted it using the back thread - 30 columns. 2nd row: we knit, while making additions in each double crochet, two double crochets. There should be 60 columns. 3-6 rows: we knit double crochets.
To perform this work, you need to tie it to the kettle handle and then knit it in reverse rows. Cut the thread and connect it near the handle. Next, columns with crochets are knitted to it and turned back, and knitted again to the handle on the other side. When the knitting has reached the spout of the teapot, you need to make a hole. The knitting is unrolled and knitted to the handle. Knit until the desired hole for the spout and handle is formed. Afterwards it is knitted in a circular pattern, depending on the height of the teapot.
We tie the floor of the dress in the form of a lattice - 2 air loops, then a double crochet, we knit it into the third buttonhole of the base of the skirt. Now we knit ruffles: we knit five columns with crochets on top of the cell, then five columns with crochets on the side of the wall, now the same number of columns at the bottom and continue to knit the entire row in this way. Knit the resulting ruffles of a different color with a thread in single crochet columns.
Related article: Stained glass “Flowers” with paints on glass and paper: sketches with photos
You need to make a comb in the middle of the connected head. We knit one single crochet, then two single crochets, two double crochets, two double crochets, a single crochet, and so on four times. We knit 4 chain buttonholes and use connecting buttonholes to return to the first one and from this buttonhole we knit the next part of the beak. We fasten the thread.
We sew beads onto the eyes. Let's look at the photo.
Let's start with the apron. You need to knit 22 chain buttonholes.
- Row 1: start knitting from the third buttonhole from the hook 20 single crochets;
- 2nd row: at the very beginning of the row we knit three double crochets from the primary column, then 18 double crochets and the remaining column - three double crochets;
- 3rd row: at the very beginning of the row, you need to knit three double crochets from the primary column, then 22 double crochets, and, as in the second, we knit three double crochets into the last column;
- Row 4: you need to knit 28 double crochets;
- 5 rows: at the very beginning and at the end you need to knit 3 double crochets together. After such a decrease, the edges should appear rounded.
Tie the resulting part along the edges of a different color with single crochets. We make a chain of air strings to make ties. Use satin ribbons to make flowers and leaves.
Now you need to knit the wings for the chicken:
- 1 row: knit 15 double crochets into a ring;
- Row 2: knit 3 double crochets and add to the end of the row;
- 3 rows: we knit half a circle with double crochets;
- 4-5 rows: at the very beginning and at the end of the row it is necessary to make decreases from 4 columns;
- 6 rows: knit all columns in one row;
The wing is knitted, and the second one is knitted symmetrically. Sew to the doll.
Related article: Crochet mittens for the winter
The step-by-step instructions provided above will help everyone easily knit such an original decoration for a teapot.
There are many more ways to make such beautiful dolls that will decorate the teapot. Very often dolls are sewn from nylon and plastic. These teapot women are quite popular and look just like the real thing. Many may find it difficult to make such a craft, but the pattern will help in making this product, as will the detailed description. And now the granny for the teapot is ready!