Do-it-yourself topiary for a wedding: step-by-step instructions
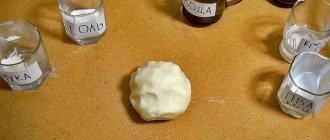
Typically, MKs begin with working with a ball. But in this case, start with a flowerpot. Place a floral sponge in it, and then place a topiary trunk there. The trunk of a tree can be anything - pencils, sushi sticks, twigs and driftwood. Still, it’s better to take something even and straight. On top of this stick you need to attach a base ball. It’s easier to take a foam blank than to make a ball for the crown with your own hands.
You can make a base balloon without using a balloon. You just need to spray the foam onto the oilcloth base with a small lump, then cut off all excess after hardening using a knife or a round tin can
Well, now to the main MK:
- Cotton balls need to be connected into one sheet, the lower part of it should be treated with PVA glue. Immediately attach the cotton wool to a floral sponge. After the glue has dried, decorate the cotton wool with decorative stones. Such stones can be bought in souvenir shops; they are smooth, not very large, and mother-of-pearl. Choose the shade yourself.
- Petals for the crown can be made from organza. You need to cut out a lot of circles and scorch the edges of the material with a candle.
- Before you start sheathing the crown, you can paint the trunk, and this is where acrylic pearlescent paint comes in handy.
- To get a beautiful crown, you will need the help of sewing pins. This master class offers the following solution - thread a pin that will go through the middle of the organza petal and attach the pin to the base ball. And this must be done with each petal. The organza should thus cover the entire crown.
In fact, the tree for the wedding is ready. But don’t forget about the obligatory finishing decor.
Wedding topiary made of organza (photo master class step by step)
This MK photo will show an alternative way of making a wedding tree from the same materials.
A ball of macroflex is taken as a base and fixed on the trunk. For roses, you need to prepare many squares of fabric with a side length of about 5 cm. How to make a petal is shown in the figure. For one rose you will need 5 petals or more - depends on the size of the future bud
The main decoration of the crown is tulle, so you will need much more of it than roses. The square blank is folded diagonally 2 times and glued to a toothpick. For greater splendor, you can glue 2 elements to a toothpick. Using a thin ribbon, additional decor is made, as shown in the figure. Flowers and beads are strung on thin steel wire. When the decor is ready, we decorate the crown, then fix the tree in a flowerpot, as shown in the photo
At the final stage, the flower pots are decorated. For this we will need a bow made of satin ribbons, tulle elements without toothpicks, stickers and bugles. You can decorate the flowerpot after the plaster has hardened. The product is ready
From coffee
We will also make a coffee tree with our own hands. To make topiary from coffee beans you will need:
- base (plastic ball, foam ball - sold in craft stores);
trunk (branch, stick, tube);
a pot or something instead (I had a beautiful clay jar last time, but now I have an ordinary glass);
coffee beans (you shouldn’t skimp – good coffee has an indescribable bright aroma);
solution for fixing (I use regular putty, plaster, alabaster, or even cement will also work);
brown acrylic paint;
glue gun and glue sticks;
newspaper or scrap paper;
burlap or other characteristic fabric;
decor for decorating a coffee topiary with your own hands.
How to make a coffee tree:
- we connect the base of the crown (ball) and the trunk (stick or tube);
cover everything with paper or newspaper, paint it brown and dry;
While the acrylic is drying, you need to prepare the pot - either simply clean it, or cover it with burlap if necessary; in this case, a regular glass was used;
let's move on to the most exciting activity - we cover the coffee topiary with our own hands with coffee beans, I advise you to be patient;
after the entire topiary is covered with grains, you need to dry it;
pour the mixture into the pot and install the topiary;
after the mixture dries, decorate it with coffee beans;
move on to decoration - see how you can decorate a topiary with your own hands in the photo.
Decoration on the glass
The difference between this variety is that a glass is used as a base, so a twig is not needed. The stem of the glass will become the trunk of the tree. The crown is made as usual, fixing it with glue. Decorative elements can be very different.
The ball should be decorated from polystyrene foam (another material); it is also worth treating the bottom of the glass and its stem. Fabric or lace is often used for this.
Step-by-step master class on making topiary
To make a topiary with your own hands, first of all prepare the basic elements:
The trunk, if it is not a natural branch, is wrapped with satin or other ribbons, twine, covered with fabric, and covered with materials selected for this composition. If the barrel consists of several elements, for example, several thin knitting needles or kebab skewers, you must first tighten them with electrical tape. You need to think about how to fix the tree in a pot and prepare all the necessary materials
When using a flower pot with drainage holes, it is important to seal them first. If the pot or bucket is heavy enough so that the crown does not outweigh the base, then foam plastic, pieces of polystyrene foam, or even polyurethane foam are sufficient for fixation.
The trunk in such a pot is placed in the center, sunk to the ground, burst with prepared materials and filled with polyurethane foam or alabaster in the consistency of sour cream.
If the base for the tree crown is made in the form of any figure, for reliability it should be secured with glue.
The “skeleton” of the tree is ready – you can decorate it.
The near-trunk space of the pot can be decorated with pebbles, shells, and covered with floral mesh or fabric.
The pot itself can be covered with fabric to make a beautiful paper “wrapper”.
The crown can be attached to the base using glue, flowers can be pinned with wire, or placed on wooden skewers.
Money tree
The main decorative element in this case is banknotes. There is no need to use real money - you can buy souvenirs. In addition to them, coins are often used.
The supporting part of the tree is prepared in the usual way. To decorate it, paints, threads, colored paper, etc. are used, but the main element is souvenir bills. They can be folded into the shape of a fan, a scroll, or an airplane. Banknotes can be used to decorate the crown, or they can be placed in a supporting container to hide a layer of plaster or foam.
There is a belief that such a money tree attracts wealth, but even if this is not the case, it can make an elegant decoration.
Wedding topiary made of tulle and satin ribbons
To make topiary for a wedding, needlewomen use different fabrics - sisal, silk, organza, satin, linen and even burlap. Trees decorated with airy tulle and shiny satin ribbons look great. In this master class on making wedding topiary, tulle forms a pillow for touching satin roses in a contrasting shade. If desired, the heroes of the occasion or the givers of the tree of happiness can use fabrics of a different tone, more suitable for the style of their wedding. See below for step-by-step instructions for making topiary.
Necessary materials
- Base ball (foam).
- Pieces of polyurethane foam.
- Tulle trims.
- Satin ribbon 5 centimeters wide for roses.
- Trims with brocade ribbon.
- Hot glue.
- Large beads, glass beads.
- Toothpicks.
- Wire.
- Small pearl beads.
- Plastic flowers.
- Pot.
- Curved trunk.
- Gypsum.
- Heart stickers.
- Scissors.
Stages of creation
Cut a ball of suitable size from a piece of polyurethane foam. Fix the resulting base on the trunk. Save the remaining pieces of foam - they will be needed to secure the future topiary. Make roses. Cut a square of satin ribbon, fold it diagonally and glue it together. When the glue dries a little, attach two opposite corners to the base of the petal, to the lower edge of the triangle. Make the required number of elements, then assemble the rose: roll the first petal into a tube to make the core. Next, carefully glue the petals in a circle.
Pay attention to the back of the product: all elements are on the same level. Fold the tulle trims, you will get a lot of them, because these decorative details will make up the main decoration of the ball
Glue two tulle trims to a toothpick and let them dry. Make additional decorative elements using a thin brocade ribbon: simply fold a piece of it in half and secure it with glue, as shown in the picture. Attach large beads and plastic flowers to a strong wire. When all the details of the topiary decor are ready, decorate the base ball with them. Place polyurethane foam in the pot, glue it to the bottom and edges so that it does not float to the top when plastering. Place the trunk in the resulting mount, carefully check that the wedding tree is level. When the ideal position has been chosen, fill the pot with plaster - you will only need a little of this material. Wait a few days for the fill to dry completely. Start making the finishing touches: make a beautiful bow using white and pink satin ribbons, prepare tulle trims (this time without toothpicks), buy heart stickers, bugles. After the material has dried in the pot, glue the trim pieces, glass beads, and attach the bow to the top of the topiary trunk to the plaster surface. Decorate the flowerpot with stickers. A beautiful “European tree” for a wedding is ready!
Ideas for creating topiary for a wedding table - photo
Newlyweds from all over the world have already implemented many ideas for decorating a wedding tree. Newspapers, ribbons, lace, corrugated paper, floral mesh, flowers, butterflies, angels and doves can be used as decorative elements. Not only the details of the crown decoration are interesting, but also the containers in which the tree is “planted”. These can be glasses, round, square pots, jars, watering cans. Often, instead of the classic base - a ball - the heroes of the occasion prefer a heart-shaped topiary, emphasizing the romantic nature of the newlyweds' relationship.
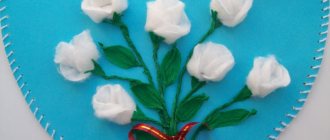
Heart made of napkins
A heart-shaped topiary for a wedding, decorated using napkins, is easy to make. You will need the basic elements (pot, solution for attaching the trunk, the trunk itself, the heart base) and napkins of a suitable color that are rolled into balls. The resulting parts need to be completely covered with the heart so that there are no gaps left. See the photo below for this and other types of heart-shaped topiary.
"Cooing Doves"
A pair of doves at a wedding celebration is a symbol meaning reverent love between spouses, peace and harmony in the future family. Beautiful birds can be created using paper, felted wool, and ready-made feather and glass figurines are often used. You can “plant” touching doves on a pot, on the crown of a topiary, or choose a flowerpot with an appropriate design.
Tree with photos of young people
A topiary with a photograph of the newlyweds will decorate the wedding event. A tree with a joint photo of the heroes of the occasion is usually facing the guests. After the wedding, the newlyweds will be able to take the topiary home to eventually insert photos from the wedding celebration. Check out photos of these interesting topiaries below.
Video: how to make topiary from candies with your own hands
Nowadays candy bouquets, which are given for birthdays, weddings, and anniversaries, have become very popular. Often, brides themselves choose a similar wedding bouquet instead of classic flower arrangements. Craftswomen did not ignore this trend and began to use a variety of sweets to decorate topiaries. Sweet trees are not only a beautiful element of wedding decor, but also a delicious treat that the heroes of the occasion will taste at the end of the event.
Future spouses or guests who decide to give them a sweet gift can make a candy topiary themselves. For this, in addition to the basic elements, you will need corrugated paper, floral ribbons, oilcloths, nets, as well as the favorite sweets of the heroes of the occasion. Details on how to make sweet topiary for a wedding are described in the video below.
Step-by-step master class: topiary for beginners
Every master class is attractive in its own way. But what do you need for topiary? How to make topiary with your own hands? Where to start?
To make a tree you will need:
- Ball – foam base;
- White and pink fabric flowers;
- Carnations with beads at the end;
- Satin ribbon;
- Pot;
- Decorative grass;
- Ready-made white-painted barrel (from a craft store);
- Small needles;
- Hot glue;
- Gypsum and water.
There are no clear types of topiary, as this is an individual and limitless imagination for creativity.
Step by step execution:
- First, we prepare the platform on which the base will rest. Mix the plaster with water until the plasticine becomes thick.
- Place the mixture in a pot and carefully immerse the finished trunk in it. The trunk should be set straight and held slightly with your hands so that it does not tilt and the plaster does not have time to fix it when it dries.
- We make a depression in the ball for stringing it onto the trunk.
- Using hot glue, drop by drop, we glue the flowers tightly to each other onto the foam ball to avoid the white base showing through. Next, we fix each flower with a carnation.
- Pour a little liquid glue into the recess and secure the crown to the leg.
- To decorate, tie a pink ribbon with a bow at the junction of the trunk and the crown. We mask the plaster in the pot with decorative grass.
The cute tree is ready!
Flowers on the ball can be attached in a chaotic manner, alternating pink with white. Or purposefully decorate half of the crown in pink and the other in white.
Instructions for Beginners
The simplest option for making such decorations is to create a topiary from ribbons. Satin ribbons can be used to make roses, and they can be used as decoration for the product.
For such work, you will need ribbons of different colors - their color should be selected taking into account your own taste and the purpose of the tree. You also need a base - a flower pot or other container - a twig for the trunk, glue, newspapers or polystyrene foam for the crown.
Progress:
It is worth starting work with the preparation of the crown. It can be made from polystyrene foam or newspaper. You need to give it the shape of a ball, wrap it in paper and attach it to the branch-trunk with glue.
Next, flowers are made from years. There are several options for their manufacture.
Flowers should be glued to the crown. They should be placed close to each other so that the base is not visible.
To decorate flowers, you can use beads, beads or sparkles.
The prepared container is filled with dry plaster and filled with water. The mixture should have the consistency of sour cream. The tree trunk must be placed inside and wait until the structure dries (this takes about 12 hours).
After drying, you can decorate the trunk with colored paper, ribbons, foil, beads, etc.
You can cover the gypsum base with small shells, stone chips, and beads. They just need to cover the surface of the plaster.
To decorate the container, you can also use different materials - fabric, paper, foil, etc. It is acceptable to leave the pot untouched - if it is beautifully decorated and matches the rest of the topiary elements.
This tree can be used as a gift or home decoration.
Step-by-step instructions: creating shapes
The souvenir tree may have an unusual shape. More than one tricky technique is used to create various shapes. You can do unusual things with your own hands, and few people will guess how you did it in the first place.
To design figures you need:
- Use of bendable materials;
- Sketch of the future composition;
- Elegant decor that hides the entire mechanism of the product.
A fragrant tree made from coffee beans will attract attention for a long time
We usually talk about designing figures when we mean making garden sculptures. Such unusual landscaping is captured in numerous photographs. The figures require certain manipulations with knitting or carpentry wire. You will get topiary sculptures, entire compositions of green figures.
This way you can get several elegant figures on your site. For beginners, there is advice - take simpler frames for the first time, do not try to build several figures at once, this requires care and a certain skill.
How to make a wedding topiary from coffee beans
Most often, wedding topiaries are made from standard materials such as rhinestones, beads, ribbons, and feathers. But many people want to have original decorative elements at their wedding. Topiaries are also made from paper bills and coins, cotton pads, sweets, pasta, and artificial flowers. Recently, coffee topiaries have become very popular. These trees look very unusual, and they also emit a wonderful smell of coffee beans.
Materials:
- 300 grams of coffee beans
- Styrofoam ball
- Flowerpot
- PVA glue or superglue
- Stick for the trunk (from any material)
- Plaster
- Thin satin ribbon
- Double sided tape
- Wide tulle ribbon
Step-by-step instruction:
- Cover the foam ball with coffee beans in two layers. Leave the table mounting area empty.
- The base of the barrel must be covered with double-sided tape so that it completely covers the mount. Then attach the tape diagonally to the plastic tube. Make sure that the tape is not visible underneath. After this, glue the trunk to the crown of the wedding topiary.
- Pour some water into the flowerpot and dissolve the plaster in it until the mixture is thick. After this, secure the tree in the flowerpot so that it is located in the middle.
- If the plaster has not hardened during this time, start spreading the coffee beans over the mixture.
- Once the solution has hardened, begin decorating the topiary. You can decorate the topiary as you like. You can take a tulle ribbon and tie it with a bow on the front side. Your wedding topiary will look very beautiful and interesting.
Magic coffee tree
Coffee beans symbolize prosperity and wealth. This tree exudes a pleasant aroma. If you want to attract good luck and financial well-being to your home, coffee topiary should be done during the waxing moon. Place the talisman in the southeast of the room. According to Feng Shui, this is the wealth sector.
Don't forget to care for the tree! You can remove dust using a hair dryer (cold air) or a soft clothes brush.
Manufacturing process:
Sort the grains by size and quality. Leave them whole and beautiful for the top layer.
Important! You should not take coffee with additives and flavorings. They are sticky and don't stick well.
Some may find this process tedious and tedious. But this is a kind of meditation. Play your favorite music or audiobook. The smell of natural coffee has a beneficial effect on a person, relieves stress and fatigue.
You need to glue the grains in two layers. The first layer is grooved down. The second - grooves up. Secure the trunk in the crown and fill the space around it with grains.
To extend the life of such a tree, cover the top with several layers of acrylic varnish. If you want a fragrant souvenir, leave it in its natural form. But keep in mind, over time the coffee will dry out and may crack.
Advice! Paint the glue that is visible in the gaps with brown acrylic paint. For a more aesthetic appearance.
“Plant” the topiary in the pot and let the plaster dry. And one more secret! You can pour gypsum at the initial stage, when the crown is not yet ready. To do this, glue a piece of foam plastic in the center to the bottom of the pot. And fill the voids with mortar. While the plaster dries, you will work on the crown. Then make a hole in the foam, apply hot glue to the barrel and install it.
Decorate the base of the pot with sisal, pebbles, pebbles or coffee beans. Decorate your tree and add a little magic!
This is interesting! Cinnamon attracts good luck and symbolizes tenderness and love. The acorn is a symbol of growth and potential. Dried orange slices, coins, bills, a small figurine of Hotei or turtles work as a magnet to attract money into the house.
Two coffee hearts decorated with a satin bow and a figurine of angels will be a sincere gift for the newlyweds.
You can involve children in the creative process. Make a topiary out of napkins with them. Video tutorials on how to make such a tree are easy to find on the Internet.
DIY wedding tree: finishing touches
You can use anything - beads, feathers, rhinestones, ribbons, lace. Usually “on the spot” it becomes clear what and where will look best. If you have a tree as a gift for your wedding anniversary, then attach a cute card that will be filled with good wishes.
After the celebration, this decoration will not be removed as unnecessary, like most items from wedding decor, but will migrate with the newlyweds into family life
You can decorate a tree with your own hands like this:
- If you are making a tree in the shabby chic style, which is now fashionable, allow artificial scuffs, and complement this decorative element with others - an old vintage watch, a retro figurine of newlyweds, etc. This is a great solution for an anniversary. This composition can also decorate a holiday table.
- You can indicate the reason for which such a tree was created like this - just buy a pot on which a composition has already been made with wedding rings and other attributes of the celebration. And this souvenir will definitely decorate the festive table, the zone of the young.
You can also put a ring at the foot of the tree, and thus present another gift to your wife. Or earrings, or some other piece of jewelry. This is the best decor for a tree.
Satin flowers
You can decorate your wedding topiary with your own hands with chic satin roses, as in Fig. 4. To create a flower you need ordinary ribbons, which can be bought at any craft store. The size of the flower will depend on the width of the ribbon, so the source material should be selected according to your needs.
Making a flower from a ribbon is not easy, but very simple. A master class with step-by-step photos will help you correctly understand the job description:
- Fold the corner of the fabric strip towards you so that the fold line is at the top. Roll up to half the fold.
- Bend the ribbon away from you and wrap the roll, forming 1 petal.
- Bend the tape away from you again, while wrapping it around the central part.
- This must be done until the flower reaches the desired size.
In this way you can make delicate rose buds that have not fully opened. If you want to make lush flowers of a larger size, then you should do it differently. Using the algorithm described above, make the central, denser part of the rose. For the outermost, wide open petals, you need to cut out parts from satin (Fig. 5).
Burn the edges of each piece over a candle or lighter flame. Make tucks on the underside of the petals. Wrap the middle part with one of the petals and attach it with glue. Place the next one next to it so that it partially overlaps the finished part. You can take a real flower as a sample. Having achieved the desired size and splendor of the rose, glue its unprepared base covered with fabric.
To close the gaps between flowers, you can glue colored feathers, fabric leaves, large beads or other decor there. You can complement the topiary with artificial butterflies.
Present for the wedding
First you need to figure out what parts the topiary consists of and what can be used to decorate it.
Basic elements of topiary:
- base (ball, heart);
- trunk;
- crown;
- pot or stand, glass.
Wedding topiary can be varied and depend both on the time of year, when you can delve into a certain atmosphere and use shells, pebbles or acorns, nuts, cones, chestnuts and dry leaves of maple, oak, birch, and can depend on the desires of the newlyweds themselves.
Wedding topiary is a very good and budget option for decorating a hall and tables. In order to make topiary from satin ribbons yourself, you need the following materials:
- The base ball for the future wedding topiary is made of polystyrene foam or polystyrene foam; you can also use regular newspaper, crumpled into a ball and wrapped with wide tape;
- Cotton balls;
- Knitting needles, sushi sticks, wooden or plastic straight stick for the trunk;
- Super glue, PVA glue or glue gun;
- Decorative or sea stones;
- Nail polish or paint;
- Brush;
- Decorative elements: feathers, notes, beads, rhinestones, stones, satin ribbons;
- Candles;
- Sewing pins;
- Polyurethane foam, plaster or alabaster;
- Container for the future tree.
We are preparing a pot for our tree. Its role can be a plastic or glass cup, the bottom of a plastic bottle or a clay pot. To make it look much more attractive, you need to decorate it with paint or satin ribbons and rhinestones, securing everything desired with super glue.
Now let's move on to the base for the tree, pot or glass. We will use a glass or you can buy a nice small pot. Pour plaster into it and fill it with water. The consistency you need is like thick sour cream. We insert our tree into it and wait for the plaster to harden.
If you wish, you can use alabaster or choose any installation mixture (cement-sand mortar, putty, gypsum), or the same floral foam/foam. If you prefer the first option, we recommend using alabaster. It is affordable, you can buy it at any building materials store, it is easy to install and does not crack. And here are the instructions for its use:
- To fill 1 container with alabaster you will need about 300 g of the mixture and about 1.5 cups of water.
- Stir the solution for 2-3 minutes.
- Once the mixture has thickened to the consistency of thick sour cream, pour it into the pot, set the barrel and hold it level for 2-3 minutes.
- Leave the mixture to dry for 8-10 hours.
How to make roses. First you need to cut a small square from the tape, fold it diagonally and glue it together. Then glue two corners to the base of the petal, to the lower edge of the triangle. Prepare the required amount of material, glue roses from all the petals: twist the first petal into a tube to make the core. Next, carefully attach the petals in a circle. Don't forget to leave a hole for the barrel.
Decorating a wood stick-trunk. To make the trunk attractive, you can wrap it with satin ribbons and glue rhinestones or stones on top.
Well, to finish the work, you just need to collect all the elements into one whole. We put the stem on the ball, then lower the tree into our pot with plaster, fix it and check how well the stem is fixed in the pot.
Our work is ready.
Winter ikebana
Thematic varieties of topiary are often made, and one of the themes may be the change of seasons. In the manufacture of such products, it is worth using materials that reflect the characteristics of the season.
Winter is symbolized by snow-covered trees, Christmas tree decorations, gifts, and this should be taken into account when making winter topiary. Suitable materials for it:
- lace;
- braid;
- glitter;
- ribbons;
- acorns;
- cones;
- foil, etc.
It is very important to think over the color scheme of the decorative tree. It is best to prefer silver-gray, blue-blue, green-brown.
For New Year and Christmas
Making Christmas or New Year's topiary is carried out according to the usual principle. It is necessary to prepare the main elements and come up with decor that matches the holiday. Such a tree will become a symbol of change. Such products often contain:
- Christmas balls (they are put on toothpicks stuck into the base of the crown and glued at the bottom);
- decorative berries and fruits;
- tinsel;
- glitter;
- beads;
- foil, etc.
This type of topiary can be of different colors. Very often they combine green and any other bright color. Shiny elements are also often used.
How to make topiary for a wedding with your own hands?
To make the gift beautiful and delicate, like the wedding itself, you need to carefully select the materials from which it can be made. Shades of pink, gold, white - these are the colors in which it is best to create a souvenir. Organza and satin, crepe paper, lace and pearl beads in light colors will help create an airy composition. Figurines of doves or swans, photos of the bride and groom (if this is topiary for a wedding anniversary), hearts, flowers, and butterflies can be used as additional decor.
A master class on how to make a small wedding topiary, which can be used to decorate a formal table or give to the bride, will help you get the job done correctly and quickly. You need to prepare:
- squares of fabric (crystalline, tulle, organza);
- satin ribbons;
- container;
- Supermoment glue or similar;
- a plastic or foam ball;
- tree trunk stick;
- building gypsum.
To make the gift beautiful and delicate, like the wedding itself, you need to carefully select the materials from which it can be made.
This master class recommends bird figurines, artificial grass, and large mother-of-pearl beads as decoration. A flower pot with a finished pattern can be used as a container.
The tree crown is made by trimming. You need to do this work like this:
Decoration for events: how to create a holiday What color should you paint the outside of the house? 3D floors: modern technologies, recommendations from designers, photos of finished interiorsBeautiful decoration for a beautiful celebration: decorating the wedding hall with your own hands
- Puncture the plastic ball, insert a stick (a thick kebab skewer) into the hole and fill it with glue. Wrap the ball in a piece of fabric and secure it to the leg with thread. Fabric elements are much easier to glue to a related material than to plastic. Cover the attachment point with a pink satin ribbon and wrap it around the entire stem of the future tree.
- Place a thin stick in the center of the square of fabric, wrap the material around it and hold it (Fig. 1). Apply a drop of glue to the place where the end of the stick is located. Press firmly onto the cloth-covered ball for a few seconds. After the stick is removed, you will get a flower with sharp petals. By placing similar elements close to each other, you can achieve the effect of a lush flower ball.
Such a crown can already be quite decorative. If desired, you can add rose flowers or beads to the tree.
Prepare a container by pouring a solution of building plaster into it. When the mixture begins to set a little, insert the already formed top of the composition into it. After complete hardening, you can continue to decorate the container by placing artificial grass in it. Glue the dove figures, as in the photo (Fig. 2), or plant them on a tree.
Making topiary for a wedding: how to choose a design
The greatest number of difficulties arise precisely at this stage. On the one hand, I want to create something non-trivial, and, on the other hand, the wedding theme does not imply ornate forms. That is why there are often cases of extremes when the tree is too ascetic or, conversely, overly overloaded with decorative elements. Photos of finished options will help you maintain common sense. Viewing them does not take much time, but will direct your flight of imagination in the right direction.
It wouldn't hurt to go shopping for wedding supplies. There is a high probability that you will find several creative ideas on the shelves there too.
In addition, attention is paid to the following details:
- Age of citizens who decided to get married;
- National traditions;
- Features of the wedding ceremony venue;
- Aesthetic preferences of the bride and groom.
Satin ribbons
Let's try to make topiary from satin ribbons. If you know how to make flowers from satin ribbons, then it will be very easy for you, but even if this is your first time taking up topiary from ribbons, you will succeed. So, I’ll tell you about the experience of making topiary from satin ribbons with your own hands.
Required:
- about six meters of satin ribbon (no narrower than 5 cm, it’s better to take several colors);
threads, beads, and ribbon for decoration;
glue gun or regular superglue;
a stick or a piece of plastic tube for the barrel;
pot or bucket;
material for the middle - a fabric bag, crumpled newspaper or a foil ball;
earth, pebbles, crushed stone (I used colorful glass for an aquarium).
To make this topiary, a master class on making flowers will also come in handy - look at the video on how to make a simple rose from a satin ribbon.
We make 12-15 roses from satin ribbon. You can use several shades of ribbon (for example, three or four), or you can get by with just one shade - when I made a topiary for my younger sister to decorate the wedding photo booth, I used a beautiful ivory satin ribbon.
We make the middle - for example, we crumple up foil or old newspaper, wrap it with threads to make a dense shape. You can wrap it with ribbon, but there is no need - satin roses turn out quite lush.
The trunk can be made from a branch, a plastic pipe or any suitable stick. In extreme cases, dense wire, folded in several layers and wrapped with tape, is suitable. Wrap your trunk with tape, and then glue the trunk to the crown of the tree on one side and to the pot or bucket on the other.
We string a couple of beads onto a thread and “sew” the beads and a satin rose to the topiary. It should be sewn or glued firmly. When the entire ball is covered with roses, you need to prepare the trunk and pot.
You need to pour a weighting agent into the bucket, straighten all the flowers, and, if necessary, decorate with a decorative ribbon.
Beads and beads
You can also make a charming topiary from beads. It’s easier to understand how to make a tree from beads with your hands, so watch the video below on how to make a topiary from beads. By the way, a craftsman can make absolutely anything from beads, including decor. For example, you can make miniature flowers and berries from beads with your own hands, which can be decorated with a beaded money tree.
Now you know how to make an artificial tree with your own hands step by step. I admit honestly, every topiary made by yourself is something special, and you will understand what it will be like only when you start decorating it. Try making festive trees and ordinary modest trees for the interior - those that are laid out with pine cones and coffee beans can not only decorate the room, but also scent it (you can add a couple of drops of essential oil).
And my sister makes money topiaries with her own hands, which attract money into the house; I will publish a tutorial next time - for now I can only show from photographs what such products look like. Try making your own topiaries and surprise your loved ones with unusual gifts!