Types of soft cat toys
It is only at first glance that it seems that all soft toys are of the same type. In fact, there are many types:
Plush cats. Classic realistic soft toys;
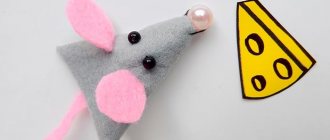
Primitive toys. Everything is simple with them - they are sewn from one or two parts depicting the head and torso. The tail is sewn to the body, but there may be no legs or ears at all. The muzzle is embroidered, and sometimes the toy may only have eyes.
Tilde toys. They have a small head, a voluminous body, and small eyes. The remaining parts are sewn to the oval body.
To prevent the toy from looking awkward, it is “dressed”. In the photo of a cat sewn with your own hands, you can see that a mandatory attribute of the tilde is knitted or sewn clothes.
Coffee, or “attic” toys. Their specialty is a pleasant coffee aroma.
The cats are sewn from white cotton fabric, then painted with a mixture of coffee and glue and baked in the oven. They acquire a beautiful color and aroma. Then they are painted with acrylic paints.
How can you decorate fabric cats?
Basically, cats are decorated with various elements of clothing. A suit is suitable for boys, and a beautiful sundress for girls. You can also sew various details into the paws, such as a heart, a fish or a cloud. You can embroider a funny grin on the face or decorate the head with a bow or ribbons. Hats on the toy and various bags/backpacks on the shoulders will look beautiful.
You might be interested in Ready-made patterns and the order of sewing warriors with your own hands
Decorative pillow
What to make a cat out of
Patterns for sewing a cat with your own hands from fur or felt, cotton will be different. But all toys will be unique. This is the beauty of handmade work - each item retains the warmth of the handicraftswoman and carries positive, kind energy.
We sew cats and cats with our own hands:
- from fur - long or short pile material allows you to create a realistic likeness of an animal;
- made of cotton fabric - it is used for primitives, tildes, coffee cats;
- from knitted fabric (this is what tildes are sewn from);
- made of fleece - soft material ideal for comforters, pillows and toys;
- from felt - miniature toys, magnets, brooches are usually made from it.
Interior cat
A cute cat can serve as a toy for a child, become an original piece of furniture, or a gift.
How to sew a tilde cat from fabric with your own hands:
- download the pattern, changing its size if necessary;
- choose the right fabric. You need to cut by adding seam allowances;
- Place the parts of the head, body, paws, ears and tail with the right sides facing each other and stitch them together. Sew the ears into the head when you sew it;
- connect the head to the body and sew the elements of the cat;
- sew the paws, connecting them to the buttons so that they can move as if on hinges;
- sew on the tail.
Step-by-step photo of making a March cat
I will try not only to describe in words what we will do with my baby, but also to attach a photo so that the sequence of actions is clear.
- Paper;
- Pencil;
- Textile;
- Threads;
- Ribbon;
- Scissors;
- Needle;
- Chalk or soap for cutting;
- Felt pen.
And now about the work step by step.
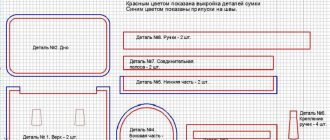
- Draw each detail on paper and cut it out. What details do we need to draw: head, ears, paws, tail, body.
- Fold the fabric in half. Using patterns, cut out parts of the product, 2 identical pieces for each part, only 4 legs for each pair and ears. To “hold” each part to the other, we pin it with pins.
- Sew each part, leaving a small gap.
- Turn out the parts and fill them with cotton wool. The cotton wool needs to be torn off in small pieces and pushed in tightly.
- Sew the holes with a hidden seam.
- Sew all the parts in place. The ears are gathered a little, and only then are they sewn on. It will look like they are a little voluminous.
- Draw eyes and a nose with a felt-tip pen. Don't forget the mustache!
We make “fingers” on the paws by sewing them with a couple of stitches.
We tie a bow and hand over a flower!
Our kitten is ready! It is not sewn very neatly, but please make a discount on what the kids made! If you sew yourself, then of course it will turn out much neater.
It was a pleasure to collaborate with you! Subscribe and visit other articles with crafts, I briefly call them My Workshop! Take a look at the article about cats made from socks, they make equally cute toys! Show it to your friends so they can make crafts with us too. That's all for today! Bye bye!
Also visit the articles
Here you will find 4 simple master classes, and 3 of them do not even require sewing! Very simple and funny toys made from socks that both babies and older children will appreciate.
flying cat
Another simple master class on sewing a cat with your own hands is the “Angel Cat” pendant.
Prepare:
- fabric for the body (quite dense);
- cotton for angel wings;
- ribbons for decoration;
- beads or ready-made eyes;
- buttons - they will make the paws and tail movable;
- threads for embroidering the face;
- stuffing material.
First, cut and sew the face, placing the parts right sides together, then do the same with the cat’s body.
Don’t forget - you need to cut by laying out the pattern pieces along the grain of the fabric, but the legs and tail - on the bias (this will make it easier to turn them out and stuff them)! Sew the muzzle to the front side of the tummy, leaving a hole for stuffing the toy.
- DIY photo frames are popular ways to create from scrap materials. 110 photo frame ideas: wooden frame with buttons, decor with stones and shells, salt dough frame, collages, decoupage
How to make a picture frame with your own hands? Choice of design and sizes. Instructions for making from scrap materials: cardboard, plinth, newspapers, buttons
- Cassette roller blinds: design examples, installation options, color choice (photo)
Place the piece on the front side, carefully straighten the head, then sew the entire piece along the contour. To avoid wrinkles in the corners when turning, make notches in them, not reaching the seam 2 mm.
Cut out the paws and tail, sew them along the contour, then use thin scissors to make neat holes, turn them inside out and stuff them. Stuff the cat's body, sew on the eyes, embroider the nose and mouth with thread.
Sew a miniature heart from a small piece of red fabric and place it in the body of the toy. Sew up the hole, sew on the paws and tail.
To close the seam on the cat's neck, decorate the seam with a satin ribbon. Sew the parts of the wings together, turn them inside out and lightly stuff them with soft filling (for example, synthetic fluff).
You can add aromatic herbs, cinnamon, vanillin. All that remains is to sew the wings to the cat’s body, make a pendant from a cord and give the toy a bouquet of flowers, a fish or a bell in its paws.
Master classes on sewing cats
On the Internet there are more than a hundred types of different master classes on making fabric seals with your own hands. Making small cats, hares and fish is considered the easiest. Even a novice needlewoman can handle this. All materials are available in every home, and production does not require large financial costs. Some toy options are presented below.
The simplest master class on sewing a funny cat
Children love funny and small cats. Before starting work, you need to talk with your child. So that he describes what type and size of cat he wants.
You might be interested in this. Examples of beautiful patterns for trousers for girls and boys
It would be good if you have a sewing machine; if you don’t have one, you can sew it by hand using the “ forward needle ” or using a small running stitch. You can fill the toy with different materials: from holofiber, synthetic fluff, cotton wool to small pieces of fabric or rags.
Felt product pattern
Materials for work:
- Various soft fabrics, preferably cotton or chintz;
- Felt fabric;
- Buttons are black;
- Thick floss;
- Filler (can be natural), scissors;
- Threads to match the color of the material;
- Pins or clips.
Step-by-step progress of work.
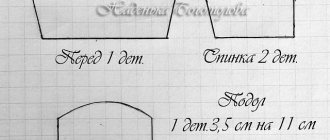
When patterning a kitten from fabric, you need to make an allowance of 1 cm. It is very light, you can even draw it yourself by hand.
Cut out cat parts from different materials. On the main part, use a pencil to draw a mustache and the outline of the cat’s muzzle.
Embroider the cat's face, sew a heart and buttons in place of the eyes. Make a spout from felt fabric.
Place the long pieces face to face. Sew all the parts of the paws and tail, making an allowance of 1 cm. Make a hole in one side of the part, the padding polyester will be stuffed into it.
Heart toy
Place the ear parts facing each other and sew them together, making an allowance of 1 cm. Turn them inside out and iron them, preferably with a finishing stitch. Fill a little with padding polyester.
Place ears and paws on the front part of the main part and secure with pins. Place the other body part wrong side up. Sew both parts, making an indentation of 1 cm. Leave a hole at the bottom.
Turn the toy inside out and stuff it tightly with padding polyester. The product is ready.
How to sew a kitten using a universal pattern - mk
There are universal patterns; you can use them to sew several different animals at once. For example, a hare, a cat and a dog.
Fabric dog
The size is approximately 20 cm. You need to take the necessary material and fold it in half, right side inward. Enlarge the pattern to the required size, transfer it to paper, and then to the craft.
You may be interested in this: The procedure for sewing a fabric and felt bow
Sew all the details of the product by hand. Each part of the product must have a hole for turning it inside out.
Then you need to take scissors and cut out the stitched parts, adding 1 cm to the pattern. It is advisable to add this value in places where it is turned inside out.
Turn out all parts of the product, stuff with padding polyester using a stick or pencil. Try to stuff more filler into the head so that it is dense. The product is ready.
Cat pillow
Pillows in the form of cats
In this master class we will look at a scheme for creating a pillow in the shape of a cat. Basically, such products consist of light shapes, and you can sew them together with your children.
Materials for work:
- Pattern of a cat from fabric (you can print it from the Internet, or you can draw it yourself);
- Flesh-colored material or vice versa with bright patterns;
- Clips, textile marker, scissors;
- Needles and threads;
- Synthetic fluff or cotton wool for filling.
Step by step progress of work.
First you need to make a pattern and transfer it to the work surface, leaving allowances. Sew on the wrong side (you must leave a hole for the filling). The pillow is turned inside out and stuffed with synthetic down. Next, decorative parts and decorations are sewn on.
Sitting cat option
A very simple master class - sitting cat
To make such a cat, you will need:
- Fabric (preferably felt);
- Threads and needles;
- Filler;
- Drawing template.
This is the simplest option for making a toy. You need to make patterns on paper and transfer them to the work surface. Separately the body, paws, tail, head, cat whiskers.
Important. The paws should be cut in a sitting position.
Next you need to start sewing the cut parts together and leaving a hole for stuffing. It is better to use cotton wool or padding polyester as filler. Turn the cat inside out and stuff it completely, compacting it. The product is ready.
Toy option for girls
DIY cat photo
- Do-it-yourself drawings on T-shirts - step-by-step instructions, necessary materials, advice from craftswomen. 120 photo ideas on how to make a print on a T-shirt
DIY gift baskets are a universal gift for any occasion! 80 photo ideas for decorating baskets: romantic, formal, children's, Italian, Brazilian, for movie fans
A DIY gift for your loved one: for Birthday, New Year, Valentine's Day, anniversary. 110 photo ideas for original and fun gifts that will surprise your loved one
Do-it-yourself lambrequins - manufacturing instructions with patterns. Types of lambrequins, choice of variety. Preparation of material and tools. Step-by-step manufacturing guide- DIY beads are interesting photo ideas for creating original jewelry. Step-by-step master class on creating jewelry from scrap materials
- DIY Tilda for beginners. History of the toy, materials and tools for creation, step-by-step manufacturing process. Sewing tilde: secrets of mastery
Read here - How to make a Lol doll with your own hands: a step-by-step description of how and what to make a popular doll model from (85 photos and videos)
Help the site, repost 
0