What kind of hat should a baby have? Of course, soft, warm and comfortable. It’s even better if, in addition to all of the above, the baby’s hat is fashionable, bright and different from others. And where can I get such a hat? I suggest you sew a fun and bright children's hat from fleece with your own hands.
Why is it better to sew a fleece hat? Fleece is a lightweight, soft, pleasant to the touch, anti-allergenic material, synthetic “wool” made from polyester. Fleece Products made from this fabric are light, durable and retain heat well, thanks to the large amount of air contained in the so-called “air chambers”. We can say that fleece is specially designed for babies. Fleece does not absorb moisture, but conducts it well. Children do not sweat in clothes made from this fabric because fleece “breathes” and retains heat perfectly.
The fabric washes well and remains soft after repeated washings. In addition to all of the above, fleece is sold in a very diverse range of colors, and most importantly, sewing from fleece is a pleasure. The edges of the fabric do not need to be further processed, the fabric does not fray and is easy to cut.
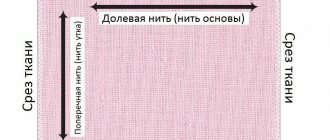
To sew a baby hat, we first need to measure the circumference of the child's head. How to do this is shown in the photo on the right. We use a centimeter to wrap around the head so that the measuring tape passes through the forehead and the back of the head - this will be the circumference of the head. Then we measure the distance from ear to ear across the top of the head - this will be the depth of the cap. For a simple hat, these measurements will be enough.
Using fleece to make hats
Fleece fabric has an undoubted advantage over other materials. This is 100% polyester, which undergoes a special treatment that prevents the product from pilling. It is quite easy to care for, the material does not wrinkle, washes well and dries quickly. Pleasant to the touch, does not cause irritation when in contact with the body.
A fleece hat is warm, elastic and fits snugly to your head. A large selection of colors gives many options in order to make the desired product.
DIY reversible knitted hat
This is a great option for kids who have a lot of clothes. It is necessary to combine two fabrics of different colors and with different patterns. To do this, two parts are built and sewn together. For this, elastic threads are used, which allow the product to stretch perfectly.
Features of sewing a double-sided knitted hat:
- Use knitted fabric of the same texture
- Pay attention to the density and stretchability of the fabric
- Before sewing, be sure to determine whether the fabric is fading.
- The fabric should not be see through and be very thin
Do-it-yourself double-sided knitted hat Do-it-yourself double-sided knitted hat
What materials are needed to sew a fleece hat?
To sew a headdress, you need fabric, a meter tape, tailor's chalk, scissors, and threads to match the fabric.
Before it comes to assembling the parts, the pattern needs to be made on paper. For this, in fact, you need the paper itself and a simple pencil. The product is sewn using a sewing machine; if you don’t have one, the work can be done with a fine hand stitch. Due to the fact that the fabric has a slight fluffiness, the seam will be invisible.
For convenience, when sewing parts together, you can first pin them together with pins, so pins will also come in handy.
You can't stop sewing beautifully!
Video, Master class
Hello, friends!
Any mother wants her child to be dressed not only warmly, but also beautifully in cool weather. It’s easier for a mother who knows how to sew. For example, she can easily sew a hat for a child or a teenager herself.
Today we will look at a master class on sewing an unusual headdress for a child and answer the question - How to sew a children's hat with ears . They are sometimes called animal caps.
Among the many models of similar hats, there is one of a very simple cut. Sews easily and quickly.
Let's look at the cut and sewing of a hat with ears in detail. If you have any suggestions for other models, write in the comments or by email.
For those who like to watch and listen to the voice, MK in video format is waiting for you at the end of the publication.
So, let's start sewing a children's hat with ears.
You will need:
- A piece of material approx. length. 55 cm;
- Threads matching the color;
- Chalk/soap for marking;
- Tape measure;
- Ruler;
- Pins;
- Scissors;
- Sewing machine;
- Iron;
- 30-40 minutes of free time.
What material is suitable for sewing a hat?
To prevent the hat from causing discomfort when worn, make it from stretchable material. Thin or medium-weight knitwear is perfect, for example, footer, ribana, children's knitwear, fleece, etc.
You can sew a hat from a suitable knitted T-shirt or jumper that has served its intended purpose, if the child has grown up and the item is still in good condition. You can give a second life. Just pre-wash and iron.
Note: It is advisable to make a pattern, taking into account the stretch coefficient of the selected fabric. I'll tell you how below.
Hat pattern and required measurements
The model is very simple, so any child’s hat can serve as a pattern.
If it turns out that there are no hats of the required size, take two measurements:
- Head circumference Og (1);
- Cap depth Gsh (2).
Please note that measurements are taken and recorded in the whole size, not in half, as is often the case when taking other measurements from a figure.
What is the elongation coefficient for and how to find it
To draw a pattern taking into account the properties of the selected material and the size of the child, we determine the stretch coefficient of the fabric.
To do this, place marks on the canvas between a 10 cm section.
And stretch the material.
Record the resulting stretch value.
Let's say that from the original 10 cm the stretch was 2.5 cm = 12.5 cm.
Divide 10 by 12.5 = 0.8
0.8 – tensile coefficient for this fabric.
IMPORTANT! We stretch without fanaticism. Remember - the harder you pull the fabric, the tighter the hat will fit and squeeze the child’s head. We don't need discomfort!
Multiply the resulting measurement of head circumference by 0.8
For example, Og - 56 x 0.8 = 44.8
Round up to 45 cm.
Next, when constructing a pattern, we apply the resulting value.
Helpful information:
For more information on how to determine the elongation coefficient, see the video.
Draw a pattern and cut a hat with ears
When cutting, I recommend adding 1.0 - 1.5 cm to the allowance for the width of the hat - to refine the pattern.
On a piece of paper, draw a rectangle, with one side equal to 1/2 the measurement of the head circumference (taking into account the coefficient), and the other side equal to the measurement of 1/2 the depth of the cap.
Then round the corners as shown.
Note: If you are in doubt about the measurements and calculations, you can cut out the workpiece, try it on, make clarifications and cut it on the main fabric.
Hat pattern first:
Next, I changed the pattern a little after trying on the hat.
Refined pattern
I specially divided it into sections so that the difference could be seen. I narrowed it a little at the top, it’s more comfortable and beautiful.
Life hack To make the hat pattern piece even on both sides:
- First, trace the pattern in full size;
- Mark the middle of the part;
- Fold half of the pattern exactly along the line;
- Trace along the contour of the other half;
- Cut out the pattern.
We will sew a hat with ears. Therefore, we cut out additional details.
Which animal do you like best - Cat, Teddy Bear, Fox, Wolf? We select and draw the “ears” of the desired animal. You will get an unusual “animal” hat. Can be decorated with suitable applique or embroidery.
My hat has cat ears. Meow…
The result is a hat pattern:
The base of the hat is 1 piece with a fold;
“Ears” - 4 parts.
Uncover
Fold the material in two layers - the hat will be denser, warmer, and the seam will be hidden inside. Don’t forget to mark the location points for the “ear” parts.
For a cap with a lapel, step back from the fold at the bottom by the desired amount, approximately 2.5 - 3.5 cm.
Note: We will consider cutting and sewing an interesting model of a cap with a lapel in the next issues. I recommend subscribing to blog updates so as not to miss new publications.
Looking ahead, I’ll show you a photo of the resulting hat.
If you change the design a little, it will suit even a teenager.
—
Next, we lay the main part of the pattern on the canvas, as shown, and outline it along the contours. In a mirror image we continue the contour of the part.
We outline the fold line. You can add a basting stitch.
After cutting, an oval-shaped workpiece is obtained.
Note: I use a self-disappearing marker for marking. Convenient tool. The drawn line disappears after a few hours. Typically, such markers or pencils are sold in “handicraft” stores or sewing equipment stores.
It lasts a long time - mine is 3 years old, it’s like new. The main thing is not to heat the markings, otherwise they will remain for a long time.
Sewing a hat
Sewing a hat is very simple:
- Checking the evenness of the cutting;
- We fold the parts of the “ears” face to face, grind along the contour, turn them inside out;
- According to the markings, we lay out the parts of the “ears”, baste or pin them;
- We chop off or baste the parts along the contour, leaving an open area for turning.
- We sew a line along the cuts using a sewing machine or overlocker (if you have one).
Note: You can find recommendations for working with knitwear, selecting needles and stitches on the pages of the project “You Can’t Forbid Sewing Beautifully!” Enter the query in Search - “ Working with knitwear” or simply “Knitwear”
In this case, I use a special needle with a rounded tip (so as not to tear the fibers) and an elastic stitch for knitwear. A zigzag stitch works well, and even a straight stitch if you set them to a minimum pitch.
- After stitching the parts, carefully iron along the seam.
- Cut off excess allowances.
- Turn it inside out.
- We sew up the open area by hand using blind stitches or using a sewing machine.
- By placing one part of the part into the other, we form a cap.
The hat is ready. If there is any material left, make a scarf.
You can decorate the model with applique or paint the hat with special paints or markers.
Helpful information:
How to sew and wear a fleece scarf.
The resulting model is demonstrated by my son Ivan.
- Well, okay, mom, even though it’s a child’s hat, it’s a cool color...
Helpful information:
How to sew a hat for a baby
We sew a fashionable cap
MK video “How to sew a children’s hat with ears”
I wish you beautiful sewing projects and good luck in all your endeavors! Elena Krasovskaya
This is interesting:
- How to sew a fashionable beanie hat with lining...
- How to quickly sew a spectacular evening...
- How to sew a cover for a sofa or swing
- Tie for school uniform. Pattern. Sewing. Video.
- Video course “Sew a cozy robe”
- Recommendations for quality tailoring...
Pattern of a four-piece fleece hat
After preparing all the materials, you need to measure the circumference of your head. We divide this value by 4 and get the size of the width of one wedge. After this, you should find out the depth of the headdress. To do this, use a meter tape to measure the distance from the forehead, across the top of the head and to the back of the head. The result obtained is divided by two. This is one wedge, 4 of these parts are needed.
For example: head circumference 50 cm, divide this value by 4 (number of wedges). 50:4=25 - wedge width.
The measurement from the forehead to the top of the head was 46 cm, divide it by 2 (the front and back of the head). 46:2=23 - height of the cap.
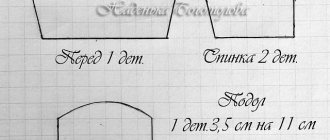
To build a wedge, you need to draw a triangle, where the height of the triangle (23 cm) is the height of the product, and the base of the triangle (25 cm) is the lower part of the wedge. The sections from the base to the top should be rounded. A fleece hat with earflaps is cut using the same principle. The pattern differs in the presence of a few more additional details, but the base is the same.
Fleece hat sewing technology
A fleece hat can be lined or unlined, depending on the season. The fabric does not wrinkle or fray, so the inner edges can be left as is. If the hat is unlined, then for a neat look it is still better to process the seams with an overlocker.
The pattern is applied to the fabric, and all 4 parts are cut out in one motion. They are sewn together. You need to watch the front and back sides of the material so as not to sew the face to the back, otherwise you will have to rip it apart and do all the work all over again.
You can first sew 2 parts each and connect the resulting halves together. Or sew one piece at a time to each other.
Patterns of fleece hats can be different. In this case, the hat can be made with a side, which is then folded up. Or leave the hat as is, just turn up the bottom seam.
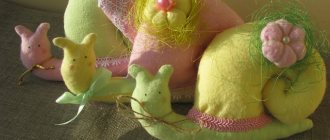
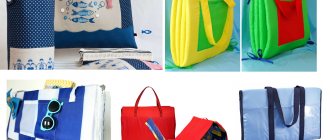
Original fleece hats with ears
For those who like original ideas, I suggest sewing a funny and bright children's hat from fleece.
Original fleece hats with ears
You can sew several of these hats and change them at least every day. The pattern for a hat with ears is here
In the video from Angel Nickman you can see all the details of how you can quickly sew such an original fleece hat for your baby.
How to sew a baby fleece hat with ears
Sewing a fleece hat with earflaps
When sewing a hat with earflaps, you need to make a lining. For beauty, you can choose fleece in two colors. Such models, which allow you to cover the forehead, back of the head and ears, are often used in the cold season. You can sew a fur hat with or without ties.
In this case, the wedges are cut, as in the previous model, taking into account your measurements. Don’t forget that the pattern should be transferred to the fabric with a margin of 0.5 cm for seams. You can find ready-made patterns for fleece hats in sewing magazines. For a hat with earflaps, you still need to cut out a visor (two parts of the same size).
Connect the wedges for the lining to each other, but leave a small open seam (6-7 cm), through which the finished product can be turned out. There should also be 4 parts that are sewn to the bottom of the hat (2 front, 2 lining), which will protect the ears.
Sew the parts of the visor together, cut off the excess allowances and turn them inside out. Connect the elements that will cover the ears and also turn them right side out.
The main parts are ready, now they need to be assembled into one product. Place the lining of the hat and the hat itself face to face, so that all the seams are visible. Insert the visor inside between the lining and the main part and secure its raw edge with pins between the main parts. On the sides of the visor, place the parts that will cover the ears in the same way and secure with pins.
Now that all the necessary components have been assembled, you need to sew them and the linings in a circle with one seam. It turns out that the visor and side parts will remain inside the two stitched parts. Now you should find an unsewn area in the lining (6-7 cm) and turn the entire product out through it.
Sew the open area manually with a hidden seam, using threads to match the fabric. You can find other patterns for fleece hats, when the visor and “ears” are cut out in one piece. When sewing, this one piece will need to be placed between the main and lining fabric. The algorithm of work is the same: stitch all the parts together and turn them through the open seam.
How to sew a turban hat from knitwear
The pattern of such a hat is quite complicated, since there are a lot of cutouts and seams when sewing. This significantly complicates the sewing of the product.
But if you are an excellent sewer, you can sew a turban without much difficulty. The whole difficulty lies in the presence of a large number of darts.
Usually the entire fabric of the product is pulled forward. If necessary, the junction of all pieces of fabric is decorated with a brooch or flower.
How to sew a turban hat from knitwear
How to sew a turban hat from knitwear How to sew a turban hat from knitwear
As you can see, sewing a knitted hat is quite simple. In addition, you can earn a little extra money from such a hobby. After all, in autumn and spring these accessories sell with a bang.
Sewing a sports hat from fleece
There is an even simpler version of the hat. The fleece sports hat pattern can be made of two parts or one if the two are cut together. If there is only one part, then there will be only one seam - at the back. If there are two, then there will be two seams - on the sides. The patterns need to be made 6-7 cm longer so that this piece of fabric can be folded inward and thus insulate the part of the hat in the ear area.
Whatever option is chosen, first of all, you need to sew up the darts at the top of the product, and then sew the details. We can say that the hat is almost ready. All that remains is to finish the internal seams and turn up the piping. You can sew a decorative patch on the side.
If you have an overlocker for stretch fabrics, then the work will be much easier and faster, because a line is immediately laid in one seam and the edge is processed.
Fleece hat - in 15 minutes
The simplest hats can be sewn in literally 15 minutes.
You will need a piece of fleece with the width: 1. Option - cap depth + lapel width + 2 allowances (2 cm) 2. Option - cap depth + lapel width + bubo width + 2 allowances (2 cm)
Pattern of a simple fleece hat
Cut out and sew the side seam. Then turn 5-7 cm inside out and stitch to the edge. All that remains is to assemble the top of the cap. In the first option, we collect the fabric and sew it by hand. You can additionally wrap the button with a piece of fabric and sew it on top. You can also simply stitch the top edge from the wrong side. The result will be something like a “Cockerel” hat. The corners can be left or hidden inside.
In the second option, we collect the fabric and tie it with a ribbon (ribbon, string), as if we were making a ponytail. It can be cut into strips of 1.5 - 2 cm. You will get a real bubo. If you wish, you can decorate the hat with a fashionable iron-on sticker.