The pompom gained its fame thanks to the military. Pom-poms served as insignia in the army. In France, pom-poms were sewn onto sailors' caps. This was done to protect the head from impacts on the low ceilings of the holds. Now these fluffy balls are used not only as a part of clothing, but also as objects for creativity and interior decoration.
Tips for needlewomen on making pompoms
How to make a pompom from threads with your own hands so that it turns out beautiful and even? Making this thing yourself is quite easy and quick. In the process of creating a product, it is advisable to follow some tips:
- To make the pompom fluffy and voluminous, use threads that have a dense and porous texture. Yarn with natural wool fibers is best suited for this. Products made from such yarn will hold their shape better and will be more voluminous and fluffy.
- To make it easier to create a template, you can purchase special rulers. Typically, templates in the shape of a circle or square are used.
- Scissors must be sharp.
- It is better to choose the color for the pompom to match the color of the product you are going to decorate, or contrast it.
- If you want to create an item with a design of several colors, use a special scheme for this.
- In order for the product to maintain a neat appearance for a long time, the pompom must be tightly fixed in the center with a thread. To tie the yarn more tightly, you can use silk threads for this. They are stronger and invisible on the finished item. For greater strength, you can wet the thread and tie the product several times. You can also secure the product with a special knot - a constrictor. This knot is very strong and can be very tight.
- It is recommended to wash pompoms only by hand at a water temperature of 30 degrees. The product is hung to dry. After drying, the pompom is combed and trimmed with scissors.
Video tutorials: how to quickly make pompoms from yarn
Needlewomen know many ways to quickly create beautiful pom-poms for decorating yarn products or other things, giving them originality and uniqueness. Thanks to the simplicity of the process and the ability to use readily available tools, even a teenager can make a fluffy ball. If desired, you can easily create a bright multi-colored pompom that will add sophistication to the item.
How to make a pompom for a scarf or hat with your own hands
POMPON WITH YOUR HANDS
A very quick way to make a pompom for crafts
How to make a Snowman pompom from yarn pompoms with your own hands Video tutorial Snowman
Mini pom-pom made of threads of two colors for booties
How to make a pompom balabon for a hat, booties, etc.
Methods for making pompoms
There are several methods for making pompoms with your own hands:
- Classic - the yarn is wound on a round cardboard template.
- Fork - the threads are wound around the fork in the process. This option is suitable for creating small pompoms.
- On the hand - using your own fingers. With this method you do not need to use any devices.
- Fast - on chair legs. Used if you need to make a large number of pompoms.
Let's look at them step by step.
Classic, using a round base
This method uses a round template made of thick cardboard. Circles are drawn with a compass or using a pattern. You can simply circle any round objects of a suitable size (saucer, lid, coin, etc.) Two identical blanks are made in the form of a bagel. The radius of the finished item will be equal to the distance between the central and outer circles. That is, the larger such a blank is, the larger the pompom will come out.
The templates need to be folded together and yarn wound around them. The finished pompom will be fluffier if you wind more threads. Next, the wound threads are cut with scissors along the outer edge between the blanks.
The thread for fixation must be stretched between the cardboard parts and the bundle of yarn must be tightly tied with it. Now you can remove the cardboard templates. Fluff the finished ball and trim with scissors. This DIY thread pompom is perfect for a hat.
Pompom on fingers
In this way, products of different sizes are formed. For a small pompom, two fingers are enough; for a large one, the entire palm is used. For this method, you don't need anything other than yarn and scissors.
Place the thread on the inside of your palm and press it with your thumb. Then start wrapping the yarn around the required number of fingers. Do not wind it tightly so that it is easy to remove the workpiece later. Wind the yarn until the workpiece is thick enough. Carefully remove the skein from your hand. Place a piece of thread under the workpiece and tie tightly in the middle. Cut the yarn along the fold on both sides. The product remains to be shaken and trimmed with scissors.
Pompom made on a fork
This cutlery can be found in every home. Using a fork you can quickly make small pompoms.
Pass a piece of thread in the middle between the tines of the fork and place it vertically. Place the end of the thread from the ball of yarn horizontally on the fork and hold it with your finger. Now start wrapping it with yarn. Continue winding the threads around the device to the desired thickness. Cut off the rest of the thread. Throw the back of the first thread over the top of the skein and tie the ends well with a double knot. Remove the workpiece and cut the loops. Fluff the product and trim to the desired shape.
Fast manufacturing method on a chair
Sometimes you need to make a lot of pompoms at once. This method works well for this. It is the best way to save time.
Turn the chair over. Attach the end of the thread to one leg of the chair and begin wrapping the yarn around the opposite legs. Wind the yarn to the desired thickness of the workpiece. Cut off the rest of the thread and fix it on the leg. Tie the resulting workpiece with pieces of thread in several places. The nodes will be the centers of the finished products. Cut the wound threads in the middle between adjacent knots. Fluff the finished pompoms and trim with scissors.
How to make a fluffy pompom for a hat?
girl in a hat with a fluffy pompom
The fluffiness of a pompom for a hat directly depends on the diameter of the object around which you wind the yarn. The second important factor is the volume of the ball of yarn. It will correspond to the diameter of the future pompom.
In addition to the classic cardboard round blanks, you will be suitable for:
- own palm
- cardboard rectangle
- mobile phone
- plastic bottle
- glass jar
The main thing is that you can pull the thread around the winding on both sides and tie all the threads tightly.
- Cut the circle to the right and left of the fixed center.
- Align the threads, cut off those that stand out in length.
How to make a pompom tassel
A tassel is a type of pompom. They are used to decorate curtains, blankets, jewelry and other items. Making a brush is not at all difficult. To work, you need to take yarn, scissors and a rectangular cardboard template.
Manufacturing process:
- Wind the required amount of yarn onto a cardboard template.
- From the top side of the workpiece, tie the threads in the center.
- From the bottom side of the template, cut the threads along the fold.
- Remove the cardboard and tie the yarn again at a distance of 1-2 cm from the beginning of the tassel.
- Trim the ends of the brush using scissors.
To secure the tassel, you can crochet a cord.
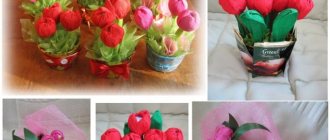
How to make a pompom from corrugated paper: step-by-step instructions, design ideas, photos, videos
multi-colored crepe paper pompoms suspended from the ceiling
- The technique for making a pompom from corrugated paper is similar to that discussed in the previous section.
- The difference is in the preparatory stage. Cut the corrugated sheets into identical rectangles, for example, 20x30 cm in size.
- Be careful when securing the center of the sheet with thread or wire. The paper is thin and may tear from excessive pressure.
- To make pom poms more interesting, fold 2 or more colors of paper into an accordion shape. Alternate them at your discretion.
step-by-step instructions in pictures for creating a pompom from corrugated paper
Where are pompoms used?
Each of the listed methods for creating pompoms is widely used by needlewomen. Not only are knitted items of clothing (hats, mittens, scarves) decorated with pompoms, but they are also used in the interior. Pompoms are used to create cozy blankets, rugs, and pillows.
Pompons are also used to create children's crafts, Christmas tree decorations, and keychains. Pompoms can be made from more than just yarn. Fur pom-poms are often decorated with hats, bags and even shoes. Bright pom-poms made of polyethylene or corrugated paper are made for cheerleading (dance show at sporting events).
Large pompoms made of tulle and corrugated paper are created to decorate festive events. Master classes on creating such things are also available on the Internet. Such products can easily cheer up both children and adults because they emit warmth and positive energy.
How to make a pompom from napkins: step-by-step instructions, design ideas, photos, videos
several ready-made pompoms from blue napkins.
The more magnificent you want the pom-pom to be, the more napkins you take to make it. For example, for the middle option, 3 napkins are suitable.
- Trim the edges of each with scissors.
- Stack them and arrange them like an accordion.
- Secure the middle with thin wire.
- Carefully go through each layer, leveling it.
- To make the napkins as fluffy as possible, level the layers only in one direction, leaving the other flat.
- Then you can glue it with another similar napkin.
In addition to processing with curly scissors, you can trim the edges in a semicircle or house. Fold the straightened napkins on top of each other, 10-15 pieces at a time, if your goal is large and delicate pom-poms. Such products are a good solution for decorating children's parties, as well as events involving children.
Pompoms made from napkins are hung from the ceiling or other objects, or glued to thin twigs or clothing.
How to make a pompom from faux fur: step-by-step instructions, design ideas, photos
rows of ready-made faux fur pompoms
- Take a cardboard blank with a slightly larger diameter than the future pompom.
- Place it on the inside of the fur piece and circle it.
- Cut out the result and sweep the edges of the future pompom from the inside so that the fur does not fall apart.
- Pull back the thread you used to sew. You will get a fur ball.
- Fix the thread so that it holds the edges tightly. If you plan to hang the pompom from something, leave it long, otherwise cut it off.
step-by-step photos of making a fur pompom
How to make a pompom from crepe paper: step-by-step instructions, design ideas, photos
Multi-colored crepe paper pompoms hang in the room.
Take a lot of crepe paper to create a pompom. Due to the thinness of its sheets, the required volume is achieved by their quantity.
- Lay out the sheets and cut them to standard A4 size.
- Fold with an accordion 1.5-2 cm wide.
- Secure in the middle with strong thread or thin wire. Leave a long tail if you plan to hang the pom pom from the ceiling.
- Cut the ends of the accordion on both sides with scissors, rounding them or giving them the shape of a triangle.
- Connect the ends of the accordion and begin to level the sheets layer by layer.
- Do this without haste, carefully so as not to tear the paper.
Instructions in pictures for creating a pompom from crepe paper
How to make a rain pompom on a stick: step-by-step instructions, design ideas, photos, videos
several ready-made rain pompoms on sticks
- In addition to rain, you need sushi sticks or pencils, tape, and a glue gun.
- Measure the required length of rain and cut off the excess.
- Cover the middle with a thin strip of tape.
- Repeat the steps as many times as necessary to obtain the desired volume.
- Distribute the resulting bunches evenly around the stick and secure with either tape or a glue gun. To be safe, use both methods at the same time.
- To add beauty to the product, cover the stick with the same rain that was used for the pompom. Wind it in a spiral in 2-3 layers and secure it with glue.
The classic way to create a pompom on cardboard rings
How to make a pompom from yarn on cardboard rings, if you have prepared the necessary tools and materials:
- A piece of thick cardboard. The thicker the paper, the easier it is to wind and cut.
- Sharp scissors with sharpened tips.
- A skein of yarn with a medium thickness of yarn.
- Compass or round template.
Stages of making a pompom from yarn:
- Decide on the size of the future product and volumes. The principle of manufacturing the cardboard base will depend on these parameters.
How to make a pompom from yarn using cardboard rings: step by step
- First, sketches of cardboard rings are prepared. Draw the first circle with a compass, which will determine the diameter of the pompom. Inside the formed figure, draw another circle with a smaller diameter. This element will become the determining factor for the volume of the product.
- Place 2 pieces of cardboard on top of each other. Using scissors, cut out a large circle, and then a small one. You should end up with 2 cardboard rings of the same size. If the yarn is thick, it is worth making 3 patterns.
- Wind the yarn onto cardboard patterns. You need to cut a long piece of yarn from a skein. Use this cut to wrap the rings. The yarn should lie tightly in each turn. So that there are no gaps.
- When the entire ring is wrapped in yarn, you need to use scissors to make cuts along the edges of the workpiece. You need to move smoothly and carefully so that the already cut threads do not fall out of the pattern.
- In accordance with the cutting, the cardboard rings are slightly moved apart. A small space is formed between the patterns. When all the edges are cut, a piece of yarn is pulled between the cardboards. You need to tie together pieces of yarn with thread. It is advisable to tighten the thread well during the process.
- Pull out the cardboard blanks. Straighten the yarn and trim any protrusions or frayed parts of the threads by cutting them off with scissors.
Lastly, you need to shake the finished product to remove small cuts and excess threads.
How to make a pom-pom from garbage bags and T-shirts: step-by-step instructions, design ideas, photos, videos
ready-made pom-pom from polyethylene T-shirts on the table
These rustling pom-poms are often used for dances, support groups for sports teams, and decorating festive costumes. Therefore, one side is always a handle, which is convenient to hold the pompom.
- Place the bags with equal sides facing each other. Cut off the handles and cut the sides.
- The remaining glued bottom will be the handle of the future pompom.
- Cut the fabrics of the bags into fringes up to a centimeter wide. Leave 2-5 cm to the edge intact.
- Roll the result into a tube and secure the handle with tape or thread.
- Straighten the fringe. If desired, add a layer of glitter tinsel along the outer edge.
- If the pom pom is made for cheerleading, attach a plastic handle inside it to prevent your hand from slipping while dancing.
step-by-step photos of collecting pompoms from garbage bags