Do you have a pencil skirt in your wardrobe? Not yet? Then join us. We will analyze in detail how to sew a pencil skirt, how to cut it quickly, without complex calculations, how to fit it to your figure, and how to properly process the seams and details of the skirt.
There are things that suit all women without exception. Young and slender, elderly and plump, blondes and brunettes. A pencil skirt is a lifesaver for all occasions, in any weather, in any circumstances.
Complete with a smart blouse, it is suitable for a celebration, an evening out, with a turtleneck or sweater - for a friendly company, a relaxed atmosphere. What about the dress code? Well, what's a dress code without a pencil skirt? Even with a strict dress code, a pencil skirt allows women to look elegant, business-like and, at the same time, very feminine.
Sewing a pencil skirt is easy. The main thing is to take your time, carefully, carefully and consistently perform all operations. So let's get started.
What do you need to cut and sew a skirt?
Prepare a cloth, a piece of dry soap or chalk, and a large plastic pattern for cutting. Don't have a pattern? A longer ruler will do. You will also need sharp scissors, thread, sewing needles with a limiter at the end, and a measuring tape.
If you have no cutting skills at all or the chosen skirt model is complex, it is better to first make a pattern on paper and then transfer it to fabric. An old newspaper and a bright felt-tip pen are quite suitable for this. Don't be afraid, everything will work out for you!
What is needed for cutting and sewing
Basic tools for work:
- Prepare material to choose from;
- Textile marker;
- Skirt pattern;
- Threads with needles;
- Scissors and centimeter.
If the needlewoman does not have much experience in sewing, then it is better to first make the pattern on paper and then transfer it to the canvas. You can use paper or cardboard as a base. You can turn to handicraft websites for help, where experienced craftswomen will help you decide on the stages of work.
Button-down denim model
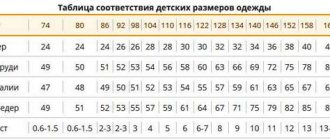
How much fabric will you need?
With a standard material width of 150 cm, for such a skirt up to Russian clothing size 66, one skirt length plus 15 cm is sufficient. That is. with a skirt length of 60 cm, you will need 75 cm of standard width fabric. For size 66, with a hip circumference of 140 cm or more, you will need fabric equal to two skirt lengths plus 15 cm for processing, i.e. 135 cm with skirt length 60 cm.
If the fabric is stretchy (loose knitwear) or loose (boucle), take care of the lining to match. You need less lining fabric; one length of the future skirt is enough.
Don't forget to choose a zipper in the same color, suitable threads for sewing, and a small button for fastening. To stiffen the belt, you can take a strip of adhesive interlining or a special corsage tape. To make convenient, neat loops for hanging a skirt, buy a little (20-30 cm) of narrow ribbon or thin soft cord. All is ready? We take measurements.
How to take measurements correctly?
It is better to find an assistant to, for example, measure the length of your skirt. Was there no one nearby? No problem, the mirror will help us.
Tie an ordinary underwear elastic band around your waist, not too tightly, but not too loosely, so that the elastic fits well and is clearly along the waist line.
Stand sideways in front of a mirror and use a measuring tape to measure your hips. Make sure that the tape passes through the highest points of the buttocks.
Important! Got a tummy? When measuring the volume of your hips, add to the measurement of your hips, taking into account your abdomen. If you don't do this, there is a possibility that you won't fit into your new skirt. How much to add, be guided by your stomach.
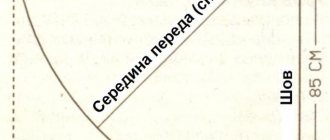
We measure the waist using an elastic band, and the length using a centimeter tape, looking in the mirror. Just do not bend over at this time, otherwise the skirt will be short. If you have a skirt of suitable length in your wardrobe, you can use it as a guide and measure it in the center of the front or back panel.
Important! Add 3-5cm to the length measurement. For a pencil skirt, it is not immediately possible to choose the optimal length; it depends on the individual characteristics of the figure - the shape of the legs, knees, hips, and abdomen. Check the final length when trying on after attaching the belt.
Write down your measurements on a piece of paper: hip size, waist size, length. Don’t be upset by the volume, don’t try on generally accepted standards. Beauty is always unconventional!
Pattern
The pencil skirt pattern is based on the basic pattern of a simple straight skirt. The difference lies in a tighter fit at the waist and hips, narrowing downward. The upper part must be treated with a belt or hard facing.
There are many recommendations on the Internet on how to sew a knitted pencil skirt with an elastic band. Don’t be fooled by the basic simplicity of sewing such a skirt. This is not a pencil skirt, you can call it a stocking skirt. And it will sit appropriately, like a stocking, hugging the body rather than creating elegance.
If you want to get a truly elegant piece, cut out a skirt with at least two side seams. It’s better with three – one more seam in the middle of the back panel. Exclusive, perfectly fitting skirts are also made with additional raised seams at the front or back.
Darts are a must-have element of a pencil skirt. Thanks to them, an ideal fit is formed.
The tapering at the bottom is the highlight of the skirt. The amount of narrowing is individual in each case, depending on the shape of the legs, hips, and length. It is convenient to correct the narrowing when trying on.
Folding the bottom on the slot
We begin to process the bottom of the skirt when the process of sewing the skirt is almost complete, that is, the zipper, belt are sewn in, and a buttonhole is made.
When calculating allowances along the bottom line of the skirt, it is better to take 2-3 cm (but not 1 cm!).
Along the entire bottom of the skirt, iron the hem allowances to the wrong side.
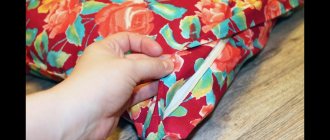
Now on the right side of the slot we turn the bottom allowance over to the front side of the skirt and sew the allowance along the side, stepping back from the edge 2-3 mm. Turn it right side out, you should get a clean corner.
On the left side of the slot you need to make an envelope corner.
For more details about this process, read this article about the angle of the envelope on the slot.
I would like to make a note: the principle of the spline is that the left side overlaps and overlaps the right. Therefore, the left side should be 2 mm lower than the right side. Under no circumstances should you allow the right side to peek out from under the left side of the slot!
Now we will make a finishing stitch at an angle of 45 degrees.
The stitching is laid across the entire width of the vent, so ironed allowances are sewn on the wrong side and the upper parts of the vent are secured.
All that remains is to hem the bottom of the skirt.
This can be done using a spider web, paper adhesive tape, or manually (choose your preferred method).
Watch also the video about how to properly process a cut with a slot:
Also watch a detailed video about the second method of processing slots - on a lining:
Step-by-step construction of a pattern
Place the piece of paper with the measurements next to you, in front of your eyes. You will also need a pen to calculate the width (opening) of the darts along the waistline.
- Draw a rectangle on paper.
- The width of the rectangle = half the circumference of the hips plus 2 cm (to fit freely so that it is comfortable to move)
- Rectangle length = skirt length.
- We divide the rectangle lengthwise into two unequal parts - the front and back panels of the skirt. The rear panel is 2 cm narrower than the front panel. This line is the side seam line.
- Mark one side of the rectangle as the top, and the opposite side as the bottom.
- From the top, set down 18-20cm, draw a line parallel to the bottom. This is the hip line.
- Darts are the most difficult part of cutting and calculations. Let's do them as simply as possible. Below there will be explanations on how to adjust the fit of the skirt to your figure using darts.
- Darts along the side seam (roundings on the side). Set aside 3-3.5 cm from the side seam line to the left and right. Connect these two points with smooth lines with the side seam, not reaching the hip line 3-4 cm. That's it! The side seam is ready.
- Darts at the front. From the middle of the front to the side seam, set aside 11-12 cm, this is the center point of the front dart. The width (opening) of the front dart is 2-3 cm, length (depth) is 10-12 cm. Draw a triangle of the appropriate width and depth. The front dart is ready.
- Back darts. From the middle of the back panel, set aside 10 cm to the side seam, this is the center point of the back dart. The width (opening) of the back dart is 5-6 cm, length (depth) is 13-15 cm. Draw a triangle of the appropriate width and depth. The back dart is in place.
The pattern is almost ready. Add 1 cm upward along the side seams, smoothly connect these points with the middles of the front and back panels. This is the natural waistline.
Draw a narrowing at the bottom. A little, 1.5 - 2 cm along the side seam down from the hip line. The narrowing is symmetrical on the back and front panels.
For freedom of movement when walking, you need to make a cut or slot. The cut is convenient if there are front reliefs (they usually run through the dart lines). If there are no reliefs, we make a slot in the middle seam of the back panel. To do this, draw a rectangle from below, 6 cm wide and 18 cm high.
You can cut out a paper pattern, pin it to the fabric with safety pins and cut the fabric with 1.5-2 cm allowances for the side seams, 3-5 cm for the bottom, and you don’t have to make allowances at all for the top edge; there will also be a belt here. Do not cut out back or front darts on the fabric!
How to tailor a belt
Step-by-step process for making a belt for a skirt:
- To begin, assemble both parts of the belt separately, grinding the central parts with the sides and laces;
- On one side of the central part you need to leave an unstitched corner 2 cm wide for the lace;
- Iron the seams of each part of the belt;
- Next, the elements of the upper and lower sides of the belt need to be fixed along the entire length. It is important that the holes match;
- Baste the fastened elements around the perimeter, making an open section 6 cm long in the lower part;
- Then the belt must be turned outward, straightened and ironed well;
- Sew the open area with an invisible seam. Then sweep the edges along the entire perimeter;
- The last operation will be to make a finishing seam at a distance of 1 cm.
You might be interested in Sewing a mattress for a newborn stroller yourself
Such a belt can visually make your waist thinner and slimmer. But it is not recommended to use it if the stomach is very visible, as it will make it appear even larger and rounder.
Asymmetrical model for slender legs
Preparing for fitting. Fitting
The front and back darts are basted. The side seams and the middle seam of the back panel of the skirt are swept away. The slot is covered completely so that the narrowing along the side seams can be corrected.
It is better to baste a ribbon or an edge strip from the fabric along the upper cut so that the product does not stretch across the waist. Fold the bottom and sew with large stitches before fitting, in order to be able to estimate the actual length of the skirt.
Important! When trying on a sour cream skirt, make adjustments until the fit is perfect. This is easy to do if you put it on wrong side up. All dart openings and seam allowances will be visible and can be easily adjusted to fit directly on the figure.
In addition to narrowing, length, and tight fit, be sure to pay attention to the side seams. They must go strictly vertically.
Have the necessary additions and adjustments been made? It's time to start sewing!
How to sew a pencil skirt?
Sew the darts and iron them to the center of the panels.
Sew the middle seam on the back panel and finish the vent.
Sew side seams and press. If you don't have a serger, zigzag the edges to protect the fabric from fraying is quite acceptable.
Finish the zipper, sew the belt, sweep out the loop, sew on the button. When attaching the waistband, don’t forget to add ribbon loops so that the skirt can be hung on coat hangers.
Hem the bottom. The bottom of the skirt, hand-hemmed with hidden stitches, looks neat.
How to sew different models
Even a novice craftswoman can sew such a skirt according to the drawing. First you need to choose the size of the fabric: the width, according to the rule, is half the figure of the hips with an allowance of 3 cm, and the length is equal to two lengths of the product with a small margin for folds. Next, you can start sewing the product; the different styles of skirts are described below. If a print or bright geometric shapes were chosen as the fabric, then when stitching you need to make sure that all the joints are connected together and the pattern is solid and not in pieces.
Straight classic pencil skirt
Step-by-step work process:
- The darts need to be folded and ironed well towards the center;
- Sew the center seam on the back side and finish the vent;
Wrap knitwear
- Baste and iron side seams. If you don’t have an overlocker, you can zigzag the edges to prevent them from fraying;
- Sew on a zipper, sew on a belt and buttons. I would like to make eyelets so that you can hang the skirt on hangers;
- Process the bottom. It is advisable to do this manually with an invisible seam.
After work, you can optionally add a small strap or decorate them with lace braid. In such clothes you can not only go to work, but also go for a walk. Lace adds more tenderness and femininity.
High waist pencil skirt
For a high waist, the basic pattern needs to be slightly edited:
- The upper straight line of the waist must be raised by 6 cm and mark A1 made there;
- Point A needs to be shifted to the right by 1 cm;
- Connect points A2, AiB1 with a rounded line.
When cutting fabric for this style of skirt, it is important not to forget about 2 cm allowances.
You might be interested in this Features of fabric glue: how to glue the material
Before the final stage of stitching, you need to try it on again and sweep everything away. If necessary, you can sew a small elastic band into the belt or sew a zipper on the side. This will visually emphasize the hips. If the hips are narrow and there are no buttocks, then small folds along the bottom can correct the situation.
How to sew a pencil skirt without side seams
The process of constructing a classic seamless skirt pattern mainly comes down to tapering along the side seams and creating vents on the back side for a loose fit.
Along the hem, you need to set aside the required amount of narrowing from the line of the side seams, which can be up to 2 cm, it depends on the type of fabric and the type of skirt. From the bottom point, you now need to lower the lines to the mark located 8 centimeters below the intersection of the hip point with the side seam point.
Stylish combination with a belt
Due to the fact that the bottom line will approach the side line at a right angle, it needs to be edited using a pattern. The front side of the product does not need to be changed.
The variation of the back side depends on the method of making the back cut. The easiest way, without changing the back panel of the pencil skirt, except for the side tapering, is to simply fold the edges of the cut inward and process it so that the V-shaped neckline comes out upside down.
Of course, it is recommended to make a vent in the back, but for this you will need to change the pattern of the back side. For the slots, it is advisable to make an additional allowance of 7 centimeters. To make an allowance, the back fabric must be cut in two halves, and then a connecting seam must be made.
High heel sock
How to make a skirt pattern with a yoke
When using a yoke, the lower part of the product may be different. This is “half sun”, and “Spanish flu”, and “balloon”, in this case there will be a pencil. Also, the lower part of the product can be with flounces or a wrap.
First, you need to make a drawing of a classic skirt with a yoke, where the line connecting the yoke to the hem of the product runs parallel through the waist.
Using a basic pattern, you can generally make many different styles. If you can’t make it yourself, then you can look for it in different master classes.
Important! You need to start modeling only when the pattern is completely ready, with various changes to the girl’s figure.
The strip is suitable for visually enlarging the buttocks