Handmade products have recently become increasingly popular and in demand. The advantages are in the naturalness of the materials, the elements of execution and the love that the craftswomen, together with the warmth of their hands, convey to their creations.
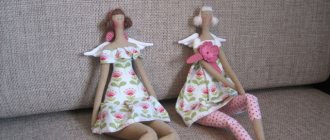
Tilda dolls are an interesting toy for children and a stylish decoration for the home. They conceal elegance and lightness, French charm and love for detail.
A beautifully made doll can become a real masterpiece and delight in appearance. Online stores offer a large selection of DIY toys, in particular dolls using this technique. But you can make beauty yourself. To do this you will need some free time , materials for work, a sewing machine if you have no experience in sewing by hand, and a good mood.
History of the toy
Of course, the tilde can hardly be called a functional toy, it is more related to interior dolls, but I made my first tilde as a gift for a sweet girl of three years old, and, as far as I can judge, I was right with the gift - toys grow with children, and I had to I have already restored the doll several times.
In modern culture, the tilde occupies a special position. Let's start with the fact that this doll, it must be said, is not new - Norwegian designer Toni Finnanger invented it back in the nineties. As the designer tells in her interviews, she planned to create a cozy home toy that would appeal to both children and adults. She used natural fabrics for this, and the manufacturing process was as simple as possible.
At first, the designer made one doll, and then things got busy, and after some time, Finnanger opened a store where you could buy a doll, patterns and books about this amazing toy. Over time, various animals began to appear, which were designed in a similar style.
Manufacturing process
Manufacturing
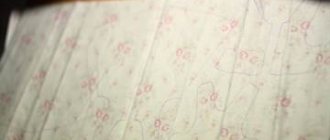
- First you need to make a pattern. Tilda patterns are available online and can be printed for free. If you wish, you can buy a book or magazine, but by and large the patterns are the same everywhere.
Tilda pattern in full size:
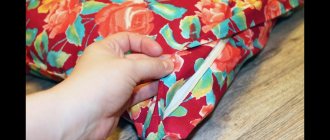
- Then the pattern needs to be transferred to the fabric. For this, it is convenient to use a chalk pencil, but if suddenly inspiration strikes you, and the sewing supply store is closed for some reason, then you can take a dry piece of soap or chalk, and a simple pencil is also suitable. How to make sure that the pattern does not move? Pin it with pins.
- You need to cut the pattern with a margin of about half a centimeter on each side.
- Each part of the body needs to be stitched well - using a machine or with a neat seam.
- Then you can start stuffing. If you want to make the doll softer, use synthetic padding; if you like thick stuffing, use cotton wool.
- Assemble Tilda with your own hands and steam or iron it.
- Then you need to make clothes for the doll.
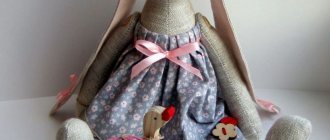
Don’t miss the measurements; it’s better to take measurements so as not to make a mistake. Typically, Tildas are made into dresses and sundresses (we suggest wearing a Tilda in a dress and a denim jacket, or a jacket and pants, see the pattern below). Do your doll's hair. Or sew a hat for the doll. I sewed a wig like this: first you need to sew the future hair crosswise to make a parting. Then you need to sew the hair to the head and style your hair. - You can also prepare accessories that will decorate it - handmade handbags and small toys or flowers.
You can watch a simple video tutorial on how to create such dolls:
The video shows in detail how to do a doll's hair:
By the way, if you know how to knit, then you will probably like the crochet Tilda doll
— I’m bad at knitting, but look how cute they are! In general, knitting is a very fertile topic, which definitely won’t hurt when making a tildo.
Watch how to make a tilde doll in a knitting master class:
Adding details
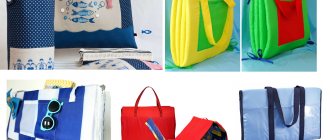
And a DIY Tilda doll must be beautiful, and for this she will need accessories. How to surround your Tilda?
- Beautiful blanket in patchwork style.
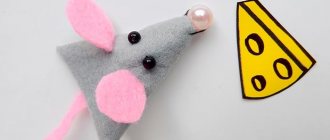
- Animals in Tilda style. For example, look at how to make a tilde hare doll master class + template:
If you liked the original Tilda doll, the pattern should also be classic - for example, you can use this one.
Garlands of hearts. Here is a pattern for making a garland of hearts (click on the picture to enlarge).
Centipede doll hair, how to fix hair
Attaching hair to the head of a centipede doll is one of the most difficult processes. We present you with step-by-step instructions on how to do this quickly and beautifully:
- First, we prepare all the tools for work that you see in the photo:
- We also prepare 1 bundle of wool and 1 m of tress (everything should be the same color), because it is from this that we will make the hair for the doll:
- We glue wool to the doll’s head, which will make sure that no bald spots on the head are visible after we glue the tresses:
- Use needles to mark places on the head where you can glue the tresses:
- Step back literally 2 mm and attach the following tress:
- We sew the blanks, and coat the places where the knots will be with glue:
- We sew the tresses around the doll's head until there is a small hole left for the top of the head:
- To make the crown, you need to take a 6 cm long tress, twist it into a tube and sew it:
- Then carefully glue the crown to the head:
- Straighten your hair with your hands very carefully so that your hair looks beautiful:
Interesting solutions
But what if you want to make unique dolls? What other Tilda dolls are there?
They make themed dolls for every holiday. This is a great way to add some zest to your interior - if you allocate a certain shelf or wide window sill for tildos, you can arrange a real dollhouse there. A variety of miniature objects, miscellaneous objects and other charming items like miniature bouquets will come in handy.
Tilde is used to bring some scenes to life. For example, there are patterns for recreating a classic Christmas scene using dolls.
Many mothers make tildos for children - children like these dolls, and they are absolutely not traumatic, and since only natural materials are used for production, they are also non-toxic.
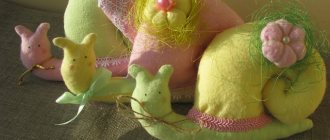
And here is the Tilda Snail with a template:
You can make a cute menagerie - for example, a hare, a fox, a bear cub and other inhabitants of the forest. But it’s better to fill the animals not with cotton wool, but with small balls - for example, cereal.
Tilda doll: clothing patterns, interesting ideas with photos and sewing tips
The Tilda doll became popular very quickly. Everyone liked the delicate, stylish doll, who dresses in beautiful outfits made from natural fabrics in pastel colors. All tildes are similar. Despite their different height, fullness or color, they are easy to distinguish from many others. Since Tilda is a handmade doll, no two are alike. What makes them different from each other?
The costume gives the doll its individuality. Therefore, clothing patterns for tilde dolls are very diverse.
Fabrics for clothing Tilda dolls
Clothes for tilde can be made from almost any material, but most often natural fabrics (linen, calico, cambric and cotton) in pastel shades are used for these purposes: lilac, lavender, lemon, light green and soft blue.
If it is more convenient for you to use synthetic fabric, then choose a plain fabric or fabric with small patterns or designs - such fabrics will combine well with each other, in addition, they look impressive on Tilda dolls.
Materials that are often used for clothing of tilde dolls: tulle, organza (for making tutus, for example), silk, fleece, knitwear, denim and chintz.
When is a Tilda doll born?
A special feature of the Norwegian doll is the ability to sew part of her outfit during production. This could be permanent underwear (a T-shirt or T-shirt and pantaloons), a corset, or the entire upper part of the dress. In this case, the pattern of the torso and arms will be made of elegant fabric. All that remains is to sew the skirt.
For tilde dolls, patterns for clothes that cannot be removed will be as follows:
For a skirt, you can choose nylon tape and cut pieces from it for three tiers. The lowest tier looks better if it is made of a wide strip with large folds. The closer to the waist the tier rises, the shorter the ribbon should be and the smaller the folds. Otherwise, the result will not be a stylish tilde, but a woman for a teapot.
Master class on sewing a dress
The easiest way to sew clothes with your own hands is to sew the upper part of the dress (corset) together with the body. In this case, the torso pattern is transferred to a pre-made blank, consisting of two types of fabric (see tilde master class for beginners). All that remains is to sew the skirt, for which we don’t need a pattern at all.
The bottom of the dress can be made from nylon tape and elastic. To do this, you will need to cut the ribbon into pieces equal to twice the length of the skirt. We sew an elastic band (the length is equal to the doll’s waist) into a ring and tie our ribbons on the elastic band. This type of clothing is perfect for a ballerina's tilde.
You can sew a swing-out robe dress. We transfer the back pattern to the fabric, turn it over and draw a mirror outline of the second half. We transfer the shelf pattern onto the fabric in 2 copies.
We cut out the parts, departing from the contour of about 1-2 cm. Then the edges of the blanks should be processed (overcast or underlaid). All that remains is to sew the robe along the side seams, turn it inside out and put it on the doll. As you can see, there are several ways to sew a dress with your own hands, and all of them are easy to do.
When tilde changes her dress
Over time, a permanent outfit will fade, become dirty and require replacement. If the pantaloons under the skirt are not striking, then a blouse that has lost its appearance spoils the whole impression. You can carefully tear off the handles and sew new ones. If you want, this is the best option. But there is another way. These are options for clothing patterns for tilde dolls that do not require complex construction (based on rectangles and stripes).
Such dresses can be sewn by measuring the fabric directly on the doll. The principle here is simple: the volume of the arm determines the volume of the sleeve, the volume of the hips determines the width of the skirt. For very wide ones, choose a ratio of 2:1, that is, two hip volumes, for medium ones - 1.5, for very small expansions - 1.2. Folds are placed directly on the doll using pins and stitched by hand.
You don’t have to rip off the doll’s arms or alter them, but sew her a dress that will cover the white fabric of the arms and corset. To prevent it from showing through the dress, choose a dark fabric. This dress is sewn using a base pattern.
Dress for a hare tilde with patterns: master class
A dress for a hare tilde with patterns is quite easy to sew. There are certain rules that must be followed when sewing a dress for a doll. Since the very idea of tilde dolls dictates the use of such natural materials as cotton, linen, calico, wool, felt and flannel, clothes for dolls are sewn in a “rustic” style. Accordingly, the material used for this is mainly linen and calico. The pattern on the fabrics should be the simplest - a cage, a small flower, a thin stripe. Flashy details like rhinestones, lurex, sequins, and fringe are excluded. The color scheme is delicate, light, pastel. Contrasting and bright fabrics will not work.
Quite often you can see a tilde bunny not in a dress, but in a tunic and shorts. Patterns are also different, both for the dolls themselves and for the clothes for them. Usually the bunny is dressed during the doll assembly process - the sleeves and trouser legs are sewn to the paws, and then a spacious dress is sewn. But it’s much more interesting when the Tilda doll can be changed into clothes. After all, Barbie dolls are supposed to have their own wardrobe for all occasions? What's worse than the Tilda doll? Nothing. Even much more interesting.
The beauty of sewing clothes for tilde dolls is that all patterns are given in full size, that is, there will be no unnecessary hassle with creating patterns.
If you have a sewing machine and suitable fabric, and the finished tilde bunny is waiting for its new thing, then go ahead, watch the master class and sew clothes for the tilde.
For work you will need
- A piece of material of suitable texture and color.
- Sewing machine
- Thread, scissors, pencil
- Optional finishing decorative elements - mother-of-pearl beads, ribbons, everything discreet and without shine. Three small buttons for a shirt, bias tape for finishing a skirt
- Pattern
The three most popular dress patterns for the tilde bunny:
- The style of this dress is close to a nightgown. Does your tilde have a nightie?
- The second option is double. The dress can be made removable, or you can connect the seams on the doll along the marked circles. The advantage is that a sewing machine is not needed in this case. If you definitely want a dress that can be taken off and put on, you need to carefully attach the Velcro tape instead of sewing the seams.
- A robe dress that wraps around the stomach. Transfer the back pattern to the fabric, turn it over and draw a mirror outline of the second half. We transfer the shelf pattern onto the fabric in 2 copies. Cut out the details, leaving seam allowances of 1-2 centimeters. Then the edges of the workpieces should be processed (overcast or padded). All that remains is to sew the robe along the side seams, turn it inside out and put it on the doll.
- Dress with pantaloons. More detailed description. The master class is given for a finished doll, to which the ears and paws are not sewn. The dress consists of two parts - a bodice, although it is more like a shirt, and a skirt, sewn together.
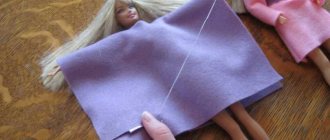
Step one - let's start sewing panties
Cut out the part from paper and shorten the trouser leg a little. In the photo this place is indicated by a dotted line. The pattern should be placed on the fabric folded in half, with the long side facing the fold. You need two such parts.
Cut out the parts from the fabric with a margin for seam allowances, leave half a centimeter or a centimeter. Stitch along the perimeter with a zigzag, turn up the bottom of the trouser legs and hem. The details of the pants are sewn according to the following pattern:
Put the pants on the doll, hem the top edge to the body.
Step two - top of the dress
Using a centimeter, measure the circumference of the neck, the circumference of the abdomen and the distance from the neck to the waistband of the pants. Based on these dimensions, draw a pattern for the top of the dress. The collar is drawn and cut out separately.
Transfer the pattern to the fabric, sew the parts of the collar, leaving the long side unsewn. Turn the piece right side out, fold the unstitched edges inward, iron, and sew. Sew the collar to the shirt. Make sure that the center of the collar coincides with the center of the shirt.
Put the shirt on the bunny, sew on the buttons and fasten them.
Step three - skirt
Sew two parts of the skirt on the sides, finish the bottom. You can do this with bias tape, or you can just fold it over and stitch it. Attach the skirt at two points on the sides, string the skirt fabric at the waistband so that it can be moved like a curtain on a string. Form pleats and then sew them to the top of the dress using a blind stitch.
Step four - sleeves
The sleeves are made from two rectangles. Fold one edge under and sew, fold in half and sew. Pull from the opposite edge to form puff sleeves. Place the structure on the paws, secure it, and sew the paws to the body. If desired, you can sew additional decorative details - a narrow ribbon on the skirt, or beads at regular intervals. If you want to get creative, you can sew an apron, or sew a decorative pocket on a skirt, or a deliberately eye-catching patch. In a word, there is room for imagination!
Job finished!
Video selection for clarity
sdelala-sama.ru
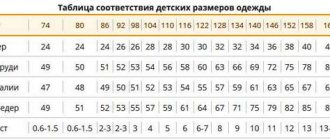
How to take Tilda's measurements
The shape of the tilde is streamlined, its contours are smooth. It's easy to increase or decrease. Now you can find very small dolls and large ones, human-sized. There were even fat women. But the ballerina dolls remained fragile and graceful. The measurements depend on the specific doll. To sew clothes for tilde dolls with your own hands, it is better to make patterns yourself according to your measurements. What measurements need to be taken and how is this done?
The doll is tied with two laces: at the neck and at the waist. These markers will be used as a starting point when taking measurements.
- The chest width is measured from one side seam to the other along the neckline. This is half chest circumference (Cg).
- The waist width is measured using the lace from one side seam to the other. This is half waist circumference (St).
- The width of the shoulders is measured from one place where the arm is sewn through the chest to the other (Shp).
- Measurements are taken along the back from the lace at the neck to the lace at the waist (Dst).
- From the top point of sewing in the arm to the hand - measure Dr.
- Arm circumference is measured at armpit level. This is Or.
- Neck circumference is measured using a string around the neck. This is Osh.
- From the bottom point of sewing the arm into the side seam to the waist - measure the chest height Bg.
Building a base pattern: back
The order of constructing the back pattern:
- Draw a rectangle with a length equal to Cr and a height equal to Dst.
- Measure the center line and mark the intersection at the top and bottom.
- From the upper intersection point, ¼ Osh is set aside in both directions.
- From the upper intersection point, two millimeters are laid down. Draw an arc through this and the two previous points. This is the sewing line for the collar.
- Five millimeters are laid down from the upper intersection point. Draw a horizontal line. The highest point of the sleeve is laid on it, retreating 1.8 cm from each point of intersection of the collar sewing line with the upper horizontal line of the rectangle.
- From the lower point of intersection of the rectangle with the central line, 2.2 cm are laid in each direction.
- From the lower point of intersection of the rectangle with the central line, mark the measurement Br and draw a horizontal line. Connect the points where it intersects with the vertical lines of the rectangle obtained in step 6.
- Connect the points obtained in step 7 and step 5 with an arc. This is the sewing line for the sleeve.
Jacket for Tilda
Using the base pattern, you can sew a denim jacket. To do this, take denim fabric of the finest weave. All seams are sewn with white thread. It is important to iron small parts well. These are pockets and a collar. The bottom of the product is folded and stitched, imitating a belt. To do this, you need to add half a centimeter to the pattern.
The picture shows a pattern for a doll 35 centimeters high, which can be sewn according to the dimensions given above. If your tilde is of a different height, you can use the principles of constructing the base and draw a pattern for Tilda’s clothing in full size. Measurements are taken similarly to those shown in the figure for sewing a doll.
- Pockets are sewn onto the sleeve and the front. They put it off.
- The shoulder seams are sewn. They put it off.
- Sew on the collar. They put it off.
- Sew the side seams. They put it off.
- Sleeves are sewn in.
- Fold the bottom of the product and stitch it. They put it off.
If desired, you can put buttons on the shelf so that the jacket can be fastened.
Simple trouser pattern
A huge advantage of sewing clothes for tilde rag dolls is that patterns can be pinned directly on the doll, since pins fit well into it. Using the jacket pattern, you can also sew a dress. There is no point in building a full skirt from a pattern. Having measured the waist and hips, it is easy to cut it out of the fabric. For folds, leave a three centimeter allowance.
It is better to sew trousers for a tilde that do not reach the waist, they will not suit her. Small models sitting on the hips are her option. It’s easy to sew them; you don’t need to make a drawing for this. By placing the doll on the fabric folded in half, measure the length of the trousers. They should reach at least to the wrists. If it's a little higher, it's okay. The width of the trousers is measured at the bottom of the torso, where the legs are sewn. This is the widest part. An allowance of one centimeter is given for freedom - 0.5 cm on each side. The place where the legs are sewn is measured - this is the beginning of the trouser legs. Cut to this point.
Leave an allowance of two centimeters for the hem and elastic at the waist. The bottom edge of the trouser legs can simply be hemmed with a stitch, or you can insert a lace. For simple trousers, skirts, and vest dresses, no drawings are made. Simply place the doll on the fabric and measure the control points, then connect them. This is how clothing patterns for a tilde are made in full size.
Tilda in Boho style: master class, patterns, chic
Hello, dear needlewomen. Today we will talk about such a trend in the fashion industry as Boho-chic. We will take a detailed look at how this style differs from others and study its varieties. We will also learn how to dress our tilde dolls in original outfits in the Boho style, without using special patterns.
Boho style and its varieties
This fashion trend appeared in the 90s of the last century, reaching its greatest popularity at the beginning of this century. And the popularity of Boho is not waning at all, but is only growing. After all, boho-chic, like no other fashion trend, helps to create a bright, memorable and unique image, emphasizing the individuality and self-sufficiency of the individual.
A characteristic feature of the Boho style is the combination of details that at first glance are completely incompatible: lace light dresses with frills and bulky shoes, ethnic Russian motifs and elements of strict classics. This combination, oddly enough, creates an image of comfort and security. This fashion trend, like any other, has its own varieties:
- boho classic: a combination of wool, velvet, corduroy, frilly lace, knitwear and mohair;
- boho-glamour: a combination of layered chiffon, guipure, flowers, all kinds of frills and fur;
- boho-eco: a combination of natural fabrics with many vintage-style accessories;
- boho-hippie: a combination of rough knitting, fringe, burlap and sheepskin;
Fans of tilda dolls, of course, could not pass up the opportunity to dress up their charges in fashionable and extraordinary outfits. This is how tilde dolls in the Boho style appeared. We will now look at how to sew clothes for a tilde in the Boho-chic style and what patterns to use.
Tilda in Boho style
Any needlewoman who is more or less familiar with the basics of cutting and sewing can create a tilde in the Boho style. To do this, just take a pattern of a product you like from a fashion magazine and reduce it to the size of a doll. Look at what sets of clothes craftswomen sew for their tildes using such “adult” patterns.
And multi-layered fluffy skirts, characteristic of the Boho style, are sewn without any pattern at all. It is enough to sew a large number of frills on a skirt sewn according to a regular pattern. The advantage of this method is that you can use scraps left over after sewing large items.
Tilda interior dolls in the Boho style are distinguished by chic multi-layered outfits in a calm pastel palette or, conversely, in a rich color scheme. The hairstyle can be very different, from playfully curled curls to banal braids. Don’t forget that in the Boho tilde look the emphasis is on accessories: shapeless bags, lush bows, long massive beads, original hats or head decorations in the form of all kinds of hoops, headbands, flowers.
Agree, the Boho style tilde will appeal to any fashionista, both a little girl and an adult woman. In addition, the bright colors in combination with unusual accessories and chic multi-layered dresses will make the doll a unique and original decoration for any interior. Good luck.
Boho style clothes
Boho style allows you to combine lace and leather, ethnic and classic, bulky shoes and frivolous floral chintz. Such elements, collected together, create an image of comfort. For an interior doll, this is what you need. There are several stylistic trends of boho: classic, eco, hippie, vintage.
Skirts must be full, with a lot of frills. The main measurement for them is from the waist to the toes of the tilde. Boho clothing patterns are only required to create sleeves and bodice, while skirts are cut directly on the fabric. The doll is placed on a piece of fabric, the waist and the widest part of the torso (where the legs are sewn) are measured, and connecting lines are drawn. Allow an allowance of one centimeter at both ends. You will need two such parts. The side seams are sewn together, frills made of guipure, lace, and chiffon are sewn on.
The back of the skirt can be fastened with a hook or button so that it can be removed. The jacket is made according to the principle of a vest with one-piece sleeves. They can be decorated with long lace cuffs or simply tucked up. Don't forget to give the doll a large handbag.
Sewing clothes for toys
A simple and easy method of sewing clothes is to sew the parts directly with sewing the doll, that is, the necessary elements are sewn to the body. Over time, it is impossible to remove or change the dress. In addition, the fabric may warp or lose its beautiful appearance. Therefore, experienced craftswomen recommend sewing clothes separately from the doll. It will be more pleasant for the child to independently select costumes for the toy.
To sew a beautiful dress you will need:
- Fabric with print or plain. When combining materials, you need to remember color balance and not combine bright colors with each other. In clothing, adhere to the principle of no more than one contrast.
- Select threads for sewing in the same tone as the fabric so that the seams do not peek out from the hem.
- Ribbons made of satin or lace to decorate the product.
- Chiffon or nylon for a full skirt.
- Scissors.
- Patterns.
Beginning craftswomen can use patterns from the Internet. This will save time and effort on developing unique sketches.
Experienced needlewomen can create an outfit for a doll based on their taste preferences. The dress pattern for the tilde is created according to the dimensions of the finished doll. For a girl to be light, elegant and with charm, the outfit should be made with a corset and a loose cut, like a circle skirt.
First, we transfer the parameters to the fabric and cut it out, then we sew the elements. The corset is done first, because it determines the size of the toy. The measurements taper towards the waist, but not much. The top of the corset is decorated with a satin ribbon to match the material.
Sew the skirt with elastic so that you can put it on and take it off the doll. Make it a centimeter longer in size, since the upper part will go under the corset. Hem chiffon or nylon under the main fabric to create a feeling of pomp. Decorate the bottom with a ribbon in the same way as the corset.