The counted cross is very simple. And in my article I will prove this to you! I'll tell you what you need for this and how to work with it correctly. Thanks to it you can make magnificent and elegant works.
147 0
Counted cross stitch is the most popular embroidery technique today. The second name for this type of needlework is cross stitch (cross stitch). The main element is a square cross formed by two diagonal stitches.
Embroidery process
Where to start embroidery
You can cross stitch using ready-made kits or using patterns for which you will have to select the materials yourself.
Embroidery kits
Cross stitch kits can be purchased at any craft store.
Standard set includes:
- drawing diagram (color or black and white) and instructions;
- the basis is a canvas of the required size;
- threads of the required colors in the required quantity, usually disassembled into an organizer;
- igloo
This is what the embroidery kit looks like.
Additionally, you need to purchase a hoop (see below) and small scissors for needlework.
What to look for when choosing a set:
- The size of the finished work. Usually indicated in crosses or centimeters. A seemingly small set may contain 100x300 cross stitches, which will take many hours to complete. For beginner needlewomen, small plots are recommended.
- Type of stitches. Cross stitch is the main stitch in the counted cross stitch technique, often complemented by other stitches to increase the clarity and detail of the work. The sets can also be supplemented with beads. Typically the packaging will list the stitches to use. The more different stitches are used in the work, the more complex it is.
- Equipment. For some manufacturers, the kit does not include a needle; less often, the kits are not equipped with threads (for example, French kits).
Embroidery patterns
If there is no set suitable for the plot and wishes, you can only purchase the diagram in printed or electronic form. Cross stitch is very popular now, so the range of patterns is huge, designers release the latest patterns every day. You will need to select materials for the pattern: base and floss threads.
Counted cross stitch: methods of applying stitches
Each needlewoman uses a stitching technique that is convenient for her. There is an unspoken rule that is the same for all types of cross stitch. All half crosses must be made in the same direction.
Many embroiderers try to make the reverse side look neat.
A beautiful reverse side speaks of the experience of the needlewoman. The stitching technique also affects how the purl threads will lie. The English version of embroidery involves pulling the threads in different directions, which differs from how the threads look with the Danish stitching technique.
Embroidery made using a counted cross stitch turns out voluminous and attractive.
Step-by-step process for applying counted stitches:
- Calculate the number of parts that make up the circuit.
- Apply embroidery elements to the canvas.
- You can embroider the design using English or Danish techniques.
When choosing the “counted cross” technique, you should take into account that the future design is not applied to the canvas, so the embroiderer counts the crosses herself. In case of an error, the stitches will have to be undone and new ones made. In each purchased embroidery kit you can find special instructions that will help you understand the technique of transferring a design to canvas.
Required materials and tools
For cross stitch you will need:
The basis
The standard base for cross stitch is a cotton canvas with a rigid weave of threads, forming a clear grid of holes through which crosses must be embroidered; this base is often called “Aida” and it was created specifically for cross stitch. Most ready-made sets are equipped with canvas. Usually the canvas is white, but you can find colored options. There is also a canvas with a printed pattern that needs to be repeated - this makes the embroiderer’s work easier.
The second base option is a fabric of uniform weave, or uniform. It can be cotton, linen, with the addition of viscose or bamboo, fabric whose thread thickness is equal to the thickness of the holes. Thus, the fabric looks like a fine mesh. It is usually embroidered evenly using two warp threads, so it is recommended mainly for experienced embroiderers.
Uniforms of various colors are available for sale. A colored base is usually used for projects where the background is not embroidered.
Aida canvas (left) and even weave fabric (right).
Threads
For cross stitch, special cotton threads are used - floss.
Ready-made sets are completed with the necessary floss colors in the required quantity, the threads are conveniently disassembled into an organizer.
Embroidery patterns always contain a key - a list of required colors of floss, indicating the number in the manufacturer's palette. Please note that each manufacturer has its own palette of floss colors.
Embroidery needle
Embroidery should be done with a needle with a blunt tip. Sets of embroidery needles of 4-8 pieces are available for sale. As mentioned above, kits are often supplied with a needle.
Hoop
Necessary for securing and tensioning the fabric. The better the fabric is stretched, the easier it is to embroider, falling clearly into the holes of the base, the smoother and neater the crosses will be. The hoop can be plastic, wooden, or metal. They are usually round; oval hoops and square frames are less common. Keen embroiderers can purchase cross-stitch machines—a hoop on a leg that frees up the other hand for faster embroidery.
Hoops vary in shape and material.
Scissors
Small craft scissors for trimming thread ends. Nail scissors will also work.
Water Soluble Fabric Marker
Using a marker, you can mark a 10x10 grid of cells (crosses) on the fabric - this will simplify the embroidery process. When the work is ready, the markings are removed in warm water. Before marking, it is recommended to check the marker on the edge of the fabric and make sure that it actually washes off without problems. Otherwise, it is better to abandon the markings - they may show through under light crosses, but will be visible in unsewn areas (if the pattern provides for such). It is not recommended to mark the fabric with a pencil or ballpoint pen - such markings will definitely not wash off and ruin the work.
What is a counted cross in embroidery?
Embroidery can be done using different techniques. Counted cross is a technique for transferring a design from a diagram to a canvas. It does not involve applying the design directly to the fabric, which makes the embroidery process more complex.
When doing embroidery using the counted cross stitch technique, the needlewoman must be very careful when counting crosses of different colors and shades.
You should start working with the largest fragment of one color. To fill it, the Danish version of stitching is used. Small color fragments are left for the end of the embroidery process.
It is recommended to use a counted cross if you have good experience in embroidering with a regular cross.
Stitch options:
- Full cross;
- Half cross;
- One quarter;
- Three-quarters;
- Double Bulgarian;
- "The needle back."
Each type of seam is designed for embroidering elements with different characteristics. It is important to be able to apply stitches of different types in order for the embroidery to be textured. In order for the threads to lie evenly, it is better to do embroidery with a needle with a blunt end.
Cross stitch technique
It's time to learn how to cross stitch. Below you will find detailed instructions.
Beginning of work
- Mark the fabric with a special marker (optional) and mark the center of the base. On the diagram, the center is usually marked with arrows, or you can calculate it yourself.
- Thread the fabric into the hoop and straighten it so that there are no distortions.
- Separate the required number of threads and thread into the needle.
Unless otherwise specified in the pattern, cross stitch is done in two threads. The skein floss contains 6 threads. It is necessary to separate 1 thread from the six of the required length, fold it in half and thread it into the needle. The result will be embroidery in 2 threads.
Fastening at the beginning of work
Knots are not used in cross stitch. To secure the thread, bring the needle from the wrong side to the front side, step back 1 thread of the warp (you will get a microscopic stitch), bring the needle to the wrong side and thread it into the ring formed by the fold of the thread and tighten. Then bring the thread back into the first hole and sew the stitch. The setting is ready.
Fastening at the end of work
After making all the crosses of the desired color, you need to secure the thread. To do this, turn the work over to the wrong side and pull the needle and thread under 3-4 vertical stitches on the wrong side. Cut off the end of the thread.
We fasten the thread at the end of the work.
Video: how to secure a thread in embroidery
In order to completely cover the embroidered base, it is necessary to select the correct thread thickness. Any technique requires preliminary selection of thread. An uncountable cross with a colored base applied to the design suffers least of all from too thin a thread, since the required color will be visible through the gaps in the embroidery. A printed cross, or in the case of a white and too light base, should be especially careful about closing the holes, since even a small speck in contrast will greatly attract attention and spoil the overall appearance of the picture.
The uniformity of crosses is achieved by:
- equal thread thickness;
- one-dimensional thread tension;
- equal fabric tension;
- correct sequence of elements.
Under no circumstances should you use threads of different thicknesses to embroider different elements of one picture; this will make the picture too thick in some places or empty in other places. One-dimensional thread tension is ensured visually and is easily carried out by experienced embroiderers. A counted cross embroidered on a hard canvas is less susceptible to contraction of the base, but when embroidering on a soft base, whether it is a printed cross or another, too much contraction of the fabric or thread can cause a completely damaged design. To ensure equal tension on the thread and fabric, you should use a hoop and a stitcher. You can also coat the threads with wax, which prevents them from catching on each other or on the base threads. For correct embroidery, the correct sequence of stitches is also important. All top stitches of the crosses should be tilted in one direction. This is achieved by careful control and does not require special skills, but gives the finished drawing a slender and neat appearance.
Cross stitch, although considered one of the simplest, requires attention and certain skills. If you carefully and patiently approach the work, the result will exceed expectations and will significantly please you.
Types of stitches
- Counted cross (printed cross) is the main stitch.
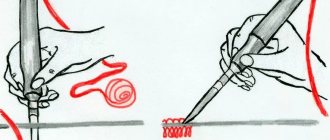
The cross consists of two diagonal stitches and is performed in two stages.
First you need to stitch from the bottom left corner of the cell to the top right, then from the bottom right to the top left. In this way, single crosses of the same color are made.
Usually there are several crosses of the same color nearby. It is convenient to do all the bottom stitches first, and then the top stitches in reverse order.
The photo shows the top stitch.
And this is what the bottom stitch looks like.
It doesn’t matter which way to make the bottom stitch and which way to make the top stitch - you can start the cross on the right side. The main thing is that all the crosses of the work are done the same way.
- Half cross.
Diagonal stitch, performed as half a cross. Typically used for a light background in airy watercolor designs.
- Backstitch or border stitch.
Used to outline the contours of details, giving embroidery clarity, texture and a finished look. Performed on top of the crosses. Unless otherwise specified in the pattern, backstitch is performed in 1 thread. For edging, use a stitch back with the needle (or forward with the needle, depending on your convenience).
When performing backstitch, it is necessary that the fabric is well stretched, the threads do not sag, and adjacent stitches are performed precisely at the same point, without gaps or breaks. If the pattern involves a long straight line, you should break it into segments of no more than 4-5 crosses to avoid sagging thread.
Most works in the counted cross stitch technique are performed using these three types of stitches. Much less frequently, patterns may include French knots, uncounted crosses, and other options. Typically, the instructions for the diagram describe the execution of the elements.
How to cross stitch correctly (video)
You can also find kits for machine embroidery. Having a little free time, patience, and desire, you can learn embroidery using the counted cross stitch technique, because cross stitch means getting not only a beautiful product, but also a lot of positive emotions, having spent quality leisure time. The most important thing is to have a good attitude, prepare everything correctly and organize the workplace, observing safety precautions. Then a work of art made with your own hands will be 100% perfect and will decorate walls, clothes or textiles in the house. And you can proudly say – I embroider!
- Author: admin
Rate this article:
- 5
- 4
- 3
- 2
- 1
(3 votes, average: 4.7 out of 5)
Share with your friends!
Technique tips
The ideal length of thread in a needle is about 20 cm. If you need to embroider a large number of crosses of the same color, you should use several threads in a row. A thread that is too long may become tangled or break.
The ideal reverse side consists of vertical stitches without broaches, knots or protruding thread ends. Embroidery with a perfect reverse is a rather difficult task and requires additional effort from the embroiderer. Usually it is used in cases where the reverse side will be accessible to others, for example, when embroidering tablecloths and towels. If the back of the work is covered (for example, by the back of the frame), it is better to focus on the evenness and neatness of the front side. However, you should not make long broaches on the wrong side (the threads may sag) and leave the ends of the thread - they can come out on the wrong side and ruin the work.
The wrong side of the embroidery.
It is better to embroider sequentially, without jumping from one corner of the work to another - in this case, you can easily make a mistake when counting the cells and then take a long time to unravel and redo the work.
Backstitch can be embroidered both immediately on completed sections of embroidery, and at the end of the work, when all the crosses are ready.
Printed cross
This embroidery technique is not much different from counting in the type of execution, but does not require constant counting of the number of stitches or crosses. This can be almost any base for embroidery with crosses applied to it. In this case, there is no need to count at all - all the stitches are already in the required places and their color is clear at first glance. Even if an error has crept in some place in the drawing, it will not affect its other parts in any way and may not spoil the drawing as a whole, especially if the error is minor. With a printed cross, you do not need to transfer the entire remaining design according to the resulting mistake or rip apart the cross that was embroidered in the wrong place. In this case, it is better to use a sharp needle to accurately hit the edge of each cross stitch. During the embroidery process, it is important to ensure that the threads completely cover the printed cross itself over the entire area of the design. A printed cross is convenient because it does not require a separate diagram and does not allow you to miscalculate or go astray from the design.
When the work is ready
Wet heat treatment
Embroidery should be washed in warm water up to 40 degrees (to avoid shedding of bright threads) with liquid detergent or colorless liquid soap. You can't wring out the embroidery! Wet work must be spread on a terry towel, rolled together into a roll and left for 10-15 minutes - the towel will absorb excess moisture. Then the embroidery must be dried by ironing along the reverse side. Thanks to this, there will be no creases left on the fabric from the hoop.
Registration of finished works
After wet-heat treatment, the work can be framed yourself or using the services of a framing workshop. To make your own, you will need a frame, stapler or glue to secure the fabric.
Cross stitch for beginners step by step: 5 basic rules
Cross stitch sets are always relevant. With their help, you can create a special coziness in your home, complement the interior with a beautiful handmade product, and emphasize the refined taste of the owners. If you are just starting to cross stitch, it is useful to familiarize yourself with the necessary materials and tools, as well as take an interest in the technology and secrets of embroidery.
Cross Stitch Basics for Beginners: Varieties of Stitches
The success of the work ahead depends on the scheme. They come in color and black and white. Each printed symbol means a specific thread color. Each square in the diagram is one stitch.
Main types of stitches:
- Fractional cross;
- Full cross;
- Half cross;
- Complex cross;
- French knot;
The French knot allows you to add volume to flat images in the right parts, thereby making it more interesting and unique. Instructions for embroidering a French knot are presented in the material: https://homeli.ru/dekor/vyshivka/krestikom/frantsuzskaya-vyshivka-krestom-skhemia.
- Stem stitch;
- Stitch “forward needle” and “backward needle”.
On diagrams of any type, stitches are indicated clearly and simply.
Follow clear rules for making stitches so that they all lie in the same direction - these are the basics of proper work.
Experienced embroiderers recommend starting training with simple patterns. They use fewer parts and no more than 5 thread colors.
Secrets of beautiful embroidery:
- In embroidery, knots are not made; the thread is fixed in a special way;
- The transition boundary of thread colors directly affects the quality of work;
- Materials must be of high quality and durable.
These nuances can be corrected with a “back needle” seam, as well as using the same method to secure the thread at the end of the work.
Ideally, beautiful embroidery should be neat on both the front and back sides.
Standard cross stitch kit for beginners
If you are still a beginner, you can purchase a ready-made kit that will contain everything you need to get started. Such sets can be easily purchased in craft departments or ordered in an online store.
Today there are a huge number of manufacturers of embroidery kits. Read about the most famous of them in our article: https://homeli.ru/dekor/vyshivka/krestikom/nabory-dlya-vyshivaniya-krestom.
The embroidery kit contains:
- Canvas. Embroidery fabric that has different densities and colors. Thanks to the special interweaving of the threads, distinct cells with free holes for the needle are formed. The most popular is Aida.
- Needles. Special embroidery needles with a wide eye and a non-sharp rounded tip. Each has its own size depending on the fabric to be embroidered on.
- Threads. More often you can find floss - 100% cotton of various lengths. The skein consists of 6 separate strands. In the diagrams, each color or shade is indicated by a special number.
- Scheme. The indicated cell in the diagram corresponds to an embroidered cross on the canvas.
- Thimble. It is necessary for working on thick canvas.
- Hoop. With their help, the canvas is stretched and does not allow it to deform.
Some kits include a fabric marker, scissors and a measuring tape. If these tools are not available, they can be purchased separately.
Before you start working, be sure to check whether the threads are shedding or not.
In order to get straight vertical lines on the back side, and a classic cross on the front side, you need to adhere to the established rules. Instructions for beginners will be a good help in this matter. Only by following them can you get beautiful and neat embroidery.
Basic rules of cross stitch for beginners:
- In nature there are only 3 stitch directions;
- You only need to sew the work with a needle in a vertical position relative to the canvas;
- The top stitches should be made in one direction;
- The lines are embroidered in two stages: we embroider a line from the bottom stitches, and then complete the crosses with the top stitches;
- When embroidering a separate row, you must complete each cross immediately.
If it is necessary to skip several cells, then the thread should be pulled from the wrong side to the desired cell and continue embroidering.
Never make knots in embroidery; there are many ways to secure the thread unnoticed.
Master class: cross stitch for beginner needlewomen
You can learn how to cross stitch correctly step by step with the help of a master class.
Master class for beginners:
- We perform the first stitch. We stretch the needle from the wrong side to the front side and insert it into the lower right hole of the cell. We remove the needle from the upper right square and insert it into the lower left corner diagonally. Our stitch is ready.
- To save time, you can use another method of performing the cross. Embroidery should begin from the left edge. We make inclined stitches in a row from the upper left corner to the lower right, and then move back.
- Before securing the 1st stitch, you need to secure the thread on the wrong side of the canvas. To do this, place the tail of the thread in the completed loop and tighten it.
When sewing stitches, do not pull the thread too tight.
For beginners, it is recommended to embroider with 2 or 3 threads. This way the threads will fit closer to each other, and visually the pattern will be more voluminous.
Simple cross stitch technology for beginners
When you start cross stitch, don’t be afraid of difficulties. The technology for learning embroidery is not too complicated and can be done even by a beginner. First, let's learn how to make stitches, without this you will never be able to make the embroidery beautiful and neat.
Crosses are embroidered as follows:
- Top down;
- Down up;
- The rows are performed vertically, horizontally and diagonally.
The cross is embroidered with two stitches - top and bottom. First, all the bottom stitches are made in the required color scheme. This can be done from bottom to top or top to bottom. Sometimes you need to make one or a couple of rows of individual crosses, in this case we embroider them completely right away.
When several squares need to be skipped, the thread should be passed along the wrong side.
Where to start cross stitch: step by step steps
Do you have a desire to embroider something, but don’t know where to start?
You should start embroidering step by step:
- Choose one suitable for beginners with a simple scheme. This kit will have everything you need.
- Prepare a place to work. It is advisable to place yourself in a well-lit place.
- Prepare fabric for embroidery. It should first be washed and ironed through gauze.
- Treat the edge of the canvas with glue and wait until it dries.
- Select a point on the outline for the first cross. And accordingly, this needs to be done on the diagram. In this process, the main thing is to avoid mistakes and accurately identify them in the same place. This moment will be the start for your embroidery.
You can save floss and time by alternately embroidering crosses of the same shade, located close to each other, without cutting the threads.
To avoid getting confused in the diagram, cross out the crosses you have already made with a pencil.
Cross stitch for beginner children: tips for parents
At first, no one thinks that cross stitch can develop into a real hobby that can unite the whole family. This hobby is equally suitable for both adults and children.
Tips for parents for embroidery for beginner children:
- To begin with, go with your child and buy everything you need for embroidery;
- Let your child choose the design he likes;
- Before starting work, prepare the place, material and tools;
- Embroider the work together, the child will be captivated by the process and will not get tired of embroidery quickly.
When purchasing a ready-made embroidery kit or materials separately, consult with the seller so that they can offer you patterns in accordance with the child’s age.
You need to carefully monitor and ensure that the child does not get hurt in the process and does not lose the needle.
Children's embroidery will be a beautiful decoration for any room in the house.
For interesting ideas and embroidery patterns for children, see the following material: https://homeli.ru/dekor/vyshivka/krestikom/skhemi-vyshivka-krestom-deti-rebenok.
Cross stitch for beginners: correcting errors in work
A correctly embroidered picture means avoiding mistakes. If mistakes are made, they must be corrected. Otherwise, the overall appearance of the embroidery will be visually spoiled and correction is simply necessary.
Errors can be divided into two categories:
- Non-essential. These are invisible flaws that do not directly spoil the appearance of the embroidery. Often, in the process of transitioning threads of different shades, the type of cross is confused. In this case, there is no need to correct anything.
- Essential. These are the errors that are visually noticeable. In this case, there is only one way out - dissolve the work and start embroidery again. In what cases does this happen: a) placement of the upper cross stitches in different directions; b) an unsuccessful selection of shades of threads that need to be used to embroider catchy elements, such as people’s faces.
Sometimes it happens when the canvas runs out at the end of the work. In this case, it is necessary to cut an additional piece of fabric and place it on the main one with 5 crosses. Then sew it with a needle-back stitch using a sharp needle.
When sewing pieces of canvas, it is important to ensure that the squares match. Embroidery placed on top will hide the joint.
Cross stitch: tips for beginning needlewomen
The initial embroidery kit should be to your liking and undeniably enjoyable, then the work will move faster and bring pleasure.
Tips for beginner embroiderers:
- Do not buy complex, large-sized embroidery; a simple design with a minimum number of colors will be enough to start with.
- If you like several patterns and find it difficult to make a choice, compare the composition of the material and the color palette of the threads.
- Give preference to simple and clear diagrams; they are easier to read and much easier to work with.
- Pay attention to the color and density of the canvas. The best option for beginners would be canvas No. 14.
- To make your work easier, use a hoop; they come in different sizes and shapes. Choose those that will be more convenient.
Sharp scissors, a thread threader, and needles are also great helpers. Use several needles at the same time, as you don't have to change the thread every time.
The best option for the first work would be an embroidery size of no more than 25x25 cm.
Cross stitch for beginners step by step (video)
If you are just learning to cross stitch, it is very important to master the process gradually. A clear master class is a kind of guide for beginners. A magazine or book on cross stitch in Russian can serve as instructions for beginners.
Source: https://homeli.ru/dekor/vyshivka/krestikom/vyshivanie-krestikom-dlya-nachinayushchikh-poshagovo