A skirt is an essential element of every woman’s wardrobe, because it emphasizes the sophistication, elegance, and excellent taste of its owner, if chosen correctly.
But it is not always possible to find what you like among the assortment available on the market. And it also happens that a thing is ideal, but does not fit in size or any other single parameter.
In this case, you can try to sew the skirt yourself. An excellent material would be knitwear - such a thing is suitable for a variety of purposes. In addition, sewing does not require special skills or extensive experience, so even a novice craftswoman can handle the job. You will learn about what exactly you will need and what the sequence of actions will be in this article.
Features of a knitted skirt
First, let's look at some features of a knitted skirt.
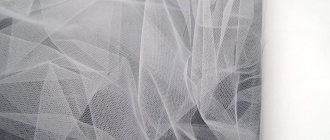
The first step is to determine the elasticity of the knitwear. After all, it is precisely this property that attracts a huge number of fashionistas - things made from such material beautifully and gracefully fit the figure, and are also pleasant to the touch.
But that is why they can also cause difficulties during the sewing process. You should be as careful as possible at the stage of stitching various parts, because due to the elasticity of the fabric, they can move.
Important! Before starting work, be sure to take all the necessary measurements, without relying on approximate parameters, in order to correctly calculate all subsequent figures that will be needed for sewing a knitted skirt.
Knitted items do not wrinkle or restrict movement, which allows you to feel confident throughout the day. Thanks to the ability to design a skirt yourself, you can choose a design that will harmonize with most things in your wardrobe, as well as add any decorative elements.
How to sew a semi-sun skirt with pockets
To cut a half-sun skirt, you need more time and knowledge:
- Fold the material in half along the edge.
- There will be a seam along the edge with a zipper.
- Set off the radius from the intersection.
- Draw a smooth line.
- Next set aside the length.
- Draw a line.
- Mark the allowance.
- Cut off.
- Cut out the belt.
- Thread the overlocker and overcast the sides.
- Iron the seams.
- Sew in a zipper.
- Sew down the bottom.
- Sew one side on the overlocker.
- Connect the belt to the skirt.
You might be interested in DIY methods for hemming jeans without a sewing machine
Important! Such a model may sag, this must be taken into account.
Pattern
Making a beautiful skirt with your own hands is not that difficult. You can create a model you like, rather than running around the shops looking for the right style; patterns for summer and winter skirts can be found on the Internet. Any style can be made by yourself.
How to make a pattern for a knitted skirt
The first step is to choose the desired style.
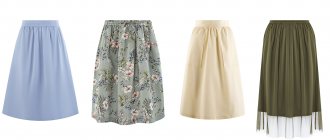
Browse through a variety of models online to find the one that's perfect for you. The most popular is the pencil skirt, which can be of very different lengths, and is also made in a huge number of different designs.
You can use one of the ready-made patterns, which are easy to find in any thematic magazine or on the Internet. Then you only need to transfer the contours to the fabric and cut out the necessary details. But if you need to adjust the length or size of the skirt, or if you want to create a unique item, you should create a pattern yourself.
To do this, you only need to take a few measurements - hip circumference, waist and length.
Important! Please note that due to the flowing and stretchy material, the hip measurement must be reduced by a few centimeters. Usually it is 10-12 cm.
Length refers to the distance from the waist to the desired end of the skirt. The drawing should be applied first to special paper and only then to fabric, but if you are confident in your abilities, then you can refuse to use paper.
How to make a skirt pattern with a yoke?
To model a skirt with a yoke, you can refer to the pattern of a straight model.
Let's look at how to sew a pencil skirt with a yoke and a tapered hem:
- We transfer the pattern of the front panel onto paper.
- We cut out a pattern along the contour.
- Draw a yoke of the required length.
- We cut along the line of the part with scissors to the point where the dart ends.
- Close the fold.
- If there is a yoke on the back panel, then we do exactly the same procedure with the second part of the pattern.
- We retreat 1.5 cm from the sides to the center along the bottom lines.
- We check the details.
- We indicate the direction of the shared thread.
- We sew all the seams.
The yoke skirt with a tapered hem is ready!
DIY knitted skirt quickly: how to make
It’s quite simple and quick to sew such a thing:
- Transfer the made pattern to the fabric - to do this, you need to fold it in half. After hip level, you need to narrow the width by about 2-3 centimeters.
- The second part should be worked out in the same way. It is best to lower the top section by one and a half cm, so that when you move and need to sit down, the skirt does not hinder your movement.
- After this, be sure to try on the resulting product before you sew it. If there are any inconveniences or errors in measurements, you will have the opportunity to correct the situation and not spoil the material.
Try walking, sitting down, and other movements that you do most often. If everything is done correctly, then you can start sewing together the parts of the product.
The side seams should be combined and stitched very carefully, because the strength and appearance of the future knitted skirt depends on this. In addition, the bottom edges should be processed. You can do this using an overlocker.
Most craftswomen prefer to add an elastic band to better hold the item. Let's look at how to do this correctly.
Video material
As you can see, knitwear is an excellent material for modeling; in some styles of skirts you can even do without a pattern. Try to start sewing with simple models, for example, without side seams or with elastic, and then show your imagination and complement your wardrobe with things that suit you.
DIY model
As a basis, you can take a dense material with the ability to stretch.
The ideal option would be knitwear, but the base is selected depending on the season. Detailed instructions will help you quickly sew a skirt without a pattern with your own hands. After the measurements are taken, you need to transfer them to the fabric . Marks are made on the wrong side, plus 2.5 cm must be added below for hemming the fabric. 1.5 cm is also added to the side seams. To avoid mistakes, the measurements are first transferred to the fabric, and then the fabric is added to the lining.
You need to cut out a rectangle whose width is equal to the circumference of your hip. If you need to make a loose cut, you can add a few more cm. The length of the product can be different, but the standard is considered to be knee-length. Cut the material and fold it along the edge.
To ensure accuracy of work, it is recommended to sew the parts together using a machine , choosing a medium or large stitch (depending on the texture and density of the material). You can sew it yourself at home, but you must constantly monitor the thread tension.
It is necessary to make a belt for skirts to highlight the waist and visually emphasize the figure. You can sew it with a zigzag or attach it ready-made. Stylists advise making a belt in the classic style from the same material as the skirt.
The belt is sewn on with an elastic band, but is not tightened too much so that the product does not warp. The model will have a straight cut, like a pencil skirt. To narrow the bottom, you need to cut the fabric evenly on the sides and sew it, without pulling too much, so that you can move normally.
The process will take approximately 2 hours to complete. After finishing, the model must be washed so that the mark comes off and the seams are smoothed out.
Warm skirt for the winter
Even in cold weather you can feel comfortable. For the base, a dense material is chosen, from which sewing a warm skirt for the winter will not be a problem. As for the fit, the model will definitely have a high waist. Visually, this will tighten the figure and create a slender image.
Manufacturing Instructions:
- Measurements are taken from the waist and below the knee. If you make the skirt shorter, then the material must be chosen thinner so that the item does not make it look fat.
- For the process, you need to make a pattern along the radius from the hip. Plain paper can serve as a basis. When working, it is important to make the correct pattern and transfer all measurements correctly. Otherwise, the result may be disappointing. You need to display a quarter of a circle on paper.
- The length is determined using the sum of the pattern radius and the approximate parameters of the product. This is a simple sewing option.
- The pattern must be cut along the contour. You cannot make deviations or change parameters during work, as this may affect the appearance of the model.
The result is a large circle. An elastic band is sewn to the workpiece, a belt is made, and the process of covering the bottom of the product is carried out. The skirt can be worn with jackets and business sweaters, as well as with beautiful blouses and stylish sweatshirts. Although the option is classic, it all depends on the color of the fabric and its texture.
Drape skirts
The material is considered ideal for creating clothes for the winter.
It contains wool, which makes the texture dense and the fabric heavy. Drape models can suit girls of any size. The main thing here is to choose your own version of the form. The skirt will be loose-fitting, so the waist should be divided into 8 parts , and the pattern should be made on paper for greater accuracy. When cutting out parts, make sure that they are stitched along the right side seam. The left side should be left for attaching the zipper. You should not sew this part by hand, as frequent use can lead to tearing of the seams. The ideal would be to machine finish it with a fine seam twice.
After the base has been cut out, you need to assemble the workpiece with thread so that folds are formed. Distribute them evenly and sew them on the machine. After this, overcast the bottom of the fabric so that the threads do not puff up from under the skirt.
If you like the long version, then the number of pleats at the waist should be reduced to 4 so that the skirt turns out to be in a classic style and is universal in terms of combination with other materials. You can replace the drape with a knitted composition, but then the product will not have the desired thickness.
Midi skirts can be made with padding poly lining , this will add a little pomp and elegance to the look. Here you also need to add more folds to the base to make the model flared and feminine. After completing the process, you need to wash the product so that the fabric fits well into the seams, but do not use hot water for the drape material so that the wool does not roll off.
Elastic options
Sewing a skirt with your own hands is not difficult. The main thing is to show a little imagination and use detailed instructions in your work. This type of skirt is lighter and suitable for spring and summer. To begin with, the material is selected; the fabric should not be thick, but it is not necessary to choose options that will be visible through. Fleece would be nice.
In terms of combination, the material is universal and suitable for different types of fabrics. Further:
- Take measurements and transfer the parameters to the pattern. You can make a base for working with both fabric and paper. After this, cut out the parts and transfer them to the fabric from the wrong side.
- Cut out the required dimensions and sew along the length. For a hem, 1 centimeter is enough. To prevent the fleece from fraying, an overlocker is used. It is not possible to process the fabric by hand.
- You need to sew the elastic to the fabric folded in half, making even indentations from the edge of 5-6 centimeters. Regardless of whether the skirt is straight or wavy, the elastic is attached to both the product itself and its belt.
Using an elastic band instead of a zipper allows you to create a more comfortable and practical model to wear, because even with a slight increase in weight you can continue to wear the skirt.
For a straight cut, the elastic is selected in a larger size so that it does not stretch too much at the waist and does not create unevenness.
Pattern of an asymmetrical wrap skirt
This pattern is usually a summer version. The smell is very comfortable and allows you to control the belt.
The direct type should also be taken as a basis. Add a few centimeters to the front for scent. You can make a dart on the sides, or sew or round the edge. You can narrow the bottom. That's it, depending on the model, complete the necessary parts and sew the base. Finish the edges, complete the belt, connect to the base. Simple and fast. And the model is incredibly popular and convenient.
You might be interested in: Making a pattern and sewing gloves yourself
Miniskirt pattern with built-in pleats
This is similar to a slip skirt pattern. A very interesting option for those who like to show off their slender legs.
- This will require a little more work.
- There are two main canvases here.
- The front is overlapped and stitched to the middle, then the other side is overlapped closely and stitched.
- On the other side of the same element, make the same two folds.
- Do the same with the back part.
- This is the secret of folds.
- Then connect the front and back, make a belt and trim the edges.
It's simple, but you need to tinker a little. As a rule, folds do not appear immediately. Everything needs to be carefully measured and stitched evenly, at the same level and at the same angle.
Pattern of a mini version
Useful for work
The basis of the process is the creation of a pattern. Typically, craftswomen use thick fabrics for this in order to clearly draw the details and cut out the necessary lines. If a woman has a narrow waist, then a regular pillowcase will serve as the basis. The option is economical but effective.
Useful tips:
- To decorate the hem with beautiful lace, you need to pin the braid to the wrong side so that the elements of the pattern peek out from under the edge. Do not sew over the edges as this will create unnecessary seams.
- Before starting work, you need to familiarize yourself with the requirements and work plan, so as not to be distracted by unnecessary maneuvers during the process. Preparation for the process includes compiling a list of materials and creating a workpiece. Without this, you should not start the process.
- Lines on the pattern and on the finished fabric should be drawn with a washable marker or marked with chalk. You cannot use pencils and pens, since there is a high probability that you will not be able to wash off the ink or lead.
- For internal seams, needlewomen advise using wide and large stitches. They are executed quickly, and you can immediately see the processed element. If the stitching procedure is done manually, then it is advisable to carry it out with silk threads and tighten it well so that there are no gaps later.
There is no need to rush to do everything quickly. The quality of work may suffer from this; each stage is performed gradually, following the instructions.
Before work the fabric must be ironed so that unevenness on the surface does not interfere with the creation of a beautiful piece of clothing. Fulfilling simple requirements will help turn work into real pleasure and give you the opportunity to enjoy the process.