It is quite possible to give things a second life, and one of the ways is to tie the neck. In our article you will find several simple methods for different types of clothing.
In every woman's wardrobe, there is probably something that is a pity to throw away, but at the same time it never gets worn anywhere. An excellent solution to the problem can be tying the neck using such an interesting tool as a hook. In our article we will talk about several good options for beginners.
Crocheting the neck of a sweater: diagram, description
A hook is a very useful tool with which you can turn an already boring wardrobe item into something unique. For example, you can make your favorite blouses even more beautiful.
Jacket neckline
- First we cast on a small chain of loops. 20 pieces will be enough, but 19 will do for training
- Knit several rows and six stitches each. There is no need to make yarn overs. It is better to knit in the direction from right to left
- Further rows will be knitted differently. Knitting should begin with air columns
- We pass the hook under the third loop. Your job is to grab and pull the thread
- This will give you two loops. Now we knit them into one
As a result, you will get a smooth and beautiful canvas:
The resulting canvas
- If the neck of your sweater is square, then this option will not work for it. Here you can do things differently.
- Insert the hook into the beginning of the shoulder seam and bring the thread through the hole. After this, tie the entire row with air loops.
After that we work according to the scheme:
Strapping scheme
Neckline with knitted border
People who have never done handicrafts often throw away things that could last for a long time. Old jackets and sweaters quickly become boring, deteriorate, and go out of fashion. Experts say that the collar of woolen items fails most quickly: the material in this place wears out and constantly becomes dirty, as the neck sweats a lot.
After constant washing, the knitted fabric becomes deformed, and as a result, the item becomes completely unusable after just a few years. However, there is a way out of this situation: you can knit a new wide collar or simply crochet a worn-out collar that has lost its presentation. In this way you can update absolutely any item of clothing. Decorating the neckline with crochet or knitting yourself is undoubtedly worth it, because:
- the old thing will immediately look different, more fashionable and modern;
- it’s much cheaper than buying a new jacket, blouse or sweater;
- this method of finishing a collar is equally suitable for men's, women's and children's items;
- If you have certain skills, you can restore a product in this way very quickly.
You can find interesting ideas for finishing the neck in specialized literature - books and magazines for those who are interested in knitting. You can also consult with experienced craftswomen and attend original master classes.
The work of restoring old, outdated things can be very interesting and creative. The new collar should be harmoniously combined with the product. Crocheting a neckline is an incredibly exciting activity.
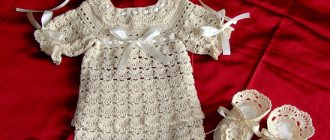
Crochet dress neckline: diagram, description
You can also make a beautiful harness for dresses. There are two popular methods that craftswomen usually use:
Method 1. “Race step”
Rachy step
- Wind the thread long enough to cover several rounds of the neckline. 10 times will be enough
- We fasten one end to the shoulder seam and make a simple loop
- We pass a hook under the loop to grab and pull the thread through it
- Tie the resulting loops into one
- Now you will receive the first loop for the beginning of the row and knitting will begin with it
Here are a couple of good patterns that will allow any novice craftswoman to make a binding:
Scheme 1
Scheme 2
Method 2. Lace
Lace can be knitted in different ways, but we offer you one very simple pattern. The drawing ends up being very beautiful, and it’s not at all difficult to make.
Lace pattern
Step-by-step scheme for tying a neckline with lace in rows:
- The first row is knitted with simple loops. As a result, you will get a chain of air loops
- In the second row we alternate three double crochets and three chain stitches
- We do the next row the same way, only the number of loops will be two
- Knit a simple chain as on the first row
- Work a chain of 4 simple double crochets and finish with a double crochet
- Here the chain will consist of one double crochet stitch, as well as one double crochet stitch
- This row is double crochet and chain stitch. Throughout the entire row they alternate until the end
- Alternating loops again. First make a double crochet stitch and then 3 chain stitches
From theory to practice
So, let's begin.
In order to crochet the neck of a finished product, you will need: the neck of the product itself, a crochet hook, threads and a knitting needle.
Let's take the finished fabric, using a hook from the wrong side from the main thread, pull a loop to the front side, using this principle we put several on the hook, pulling the thread a little, since the loops should be put on tightly.
Related article: Main diseases and pests of perennial phlox
Now the knitting needle is put into operation, onto which we transfer all the loops on the hook, continuing to replenish the number of loops with the help of the hook. Using the main tool, we pull out the loop and transfer it to the knitting needle.
That's all. The first part has come to an end. The loops are cast on. We smoothly approach knitting the first row. We knit the first row of our product so that the front loops are visible on the wrong side, and there are purl loops in the front row. If the product you have chosen has a round neck shape, then you need to knit it with purl loops; if the neck has a seam, then we knit it with knit stitches.
If you want the appearance of the collar of your product to be exactly similar to the factory one, then the first row must be knitted along the wrong side with facial loops, as a result of which purl loops will be located on the front side. Thus, the first row of the front side looks as if the collar was stitched with a needle. This is the result we can get by using the first option for processing the neck.
To complete our work, we need to knit a neckline of the required length. The loop flap can be closed at your request using knitting needles or a hook, but if you are processing a stand-up collar, then the loops closed with a needle will look much better on the product.
Let's look at another option for crocheting the neck of a product. To begin, cast on fifteen or even twenty air loops from right to left. Start the report with the loop that remains on the hook, choose the third one. Through the last loop, pulling the hook, we grab the main thread, which we begin to pull between the threads of the third loop. Thus, on our hook there are only the captured warp thread and the first loop, which became the beginning of our chain.
Related article: Do-it-yourself Buddhist rosary on your hand with photos and videos
Thus, we have formed two columns.
Using this principle, continue working the neck of your piece until it is finished. But now the hook should go into every loop. As a result of these actions, we get a strip; we need to turn it over and continue in the same spirit, forming the next row. In each subsequent row, we remove the first loop, without passing it through the main thread, so that the fabric is smooth and without gaps.
We'll start crocheting the neckline from the left shoulder. We secure the neckband by pulling the finishing thread with the right side through the outer loop. It should look like an ear. We pull the thread through the nearest neck loop and the formed eye. This led to the formation of a new loop. Using this pattern, we will process the entire neck. After each completion of a row, we begin a new one, using a sample diagram.
Schemes for crocheting necklines of any complexity.
Below are shown schematically several options for crocheting a neckline, which can be a good help for you in making a neckline design of any complexity.
Crocheting a sweater neck: diagram, description
Today there is an increase in the popularity of pullovers. Many people prefer knitted jumpers, but in order not to throw away the old item, you can crochet the neck of the pullover. There are some very good options for how to do this.
Boat strapping
Boat diagram
This pattern is quite simple and features alternating rows.
- The first row is knitted very simply. To do this, alternate single crochet and chain stitch
- The second row is done entirely with double crochets
- Then we alternate the rows. That is, we do the third like the first, the fourth like the second, and so on
Result
- Knot tying for V-neck
Tying with knots
Knitting is also done in rows and looks like this:
1-3 row. Knitted with simple loops, single crochets for rows 4-6. Performed with air loops 7-9 rows. We do the same as the first row, row 10-12. Created with four single crochets and three chain stitches. Alternate them throughout the entire row until the very end.
Crocheting the neck of a vest: diagram, description?
- Knitted vests also look very interesting and original. Openwork knitting looks the most interesting.
Tying a vest
The work diagram is presented in rows to make it easier for you to navigate:
1. We knit with simple stitches. This is required for the opening row.
2. We make the second row according to the scheme - 3 chain loops, a double crochet loop, again chain loops, but already two, then one double crochet and 7 more chain stitches
3. To tie the edges we make the following row - 1 single crochet and 4 chain stitches. This knitting alternates until the row is completed
4-7. In these rows we alternate the pattern of 2-3 rows
8. The row is knitted by alternating 3 chain stitches, 1 double crochet stitch, 2 chain stitches and 1 more double crochet stitch.
9. We make 4 single crochets, picot, repeat again with double crochets and picot. Now we make 3 single crochets, picot, and again 3 single crochets
Another good way to tie a vest is with a hem:
Scheme "Border"
- The first row is knitted with six single crochets
- The second row has a simple pattern and all stitches alternate - 1 single crochet, 2 chain stitches, 4 double crochet stitches, 2 chain stitches
You will get a beautiful border, somewhat similar to lace.
Don't rush to get rid of old things. Show your imagination and give them a second life.