For knitting we need
For snood you need to take:
- straight knitting needles No. 7;
- 1 skein of medium wool yarn or 2 skeins of fine yarn.
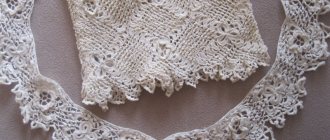
Snood is one of the scarf options. Its difference from the usual one is that it does not need to be wrapped around necks and the ends hidden or tied. It already consists of a ring and a pipe, which you just need to throw around your neck and already look fashionable. Some options are made several times longer specifically to create volume on the neck.
It is fashionable to knit a tube scarf using knitting needles in 2 ways. The first option is to make a snood on straight knitting needles, like a regular scarf, which is then sewn with a needle or crochet. In this case, the pattern lies along the product in beautiful stripes. But, at the end you end up with a seam, which, if you use thick yarn, can get in the way.
The second option is a snood, which is knitted on circular knitting needles. The pattern on this product lies across the scarf and this type has no seam. Both options look good and relevant, but if you have circular knitting needles, it is better to knit a snood on them.
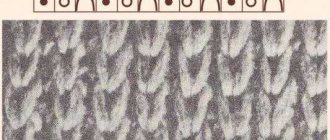
Description of the English elastic pattern
Elastic bands are one of the most popular and yet stylish patterns. The English elastic looks luxurious, but it is very easy to do.
Description of the pattern by row:
- *knit the first loop, 1 yarn over, then remove one loop without knitting*, repeat from * to *.
- * make a yarn over, remove 1 loop without knitting, then knit a loop with a crochet from the previous row together with a knit loop *, repeat from * to *.
- * knit a double crochet stitch from the previous row together with a knit stitch, then 1 yarn over, and remove 1 loop*, repeat from * to *.
- Next the 2nd and 3rd rows are knitted.
Knit the required number of rows, then close the loops and sew the edges. You can sew it with a regular thick needle, or you can crochet it. It is worth paying attention not to overtighten the seam when sewing. It will also look beautiful if, when sewing the products, you get the loop into the loop. Then it will be less noticeable. And a chic scarf that will protect your neck from any bad weather is ready.
Schemes of double-sided patterns with knitting needles for snood
Options for double-sided designs for a scarf-collar with a diagram:
- Simple pattern.
- Relief pattern.
- Spectacular braids.
- Two-color knitting.
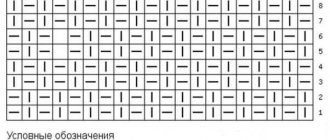
- Sea wave. Cells with a horizontal stripe in the diagram are knitted, with a vertical stripe - purl, with a circle - yarn overs, with a house - two loops knitted together.
- Zigzag shadow pattern.
You can also watch a detailed master class on how to knit a double-sided snood pattern with knitting needles in the video:
The second version of snood with English elastic on circular knitting needles
The product, which is made in this way, does not have a seam. It can be made in any width, which gives it additional volume, which will add luxury to the image. In addition, a large volume will create warmth and comfort on your shoulders and neck.
For this option you will need circular knitting needles and yarn. Cast on the required number of stitches and knit according to the pattern.
Description of the pattern in rows:
- * 1 yarn over, slip 1 loop without knitting, knit 1 loop*, repeat the report from * to *. Knit the pattern to the end of the circle.
- * the loop together with the yarn over is knitted with a purl loop, make 1 yarn over, remove 1 loop without knitting*, repeat from * to * until the end of the circular row.
- * 1 yarn over, slip 1 loop behind the back wall, knit a double crochet stitch from the previous knit row*, repeat from * to * until the end of the circular row.
- We knit rows according to the pattern. Having reached 30-35 cm in height, knit the last row with a regular elastic band: 1 knit stitch, 1 purl stitch. The loop with the crochet is knitted with a knit stitch, the loop that was removed is knitted with a purl. This row is necessary in order to carefully close all the loops and get a smooth edge.
You can close the product in the usual way. Knit 2 loops together, throw the resulting 1 loop back onto the working needle and repeat again. But on scarves, sweaters and other knitted items where the pattern ends at an elastic band, over time the edge will look sloppy. The elastic will stretch and the edge will lose its neat appearance. In such situations, it is better to close knitted items in a special way that will allow you to get an elastic edge. This will also add additional charm and exclusivity to the item.
Knitting methods
There are several options for creating an accessory. Each of them will receive an original warm item.
Snood in two turns with an English elastic band
This version of a circular scarf is suitable for women of medium or tall height. It can not only be beautifully draped around the neck, but also used as a hood. Standard sizes for a two-turn snood are 150-180 cm in length and 35-55 cm in width. It will take no more than two to three hours to make.
To work, you will need yarn of medium thickness (at least 3 skeins) and straight knitting needles of medium diameter. The pattern on such a scarf will be located along the product. The number of loops should be a multiple of 3 plus 1 loop and correspond to the width of the snood. Next knit according to the proposed pattern:
Related sample and diagram of a classic English elastic band with description
Alternate these two rows until the end of the product, that is, until the desired length is achieved. The final stage of work is to sew the ends of the resulting scarf together with a tailor's needle. The seam will be less noticeable and neat if you connect the edges loop into loop.
How to properly sew the edges of a snood with a needle
You can also crochet the edges if you have the skills to work with this tool. The product is ready.
Important! When joining the edges, the main thing is not to overtighten the seam, otherwise it will ruin the appearance of the product.
Snood with an English elastic band in one turn
This model is suitable for short, slender women. The classic length of a snood in one turn is 60 cm, the width of the product is usually ½ the length of the product.
Prepare the selected yarn. Cast on the number of loops corresponding to the width of the product and knit the snood with straight knitting needles using an English elastic band according to the pattern suggested above, in turning rows. When the height of the knitted fabric reaches 60 cm, close the loops and connect the edges of the scarf using a needle or hook.
How to do this correctly is shown in detail in this master class:
The model resembles a regular collar
Snood with English elastic band without seam
A distinctive feature of this tube snood, knitted with an English elastic band, is the absence of a seam. In this case, the pattern lies across the product. For beginning craftswomen, this option is the most convenient, since not everyone can sew a seam accurately the first time. At the same time, knitting and trying on a product without a seam is more convenient and easier. This option is ideal for snooding in one turn.
To create this model you will need yarn, circular knitting needles of the required diameter and a special marker to mark the beginning of the row.
You should cast on the number of loops that corresponds to the length of the product and knit according to the pattern.
If reading the diagram is difficult, you can use the description of a circular English elastic band in rows:
- row 1: *yarn over, slip off stitch without knitting, knit* repeat repeat until end of round;
- Row 2: *purl a double crochet loop, yarn over, slip the next stitch* repeat repeat until the end of the round;
- row 3 *yarn over, remove the next one behind the back wall, knit the loop and yarn over of the previous row* repeat repeat until the end of the row.
Knit rows according to the pattern to the desired height of the product. In the last row, alternately knit one knit stitch and one purl loop, that is, with a regular elastic band. This row is needed to ensure that the edge is smooth and neat.
When knitting a snood in the round, it is important to close the loops beautifully. There are two ways:
- Classical. Knit two loops together, return the resulting loop to the working needle and repeat the action until the end of the edge of the product. Unfortunately, over time, such an edge will look untidy.
- With elastic edge. This method is a little more complicated, but the result is worth it - the edge will be neat. Knit two stitches together, transfer one stitch from the left (non-working) needle to the right (working) needle. Again, two knits together. There is one loop on the right needle. Knit one loop from the left knitting needle (there are already two loops on the working knitting needle). Transfer them to the left needle and knit together. Repeat until the last stitch. To be secure, tighten it with a hook.
You can learn how to correctly knit the last row of a snood knitted with an English elastic band from this video:
Important! Do not close the loops too tightly, otherwise the edge will lose elasticity.
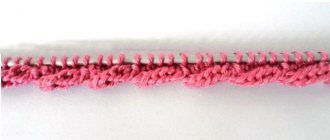
A product without a seam looks more aesthetically pleasing
Snood with a false English elastic band
Such a snood, knitted with a false or simplified English elastic band, looks no less impressive in canvas and is not much different from the classic one. But it’s easier to make and you can save yarn. To knit a snood with a false English elastic, you should take the selected yarn and knitting needles of a suitable diameter and cast on the number of loops based on the desired width of the product.
Important! The number of loops should be a multiple of 4 plus 2 edge loops.
Next, knit according to the proposed description, alternating two rows until the height of the knitting fabric is equal to the length of the future snood.
Related False English Gum Pattern with Description
If it is difficult to knit according to the description, you can watch the video with a detailed master class:
Snood with two-color English elastic band
To knit a circular scarf with a two-color English rib (also called brioche), you will need two colors of yarn and, depending on the model you choose, straight or circular knitting needles.
Important! The yarn should be of different colors, but of the same type and manufacturer, that is, the same thickness and length, otherwise the fabric will be uneven.
There are two ways to knit a two-color English rib:
Horizontal. Cast on the required number of loops (must be a multiple of two). Knit a snood using English rib knitting needles in rotating rows according to the classic pattern suggested above. During the knitting process, change the thread color every two rows. You can find out how to do this correctly by watching the master class:
Circular. The technique is no different from the technique of knitting a snood with an English elastic band without a seam. How to alternate colors correctly is shown in detail in the video:
Closing loops to create an elastic edge
At first glance, when reading the description, it may seem that this option for closing loops is complex. But, having figured it out and tried it twice, you will close all products this way, even those without an elastic band.
To begin, knit 2 stitches together. Then we remove 1 loop from the left knitting needle, without knitting, onto the right knitting needle. These 2 loops must be knitted. Then you again have 1 loop on the right needle. We knit 1 stitch from the left knitting needle. Now you have 2 loops on your right needle again. We transfer these 2 to the left needle and knit them together. We repeat everything from beginning to end until 1 loop remains on the knitting needles. You tighten it with a hook.
Universal
This fashionable scarf is suitable for both women and men.
What you will need:
- Thick yarn.
- Circular knitting needles.
- Hook.
- Scissors.
How to link?
Cast on ninety-eight stitches. If you want to make a wider scarf, then take more loops. The main thing is that their number is even. Then pull out one needle and remove the edge stitch.
Take a knitting needle with loops with your left hand, and an empty one with your right hand. Lower the first loop onto it. Pry the next one over the front wall. Pick up the thread and, together with the knitting needle, pull it into the loop on the other knitting needle.
Purl the next stitch. After you make it, pull the thread together with the knitting needle into the loop in the opposite direction.
Continue knitting, alternating knit and purl stitches. Make sure that the loops do not twist.
When you get the desired width, bind off all the loops.
If the clamp is too tight, loosen it a little with a hook.
Results
We considered 2 options for making a tube scarf. Both look quite stylish and unusual. Although the pattern is identical, if executed in one version or another, it will look completely different. A snood with an English elastic band, which is initially knitted like a regular scarf, will suit any coat or jacket. It will look very feminine on a classic double-breasted coat and just as stylish on an oversized coat. A snood on circular knitting needles will harmonize well with a formal coat or a down jacket sewn with a straight cut. You can complement the look with the help of mittens, which are made from the same yarn as the snood.
Thanks to our master class, you can easily make an accessory that will warm you in the cool winter and charm everyone around you. Snoodik is perfect for girls of all ages: both little princesses and women of Balzac age. In addition to ladies, even men can wear such a scarf. It will add comfort and softness to a man's look. Men's scarves are made from yarn in muted tones and at the same time look very stylish. Knit, wear and have fun!