How to sew a dress for a girl: master classes and patterns
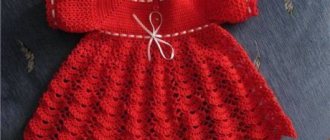
A beautiful fluffy dress for a girl is a real dream; perhaps every little girl wants to get such decoration. A fluffy dress is well suited for any occasion, be it New Year, graduation or, for example, a matinee in kindergarten. Therefore, this time I want to share patterns for a children's dress with a full skirt. The article presents ready-made dress patterns for girls for 2 years, from 1 year to 14 years, and another pattern for 4-5 years. As well as two options for modeling patterns with precise calculations for 9-year-old children and 3 master classes on sewing a dress for a girl.
Pattern: fluffy dress for a girl with a pleated skirt (for 9 years)
For sewing, it is recommended to use tulle, silk, organza, satin or any cotton fabric that holds its shape. You can use tulle for the petticoat.
Pattern: fluffy dress for girls with a circle skirt (for 9 years)
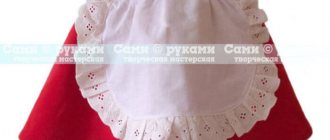
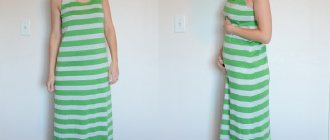
Summer children's dress in the “Elodie” style
To sew a dress we will need:
- fabric with a small pattern for a skirt - with a width of 1.5 m you need to take 1 m;
- plain (preferably white) fabric for the bodice - with a width of 1.5 m you need 0.3 m;
- hidden zipper;
- elastic band 5 mm wide;
- white stitching for finishing the lower edge of the skirt - about 3 m;
- lace to match the color of the patterned fabric - about 0.55 m;
- thread - elastic;
- threads, sewing tools.
Description
To make this model, we use the “Elodie” children’s dress pattern. If you use more refined fabric, the pattern is also suitable for sewing an elegant dress.
We make life-size patterns and mark on the fabric all the details of the skirt of a dress for girls 4 years old.
We cut out with allowances around the perimeter of 1 cm.
We mark the details of the bodice on the white fabric. We cut them out, allowing for an allowance of at least 1.5 cm along the neckline and the lower edge of the sleeves, and an allowance for the remaining cuts of 1.0 cm. We process the sections of the bottom of the sleeves with an overlocker and turn them on the wrong side. We sew the line at a distance of 7 mm from the fold line.
We measure the required length of the elastic band and thread it into the drawstring. We pin the ends of the elastic with pins, then attach the fasteners.
We sew the sleeves with the details of the bodice. We sew the side seams with an overlocker.
We make a drawstring along the rollout of the neck, leaving an open area on the back. We thread an elastic band that is obviously longer. We try on, determine the desired length of the elastic, cut it off, and grind the ends of the elastic. We sew up the remaining open area by hand.
Thread an elastic thread into the bobbin and sew along the bottom of the bodice, forming small gathers. We tie the ends of the thread.
Sew together the wedges of the skirt, leaving one of the seams open. We overcast the edges of all allowances, including the open seam. We sew the zipper, and its slider should be at the level of the seam where the skirt is attached to the bodice of the dress. After sewing in the zipper, we machine stitch the rest of the last seam for sewing the wedges. We fold the skirt with the bodice, paying attention to the coincidence of the side seams. We pin the parts together with pins. We sew the parts on the overlocker, simultaneously sewing the tails of the hidden zipper.
We attach lace along the front side.
We process the lower edge of the skirt with an overlocker, turn it under and stitch it. Sew on the seam.
Iron the finished dress.
How to sew a fluffy dress for a girl
Step 1: For a pleated dress, start from the bottom first. Process the bottom of the product and then add bow folds; you can see how to make a skirt with pleats in this article.
Step 2: Sew the side and shoulder seams on the top of the dress.
Step 3. Sew the edges on the skirt. If you chose a model with a circle skirt (I wrote about how to sew a circle skirt here), sweep the top section of the skirt and gather it to the size of the bottom section of the top of the dress. Then sew the skirt to the top.
Step 4. For convenience, sew a zipper into the back middle seam.
Step 5: Sew seams on the sleeves, if any. Baste the top edges and sew in the sleeves.
Step 6. To make the skirt even fuller, you should make a tulle petticoat identical to the main skirt. Pull it over the dress, tuck it in and sew it to the zipper, and then to the seam of the skirt.
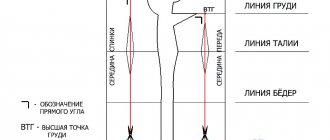
Creating a pattern for the base of a dress for a girl aged 3-5 years
On a convenient surface, on a blank sheet of paper, draw a rectangle and label it with the letters ABCD. The vertical lines AD and BC are 46 cm in size, that is, it corresponds to the length of our future dress according to the measurements written above. The horizontal lines AB and CD, which are also our width, have 37 cm (chest circumference according to our measurements, adding 9 cm to them for any size):
28+9=37 cm.
Armhole depth.
From place A, we go down in the direction of AD and count 1503 cm. We denote the resulting place with the letter G (1/3 of the chest circumference, adding 6 cm):
28:3+6=15.3 cm.
From place G to the right we draw a horizontal line until we collide with line BC. We denote this “collision” as G1.
Waistline.
From place A, in the direction of AD, we count 24 cm (this is our length of the back to the waist) and denote it with the letter T.
From the new designation we draw a horizontal line to the right until we collide with the line BC. We call the “collision” point T1.
Back width.
From place G to the right side, in the direction of GG1, we count 13.3 cm. We denote the resulting place as G2 (1/3 of the chest circumference by our standards, adding 4 cm):
28:3+4=13.3 cm.
From place G2 we restore the perpendicular until we collide with AB. We denote “collision” by P.
Armhole width.
From place G2 to the right side, in the direction of GG1, count 9 cm and mark place G3 (1/3 of the chest circumference according to the measurements above, adding 2 cm):
28:4+2=9 cm.
From the new designation we restore the perpendicular until we encounter AB. We call “collision” P1.
Lifting the shelf.
From places P1 and B we draw vertical straight lines up 2 cm. We designate the resulting new places P2 and W, and then combine them together.
Side line.
From place G2 to the right, in the direction of GG1 we count 3 cm and designate this as point G4. From this same new location we lower the perpendicular until it collides with the SD. We call the “collision” the letter N. And we call the middle of the “collision” with TT4 T2.
Auxiliary points for the shoulder and armhole lines.
We must divide PG2 into four equal parts. We also divide P1G3 in the same way.
Well, we have smoothly finished the first part. Let's move on quickly! We begin the part according to the drawing of the back, and after that the front.
Neckline.
From place A, in the direction AB, to the right side we count 4.7 cm (1/3 of the neck circumference according to our above-written measurements, adding a few cm to them, or rather 0.5):
12.5:3+0.5=4.7 cm.
From dream 4.7 we rise at right angles to AB and count 1.5 cm. We connect places A and 1.5 with a smooth line.
Shoulder tilt.
From place P we descend at right angles to AB and count 1.5 cm.
Shoulder line.
We must draw our shoulder line through places such as: 1.5 (neck) and 1.5 (shoulder slope). The length of this line should be 10 cm (shoulder length according to our measurements, adding 1 cm for fit):
9+1=10cm.
Armhole line.
First of all, we must divide the angle PG2G4 in half with a dotted line and count 2.5 cm from place G2 on it. From place G4 we do not stop leading the side line upward by 0.5 cm. From place 10 (passing through the middle place of division of line PG2 and places 2.5, we draw a smooth line to place 0.5, which creates an armhole line.
Aren't you tired? Are you confused? Then let's move on!
Side seam.
From place T2 to the right side in the direction of TT4 we count 1 cm. We draw the side seam line through places 0.5, G4, 1 and until the “collision” of the SD. We call the location of the “collision” H1. We rise from the new place and set aside 1 cm.
Bottom line decoration.
We must divide the distance DN into two even parts and combine the center with a place called 1.
The second part is over. Let's quickly move on to the construction of the FRONT.
Neckline.
From place Ш to the left in the direction ШП2 we count 4.7 cm (1/3 of the neck circumference according to our standards, adding 0.5 cm):
12.5:3+0.5=4.7 cm.
From the place we go down along the ShS line and count 5.2 cm (1/3 of the neck circumference according to our standards, adding 1 cm):
1.5:3+1=5.2 cm.
Places 4.7 and 5.2 are united by a dotted line, divided into two equal parts and from place W (through the center of the division of the dotted line) we count 4.7 cm. From the same place (through 4.7) to place 5.2 we draw smooth line.
Shoulder tilt.
From place P2 we go down the line P2G3 and count 3 cm.
Shoulder line.
We combine places 4.7 (this is the upper place of the neck) and place 3 (this is the slope of the shoulder). After that, places 4.7 to the left side along the slope we count 9 cm.
Armhole line.
We must divide the angle P1G3G4 into two even parts with a dotted line and count (on it) from place G3 2 cm. From the upper center of division P1G3 we count 0.5 cm to the right. With a smooth line we unite 9, 0.5 the lower center of division P1G3 , 2, touching GG1, 0.5. The line that we got will be the armhole line.
Side seam.
From place T2 to the left side in the direction of TT1 we count 2 cm. We draw the side seam line through places 0.5, G4, 2 until the “collision” of the SD. The place where the side seam “collides” with the SD is called H2. We rise from the new place and count 1 cm.
Decoration of the waist line.
From place T1 we go down in the direction BC and count 2 cm. We combine places 2 and 2 (side seam).
Bottom line decoration.
From place C we further draw a vertical line downwards by 2 cm. Places 2 and 1 (on the line of the side seam G4N2) are easily united with a convex arc.
Slowly but surely we are finishing the third part. And similarly we move on to the next part - SLEEVE.
We start all over again, that is, we again draw a rectangle with the designation ABCD. The vertical lines AD and BC are 28 cm, which is our sleeve length according to measurement. The horizontal lines AB and CD are 28.7 cm (this is our width). 1/3 chest circumference according to our measurements, adding 5 cm and multiplied by 2:
(28:3+5) x 2 = 28.7 cm.
Height of the rim.
From place A we go down in the direction of AD and count 10.5 cm. We denote this place with the letter P (1/4 of the depth of the armhole of the dress, subtracting 1 cm):
(15.3:4 x 3) – 1 = 10.5 cm.
From place P to the right we draw a horizontal line until it “collides” with BC. We call “collision” P1.
Auxiliary lines.
We must divide AB into 4 even parts. We denote the midpoint of division as O. From all division points AB we lower perpendiculars until it “collides” with VD. We call “collision” H, H1 and H2.
Sleeve hem line.
Places P, O and Ryo are united by a dotted line. The places where the dotted lines “collide” with the auxiliary lines are called O1 and O2. We divide the pieces of dotted lines into two even parts. We count from the places where the pieces are divided at right angles to the dotted line:
- from PO1 down 0.5 cm;
- from O1O up 1.5 cm;
- from OO2 up 1.5 cm;
- from O2P1 down 1.5 cm;
- from O1 up 0.5 cm.
We draw lines through places P, 0.5, 0.5, 1.5, O, 1.5, O2, 1.5 to place P1. Rolled sleeves. O – the highest point of the sleeve.
Bottom line decoration.
From places D, D and C we rise and count 1 cm each. From place H2 we also rise and count 2 cm. We draw the bottom line through places 1, H, 1, 2 to place 1.
Oh...And how much work! But that's not all! Let's move on to the next part of our huge work - COLLARS.
Well, we’re not used to drawing, are we? Draw a right angle with the vertex at location A.
Sewing line.
From place A to the left and down we count 8.3 cm (1/3 of the neck circumference according to our measurements at the very top):
12.5:3 x 2=8.3 cm.
We connect places 8.3 and 8.3 with a dotted line. We divide this line into two equal parts and from place A, through the center of the division of the dotted line, count 8.3 cm. We draw the sewing line through 8.3.
Collar width and hemline.
From place 8.3 along a horizontal line to the left we count 5 cm. From place 5 down we put 1 cm. Places 1 and 8.3 are combined. From place 8.3 along a vertical line we put 5 cm down.
From place 5 to the left, draw a dotted line horizontally. We came up with an angle with the vertex at location 5, with the sides appearing as a dotted line and vertically at location A. What did you come up with? Next we draw a line that divides our angle in half and count 2.5 cm on it.
From place 8.3 (which is located in the center of the sewing line) we count 5 cm. We draw the bottom line of the collar through places such as: 1, 5, 2, 5 and end with place 8.3.
Can we take a break? You can drink tea with sweets or sleep for an hour or two. But if you are still full of strength and want to reach your goal, like us, then go ahead! Let's move on to the TURN-UP COLLAR.
Draw a rectangle ABCD. The horizontal sides AB and CD are 17.5 cm and are the same as our collar length (neck circumference according to our measurements, adding 5 cm):
12.5+5=17.5 cm.
The vertical sides AD and BC (this is our width) are 8 cm.
Sewing line.
From place A to the right in the direction. AB we count 12.5 cm (our neck circumference according to measurement). From place D we rise and count 6 cm. We unite places 6 and 12.5 with a dotted line. Then we divide this line into two equal parts and from the center of the division down at a right angle to the dotted line we count 1 cm. We draw a sewing line through places 6 and 1 and end it at place 12.5.
Bottom line and toe.
From place C we count up 2 cm. We combine places 2, 12.5. Then from the place 12.5 down the inclined line we count 6 cm.
We divide the CD into three equal parts. We draw the bottom line of the collar through places D, the center of the division SD (extreme on the left side) and bring it to place 6.
Oh...We're a little tired. More precisely, they lost a little strength. But we have very, very little left. And this cannot make us happy. Let's get started soon!
How to sew a dress for a girl with a full skirt: pattern and master class
And another pattern with a step-by-step sewing master class. Download and print the pattern in full size (100% scale). The reference square on this pattern is in inches (1 inch = 2.54 cm).
Dress pattern for girls 4-5 years old (size XS)
What do you need:
- 60 cm elastic fabric for the top,
- 90 cm of knitted fabric for a skirt,
- paper pattern.
Retake the pattern details
The width of the fabric cut for the skirt is 90 cm, and the length depends on your preferences (measure from the girl’s waistline).
Processing the top of the dress
Finish the bottom edge of the sleeves. Cut off the excess on the small sleeves (shown by the arrow). Baste and tighten a little so that the top of the sleeve becomes 12.5 cm. Sew the sleeves to the front and back top flange. Sew the side seams on the top of the girls' dress.
Sew the braid to the neckline. It is better to sew with a stretch seam, such as a zigzag or stretch seam.
Fluffy skirt for children's dress
Process the bottom of the future skirt. Baste the top and tighten the thread until the resulting size for the top of the skirt matches the bottom of the top. Pin the skirt to the top and sew.
Another dress for a girl, made using this pattern
DIY casual dress for girls: MK
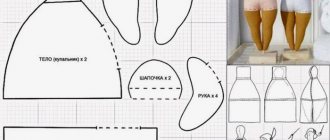
This bright summer dress is sewn quickly and extremely simply - you don’t have to have the skills of a professional dressmaker! Using the pattern below, you can sew such beauty for a baby from one year old to two or three years old.
For work we will need the following tools and materials:
- a piece of breathable, lightweight fabric (100% cotton is ideal);
- a T-shirt that fits the girl well - for creating a pattern;
- sharp scissors;
- sewing threads to match the fabric;
- darning needle;
- sewing machine;
- pins;
- decorative braid to decorate the bottom of the dress;
- linen elastic.
Sewing
First, we need to make patterns for the sleeves, front and back of the future outfit, leaving at least 5 millimeters of seam allowance. If you do not plan to trim the bottom edge of the dress with braid, add 1.5 centimeters of seam allowance to its length.
Next, we fold the parts of the sleeve and body with the right sides inward, align the armholes and secure with pins. We repeat the same with the second sleeve. Using an overlocker or machine, use a zig-zag stitch to process the armholes and smooth out the seams.
We process the edges of the sleeves with an overlocker, bending them 1 centimeter to the wrong side.
Now we process the neckline. To do this, bend the fabric by 5 millimeters and iron it. We make another bend, but this time by 1 centimeter, and iron it again.
We sew the side sections of the dress, starting from the folded sleeves to the bottom section. We process the seams.
We sew the sleeves along the fold line, leaving a small hole at the beginning of the seam for threading the elastic.
We use a sewing machine to sew the edge of the hem, which is located around the neckline - we will also insert an elastic band into it, so we leave a small hole at the very beginning of the seam.
As a result, we will need three pieces of elastic, which should be equal in length to the circumference of the girl’s neck and forearms. We thread them through the neckline and sleeves, after which we securely sew together the connections of their ends.
We sew up the holes for threading the elastic bands.
We process the bottom cut of the dress. To do this, we fold the fabric twice - first by 5 and then by 10 millimeters. Let's sew. We trim the bottom of the clothing with decorative braid.
MK: how to quickly sew a fluffy dress with a ballet skirt
And here is another option for a fluffy dress for a girl. It can be sewn together in a matter of minutes, since the top part will already be ready. We will take a blouse of the appropriate size for her.
How to sew a dress for a girl with a ballet skirt
What you will need:
- Blouse (can be a T-shirt),
- 50 cm of knitted material for the petticoat,
- 1 m tulle,
- elastic band.
dress for girls with ballet skirt
Step 1. Cut off the excess part of the sweater so that it ends at the girl’s waist.
Step 2. Sew on a wide elastic band.
Step 3. Cut two trapezoidal pieces from knitted fabric. To do this, attach the fabric to the cut of the blouse and, starting from the waist, draw two oblique lines. Cut out the resulting A-shaped pieces and sew along the sides.
Building models using a basic pattern
With a basic pattern on hand, you can create many types of beautiful clothes that children will enjoy wearing. You will also need a drawing for the sleeve - the base is usually built using a single-seam piece. To make a dress from cotton fabric with darts and a hidden zipper, you will need to add 2 cm to the half-circumference of the chest. This way the finished item will fit tightly to the body and not restrict movement.
Progress
- Shorten the shoulder by 1 cm and re-draw the armhole line along the front and back.
- Set aside 15 mm on the sides and waist and fit the product - draw new outlines.
- Make darts - from the center of the waist along the back and front, set aside 7 mm.
- Draw two darts (on the front and back) 10 cm long and 1.5 cm deep.
- Measure the desired length of the skirt from the waist down.
- Separately re-cut the neck facing (width - 3 mm).
- Based on a single-seam sleeve, model a narrowing at the bottom, a dart about 50 mm long and up to 20 mm deep.
- Shorten the sleeve to the elbow line and check the collar - its length should be equal to the length of the armhole.
Also, using the base pattern, you can sew a beautiful festive dress with decor from voluminous fabric - for example, organza. After cutting out the front and back, the skirt is modeled separately according to the basic drawing. For it you will need a flounce made of fabric that lies in voluminous folds.
Progress
- Cut out the skirt from the main fabric.
- Make “volume” increases on the drawing and outline the flounce, which will be made of organza or a similar material.
- Cut the part along the marked lines.
Using the base, you can model sundresses with straps, beach dresses with elastic bands on the chest. You can easily make sleeveless school dresses that are worn with a turtleneck or a formal shirt. It is enough to spend a little time carefully constructing the basic pattern. In the future, you will be able to sew clothes literally in the evening, without much difficulty delighting your child with new outfits.
webnode.com.ua
Master class: how to sew a dress for a girl from an adult sweatshirt
Sweatshirt dress for girls
Now let's see how to transform your sweater into a dress for a girl. To work, you only need the sweatshirt itself.
Cutting out the main details of a children's dress
First you need to rip off the sleeves. Then attach the child’s T-shirt to the jacket folded in half, tucking it in at the bottom (tuck it where the waist begins). Trace and cut out the top. On the bottom, draw areas for pockets along the top of the dress. Next, draw a straight line to the bottom. Cut out the bottom of the product.
Cut pockets from the remaining fabric. To do this, attach the sections for the pockets on the skirt to the fabric, outline, and draw the remaining part.
Sleeves and pockets
From the sleeves of the sweatshirt, cut out sleeves for a baby dress. To do this, attach the sleeve to the top of the dress and draw a curved line from the bottom. Sew in pockets.
Jacket dresses for girls - final
Sew the top and bottom. A dress for a girl from a sweatshirt is ready!
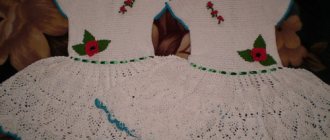
Charming dresses for a little princess to bookmarks 58
We are sewing a dress for a girl aged 6 years. In such a dress, a little fashionista will feel comfortable and at ease.
Using the pattern given below, we cut out the dress, while cutting out the collar 4 pieces. Then we sew the shoulder and side seams of the dress yoke. We sew the side seams of the skirt and after that we outline the folds of the skirt and sew the skirt to the yoke. We fold the two parts of the collar right side together and stitch along the outer contour, then turn them inside out and stitch the second part of the collar in the same way. Sew both parts of the collar to the neck. We turn up the bottom of the dress and the armhole.
We sew a dress for a girl, pattern:
An interesting style of dress for a girl that we can sew with our own hands for our little princesses for the summer. This dress can be either elegant or for every day, it all depends on the chosen fabric.
Dress pattern for girls:
A dress for a girl turns out to be super budget-friendly. It could be dad's shirt and a little lace, mom's skirt and some kind of applique, or a funny-sized piece of fabric - a remnant from her sewn dress.
Children's dress r 86-92 .
Dress Materials:
· Fabric that holds its shape (cotton, linen, gabardine, crepe, shirt fabric, etc.): with a width of 1 m – 0.8 m, with a width of 1.5 m – 0.5 m
· Zipper or button closure
· Cotton, lawn for lining – 0.6 m at any width
· Trim: lace – 2.5 m, 3 buttons
Girls, sorry for the corrections in the pattern: at first I wanted to give a more universal one (front-back clasp), and then I realized that I would only confuse those who are not yet very smart at “swimming” in this matter... But, alas, I no longer have the strength to redraw it! ))))) only the crossed out words were corrected - they are not needed, the rest is completely correct.
1. Open. Using the patterns, we cut out the parts: front – 1 part with a fold, back – 2 parts, skirt – one part with a fold.
2. Assembling and processing the top of the dress:
a. We assemble the dress along the shoulder sections, trim the allowances to a comfortable size - 1-1.5 cm, and iron them. Leave the side seams open.
b. Place the resulting piece face to face on a piece of cotton fabric that will be used as a lining.
c. We carefully smooth out the details, making sure that the front of the dress and the lining match perfectly. We chop off the parts and cut out the lining
d. In this case, basting is not necessary; you can chop the tailor’s pins like this and safely stitch along them: the machine easily passes over the pins if they are inserted clearly perpendicular to the stitch line, and the chance that the machine’s needle will hit the pin is minimal.
e. We line up the neckline and both armholes, iron them, cut off the allowances to 0.5-0.7, and if necessary, cut the allowances at the rounded areas. Please note that we sew the beginning and end of each armhole along the side seam allowance slightly obliquely - this is important.
f. Having placed the resulting part with the lining up and the front towards you, we place our hand between the dress and the lining, with the other hand we help ourselves and pull the back lining towards us through the shoulder tunnels
.
Repeat with the second half of the back. Straighten the inverted part.
g. Carefully sweep out the edge of the armholes and neckline, making sure that the 1 mm roll goes to the wrong side of the dress - then the lining will not be visible. We iron it to make sure it’s done well and stitch it along the front side of the dress.
h. We sew the side seams, not forgetting to make a reliable fastening at the armhole itself. To do this, I do this: I start stitching from the armhole to the waist line, but not from the very edge of the armhole, but stepping back 3-5 mm from the processed edge of the armhole. I sew two or three stitches, turn on the reverse and return the stitch to the very edge of the armhole, then, releasing the reverse, I sew a regular stitch. Why is this so? – the beginning of the stitching will be inside the seam, the beginning of the side seam will be secure and without any knots. We process the cuts (zigzag, overlock) and manually secure the side seam allowances at the armhole. The corners of the allowances should be below the edge of the armhole so that they do not peek out. It was for this purpose that we made slightly beveled lines along the allowances at the beginning and end of the armhole (see point 4).
3. Connection of the top of the dress and the skirt . We fold the skirt and top of the dress face to face, carefully aligning the marked pattern lines so that after sewing the middle back seam, all the lines clearly coincide. We sew down the waist seam, overcast the edges and iron the seam allowances upward. Place the lace on the waist seam line, sew along both edges if the lace is wide, and along the bottom edge at the waist if it is narrow.
We sew an elegant dress for a little girl online, part 1. Those. description and preparation
I’m sewing my very first dress for my one-year-old daughter, elegant, fluffy, like a princess’s. Based on a pattern from Diana Fashionable, special issue 2, 2011, with additions. Everyone is welcome to join!!! Sizes 1/2 - 4 years. Because I have little experience, so I would really like to hear advice from the pros on various points. Next is a description of the model. The font will be clearly visible if you save photos of the pages to your computer and print them on a regular printer. Good luck everyone!
Using this pattern you can sew a lot of different beautiful dresses, it all depends on your imagination and the availability of materials in the store.
How to make a pattern : either you download a magazine on the Internet, or I can scan my pattern on A4 for a year, but I don’t know how it will change after printing, although you can probably figure out what % to put in the settings so that there is one in one, or you can rip open a child’s old blouse and use it to make a pattern for the top. The bottom is a rectangle. The material consumption is indicated in the magazine, if you want to change and add to the dress, then add. calculate the material yourself. For example, for our dress I bought satin (1 m.), cotton fabric for lining (1 m.), tulle, ribbon for a belt, a flower, beads, a fly for decoration, and a zipper. If you want a full skirt, then you need a tulle petticoat. The fabric consumption is at your discretion, the more, the more magnificent. Tulle comes in widths of 1.5 and 3 meters. If it’s 3 meters, then it’s enough to take as much as the length of your skirt (measure the length from the waist to the child’s shoes, for example). For my doll it is only 35 cm . If it is 1.5 m, then you can take a double length, or a single one, and the petticoat will be less fluffy (I looked at the fabric, it’s not so fluffy, you need 3 meters!). I took some extra fabric, probably for later. the creation will remain) I propose to divide the entire process of creating a dress into 3 stages: 1. Pattern, pattern editing, selection of materials, cutting. 2. Directly sewing. 3. Decorating the dress. So, I’ll start with a description of stage 1 , what I did and how. In principle, you can just take a ready-made pattern and cut it out, but... I don’t have much experience, so I decided to first try what would happen and sew a test dress from a sheet. I also plan to make a dress with long sleeves; I took a bolero sleeve from the same model, narrowed it, reduced it on all sides, reduced the bodice armhole, and raised it by 1 cm. Like this:
After that, I cut out the details on the sheet, made 1 sleeve, not 2, to see how it would be.
I sewed a test dress. Of course, I didn’t sew everything, I didn’t finish the seams, I just stitched the shoulder seams, side seams, sewed the panels of the skirt, gathered the skirt (I learned how to do it :)), sewed the bottom and top, sewed in the sleeve, learned how to make a fit on the sleeve, everything according to the magazine.
I tried it on for a child: I consulted on the aspen, they suggested raising the sleeve and waist, I decided to try it on with a belt (the waist will be visually higher), and then think again... I sewed the second sleeve 1 cm higher into the test dress, tried it on again, and decided to change the pattern a little more on the finished dress, adjusting the armhole. But, I think, such little details in detail are of little interest to anyone, so I’ll move on to the main process . See part 2. By the way, while sewing the main dress, it turned out that there was no need to raise the waist, maybe because the 2 layers in the dress and the fabric are different, “worth " differently. Girls, please post your news in the comments, has anyone started work? I will edit this post, and not write in the comments, how and what I am doing, when there is time Questions - in the comments, and I will answer mainly in the post itself, so that everyone can see right away.
How to sew a dress for a girl. Dress pattern for girls
Every mother wants her beloved daughter to be the most beautiful and look like a princess. Any image can be brought to life thanks to a dress. But sometimes children's clothing costs much more than adult clothing. Therefore, the most profitable solution would be to sew a dress with your own hands.
This will, of course, take more time than shopping, but it will save a lot of money, and mom will be much more pleased if the dress she made becomes her daughter’s favorite. You can create absolutely anything at your discretion. In the article, anyone will find interesting information on how to sew the most common types of outfits; each dress pattern is also described in detail. It will be a good example for a girl to see her mother doing needlework. And if the child is six years old and above, then he will be happy to help you.
A simple pattern for a simple dress for a girl
If you decide to start sewing for the first time, you should start with the simplest things. The version of the dress, or even a sundress, proposed below, was created specifically for beginners, and you can show your imagination by choosing an interesting fabric or decorating the product with homemade bows or flowers. This dress is made of two main parts - front and back.
The dress should be loose and light so that the child can walk comfortably in it. Therefore, the main measurement will be the volume of the hips, but you can add some extra if you want to make the dress looser.
However, if you do not have large supplies of fabric, then take only as much as you need.
As mentioned above, the sundress consists of two parts, for each of them you need to take half measurements. When drawing a pattern, you should note the length of the armhole. It should be approximately 9-12 cm. It all depends on the child’s height and his physique. The dress pattern for the girl is ready, the main thing is to take the measurements correctly. After you have drawn the pattern, transfer it to the fabric, not forgetting about the allowances on all cuts. All that remains is to cut and stitch.
Ready-made sundress dress pattern for schoolgirls
If a girl prefers to change her looks at school, and at the same time remain in a classic style, you can sew a sundress. You can wear different blouses and turtlenecks under it. Thus changing the “mood”. This model will be easy to sew. The sundress can be complemented with interchangeable accessories or fluffy blouses with a variety of sleeves.
School sundress option
It is recommended to choose jacket fabrics that will keep their shape. If the material is thin, it could be a suit. Linen and cotton will do. Or a mixed composition.
What parts are needed:
- back - 2 pieces;
- shelf - 1 piece with a fold;
- side of the shelf and back - 2 pieces each;
- skirt - 2 sides;
- facing of the front and back - 1 and 2 parts.
A simple dress for a girl.
The process of creating a school sundress for a teenager:
- Iron the non-woven fabric.
- Connect the back of the central parts with a middle seam.
- Before sewing from the central and side parts. Use raised seams.
- Overlock the cuts.
- With right sides facing in, sew the side and center back pieces. Process with overlock.
- Pin the facings to the desired places on the front and back.
- Make close seam allowances. Notch at the corners.
- Iron the edges of the facings on the wrong side.
- Stitch the shoulder sections. It is recommended to sew the edges without a machine.
- Topstitch the neckline front and back. Sew the details.
- Sew a hidden clasp along the left slits.
You may be interested in this: The procedure for taking measurements from a woman for sewing a dress
Advice! If you need a fluffy sundress, you need to gather it at the beginning of the skirt. But the suit will still make it heavy.
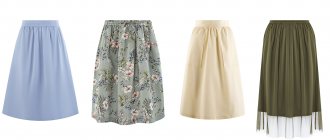
Easy pattern for a sundress dress
Depending on what class the girl goes to, you can make an individual length. And also experiment with color. The skirt is made in a different shade to highlight the waist. Or they completely separate the top and bottom with colors. If you take a thicker fabric, the outfit will be suitable for the cold month of autumn.
The first option can be sewn in a classic and simple version. And next time add a sundress with a bow, belt, and pockets. Then you should choose a simple blouse or a white turtleneck.
A sundress dress in a classic style will allow you to change your school outfits. Changing the blouse or turtleneck completely changes the look. You can sew it from suit fabric. For blouses, make a simple option. And for turtlenecks, add accessories.
Classic shape
Simple patterns from a T-shirt
To do this, you will need an unnecessary T-shirt or tank top that is the right size for the girl. The T-shirt should not be ripped open, but simply cut along the seams, starting with the sleeves, and then along the shoulder and side seams.
If your intended dress is without sleeves, then cut them off and leave two halves (front and back) without them. If you want a dress with sleeves, then leave the halves as they are.
It remains a difficult task to take measurements of the child:
- To start, measure from your shoulder to your waist, this will be the length of your top.
- Next - from the waist to the expected length of the outfit. To make it easier to measure, loosely tie a rope around the girl’s waist.
- The measurements should be taken to the front of the T-shirt. Draw a new line using a slightly convex line. Keeping the seam allowance in mind, cut along it.
- Place the part you just cut to the back of the T-shirt and draw the bottom cut with chalk. Also cut along the new line.
There is no need to make patterns for the skirt.
Now the dress pattern for the girl for the holiday is ready.
Dress pattern with a collar for a girl
The pattern of a dress with a collar for a 1-year-old girl is complicated by small details that require a lot of attention. Be sure to carefully choose a fabric that will not be harmful to the baby's delicate skin. There are many color options. You can sew a dress for everyday wear or for the baby's first holidays.
You might be interested in: Making a pattern and sewing booties for a small child with your own hands
What parts to sew the model and collar from:
- shelf with a bend - 1 pc.;
- back with a bend - 1 pc.;
- sleeve - 2 pcs.;
- collar - 2 pcs.;
- yoke - 2 pcs.
Delicate dress for a 1 year old girl
Step by step process:
- Attach interlining to the yokes. Sew edges. Stitch the hem to the wrong side.
- Fasten the yokes. Fix or sweep.
- Fix the fold on the shelf.
- Sew the yokes to the shelf.
- Make a collar and stitch. Measure carefully so that it is not asymmetrical.
- Place the collar on the front side. Sew. Sew off the neckline.
- Sew the sleeves into the armholes. Finish the edges.
- Make loops and buttons.
Bright dress with polka dots
The master should choose the fabric taking into account the age of the child. At 1 year of age, there is a high probability of an allergic reaction. Therefore, when purchasing fabric for a bright new outfit, you need to look at the composition.
Important! Different collars create great looks.
Sewing a dress for a 1 year old girl is difficult because of the small details. The collar can be a problem, but it looks good on a small outfit. Depending on its shape, a different style is created. It is recommended to choose natural, delicate fabrics that will not harm the child.
Pattern example
Sewing a dress
- We start by processing the cut for the fastener. It needs to be sewn up with edging tape or a double strip.
- Afterwards you will need to stitch and overcast the shoulder sections. Don't forget to iron them to the front.
- Next we go in order, we need to edge the armhole sections.
- Let's move on to the skirt. Connect the 2 strips made from different fabrics, stitch, overcast and, of course, iron them.
- Afterwards, one of the sections of the future skirt should be stitched, both from the first fabric and from the second.
- Having previously made it on the machine so that the top thread loops, we begin to connect your two skirts. Turn the already closed strips right side out. Place one closed side into the other. Sections that remain unprocessed should be pinned together. Stitch them.
- The matter remains small. You need to pull the loose ends of the threads together. The assemblies should be distributed equally. Remember that the length of the cut of the skirt should be equal to the length of the cut of the top of the dress.
- Finally, you need to connect the top to the skirt. The skirt should be on the wrong side, and the top of the dress should be on the front. When joining, the top should be slightly inside the skirt. The upper part can be decorated with lace.
- Process the belt and attach a flower to it.
Now the dress for the New Year is ready.
We sew a fluffy evening dress
Finally, all that remains is to make a dress, which, when tried on, the girl will be delighted with for a long time. It should be remembered that, as elsewhere, the pattern of a ball gown for a girl is the main component in sewing an outfit. If you do it right, and even choose beautiful fabrics, the baby will feel like just a princess. What girl doesn’t dream of visiting a fairy tale?
The most difficult task is to choose the style, fabric and color of the future dress. When choosing a material, you need to pay attention to the fact that the fabric does not prick, but is soft and pleasant to the touch. If you are going to sew an outfit for a school-age girl, then beads and rhinestones are appropriate, and if the child is still very small, then you should not sew on any decorations smaller than a bow or a flower, as he can tear them off and start tasting them.
After the final choice of color and style, we begin to sew directly. When sewing this dress, as in the case of the previous one, you can make your work much easier by making sure that the pattern for a girl’s ball gown is made from her own T-shirt. Thus, the top will be almost ready.
Classic style jacket pattern
Sewing a jacket is more difficult than sewing a dress. But if you have experience, it's worth a try. It will be a great addition to a classic dress. The cage looks strict and at the same time stylish. It has become a classic and always remains relevant. The size is calculated individually.
You might be interested in How to create a pattern for men's pants step by step
The size of the jacket may vary. But you will need a piece of checkered fabric 1.5 meters wide and at least 2 m high. The collar will look appropriate if made of velvet. If the master does not have a powerful sewing machine, you can take light fabric options and also not use velvet. Any girl or girl will be happy to wear a classic jacket.
Jacket pattern option
What details are needed to create a jacket for a girl in a classic style:
- folded back;
- back side - 2 pieces;
- side part of the shelf - 2 pieces;
- shelf - 2 pieces;
- 2 sleeves;
- 2 folded collars in velvet or lighter fabric;
- 2 bows made of the same fabric as the collar.
Simple pattern
Description of the work sequence:
- Measure the parameters of the girl who will wear the jacket. Write everything down and calculate the space for the seams.
- Draw or print the finished pattern according to your measurements.
- Cut out all the details.
- Reinforce the lining, collar, back and sleeves with adhesive lining.
- Sew seams. Iron.
- Sew the collar into the neckline.
- Iron all seams. Baste and connect.
The jacket itself is easy to create. Problems may arise when working with the fabric. It must be chosen carefully. There are requirements for materials that are used for sewing school clothes. It must be breathable. This is a basic hygiene requirement. Hygroscopicity must be at least 10%. This indicator can be found in natural fabrics. There should be no electrification at all. It is important to pay attention to dyes. They must be safe. But you should not choose fabric only with a natural composition. Synthetics are responsible for a neat appearance. It also helps maintain the shape of your clothes.
Important! The hem allowance for the bottom is sewn with hidden stitches.
Simple but stylish jacket
A jacket is a great addition to a dress, as well as a blouse and skirt. A stylish look will come out when using checkered fabric. A velvet collar will complement the picture. Details made of the same material will make the idea unified. It is recommended to carefully select the fabric for sewing children's clothing.
Jacket option
Simple full skirt
In fact, the pattern of a fluffy dress for a girl is no more difficult than a regular one. The main question is how to sew a full skirt. In fact, everything is very simple. It is enough to cut out a rectangle four times the width of the girl’s hips. Adjust the length of the product at your discretion. And for the belt, you need to cut a strip from the fabric a meter wide, longer than the girl’s waist circumference, and about 10 cm long. The optimal length of the product is the one that reaches the middle of the shin. This way the girl will look festive, and at the same time nothing will bother her at the hem. The outfit must be tried on at any stage, even at the stage of patterning children's dresses. It will be difficult for girls to stand patiently every time mom needs to take measurements. Therefore, you can turn on her favorite cartoon and continue to work calmly.
Possible failures
Don't be upset if you didn't succeed in sewing the dress the first time. It is extremely difficult to make patterns for a girl, especially taking measurements. But if you continue to work and don’t focus on failures, then eventually you and your beauty will get the dress of your dreams. The main thing is to remember that patterning an elegant dress for a girl takes time and effort. Usually, if you rush too much, the product turns out sloppy and careless.
Do not think that the dress you sew will not be useful anywhere else. Even if your child never wears it again, it will be a great template for making other outfits. Using this example, it will be much easier to sew a new product in the future, especially since you already have experience. And your daughter will only be happy with a new beautiful dress.
Remember the main thing
I would like to remind you that you are sewing the outfit for your girl, and not for yourself. Therefore, do not forget to listen to the wishes of the child, whatever they may be. After all, it is he who wears the dress, not you. And if the girl doesn’t like it, then her mood will be spoiled, and your efforts will be in vain.
In conclusion, I would like to say: do not be afraid to experiment and try something new. Patterning an elegant dress for a girl is not as difficult a job as it seems. The main thing is to adhere to accurate measurements and know how to use a sewing machine. For the rest, rely only on your imagination.
Sources:
https://www.da-ma.ru/vykrojka-pyshnogo-platya-dlya-devochki-plate-na-prazdnik.html/ https://delaemrukami.boltai.com/topics/ocharovatelnye-platitsa-dlya-malenkoj- printsessy/ https://www.syl.ru/article/170493/new_kak-sshit-plate-dlya-devochki-vyikroyka-platya-dlya-devochki