Beautiful, fashionable crochet hat for spring for girls: diagram and description
It is mistakenly believed that knitting a hat is as easy as shelling pears. After all, for this you need to have perseverance and know at least a minimum of the basics of knitting. However, if you have these qualities, you will be able to knit a hat.
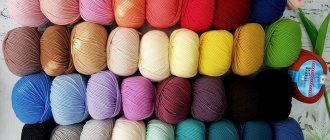
First of all, you need to choose a yarn that is suitable for a product such as a children's hat.
A children's knitted hat must meet the following criteria :
- It should be comfortable, that is, not slipping, not puffing up, not pressing. Yarn plays an important role in this matter.
- The child's head should not sweat. Therefore, the yarn must be natural.
- The hat should not be prickly. Wool is not the most suitable option in this regard, although wool is a natural and warm yarn. You can't do without synthetic additives. In addition, synthetic fibers help maintain the elasticity of the product.
- The hat should be appropriate for the season. Remember, cotton is a summer yarn, wool, wool blend is a winter yarn.
How to choose yarn for a children's hat
Important: To knit a high-quality, seasonally appropriate hat, pay special attention to the choice of yarn.
types of yarn are suitable for spring :
- Cotton with acrylic
- Merino wool (it is not itchy) for early spring
- Acrylic (yarn is easy to care for, soft, but not natural)
- Alpaca and microfiber
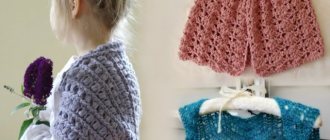
Many mothers want their child to be dressed not just warmly and comfortably, but also fashionably. In a crimson hat with ears, the girl will look stylish, and paired with a coat, your girl’s image will be bright, fashionable and original.
Fashionable spring hat for girls
The hat is knitted from the crown. Choose the right yarn. For this hat, not too thin yarn is suitable (75% acrylic, 25% wool will be just right).
Knitting description:
- Cast on a chain of 6 air loops and close it into a ring.
- In the second row, knit 12 double crochets.
- In each subsequent row, increase the number of double crochets.
- Tie a circle using an enlarged method that will correspond to the diameter of the child’s head.
- Then, until the end of knitting the hat, knit with another pattern: seven double crochets in one loop, count five loops, from the base of the sixth loop, knit seven double crochets again.
- Connect the bundle of posts with a connecting loop. In each row, the columns are arranged in a checkerboard pattern.
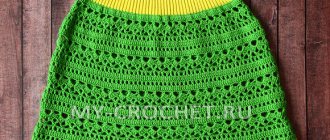
Pink hat for a girl: knitting pattern
When the main part of the hat is ready, knit the ears with double crochets according to the following pattern:
Pink hat for girls: ear knitting pattern
Distribute the remaining yarn evenly over the ears of the hat and tie the braids. At the bottom of the braids you can make small pompoms.
Below are some ideas for crocheting spring hats for girls.
Spring owl cap
Crochet hat for girls
Children's hat for late spring
Preparing for work
If you know how to knit more or less, and also have patience and perseverance, then crocheting a hat for a girl will not be difficult .
Do not forget that the child should be comfortable in his headdress - it should not squeeze his head or, on the contrary, be too loose and fall off. Therefore, when starting to knit a hat for a girl for the fall, measure the circumference of the child’s head and the height (or in other words, the depth of the hat) from the earlobe to the top of the head.
Yarn selection
Your next step will be to choose the yarn from which you are going to knit. Remember: synthetic additives allow knitted items to keep their shape longer. That is why it is important to decide on the time of year when the child will wear a hat.
If you are planning to crochet an autumn hat for a girl, then the following types of yarn are suitable for it:
- cotton with silk added (ideal for warm autumn);
- linen with the addition of viscose (also intended for warm autumn, so that the child does not feel hot);
- a mixture of cotton and acrylic (allows the head to “breathe”);
- acrylic (it is better to choose a special hypoallergenic children's one);
- a mixture of acrylic and wool (for cold autumn);
- acrylic with the addition of lurex will make the hat shiny and even more beautiful;
- melange yarn with beautiful tints of color will make the model unique and original.
For a winter hat, it is better to take half-woolen yarn, since pure wool will be prickly on children’s delicate skin. But in any case, it is necessary to give preference to natural materials in order to avoid unwanted allergies or overheating of the child.
Required Tools
So let's continue:
- The yarn has been selected.
- Select a hook that matches the thickness of the thread.
- Having chosen the model you like or come up with your own, we select accessories (beads, buttons, appliques, pom-poms, flowers, leaves).
- You will also need a needle and a sewing kit of colored threads.
Having prepared everything you need, you can safely start knitting.
Beautiful crochet hat for autumn for a girl: diagram and description
Important: For autumn hats, you should take warmer yarn. It is desirable that the composition contains wool. You can make a lining for the hat, but if the yarn is dense and warm, you can do without the lining.
A hat with a flower will warm the baby in the cool autumn and delight with its bright colors.
Autumn hat for a girl
To knit this hat you will need two colors of yarn. The yarn can be half wool and half acrylic. You can take another composition, for example, 75% wool, 25% acrylic. You will need a 3.5 mm hook.
- Like most crochet hats, this one needs to be crocheted from the top of the head.
- Make a ring of air loops.
- In the next row, double the number of stitches by working a row of double crochets.
- In the third row, double crochets alternate with embossed stitches.
- In the fourth row, knit 2 double crochets, 1 raised crochet.
- In the fifth row between the double crochets and the double crochet, add 1 chain stitch.
- In the sixth row in each segment we increase by 1 double crochet and 1 chain stitch.
- On the seventh row, make 1 more double crochet in each segment.
- Increase the number of columns in each row until you get a diameter equal to the child's head.
- When you have knitted the desired diameter, continue knitting without adding stitches.
Knitting pattern for an autumn hat
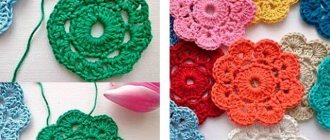
After you have finished knitting the main part of the hat, knit a flower from two colors of yarn according to the pattern.
Knitting pattern for a flower for a hat
Also tie the ears with single crochets. In each row, decrease a stitch on each side. Tie the edge of the finished product with yarn of a different color. Make a pompom of any size.
Autumn hats can be completely different in appearance and composition.
Crochet baby hat
Autumn hat for a girl
Hat with ears and visor for girls
Two models for girls
It's no secret that hand-knitted items are always highly valued. Have you ever wondered how much materials, tools, and all kinds of accessories for jewelry cost? Just for fun, go to a craft store. All questions will disappear by themselves.
To avoid spending money on exclusive handmade products, try making your favorite models yourself. And then a crocheted warm hat for a girl will be the most stylish and fashionable, and most importantly, original and unique.
Hat with ear flaps
This model is easy to implement and will not take you much time.
So, to get a comfortable and beautiful hat for winter, take yarn of two colors. For example, Alize RAINBOW (color 1304) and Alize LANAGOLD (color 56) - one skein will be enough, as well as a hook number 4 or 5, depending on how tightly you knit, and 2 large buttons.
Diagram 9 will help you knit the bottom of the hat (when knitting, be guided by the size of the child’s head). Having reached the required diameter, continue knitting in the round without increasing the depth of the headdress. The ear of the earflap hat is knitted according to pattern 10 to the desired length. Knit the frontal part separately, again focusing on the size of the finished product.
Having collected all the parts of the hat, take red yarn and tie the edges with one row of single crochets, thereby “sewing” the frontal part to the front of the hat. Tie two chains of air loops in red: you will get ties. Now you need to sew on the buttons, and the girl’s winter hat is ready.
The pattern for the bottom will help you knit other equally cute hats for fashionistas and fashionistas; you just need to change the color, yarn and appearance of the product, creating new unique models. Even a fully grown girl will not refuse to try on this cute headdress.
Openwork beret for warm autumn
Since the climate in autumn is extremely changeable, a few autumn hats would be useful for every little fashionista. For example, early autumn often pampers with good weather, so it would be inappropriate to soar a child in a warm hat: this particular model will be useful for you.
For knitting you will need one skein of any white yarn, for example:
- Alize COTTON BABY;
- YarnArt JEANS;
- Pekhorka CHILDREN'S NEW.
As well as hook number 2 or 3 and one large button.
To knit this wonderful hat, you need to follow pattern 1, casting and knitting the required number of loops and stitches, focusing on the size of the child’s head.
The flower is knitted according to this pattern:
At the end, the headdress is tied with six rows of single crochets and one row of “crawfish step”. Having knitted the hat and the flower, you can begin assembling the product. Mark where the flower will be located and sew it on using the button of your choice.
You can modify the crochet knitted autumn hat models to your liking. For decoration, use bright flowers and leaves, beads and beads, in a word, everything that your fantasy and imagination suggest.
Warm winter crochet hat for girls: diagram and description
A winter hat must be warm. To do this, you need to make a lining - from fleece, from merino wool, from brushed knitwear.
Important: Most often, fleece is used as a lining for a hat. This fabric is very warm and does not allow cold air to pass through. But it’s worth saying that fleece is still synthetic. If you want a natural lining, knit it from merino wool or sew it from several layers of knitwear.
A winter hat will be very warm if knitted from wool. Many adults, and children in particular, do not like woolen products because they are itchy. You can use merino wool, which is not itchy.
Pink hat with flower
For knitting you will need: hook 3.5; pink and white yarn.
The lining can be knitted or made from fleece. There is a knitted lining here.
Warm winter hat for girls
Children's winter hat: diagram
Knitting begins from the top of the head. The diameter of the circle is increased by adding double crochets. In the third row, lush columns are added, which give the hat a beautiful look.
Children's winter hat: step-by-step knitting
At the same time, knit the lining with double crochets according to the same dimensional grid as in the main hat. When the hat fits the child's head, tie the ears according to the pattern.
Children's winter hat: step-by-step knitting
Then start decorating the flower:
- Knit the first row of the flower with double crochets (through the loops of the 1st and 3rd rows of the hat).
- The second row is knitted like this: turn the knitting and make 2 double crochets in each double crochet.
- Subsequent rows are knitted similarly to the second. Tie the last row with white thread.
- The volume of the flower depends on your desire.
Children's winter hat: step-by-step knitting
Below are ideas for crocheted winter hats for girls.
Crochet winter hat for girls
Warm children's hat
Hat for girls
Summer hats: crochet patterns for children and adults
View > Home / Hats, scarves, Knitting for children, Hats, Panama hats, Knitting for women, Filet knitting, Panama hats for children, Beret patterns, Panama hat patterns, For summer, Hat patterns
05 Oct 2021 Category: Hats, scarves, Knitting for children, Hats, Panama hats, Knitting for women, Filet knitting, Panama hats for children, Beret patterns, Panama hat patterns, For summer, Hat patterns
your feedback
In summer, everyone needs a hat - both children and adults. A light openwork hat will not only protect your head from the merciless rays of the sun on a hot day, but will also add an elegant zest to the summer look of a girl, girl, woman! An original hat, crocheted by your beloved mother or grandmother, will also appeal to mischievous little boys who prefer to spend most of the day outside.
We agree that today a summer headdress can be easily purchased in a store, however, hand-made items are famous not only for their exclusive design, but also for their ideal fit, because they are knitted according to precise head circumference measurements.
Knitting summer hats is the stage of getting acquainted with crochet that is best suited for beginning knitters. As a rule, the process of crocheting them is quite simple, so we recommend that all beginners practice crocheting on hats.
We have selected for you a large collection of patterns and detailed descriptions for knitting current models of children's and women's hats. Let's not languish, let's move on to crochet lessons!
Designations further in the text:
- VP – air loop;
- runway – lift runway;
- RLS or art. b/n – single crochet;
- CCH or art. s/n – double crochet;
- С2Н – st. with 2 yarn overs;
- С3Н – st. with 3 yarn overs;
- PS – half-column;
- PR – previous row;
- SS – connection column.
Summer openwork hat for your beloved daughter
Little girls are great fashionistas, which means that any little girl will appreciate a stylish patterned hat with bright decor. Children's hats for girls can be knitted in the form of a stocking (this model fits well on any head), a light beret, a loose Panama hat, and even a spectacular hat with a hard brim. For your daughter, you can knit any kind of headdress for the summer, it all depends on the creative imagination and desire of the needlewoman.
The only thing is that when preparing to knit a baby hat, you need to carefully choose the yarn - it is desirable that it be 100% natural (cotton), it is better to avoid synthetics in the composition. Only natural yarn will provide high-quality natural air exchange and also protect against the harmful effects of ultraviolet rays.
Also, before starting knitting, it is necessary to accurately determine the size of the future product. To do this, measure the circumference of the child’s head and add 1 cm of allowance, divide the result by 3.14 - we get the desired diameter of the “bottom” of the cap. Professional craftswomen try to knit the last four rows of the “bottom”, alternating additions, so that the hat will fit perfectly on the child’s head.
So, let's start knitting our first model - a tight-fitting beige hat with a simple floral motif. This baby hat is very easy to knit; even a beginner in knitting can easily master it. For a hat for a one or two year old child, you will need only 35 grams of cotton yarn (you can use “Iris”), as well as a hook No. 1.5-2.
Hat pattern:
Step-by-step knitting instructions
Using beige yarn we make a chain of 10 VPs and close the SS into a ring.
Row No. 1: 5 VP (4 VP + 1 VP), then knit 20 repeats 1 C2H in a ring + 1 VP. SS.
Row No. 2: 6 VP (4 VP + 2 VP), continue knitting with rapports (20 r.): 1 C2H in the next. С2Н PR from the hook + 1 VP. SS.
Row No. 3: 5 VP (3 VP + 2 VP), 1 Dc in the arch of 2 VP PR, 1 VP, then again we knit 20 repeating combinations: 1 Dc in the next. arch of 2 VP PR + 2 VP + 1 SSN in the same arch + 1 VP. SS.
Rows No. 4-13 are knitted in circular rows according to the pattern shown above. We finish the rows with SS. Cut off the beige thread.
Rows No. 14-15: we knit floral motifs with white thread according to the pattern, ending with a SS. We cut off the thread.
Rows No. 16-18: continue knitting in columns with beige yarn according to the pattern. SS. When the hat is ready, decorate the centers of the flowers as desired - with rhinestones, pearl beads or other suitable decorative elements.
Hip rainbow cap for a naughty boy
Not only girls enjoy stylish hats, boys are also not averse to taking a walk under the scorching sun in a stylish panama hat or cap. We suggest you try knitting a bright cap with a visor for your son, especially since it is absolutely simple to make. For the cap you will need the remains of multi-colored cotton yarn, as well as hook No. 2. The model is knitted with strips of single crochets, the pattern looks like this:
Step-by-step execution
Using a yellow thread, we collect a base of 3 VPs and close it into a ring using a SS.
Row No. 1: 1 runway, 5 sc in the ring. SS.
Row No. 2: 1 RLS, 1 RLS in the first RLS, then knit with rapports (12 rows): 2 RLS in one loop in the first RLS from the hook. SS.
Rows No. 3-4: knit sc in the round, in each row we evenly add 6 sc. SS. Change the color of the thread.
Rows No. 5-8: with red thread we knit rows in a circle with sc, in each row we evenly add 6 sc. SS. Change the color of the thread.
Rows No. 9-11: with beige thread we knit rows in a circle with sc, in each row we evenly add 6 sc. SS. Change the color of the thread.
Rows No. 12-15: using blue thread we knit rows in a circle with sc, in each row we evenly add 6 sc. SS. Change the color of the thread.
Rows Nos. 16-18: using a dark green thread, we knit in the circle, sc, but without any additions. SS. Change the color of the thread.
Rows No. 19-22: using a mint-colored thread we knit RLS, without increasing. SS. Changes color.
Rows No. 23-25: using a yellow thread we knit RLS, without increasing. SS. Changes color.Rows Nos. 26-29: using red thread we knit RLS, without increasing. SS. Cut the thread.
We knit the upper part of the visor
We attach a dark orange thread to the outer part of the 29th row and knit in the forward and reverse directions according to the following pattern:
Rows No. 1-2: 1 runway, 25 sc in 25 sc PR.
Rows No. 3-7: knit RLS and gradually decrease on both sides of each row - decrease 1 RLS. SS. We hide the thread in the loops and cut it off.
the lower part of the visor from the wrong side according to the same principle as the upper part. Finally, the entire cap along the free edges, incl. and the visor - we tie it in a circle in a “crawfish step” (1 row), so the upper and lower parts will be connected into a complete visor. Our rainbow cap is ready!
Women's hats - a bright touch of a summer look
If you have already tied up your little ones, it’s time to take care of yourself – our selection of detailed instructions for knitting stylish hats for the summer is waiting for you!
Juicy stocking cap in boho style
One of the most popular is the stocking-shaped hat; this model is suitable for absolutely all representatives of the fair sex! Since the fashionable boho style is gaining more and more momentum in the fashion industry, we suggest you try to knit a bright multi-colored hat in which you will definitely not go unnoticed!
For knitting you will need cotton yarn of red, light green and sky blue colors, in total quantity - 100 grams, as well as a hook No. 5-6.
The main pattern of the cap is knitted in half-stitches (PS) in the round, each row ends with a SS, the new one starts with 1 VP.
Knitting steps
We cast on a chain of 4 VPs, close it in a circle with an SS, knit using the circular method, constantly alternating the colors of the yarn through three rows.
Row No. 1: we knit 11 PS into the ring.
Row No. 2: we knit 2 PS into each PR loop, we get 22 PS.
Row No. 3: knit with repeating combinations: 2 PS, next. loop - 2 PS, in the end we get 29 PS.
Row No. 4: knit with repeating combinations: 2 PS, next. loop - 2 PS, in the end we get 38 PS.
Row No. 5: continue to knit with rapports: 3 PS, next. loop - 2 PS, in the end we get 47 PS.
Row No. 6: knit with rapports again: 3 PS, next. loop - 2 PS, in the end we get 58 PS.
Rows No. 7-25: knit 58 PS each without any additions.
To knit the final, 26th row, turn the hat inside out and knit one row with single crochets. Our bright boho hat is ready!
Snow-white openwork beret
Despite the simplicity of knitting, such a beret wins many women’s hearts - it looks truly feminine and can be appropriate both in a youth casual look and in a romantic evening look.
To knit a beret, you need to take 35 grams of cotton thread of the “Iris” type, as well as a hook No. 1.5-2.
Beret knitting pattern:
The beret is knitted using the circular method, a pattern formed from single crochets and chain stitches. We collect a base of 5 VPs, closing the SS in a circle.
Row No. 1: 2 VP, 5 repeats: 3 VP + 1 DC in the base loop PR, 3 VP, SS.
Row No. 2: 2 VP, 1 SSN, 11 repeats: 3 VP + 2 SSN, finishing with 2 VP + SS.
Row No. 3: 2 RLS in the PR base loop, 11 repeats: 3 VP + 1 RLS, close row 2 VP + SS.
Row No. 4: 2 runways, 3 dc, 2 ch, 11 repeats: 4 dc + 2 ch, completing the sl st row.
Row No. 5: 2 runways, 4 dc, 2 ch, 11 repeating combinations: 5 dc + 2 ch. SS.
We get 12 “petals”, continue to knit, periodically adding 1 DC to each “petal” in each subsequent row. In total, knit ten more rows with such increases. Knit the next row without increasing, 13 dc in each “petal”. We knit the next seven rows with decreases - we remove 1 DC in each petal of each row. We knit the last two rows with regular single crochets. Beretik is ready!
Summer bandana hat made using the fillet technique
A bandana hat is also relevant for the summer season - thanks to the ties, you can experiment with its shape, each adding fresh notes to the image. The advantage of the sirloin pattern is not only the simplicity of knitting, but also the incredibly airy knitted fabric - the hat turns out to be translucent, allowing air to pass through and at the same time protecting from sunlight.
For a summer bandana hat you will need 150 grams of red cotton yarn, as well as a hook No. 2-2.5.
Chart of the fillet pattern for the bandana:
Progress
We knit a base of 6 VPs, close it into a ring using a SS, and knit a DC in the center of the ring. We continue knitting with a fillet net (DC + VP), knitting in a circular manner, evenly adding DC on the sides of each row. As soon as the circle reaches a diameter of 12 cm, we proceed to knitting the flat part of the hat: on both sides on the left and right we cast on a chain of 150 VPs, we knit the ties using the fillet technique, we knit the flat part of the bandana with a floral pattern according to the pattern provided above. The bandana hat is ready!
Models of summer hats that are relevant this season
Video tutorials on crocheting summer hats
We also recommend:
- Calculation of the amount of yarn - table for calculations
- Knitting trends 2021: patterns, materials and new things
Like? Press!
Tags:
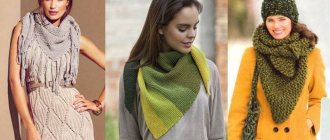
Fashionable crochet hat and scarf for girls: diagram
The hat looks good when paired with a scarf. Crocheting a simple scarf is not difficult; it basically consists of double crochets. You can add flowers or beads as decoration.
Hat and scarf set for girls
Knitting description
Crochet hat and scarf: knitting description
Crochet hat and scarf: description continued
Scarf color scheme
Crochet hat and scarf: color scheme on the scarf
Other kit options.
Beautiful set for a girl: hat and scarf
Crochet hat and scarf for girls
Crochet hat and scarf
Fashionable, beautiful crochet hat and snood for girls: description and diagram
Snood is one of the most popular types of scarves recently. The snood can be worn either as a scarf or as a headscarf. The snood is long and voluminous.
Hat and snood for girls
This hat and snood are knitted in lush stitches.
Description of the header:
- Start knitting the hat from the top. Cast on a chain of air loops and close it.
- Knit the first row with double crochets.
- The following rows are knitted in puff stitches with puff stitches added to each segment.
- Addition is done until the desired diameter is reached.
Pattern for knitting a hat with lush columns
Finish the hat with a relief elastic band.
Knitting pattern for ribbed elastic
Snood is also knitted in lush columns using a single piece of fabric according to the pattern.
Snood knitting pattern
Another option for a stylish set. The hats are knitted with single crochets, and the snood with double crochets.
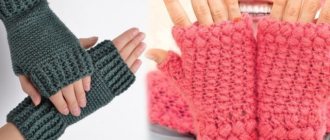
Crochet hat, snood and mittens
Deciding on the model
There are not so many fundamentally different models of hats. There are approximately 5, on the basis of which you can design and fantasize.
Classics of the genre
For a round hat, we start knitting from the top by knitting a flat circle with uniform increases.
Related article: Money gifts for a birthday or wedding anniversary with photos
We knit to the required diameter, then we make increases through the row until we reach the required volume of the head and we knit in a straight crown to the required depth.
Cute cap
We also start knitting with a flat bottom, but increases are made less frequently to form a cap.
Kubanka and beret
The so-called kubanka hat is knitted in the same way from the top, but after the flat bottom they immediately begin to knit the crown, without a smooth transition. The beret is characterized by a large bottom and smooth decreases at the crown. Also, at the end, the beret is tied with an elastic band.
Cap
The cap usually consists of two parts, a flat circle at the back of the head and a crown, which is knitted from the back of the head to the face. The cap, trimmed with ruffles, flowers and brooches, looks original.
To make an autumn or winter hat for a girl, it is better to choose models with closed ears. Bonnets are perfect for babies, and caps or classic hats for older girls.
You can watch the video below to learn how to crochet a hat for the winter:
To make the hat warm, you can put it on a fleece lining or knit a balaclava from cotton threads. Berets and kubankas are perfect for spring and summer. Moreover, you can knit openwork models that will become original Panama hats.
Video about knitting a weightless Panama hat below:
Crochet Mickey Mouse hat for girls: pattern
You can often see little girls wearing Mickey Mouse hats.
Crochet Mickey Mouse hat: option 1
Crochet Mickey Mouse hat: option 2
Mickey Mouse hat for girls
You can knit a similar hat according to the following pattern.
Mickey Mouse hat knitting pattern
Beautiful crochet helmet hat for a girl: diagram
The helmet hat is very comfortable. It reliably covers the ears and neck from the wind.
Helmet hat: measurements
Children's hat and helmet: description of knitting
A milky-colored helmet hat is suitable for both girls and boys.
Crochet children's hat and helmet
Yarn and decorations
So, we have decided on the size and model, now we need to select the yarn. For winter, it is better to choose wool yarn with a small addition of acrylic or other synthetic thread. You can knit in one or more threads; the more folds, the warmer the product will be. For summer openwork berets, Panama hats and hats, it is better to choose thin cotton or silk.
When the base of the hat is ready, the most interesting time comes for imagination and creativity. Our work needs to be decorated. You can decorate with anything, it can be brooches, buttons, beads and seed beads, rhinestones and sequins.
Related article: Felting wool slippers for beginners with photos and videos
Or you can go further and knit the decoration yourself. All kinds of flowers have been and remain the most popular in decorating hats for girls.
Crochet cat hat with ears for girls: diagram
Hats with cat ears and faces are also often worn by children and young people. There are different styles of these hats.
Blue Riding Hood with Kitty
Hat with cat ears
Hat with a cat face for a girl
Pink cat hat
The cat hat is knitted according to the following pattern.
Knitting pattern for a hat
Ears and eyes are knitted separately.
Knitting pattern for muzzle to hat
Part size in centimeters
Double warm hat with ears: video master class
Crochet bunny hat for girls
We will need:
- yarn (50% wool, 30% acrylic, 20% mohair, 100 grams per 256 meters) – 1 skein of white color. and half soft pink;
- cr. No. 4.
Size: 9 months – 1.5 years.
Description
Girls hat
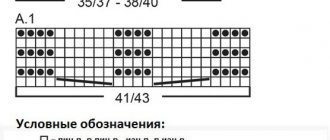
We dial 3 v. p. in a circle, main color, knitting. in a circle, we always end with a connective. s.. The rest is according to the diagram below. 1 p.: 12 s. s n.. 2 r.: 2 v. p., 2 p. s n. in each With. = 24 s.. 3 r.: 2 v. p., *s. s n. in the next s., 2 s. s n. in the next s., from * = 36 s.. 4 rubles: 2 c. p., *(s. with n. in next p.) x 2, 2 s. s n. in the next p., from * = 48 s.. 5 r.: 2 c. p., *(s. with n. in next s.) x 7, 2 s. s n. in the next n., from * = 54 s.. 6 r.: 2 v. p., s. s n. in each p. = 54 s.. 7-12 pp.: 2 v. p., s. s n. in each p. = 54 s.. 13 r.: s. without n. = 54 s..
Ears
We make 4 pieces: 2 main colors. and 2 additional color.. We dial 37 p.. 1 p.: 2 s. without n. in the 2nd paragraph from the cr., p. without n. in the next p., (p/s with n. in next p.) x 4, (s. with n. in next p.) x 4, (s. with two n.) x 16, (s. with n. . in next p.) x 4, (p/s with n. in next p.) x 5, p. without n. in the 2nd p., turn. 2 p.: 1 v. p., s. without n. along 37 p., turn and c. in kr.: p. without n. in the next p., (p/s with n in next p.) x 4, (s. with n. in next p.) x 4, (s. with two n.) x 16, (s. with n. in next p.) x 4, (p/s with n. in next p.) x 5, p. without n. in the 2nd row, turn.. 3 rows: repeat the 2nd row.
Assembly
We connect both ears together with. without n. and sew them to the base.
Balaclava hat: diagram
The balaclava covers most of the face, leaving only the eyes open. You can knit a bright and beautiful balaclava for a girl.
Balaclava hat for girls
Children's balaclava hats
Knitting a balaclava begins at the top. The diagram is similar to the hat-helmet diagram.
Balaclava hat: diagram
When you knit according to this pattern up to the eyes, use a ruler to measure the distance that needs to be left for the neckline. Then continue knitting, leaving these rows untouched. Connect the knitting, knit to the required length.
Knitting is not just a fun hobby, but also useful. Spend your leisure time to the benefit of yourself and your loved ones.
We take measurements and calculate the size
Whatever type of headdress you choose for your baby for the summer, you need to correctly calculate the size of the Panama hat. Most hats are knitted from the bottom; you need to calculate its diameter. This is the top part of caps and hats. For knitting a beret, this value is also important.
You can take the approximate sizes from the table below, but it often happens that a three-year-old and a five-year-old child have the same size, so it’s better to start calculating the value with the participation of a model.
To calculate the radius of the bottom, measure the circumference of the baby's head.
The resulting value must be divided by the number π=3.14. The seat depth of the hat (side) is calculated by dividing the head circumference by 3. Add 1 cm to the resulting figure.
Caps and caps are made from the center in circular rows. When the diameter reaches the required value, knitting is continued in the round without increments. To make the brim of the hat, an openwork pattern is made along the edge.
To knit a beret, add 1-4 cm to the resulting diameter of the bottom. The size of the increase determines the pomp of the headdress. First, a wide circle is knitted, and then it is reduced to the circumference of the head.
Related article: Missoni pattern with knitting needles: master class with description and video