History of the headdress
The birthplace of most varieties of turban hats is Asia, North Africa, and India.
Sometimes the headdress is called a turban, although in fact it is large. Traditionally, turbans in hot countries are worn not only by women, but also by men. It protects from the scorching desert sun; with its free end you can cover your face from wind and dust. In Central Asia, only wealthy people were allowed to wear a turban. The festive version was embroidered with precious stones and decorated in every possible way.
The turban came from the East to Europe during the times of the Crusaders, who appreciated wearing such hats on their campaigns. The headdress became a fashionable attribute among noble ladies and gentlemen.
In the 20th century, turbans were worn by stars of world and Soviet cinema; new models could be found on the pages of a fashion magazine. It was then that women began to come up with various options for how to knit a turban with knitting needles or crochet stitches.
The turban became part of unique images
Today, the turban has become a stylish accessory; it helps to create an unusual image and emphasize individuality. The most popular models are those decorated with large brooches, rhinestones and beads.
What you need for work
Before you start studying turban knitting patterns, you should make sure that you have all the necessary materials and available tools for the work. You need to get:
- thread. Which? Everything depends, of course, on individual preferences, but in order for the turban to give maximum warmth in winter and look most presentable, it is recommended to use 100% yarn;
- knitting or crocheting. Their size directly depends on the thickness of the selected yarn;
- brooch for decoration. If you want your turban to look bright and attract attention, decorate it in the center with a beautiful brooch - a sensation is guaranteed. For central decoration, you can choose brooches either large, round in shape, or small, made in the form of a drop-shaped pendant.
Each item on the list is important, but the first one is fundamental, so we’ll dwell on it.
Correctly combining a hat with clothes
The turban has won the love of fashionistas with its versatility - knitted models go perfectly with fur coats, down jackets and coats.
More elegant options, embroidered with beads and stones, can be used for going out or in evening wear.
Knitted hats and headbands go well with boho-chic dresses and youth jackets.
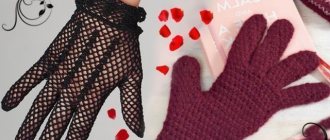
The contrasting bright color of the turban looks especially elegant when worn in a monochrome look (burgundy and total black turban) or in combination with another accessory, for example, gloves.
The only style for which a turban is not suitable is sports.
Required Tools
To make your work easier and save time, it is recommended to decide on the model in advance. There are several variations of the product, which differ in shape, volume, height, and direction of folds. When choosing a style, it is recommended to take into account your face type:
- elongated - low models with horizontal folds and all kinds of decorations are suitable;
- round – tall styles will look more appropriate;
- square - it is recommended to choose a turban with light folds and abundant drapery;
- triangular - the ideal option would be a heart-shaped turban with complex decor.
Girls with an oval face shape can wear any type of turban, with the exception of very tall ones.
Also, before work you need to find suitable diagrams. It is advisable that they are not in electronic form, but in printed form. In addition to the pattern, you will need:
- strong fishing line;
- threads matching the tone of the material;
- several pins;
- sharp scissors;
- sewing machine.
If you have minimal experience, sewing a turban with your own hands will take no more than 2 hours. At the same time, novice craftswomen are recommended to use knitwear, since the material is easily stitched and drapes well. In this case, you will not need any special skills or abilities.
Measurements and pattern preparation
Before you make a turban with your own hands, you will need to first take measurements so that it fits better on your head. Otherwise, the turban may not hold its shape well or fall over the face. Knitted, turban-towel for women and other models are sewn taking into account the measurement of head circumference and depth of the headdress.
To take measurements, use a regular tailor's meter. Then you need to make patterns according to the selected patterns. It is worth considering that the complexity of the work differs depending on which particular scheme is chosen. For the first time, simple options are recommended that involve stitching together fewer parts. The pattern of the simplest model is a rectangle.
Practical advice from needlewomen and fashionable shades
Choose thick yarn with a natural composition for the turban.
- The turban should be loose and not tight around the head.
- To make the hat seem more voluminous, choose yarn with voluminous acrylic.
- The hat should be slightly longer on the forehead than on the back of the head, so that folds can be formed later.
- For the finished product, only hand wash in warm water is suitable. You can dry the turban in a jar of a suitable size so that it does not lose its shape.
As for trendy colors, plain hats in calm shades - white, gray, peach and powder - will never go out of style.
A black turban should be complemented with some kind of decor so that it does not look too mournful.
As for bright shades, the aforementioned burgundy, emerald shade and bottle glass color will look advantageous.
The most daring fashionistas can use fuchsia and purple to make the turban the main color accent of the image.
Creating an image
Hand-knitted women's hats are at the peak of popularity. But in order for a woman’s turban to look good, it is important to take into account some of the features of its creation. In addition, knitted hats should be combined with other wardrobe items.
Texture and color
Turbans gain volume through the use of relief patterns. You can use absolutely any knitting - plaits, braids, various complex patterns and weaves. But even a simple 2x2 elastic band allows you to get an interesting product.
The winter version of the turban can be made of mohair, angora, cashmere and other types of wool. Spring and autumn models are created from acrylic, cotton, and velor threads.
The choice of colors is determined by the woman’s personal taste preferences. These can be natural shades, pastel colors or bright, rich colors. The main thing is that the finished model is in harmony with outerwear and other accessories. The girl in the turban looks like a princess from a fairy tale
What to wear with
A feminine and sophisticated turban harmonizes with short-pile fur coats and coats of various cuts. The accessory looks no less stylish in combination with a leather jacket and a short down jacket.
Thin models can be worn indoors with dresses, trousers, jackets and skirts. Don’t rule out the option of jeans and a sweater – it will look quite original.
How to decorate
A knitted turban hat is decorated in the central part, but sometimes you can find asymmetrical models. Usually, quite large and bright jewelry with pendants are used for this. You can also embroider the headdress with beads or sequins.
In some models, a large knot is tied in the center, giving the headdress a special shape. This detail can be left without additional decoration or decorations can be placed on top of it.
A turban, which is part of an evening outfit, can be decorated in a more exotic and extravagant way. Feathers and artificial flowers are often attached to designer hats
Types of turban
The second name for the turban is sultanka. In its modern form, it looks like a canvas twisted in the forehead area. Often the central part has beads, beads or gemstone decoration. Stylists have developed two types of oriental headdress especially for European fashionistas:
- wide bandages a la turban;
- classic turban hat.
Modern fashion has a habit of transforming and stylizing things from the past. A striking example of this trend is a wide headband a la turban. It is easy to make it yourself with basic knitting skills. All you need to work is:
- Measure the volume of your head.
- Select a pattern.
- Knit a sample to calculate the knitting density.
- Weave the headband with the chosen pattern to the desired length.
- Sew the edges of the fabric.
As a material, you can use yarn of any composition; to create a more insulated version, make it in two or three threads.
A turban hat is more difficult to make than a headband. It covers the top of the head, protecting against the cold. It is knitted in different patterns, creating an intricate weave in the forehead area, which distinguishes the turban from other headdresses.
Warm and beautiful
A knitted women's hat in the shape of an oriental turban is universal: such headdresses are made for winter and off-season. Crossing headbands are made for sports. Hats are not limited to patterns, they are varied in shape and design. They are suitable for beginners.
If you choose the right yarn and add decor, you will get a warm decoration in an oriental style. For narrow faces, wide overlay strips are used to assemble scarves; they are knitted crosswise, picked up from the edge loops of the bottom row. Comfortable turbans remain at the top of the list. They can be seen on catwalks and in everyday life. They are at the peak of popularity again.
Patterns
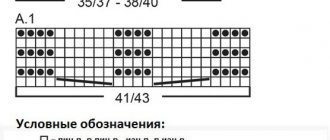
There are several standard ornaments that are used in the manufacture of the product. Depending on the pattern, it will be lush or smooth, with an abundance of details or stripes, this will determine its final appearance. Some are quite simple, while others will require attentiveness and skill to implement. Let's consider several popular options with a diagram and description.
Stockinet
The simplest option is to knit even rows with knit stitches and odd rows with purl stitches. The edges of this knit are usually rolled up, resembling cinnamon sticks.
English script
Voluminous and elegant, stretches well. The easiest way to knit it is using a template.
Pearl pattern
Aka rice knitting. It is knitted alternatingly: the first row is knit 1, purl 1, the second row is reverse, that is, where the wrong side used to be, now it’s a face.
Knitting patterns for turbans
It is very important to choose a pattern for a future turban hat, knitted with knitting needles, from the proposed patterns and descriptions. The volume and appearance of the product depend on it. For the turban, choose simple patterns that even novice needlewomen can do:
Stocking stitch is the simplest stitch to knit. To create it, it is enough to know how to knit the front loop. The canvas is created only with facial loops and turning rows. The peculiarity of stockinette knitting is that it has a front and back side.
English gum. This is an elastic band with voluminous loops, the fabric is very elastic, with a beautiful texture. It is convenient to knit it using a pattern with a description.
Relief elastic band. It is knitted like a regular 1 by 1 rib, but with a little secret. To make the process easier, you can watch a detailed master class:
French gum. It looks very impressive, the structure is corrugated and dense. You can link it correctly using the description:
It will be more convenient for novice knitters to knit a voluminous or patent elastic according to the master class:
Pearl pattern or rice knitting. A simple pattern with alternating knit and purl stitches can be made according to the diagram with the description:
How to knit a turban: a simple method from linen
The knitting is based on a simple scarf. You can use any pattern, but an elastic band (any kind) will look more successful. Moreover, it will tightly form the very shape of the product. We offer you a simple option for creating a turban from knitted fabric.
- We repeat, you can choose any pattern. For example, voluminous elastic bands will look very impressive . Alternatively, you can use the patterns below to knit the fabric.
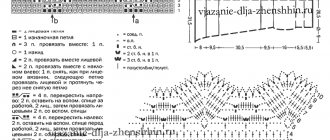
Pattern Schemes
- Next, you will need to calculate the width of the canvas, based on the report and the volume of your head. But on average, as in our example, you will need 21 loops. That is, these are 4 loops of the pattern 4 times = 16, plus 3 loops for symmetry, and 2 edge loops.
- When you have dialed the right number, then knit the first stitch! So that the outer row is even and neat. After all, if you remove it, the loop will go into two loops, so the whole look can be ruined. Then 2 persons. for symmetry and then follow the report: purl 1, knit 3. You also complete the faces. and the last purl!
You can also use a simple elastic band for thick yarn.
- After turning, make the first loop and knit 1 stitch. and follow exactly the same report. One middle loop should always match the pattern. That is, to be the front side on one side, and only the wrong side on the other. The remaining loops alternate. Complete the row of 2 faces. and 1 purl. Please note that if you are knitting on a purl loop, then you need to make a loop on the front wall, and on the front - on the back.
- Knit a strip of the required length - approximately 90 cm. But be guided by your head volume. Now you need to close the loops. To do this, close them in the same way behind the front wall with a purl loop, and behind the back wall with a front loop. And try not to tighten the loops too much.
- Wrap it as shown in the diagram and sew on the strips. First, make the seams at the back of the head, and then fasten the side holes. You need to sew along the front side, pulling the patterns together with a broach.
Knitted turban
Beautiful relief
simple relief knitting pattern
The pattern repeat should consist of a sum of loops that is a multiple of six. Without taking into account the edge ones, one more central one.
The canvas must be at least 10 cm wide.
After casting on the stitches on the knitting needles, mark the central thread of a different color.
After finishing knitting, remove the thread.
To create a high-quality product with embossed elastic, you should use some tips:
- 1st p (knit): 1 kr, *1 p remove unknitted, 1 i, 2 k*, 1 kr.
- 2nd r (purl) and all even ones: 1 cr, * remove 1 p without knitting, knit according to the pattern *, 1 cr.
- 3rd p (knit): 1 cr, *1 p removed unknitted, 1 and, 2 p crossed*, 1 cr.
- 5th row and all odd rows are knitted according to the pattern of the third.
After five centimeters of the canvas, it is necessary to make increases between reliefs.
To do this, five purl loops are knitted evenly in each row.
After adding, the side parts should have six loops, and the central parts should have eleven.
Next, knitting continues strictly according to the pattern.
Then a uniform decrease is carried out.
Close the loops and sew the product.
From the picture on the left you can understand what the raised elastic band on the turban looks like.
The pattern is especially noticeable on light-colored yarn.
How to quickly knit a turban with circular knitting needles?
This is one of the simplest and fastest options when even a beginner can create such beauty. But the first step is to specify the choice of thread.
Rollers are formed by alternating rows
- It is better to learn with thicker yarn. Also consider your region. For example, for severe frosts it is good to use Caucasian or merino yarn. By the way, a thick thread will hold the rollers well. If you are going to make a headdress made from wool or alpaca, then be prepared to create an additional lining. For the spring-autumn period it can be excluded.
- Now we determine the number of loops. If you have a thin thread, then you will need 100 loops, for thicker yarn - 80. But in order not to guess, knit a 20 by 20 square. And by this amount per 1 cm you can calculate the required set.
- Start working with purl rows! Then the first roller will have the correct turn. Knit 5 rows, but do not connect them into a ring. That is, knit a row purl, turn the product over and pass the knit stitches along the pattern.
- And now you close it in a ring. It is more convenient to work on small knitting needles. Otherwise, you will need to stretch the line each time. Start the front row at the far wall, and the second row at the front.
Color and decorations set the mood
- In general, you should end up with 7 rolls of 5 purl and knit rows. And due to this change, protrusions will form. Now in the very last row of the front section you begin to bind off the loops. In this case, they will not be visible, since the wrong row will hide with its protrusion.
- Close through 4 loops. If you have a thin thread, then after 5. Knit another 5 purl rows. And now complete the closing of the loops. It is worth connecting the third spoke and removing it from both sides at once.
- To do this, fold the product in half and remove the near, then the far loop. Now return this resulting loop to the nearest knitting needle. Thread two loops on this needle and 1 on the far needle. And repeat this until closing.
- Now you don’t cut this thread, but use it to fasten the folds in front of the turban. You can do this with a needle, simply stitching them together a little, or you can simply pull them through several times with a hook. And all that remains is to sew up that section when the work was not yet done in a circle.
- Finally, you just need to decorate with a beautiful brooch and the turban is ready!
- By the way, you can make the first rows with an elastic band 1 by 1 or 2 by 2. The headdress will not lose its sophistication from this.
Can be done with an elastic band
LiveInternetLiveInternet
A knitted headdress for the fall-winter 2016-2017, according to the latest fashion trends, should have the charm of the East. We are talking about hats made like a turban - such headdresses are not too intricate, but at the same time, they are quite voluminous thanks to the soft flowing folds and look great on the head, allowing the fashionista to create a truly spectacular and memorable image.
Note that a turban hat is not ideal for every model of coat or jacket, so if you want to introduce a turban hat into your wardrobe, think about what to combine it with to create a balanced and elegant look.
An ultra-fashionable turban hat can be worn with elegant fitted coats in a classic style, some models of parka jackets, sheepskin coats and fur coats.
This year, fashionable turbans are presented in colors such as black, sapphire, gray, and cinnamon. In order to enliven the image and make it more memorable and eye-catching, the front part of the turban hat can be decorated with a large brooch or a stylish metal buckle.
Spectacular turban hat in retro style. Let us remind you that several decades ago knitted turbans were very popular and we found for you a description of knitting one of these retro models: ma: a turban with a relief elastic band and voluminous pleats
Options for knitting women's turban-type hats: a turban with an unusual weave of knitted fabric on the front:
—
—
Crochet turban. Master class This is my (Olga Cheresh) version of the turban. Knitted to order. I will try to describe the knitting process in more detail and more clearly. The yarn I love is ALIZE COTTON GOLD. I think I will knit many more things from it)) Composition: 55% cotton, 45% acrylic. So a hat for spring or autumn. I crocheted number 3. For a head circumference of 64 -65 cm. But on my head of 59 cm it also looked good! So, we cast on 27 air loops on hook No. 3 and knit 7 turning rows with an elastic band, alternating relief and purl dcs (double crochets). Then we knit the 8th front row as follows: 3 lifting loops, 1 LRSSN (front relief double crochet), 1 IRSSN (purl relief double crochet), 1 LRSSN, * 1 VP (chain loop), 1 IRSSN, 1 VP, 1 RL SSN *. Repeat the section between the stars 9 more times. Thus, we get a total of 10 arches. We alternate the last 3 loops 1IRSSN, 1LRSSN and SSN in the VP lifting of the previous row. 9th purl row: 3 VP lifting, 1IRSSN, 1LRSS, * 1VP, we knit a DC in the loop above the LRSSN, then we knit the LRSSN itself (i.e. we make an increase), 1VP, IRSSN*. We repeat this section 9 more times. Then, 1IRSSN, 1LRSS, 1IRSSN, SSN in the 3rd VP of lifting. 10th front row: knit further according to the pattern. In the arches of the SSN, which we added, we knit the IRSSN. That is, between the VPs we knit 2IRSSN. 11th purl row: in each arch above the first LRDC we knit a DC and then 2 LRDCs. 12th row: we knit all the DCs in each arch with an IRSSN. Next, in each purl row we make an increase - DC, and in each front row we knit it IRSSN. So we bring the number of IRSSN in each of the 10 arches to 7. There are 20 rows in total, which equals approximately 10.5 - 11 cm. Then we knit according to the pattern, without increments, 22 rows. In the 43rd purl row we begin to decrease the RSSN. To do this, in each arch we knit the first 2 LRSSN with one vertex. That is, we do not knit the first LRSSN to the end - 2 loops remain on the hook, we also do not finish the second LRSSN and knit the remaining 4 loops on the hook all together. 44th front row: in each of the arches we knit the last 2 IRSSN with one vertex together. There are 6 IRSSN left in the arch. In the same way we make decreases in subsequent purl and front rows. In the 54th front row between the VPs we knit one IRSSN. In the 55th row we knit 27 RSSN with just an elastic band - without VP. Next, for the side stripes of the turban, we divide the knitting into 2 parts - 14 LRSSN. From the central LRDC of the previous row we knit 2 DCs - one for each of the stripes. We knit stripes only LRSSN in the front rows and IRSSN in the purl rows. I can’t say exactly the length of the stripes, I knitted them by eye and they turned out longer than they should and I had to unravel them a little. We put the stripes one on top of the other and sew them to the turban. At the same time, we sew one row of the side strip to two rows of the turban, seating it. The turban is ready! In my opinion, it is easy and simple to knit! I’ll knit the next one for myself and definitely show it off)) Good luck to everyone!!! Author: Olga Cheresh https://chereshnea.blogspot.ru/2015/05/chalmakriuchikom.master-klass.html?spref=fb
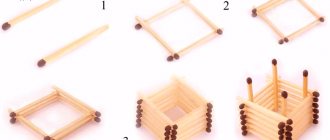
Step-by-step instructions for models
Using several models, we will analyze the most popular turban models and how to create a lovely product based on the pattern. The pattern can be changed at your discretion, but the pattern remains practically unchanged.
Turban with English elastic band
This casual model can easily complement a parka, jacket or down jacket.
A step-by-step description of how to knit a soft and very comfortable turban. The English gum makes this product very voluminous and appetizing.
To work you will need:
- yarn with 50% wool content;
- knitting needles number 4.
Sample
We measured the head around the circumference and determined the depth for the hat. Next, we knitted a small piece with an English elastic band and determined how many loops would be needed for the circle. It is better to count how many rows, since this model is assembled in a special way and you can further verify this.
Knitting stripes
If you take apart such a model, you might be very surprised. After all, it’s just a stripe, very reminiscent of a scarf. Additionally, before knitting, you need to divide the depth into 2 parts.
After all, one stripe is a quarter of the entire hat. Next, pick up this quarter and knit a strip equal to the circumference multiplied by two. Additionally, you can add 3-4 cm to the clutch. We knit with an English elastic band until the required indicator and close the loops.
Assembly
The pattern shows how to twist the strip to get such a charming turban.
When unfolded, the unsewn part is just a long scarf. The diagram shows where the seams exist and where you need to tie a small clutch knot. Beautiful yarn and decoration will make a turban your favorite hat.
Important! The fabric pattern will be smooth and with straight edges if you knit it with an odd number of loops.
Such a highlight in a woman’s wardrobe can appear in just one evening. The product can be decorated to your taste. Beads all over the surface or a bright detail where the stripes meet.
Burgundy turban
A precious model and not so difficult to create.
You can quickly do it in simple steps at home, listening to a couple of your favorite tracks in the evening. To work you will need:
- burgundy yarn of medium thickness;
- knitting needles number 3.
Casting on loops
To cast on loops and determine the length of the strip for the product, you need to know the depth and circumference of the head . The circumference must be multiplied by 2 and using the sample, calculate the number of loops for a double circle. The stripe width is the initial set of loops. It is also easy to recognize - you need to divide the depth by 2.
Band
We knit a strip to the height of two circles.
Assembly
We assemble the product according to the specified pattern. You will need to make three seams (middle and two side).
This hat is decorated with small embroidery (beaded brooch). If you are a master of beading and embroidery, you can handle this too. You can buy a ready-made version, no less beautiful than in the photo.
Turban for a beginner
The simplest model, which is popular among middle-aged women. The interesting thing is that the most common things are quite simple to create. This particular pattern can be easily mastered by a beginner knitter. This easy knitted headband, made by yourself, will give you confidence in your own abilities.
To work you will need:
- gray yarn 150 g (you can use baby yarn);
- knitting needles number 3 (circular or stocking).
It is better to knit in two threads. Make a set that matches the model's head circumference. Knit alternating knit and purl stitch in two rows. Knit to a height of 14 cm. Bind off the loops.
Then you need to knit a rectangle with sides of 10 cm and 3 cm using a tangle pattern.
Assembly consists of sewing together a rectangle (sew 3 cm sides). Place the base of the turban forward by stitching. That's it - the model is completed. It is very difficult to say how long it takes, but it is not measured in hours. 40 minutes and the popular hat is ready. You can decorate at your own discretion. Three delicious models will help you make your own turban. This highly personalized piece will not only decorate your heads, but will also keep you warm. You can make it with discreet jewelry, or you can create very rich versions with precious brooches. Some models are skillfully decorated by needlewomen with fringes and even satin ribbons. This is where the flight of imagination is not limited.
Models for Beginners
For those who are just mastering knitting and purling, it is important to learn how to make a straight edge. To do this, the last loop in all rows is knitted with a knit stitch. You need to start the row by dropping the first unknitted loop from the left needle to the right, working one.
The choice of threads is made in accordance with the season. For winter you need bulky threads. For autumn, thin yarn is suitable. The knitting needle number is indicated on the packaging label.
Knitting thick yarn with thin knitting needles is inconvenient, resulting in a rough fabric. Knitting thin yarn with large knitting needles requires experience, otherwise the rows will turn out uneven.
Large knot
First, measurements are taken. The head is measured from ear to ear across the crown. The result obtained is divided in half - you get the width of the fabric for the turban. To determine the number of loops in one centimeter, a sample of a simple razik is knitted: the knit stitch alternates with the purl stitch, on the reverse side the knit stitch is knitted on the knit stitch, the purl stitch is knitted over the purl stitch.
The knitting density is calculated by dividing the width of the resulting pattern by the number of loops in the row. Then they begin to form the fabric for the turban. A scarf 90 cm long is knitted with an elastic band. Then it is wrapped around the head, twisting it on the forehead. After this, it is enough to sew the ends of the fabric in the desired position along the entire length of the free ends. The knot is secured with a hidden seam.
Turban with a small knot
Those who prefer hats with a wide curved edge can design the headband in the form of cross stripes. First, on circular knitting needles, purl stitches with the addition of 6 loops per row are knitted for a cap. It covers the back of the head to the beginning of the forehead.
The last row of the top half of the hat is left on a circular knitting needle or the last row is closed - whichever is more convenient for you to sew on the headband. For it, an odd number of loops are cast on in width, and the volume of the head plus 4 rows for volume are knitted with a relief elastic band. The ends of the rim are closed, turning one of the edges over.
Then both parts are sewn together. The front is a turban, the back is a traditional bell. To sew a headband unnoticed, take a large needle, thread knitting threads into it, and make stitches over the seam in the direction of the loops.
Turban with extension
For lovers of voluminous headdresses, you can knit an original hat in the shape of a fluffy turban. The fabric is knitted with expansion: between the edges of the English or other voluminous elastic, the loops are first decreased and then added. The hat begins with 5 embossed rows, loops are added to each row every 4 rows.
After 12 cm, a fitting is made on the head. Usually no further additions are required. Then 5 or 6 cm of fabric is knitted evenly, then decreases begin. When the canvas reaches its original size, the canvas is divided into two parts with the addition of edge loops from the central relief row.
Two parts of the headband are knitted, they cross at the front, and are sewn to the beginning of the hat at the back. For such a headdress, not only an English elastic band is suitable, but also rows of crossed loops. Two, three, four, it all depends on the thickness of the threads and the skill of the knitter. It is very important to make an even backing fabric; its quality depends on the appearance of the hat.
DIY turban
Sewing a turban with your own hands is quite simple. To do this, you need to prepare all the necessary tools and material in advance. But the most important thing for a beginning needlewoman is to find a suitable master class on how to pattern a women’s turban from the chosen fabric. There are many methods for making this headdress. In order to sew a turban with your own hands, you need patterns and diagrams of the headdress you like.
Traditional square turban
An interesting and at the same time simple headdress can be sewn from knitwear or similar fabric. There is nothing complicated in making such an accessory - you need to sew two seams on the back side of the product. For such a turban, an ordinary knitted scarf or strip of fabric is suitable.
To get started you will need the following:
- A strip of knitted fabric approximately one and a half head circumference long.
- The threads are the same color as the material.
- Brooch or other decoration.
Manufacturing is carried out in the following sequence:
- The prepared material is twisted in half. The result should be a circle equal to the circumference of the head.
- The front of the headdress will be where the ends overlap each other.
- The remaining loose ends are folded back and attached to the back of the hat.
- A brooch or other decoration is attached to the front center.
- Trying on a turban
You might be interested in Sewing a bolster pillow yourself: interesting patterns
Additional Information! When adjusting the size, it is worth remembering that after washing a knitted item may shrink a little.
Traditional voluminous turban
A more complex, but at the same time more voluminous eastern hat. A brooch is also suitable for decorating it.
For manufacturing you will need the following materials:
- A piece of elastic fabric measuring 30-35 cm.
- Threads in the color of the selected material.
- Sewing machine.
- Brooch or other decoration.
Traditional voluminous turban
The production of this item of clothing is carried out in a strict sequence:
- First of all, you will need a pattern - a strip of fabric measuring 30x60 cm.
- Patterns are applied to the workpiece and outlined with chalk.
- The fabric strip is folded in half.
- The upper two corners are rounded, and the cut areas are processed.
- The top and side edges are sewn together. The lower part remains free.
- A gather is formed at the front. This can be done either by folding or tying with threads. It will be easier and more correct to create a voluminous product by gradually pulling the material from the back of the headdress and creating folds from it at the front.
- For decoration, a brooch is attached and the finished product is tried on.
Simple twisted turban headband
This accessory will come in handy when it’s too early to put on a warm hat, but it’s already getting cold outside. The easiest way would be to tie a turban headband. Using knitting needles, a circle of fabric is made to fit the size of the head. At the front it is slightly pulled together with some decoration or a velvet ribbon.
DIY turban headband
You can also choose a more complicated method. Then the work of sewing a turban will be done in stages:
- Take a strip of fabric measuring 140x23 cm.
- If fraying fabric is used, it is tucked around the entire perimeter by 1 cm.
- The turban blank is wrapped around the head so that the ends of the fabric are in front.
- The strip is wrapped several times to cover the forehead and sides of the face. At the front, the edges of the material are formed into a knot, and the remaining ends are tucked to the sides under the turban.
Thus, the result is an almost real oriental headdress, only with an open crown.
Towel turban
This product can hardly be called a full-fledged headdress - it is convenient to use for drying hair and cosmetic procedures. You can simply wrap a terry towel according to a simplified pattern or sew a turban from it for the bathroom.
Towel winding diagram
This home accessory can be useful both for drying hair and when applying various creams and masks to the skin of the face. The turban will reliably protect hair during cosmetic procedures.
You might be interested in this: The procedure for sewing sundresses without patterns with your own hands
To sew it, you can take a beautiful, but unnecessary towel. Next, using the pattern diagram, two blanks are cut out.
Cutting diagram
Important! If the hair is very long, then the sizes can be slightly increased.
The resulting parts are sewn together along the top using a sewing machine or by hand. It is advisable to sew a loop on the back side of the accessory, and a button on the front side so that it is convenient to fix them together.
Shawl turban
An ordinary scarf can also be turned into an exotic headdress with simple manipulations. The scarf should be draped over your head so that its ends hang over your forehead. Then they are twisted, thrown back and tied into a knot.
Shawl turban
Additional Information! To keep the tied scarf securely, you can wear a light hat underneath it.
Knitted turban with brooch
Using this method, you can sew a formal headdress that can be worn with a suit or dress for a festive event. To sew the product, it is recommended to use bulky knitted fabric measuring 120x60 cm. Sewing is done step by step:
- The material blank is folded in half. At the top the edges are slightly rounded.
- The side and top parts are stitched on a sewing machine and slightly pulled together to form neat folds. When sweeping, the front part should be inside.
- The product is turned inside out and put on a mannequin or something similar to it, for example a three-liter jar.
- The knitwear is slightly pulled together on both sides, joined in the middle and secured with stitches.
- The fabric below is slightly draped, pulled together and also fixed.
- The remaining ends are trimmed.
- At the end of the work, a brooch is attached to the front. It is desirable that it be the same shade as the material of the headdress.
Knitted turban with brooch
How to sew a turban with a bow for a girl
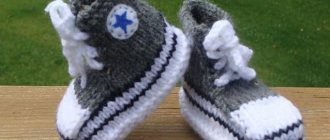
A turban for a child will be a wonderful addition to a morning party in the garden or a full-fledged accessory that babies and girls in school can wear.
Turban with bow for girls
The easiest way to make such a headdress is to twist it from a piece of long material. But it is better to make a hat with good knot fixation. Sewing a children's turban is not much different from making a knitted turban, except that for a child it is better to choose velor or pleated fabric. When determining the size of the product, it is better to make it larger so that the turban can be worn on a hat. Instead of a brooch, a bow will look natural on a children's accessory. It can be made from the same material as the headdress itself or another, but with the condition that the colors match.
Turban for a schoolgirl
Thus, it does not require much skill to know how to sew a turban with your own hands - you only need a pattern, material for sewing a headdress, and you can start creating this colorful piece of clothing.
Features of crocheting a turban
The crocheted turban hat in most models has a simple pattern; it is crocheted in the shape of a rectangle. You can even make it from an ordinary scarf. The rectangular fabric is folded in a special way, stitched, and often decorated with a brooch, resulting in a comfortable and stylish hat in the oriental style.
But there are also one-piece models, the manufacture of which requires precise measurements, otherwise the turban will not fit well on the head. In addition, such patterns usually use increasing and decreasing stitches, which requires attention.
If the needlewoman still has few skills, it is better to start with simple turbans. This will help make the knitting process enjoyable and gradually gain the missing experience so that you can later move on to more complex patterns.
Unique turban
Initially, it was considered a men's headdress in the East. She always betrayed the owner’s well-being. When women began to wear turbans, decorating the turban with large brooches and gold chains became fashionable.
An oriental-style hat fits tightly on the head and covers the ears. The second common name for a woman's turban is sultanka. Depending on the shape of the face, women choose a headdress with a large knot (the tightly knitted fabric is twisted) or tight-fitting ones, when two intertwining slats are narrow and are thrown over while knitting a turban.
For those who do not know how to knit, just wrap a scarf around your head in the shape of a turban, secure the end with a decorative pin, and gather the knitted fabric in front with a beautiful brooch; they are again at the height of fashion. For those who know how to knit, it is easier to make a hat from yarn. The choice of embossed elastic band is a matter of taste. The main thing is to understand the principle of creating a turban.
What you need to knit a turban on your head
To crochet a turban hat, you need to select the model of the product, materials and tools that are necessary for the work. Be sure to take measurements.
Model selection
When choosing a model, it is important to determine for which season the product is knitted. A turban made with a tight knit is more suitable for winter. Models with openwork patterns are ideal for autumn. The decor is selected based on the color of the turban; there should not be too much of it. And, of course, the older the future owner, the stricter the headdress should be.
Important! It is more rational to make the decor on the turban removable, so that if necessary it can be easily replaced or removed.
Yarn selection
This point is very important, since the appearance of the product and its wear resistance depend on it. You also need to consider how warm the turban will be.
- Season. Winter option - 100% wool or blended yarn with mohair, angora or alpaca. For the warm season - linen, cotton or viscose.
- Thickness. The density of the headdress depends on it. For dense patterns, yarn 200 m per 100 g is suitable, for openwork - 500 m per 100 g.
Important! Acrylic yarn is suitable for any season.
Hook selection
A high-quality and correctly selected tool guarantees ease of use and a good final result.
What criteria are used to choose a hook:
- Size. It is chosen depending on the thickness of the yarn. Refer to the yarn label for recommended hook number.
- Material. The hook must be strong so as not to break or deform during operation. Therefore, it is not recommended to choose plastic or aluminum hooks. A bamboo tool is pleasant to use, but a metal one would be a better option. Preferably with a plastic or rubber handle. The latter rubs your hand less during long-term use.
Important! When choosing a hook, you should pay attention to the working surface. There should be no nicks or roughness on it. Otherwise the thread will not slide along it.
The right choice of tools is the main key to a beautiful knitted product.
Product size
To determine the size of the future turban, you need to take two measurements using a centimeter tape. How to correctly measure the head circumference and depth of the product is shown in the diagram: