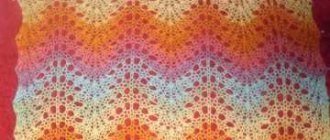
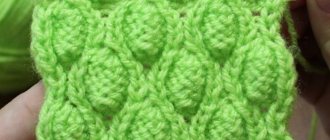
Features of the “Asian spikelet”
The drawing is complex only at first glance. In fact, it is enough for him to master the knit and purl stitches. To complete the pattern, it is important to stick to the description. The main thing is not to get lost when knitting thin strips again.
What is the significant difference between the pattern and braids or other three-dimensional patterns:
- the fabric is not knitted from top to bottom, but along the width of the product;
- the edge of the knitting is formed wavy, it does not need to be further processed or crocheted;
- the number of loops on the knitting needle must be a multiple of half the width of the strip;
- the strip always has an even number of loops;
- the number of rows in a strip is always even;
- the strips are knitted alternately, their length should be the same;
- the pattern is first knitted from the front side with knit stitches, then from the back side with purl loops, due to this a spikelet is created;
- The distance between the spikelets varies, but the number of rows should be even.
Depending on the thickness of the yarn and the type of product, the width of the spikelets is made from 6 to 10 loops. It is important to maintain proportionality between the width and height of the strips. Standard reports:
- 6x10 (six loops, ten rows);
- 6x12 – suitable only for soft fluffy yarn;
- 8x14;
- 8x12;
- 10x16 (for thin threads);
- 10x18 (for the fluff from which spider webs are knitted).
It is necessary to take into account that the yarn consumption for the “Asian spikelet” is 2.5 times more than for standard patterns. The products are very voluminous and warm. If desired, the holes formed in the canvas are removed and a continuous “Asian spikelet” is made. It looks more voluminous, each “grain” becomes convex.
Mastering the technique
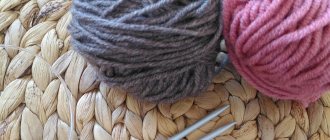
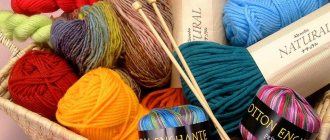
For those who are just learning to knit, it is advisable to use tightly twisted threads without fluff or long fibers. You need yarn that unravels easily. It's better to start with a scarf and hat.
For the headdress, first knit the lining obliquely, starting from the corner (three loops). A cloth with spikelets is attached to it. The edge row is crocheted.
Scarf using the openwork spikelet technique
It is better to perform it in strips 6 loops wide. Cast on a number of loops that are a multiple of three. For a standard width scarf, cast on 33 stitches. Step-by-step instruction:
- The outermost edge loop is always transferred from the left to the right knitting needle. The first row is knitted completely purlwise.
- On the front side you only need to knit 6 stitches - this will be the first grain of the spikelet. It is necessary to make 10 rows (the face is knitted with knits, the backside is knitted with purls).
- When the last purl row is knitted, the grain is knitted into the common fabric; for this, three more loops are added to 6. Then the knitting is turned over.
- You need to make 6 loops on the wrong side - the second grain is formed. There will be 3 loops left on the right needle.
- When 10 rows are knitted again, the grain is again connected to the fabric - 3 loops are added to six, for a total of 12 loops on the right knitting needle.
- On the wrong side, you again need to form the next grain - again only 6 loops are knitted.
- This is how the pattern is repeated until the end of the front row.
- When the first half of the spikelet is formed, knit the entire row with purl stitches, then the next row with knit stitches.
- Proceed to the second half of the spikelet, it is formed on the wrong side. Knit in the same way - in strips of ten rows.
- The distance between the spikelets is knitted with front and back rows. Make from 2 to 6 rows.
Hat made using the solid spikelet technique
They start working on the hat after knitting the scarf in order to determine the required number of spikelets. They look at how many times the drawing needs to be repeated according to the volume of the head. The spikelet is made solid - the holes are sealed, or rather, two small ones are made from one large one. Each grain is grabbed in the middle. After knitting the strip, count the number of edge loops, and insert the right knitting needle into the middle one. The outermost loop from the left knitting needle is pulled through the resulting window. The middle of the strip is hooked. You can continue knitting. It is important to pick up each strip; it must be done in the middle so that the grain is symmetrical.
Stylish jacket
Let's consider a master class on knitting a sweater; the technique is classic and will not be difficult.
For work we will need:
- knitting needles No. 5;
- yarn - 700 g.
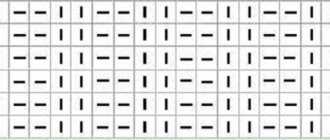
The knitting pattern is shown in the following photo:
Article on the topic: Master class on cutting from napkins: what is it, patterns for beginners
We cast on 85 loops and knit 14 rows. 2 rows - wrong side, 2 - front side. At the bottom we knit 60 loops with the front side and turn the knitting. We knit 12 rows of 4 loops, constantly turning the work. From the next 4 loops, we also knit 12 rows. We knit like this until the end of the row. To form the neckline, it is necessary not to knit five loops at the end in every third row.
We alternate the convex parts with four rows of the front side. Having knitted 5 rows, set aside 44 loops. We take another knitting needle and cast on 52 loops, connect with other loops and continue knitting the bulges. Having knitted 10 rows, cast off 52 loops, return the postponed loops and continue knitting until 12 volumetric rows are formed.
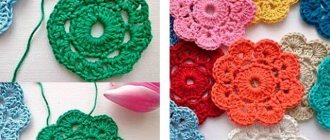
In general, the essence of knitting the “Asian spikelet” pattern is clear. Crochet lovers can also make this pattern themselves. Here, for example, is a bracelet knitted in the “Asian spikelet” style:
We knit 22 chain stitches and knit the first row of double crochets.
We knit 3 lifting air loops and 2 tbsp. double crochet
Then we dial 28 air. loops and fasten them into the second loop from the edge of the st. double crochet and complete the row.
Now we knit 3 air loops and knit a row of sts. with nak.
And so we knit another 7-8 times.
You can experiment with the number of loops. To form a “braid” we crochet according to this pattern.
Pull the bottom loop through the top.
The result is a pattern like this.
Thus, you can knit various hats, scarves, sweaters, etc. The knitting technique is quite simple and any beginner can handle it.
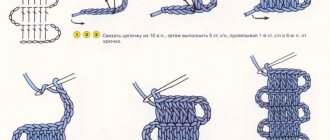
"Asian spikelet" crochet
The pattern is formed from top to bottom or bottom to top, and not across. The spikelet is made from chains of air loops - rings protruding above the canvas. These soft grains are pulled into each other, forming a pattern. The pattern looks nothing like a knitted fabric.
But the products turn out to be textured, voluminous, and original. The spikelet chains can be directed in opposite directions. Knitting the fabric is simple: for this purpose, double crochets are made.
Air chains are formed through an equal number of columns (from 6 to 10). First, a double crochet is knitted, then it continues with a chain of chain stitches (up to 25).
The edge of the chain is secured to the top of the column. Then the canvas continues again. The height of the repeat is from 2 to 4 rows.
It is important to measure the height of the free rows and the size of the chain loop. After the knitting is completed, the air chains are pulled one into the other.
Volumetric “spikelet”
A raised and very voluminous spikelet, which is made on the reverse surface. It looks expressive and is not difficult to knit. Suitable for knitting hats, cardigans and a variety of products.
Spikelet pattern with knitting needles - video:
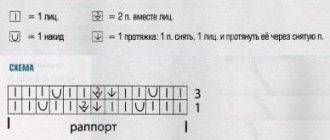
Knitting pattern in rotary rows:
Pattern repeat: 7 loops; 2 rows.
The number of loops is a multiple of 7 + 2 for symmetry + 2 edge loops. The pattern repeat is indicated by *______*.
Preparatory row: *K2; 5 p.;* 2 knits.
- ROW 1: *P2; 1 person; from 3 loops we knit 3 loops behind the back walls (knits; yarn over FROM YOURSELF; knits); K1;* P2.
- 2 POISON: *2 persons; 2 loops are swapped with a tilt to the LEFT (picked up by the front wall) - the first loop is not knitted, the second loop is knitted from the inside out; 1 purl; 2 loops are swapped with a tilt to the RIGHT (picked up by the back wall) - the first loop is knitted purlwise, the second loop is not knitted; * K2.
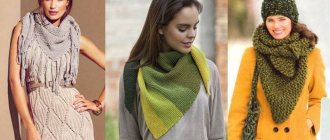
Chic and style
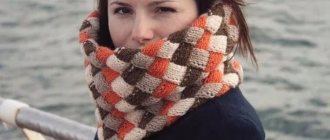
Three-dimensional drawings are at the peak of popularity. If you want to make something fashionable, it’s time to take up knitting needles or a crochet hook. Luxurious things can be done by beginners. To transition colors, balls of different shades are used.
For convenience, they are secured to the fabric with pins so that the threads do not get tangled. When changing colors, it is enough to cross adjacent colors.
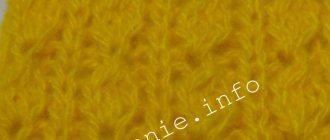
The “Asian spikelet” made of mohair looks very airy. Cardigans and jackets for the street are made with a thick lining so that the item does not get drafty. The pattern goes well with inserts made of drape and leather. You can create a unique outfit.