- 42997
- 13-10-2020
- Author: Mysekret Team
- 0
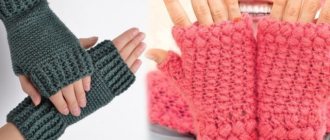
Mitts are comfortable gloves or fingerless mittens that go well with almost any style of clothing: from classic to street. There are many models of mitts, among them a special type can be distinguished - mitts knitted with knitting needles. We’ll talk about them in more detail in this article.
Knitted mitts are beautiful and comfortable products with an interesting texture, which, depending on the time of year, delight their owners with interesting patterns or openwork, complete freedom of movement and warming warmth.
They can be long or short, openwork or dense, with many beautiful motifs or made with simple patterns. Knitting these beautiful and comfortable products is quite quick and easy. Well, the most difficult task in this matter is to choose from dozens of beautiful schemes exactly the one you like the most.
Knitted mitts “Verbena”
Product length – 19cm.
To work you will need:
- yarn, 100% wool (50g per 105m) – 100g;
- sets of hosiery sp. No2.5 and No3.5.
What patterns will we knit:
- patterns - see diagrams 1, 2, 3, 4;
- 2LP – 2p. knit together to the right: first pick up the right sp. the second st., then the first st. of the left sp., knit them in 1 k. for the upper lobes;
- 2LL – 2p. together with knits to the left: remove stitch, 1 p., throw the removed stitch onto the knitted one;
- DU – double decrease: enter the right sp. in the 2nd stitch, then in the 1st stitch of the left sp., remove them without knitting, 1 p., throw the two removed stitches onto the knitted one.
Knitting density: on stockinette stitch 22p. for 30r. correspond to a 10cm by 10cm square.
Description
We will knit in the round with sock needles.
We dial sp. No2.5 58p. and distribute them into 4 sp. We knit 1 row l. loops. Then: purl 1* purl 1, purl 3* – repeat from * to * over the next 20 sts, 16 sts. – pattern 1, * purl 3, purl 1 * – repeat from * to * over the next 20 sts, purl 1. Continue working as set 3cm.
Track. row: 1i., *1l., 2p. in 1i., 1i.* – repeat from * to * above the next. 20 p., 16 p. – scheme 2 (reduced 1p.), *1i., 2p. in 1i., 1l.* – repeat from * to * above the next. 20 p., 1i. Total – 47p.
Next we work sp. No3.5
Track. r.: 1p., *1l., 2i.* – repeat from * to * above the next. 15 p., 15 p. – scheme 3, *2i., 1l.* – repeat from * to * above the next. 15 p., 1i.
We knit the pattern of pattern 3 twice in height (16cm) and then again work with knitting needles No. 2.5. We perform an increase: in areas of two purl stitches we add 1 stitch. – we have 3pn. Instead of cx. 3 we knit sch.4. In work 59p.
We continue to knit knit stitches over the front and back to a height of 19cm. - over purl ones. Close the loops according to the drawing. We perform the second part in the same way.
Knitted mitts with braids
Very cozy mittens with a simple pattern. In terms of difficulty, they are accessible to beginner craftswomen.
The model is designed for sizes S/M(L).
To work you will need:
- yarn, 100% wool (50g per 49m) – 100g;
- sets of hosiery sp. No3.5 and No4.0;
- auxiliary sleep;
- marker.
What patterns will we knit:
- l. satin stitch: when knitting in the round, knit all stitches;
- see diagrams 1,2,3,4:
Knitting density: 3.5 knitting needles per liter. smooth 21p. for 28 rub. correspond to a square of 10cm by 10cm; knitting needles No. 4 on l. Ch. 22p. for 30r. correspond to a 10cm by 10cm square.
How to knit mitts
We cast on with knitting needles No. 3.5 40 (44) sts. and knit them round in the order: 14 (18) p. according to cx. S2, 26p. according to C1a. After 3cm, move to C1b (instead of C1a). We will knit the remaining stitches as before.
Having knitted cx. S1b (we have 42 (46) p.), go to sp. No4,0. Knit 14(18) p. l. Ch., diagram C3. Once again we repeat cx.C3. At a height of 17 (18) cm, the next row should be the 1st row. cx. C3. We change sp. at No3.5.
We knit 14(18) sts. according to cx. C2 and cx. C4a instead of cx. C3. When cx. C4a will be knitted 1 time 40 (44) sts, continue with knitting needles cx instead. S4b. The rest of the points are as before. Close the item according to the drawing. Perform the second part in the same way.
Video lesson
Here is another option for knitting mitts, this time in the Scandinavian style, quite warm and beautiful, with large embossed braids. The knitting process is usually easier to understand in video master classes, especially for beginners.
Video lesson on knitting mitts with knitting needles
Share with your friends!
- 103
- 10
- 4
- 117
Shared
Subscribe to our Yandex.Zen channel or Yandex.Messenger
Knitted mitts with jacquard pattern
Very impressive, with contrasting jacquard they are easy to knit. An important note for beginning craftswomen: pay special attention to the quality of the yarn. She shouldn't shed!
Dimensions of the finished product: 16cm by 30cm.
To work you will need:
- yarn, 100% wool, black (50g by 68m) – 100g;
- the same white color – 50g;
- sp. No5.5.
What patterns will we knit:
- l. satin stitch: for forward/reverse knitting in l. R. All stitches are knitted, purlwise. R. - purl;
- jacquard – see diagram:
Knitting density: per l. satin stitch and jacquard with knitting needles No. 5.5 17p. for 47 rub. correspond to 10cm by 20cm.
Description
We cast on with knitting needles No. 5.5 30p. and distribute them like this: 14p. according to scheme, 16p. l. Ch. in black. Having received 30cm of total height, close the loops. Knit the second piece in the opposite direction.
Assembly
We sew the side seams, leaving a 5cm cut under the thumb 5cm from the edge.
Against time
Over time, mittens have not lost their relevance both as a stylish ladies' accessory and as a specialized item of clothing. This trend is unlikely to change in the future.
They have proven themselves very well from a practical and aesthetic point of view. We were captivated by the variety of shapes and wide range of uses. Simple, luxurious, warm, subtle, for children and adults - they will always be in fashion.
https://youtu.be/WsObvMvPsoghttps://youtu.be/ai8BwijsBpE
_
Green mitts
The model is designed for two sizes: palm circumference 18(21)cm.
To work you will need:
- woolen or half-woolen yarn (100g per 300m) – 70g;
- set of hosiery sp. No2.5;
- pin.
What patterns will we knit:
- elastic band 1l.x1p.;
- l. Ch.: vv l. rows - front, purl. – purl;
- pattern: knitted according to pattern:
Description
Right
We dial 44 (48) p. and go to work in a circle. We knit 10 rubles with an elastic band. We knit the front stitches behind the front walls. From the 11th p.m. loops on 2 sp. let's knit the l. Ch. - this will be the inner part of the palm, and on the remaining 2 joints. we knit a pattern - this will be the outer side of the palm.
Having knitted 9cm, we begin to form a hole for the thumb on the back of the hand. To do this, on the sp., which were used to knit the l. Ch. remove with a pin 7p. We dial another 7p. and continue working. We knit it to a height of 17cm from the beginning. Then again 6 rows of elastic and close the loops according to the pattern.
Thumb
We transfer the removed sts from the pin to the sp., raise 7 sts along the edge. plus 1 p. on each side of broaches. We distribute all the loops, which are 16 stitches, into four sp. Let's knit the l. Ch. up to a height of 4.5 - 5 cm. Close the item according to the drawing.
Left
Knitted mirror right.
Schemes and descriptions of knitting mitts with knitting needles
To understand in more detail the specifics of knitting mitts, we will consider different ways of working on them, and apply several diagrams and descriptions of making mitts for adults and children. But first, let’s learn how to knit your first mitts with knitting needles - diagrams with descriptions for beginners will help with this
Master class for beginners
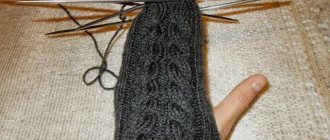
In order to learn how to knit mitts with knitting needles for beginners, a master class on knitting mitts with knitting needles will be useful. Let's look at a step-by-step version of knitting mitts with a wedge for the thumb, which are knitted on five knitting needles. For beginning knitters, it is better to knit mitts for yourself first, so that you can try on the product at any time and, if necessary, correct the number of stitches.
At the very beginning, we measure the circumference of the thumb and the circumference of the palm above the thumb. We calculate the knitting density and the required number of loops for the initial set according to the girth of the forearm (round the number to a multiple of four).
Materials
- yarn “Natasha” (95% wool and 5% acrylic, 250m per 100 grams);
- knitting needles No. 2.5.
For example, the cuff is knitted on 44 loops, with a transition to 40 loops to the palm. The number of loops is adjusted according to the parameters.
Progress
On two knitting needles folded together we cast on the required number of loops in the usual way. After the 44th loop, a fixing “tail” is tied with the main thread in a knot.
Next, we knit with a 1×1 elastic band according to a simple pattern: 1 knit, 1 purl. In order for the circular pattern to look good and the pattern not to be distorted diagonally, we knit the front and back loops in the classic way - behind the front wall.
Having knitted 11 loops, leave this knitting needle and take another one. We knit 11 more loops. Thus, when we reach the end of the row, we will have 4 occupied needles, each with 11 stitches. And the fifth knitting needle is free, working.
The knitting needles are numbered starting from the one on which we knitted the loops first. It is easy to recognize - there is a “tail” of thread left from a set of loops.
Arrangement of knitting needles No. 1,2,3,4.
We knit with a 1x1 elastic band to a height of approximately 5 cm. At the junction of the first and last (No. 4) knitting needles, we get an ugly place (photo 1). It is masked using a hook and thread from the “tail” of a set of loops, which is saved at the very beginning after tying. This is what this area looks like after masking (photo 2).
When we knit in a circle, we see the front side of the item in front of us and can quite easily follow the pattern. After 5 cm of elastic, we need to switch to the main pattern and reduce the number of loops to forty .
On knitting needles No. 1 and No. 2 we will have the upper part of the mitt, and on knitting needles No. 3 and No. 4 we will have the lower part. We knit the lower one, the one that falls on the back of the hand, only with knit stitches. And for the top one you can use a simple “double rice” pattern.
The first row after the elastic on the knitting needles is knitted only with knit stitches, and the last 2 loops on each knitting needle are knitted together. This reduces the number of loops to forty, and there are now 10 loops on the knitting needles.
Next, on needle No. 1, 2 knit stitches are knitted in a row - this is the basis for the future “wedge”. The pattern itself is also an alternation of “1 knit – 1 purl”, but with an offset along the rows. Two rows - loops on top of each other, then a row: over the front - purl, over the purl - front. Row - again according to the pattern, one above the other, and again offset.
We knitted 3-4 rows, and proceeded to the “wedge”. Its base is the second loop on knitting needle No. 1. In the row where we start increasing, we knit the first loop, yarn over, knit the second, and another yarn over.
Designations in the photo: 1 – “base of the wedge”; 2 – yarn overs to the right and left of it. - the type of yarn overs used further. They should be such that when knitting in the next row, a hole will not form in their place. Since we are knitting with classic knit stitches, the yarn overs will look as shown in the picture.
Next we knit according to the pattern. On the next row we knit the yarn overs, now there are two more loops on the first knitting needle. One more row according to the pattern, and then an increase again - on the first knitting needle we knit the first loop, then we knit a yarn over, three loops we knit (those formed during the first increase + the one that underlies the “wedge”) and another yarn over.
This is a general pattern for knitting a “wedge”. All the “wedge” loops here are knit stitches. We always add after an equal number of rows. After two more rows there will be 5 loops between the yarn overs, then 7 loops. We will stop here, because 16 loops are enough for the thumb. 7 loops + 2 yarn overs = 9 loops. We will then pick up the remaining 7 from the edges of the knitting (photo 1).
Then we knit, without adding any yarn overs and periodically trying on. We reach the base of the thumb. Here we need a large safety pin.
We knit the first loop of needle No. 1, which is not included in our increases. By the way, we started the “wedge” from the second loop so that between knitting needles No. 1 and No. 4 a hole would not form from stretched loops. Then we remove 9 loops on a pin, included in the “wedge”, and on a working knitting needle, on which one knitted loop hangs, we add 4 loops with yarn overs (photo 2).
Exactly 4 loops, because you need to add half of the removed ones, round down. In this case, it is better to make yarn overs using air loops, as in the figure. Next we knit according to the pattern, knitting the yarn overs (photo 1).
And in the next row we knit these loops two together. It was 4, now it’s 2. And in total, on needle No. 1, after removing the “wedge” onto the pin, there were 10 – 1 (the base of the “wedge”) + 4 = 13. After knitting the loops above the pin together: 13 – 2 = 11. So , in the next row in approximately the same place you need to knit 2 more loops as one to return to the original 10 loops. We knit further and try it on. We switch to elastic again (photo 2).
Next, we knit a 1×1 elastic band, without adding or subtracting anything. When the elastic is the right size, you can close the loops.
The loops on the mitts can be closed with a pigtail. We returned after the next row to needle No. 1. We knit the first loop (it’s the front one). We also knit the second one, purlwise, and then pull it under the first one. The first lies on top, and the second remains on the working knitting needle. And then continue according to the drawing. The edge turns out beautiful.
We cut the thread with a margin and secure it with a hook. Let's return to our thumb. We already have one part - these are 9 loops on a pin. Along the edges of the hole for the finger, we evenly cast on 7 more loops - a total of 16. The “tail” from this cast should remain inside the mitt. You can immediately fasten it between already knitted loops, or you can first knit a row of fingers to understand where the gaps remain. It is very convenient to cover them with this “tail”. We distribute 4 loops onto the same 4 knitting needles and knit. 5-6 rows are enough (photo 1). Then we switch to 1x1 elastic, knit several rows, and close it in the same way as the main part (photo 2). The mitt is ready.
The right mitt will differ from the left one in that the upper part will fall on needles No. 3 and No. 4 and the base of the “wedge” will be the penultimate loop on knitting needle No. 4.
Knitting pattern for openwork mitts for women
For the beginning of autumn or spring, when every woman wants her hands to be warm, but it is already too hot for mittens and gloves, openwork mittens with knitting needles are suitable - the knitting pattern will help you create them with your own hands. This accessory will look great with a coat or jacket, knitted coat or cardigan.
Dimensions
Palm circumference: approx. 20 cm; Product length: approx. 20 cm.
Materials
- superfine yarn (100% wool; 400 m/50 g) - 50 g black;
- stocking needles No. 3.5.
Knitting patterns according to patterns
Openwork pattern
Knit in the round using knitting needles No. 3.5 according to the pattern. The diagram shows only even (respectively, faces) rows. In odd rows, knit stitches and yarn overs. In the purl rows, purl the loops and yarn overs.
Sequence of rows
Perform 2 times from the 1st to the 8th row, 1 time from the 9th to the 46th row. and 3 times from the 47th to the 54th r.
In rows 1 to 8 and 47 to 54, start with stitches before repeat 1, repeat repeat 1, end with stitches after repeat 1.
In rows 9 to 46, repeat rapport 2.
Knitting density
24 p. x 38 r. = 10 x 10 cm, knitted in an openwork pattern using knitting needles No. 3.5.
It is important to ensure that the density of your knitting corresponds to the specified one (if necessary, change the number of knitting needles).
Progress
On knitting needles No. 3.5, loosely cast on 48 sts in 2 threads (take one end of the thread from the outside, the other from the inside of the ball). Distribute the loops onto 4 knitting needles (12 sts on each) and close them in a ring. 2 r. knit with double thread.
Continue the work with a single thread in an openwork pattern, performing rows in the specified sequence.
In the 36th r. Divide the main stitch pattern for the thumb hole between the 1st and 4th needles. Here add 1 chrome on both sides. and knit, continuing the pattern, in rows in forward and reverse directions.
Complete from 37th to 54th r. and added chrome. close the loops.
Next, knit in the circle again and perform 2 times from the 47th to the 54th row. Finally, knit 2 rows with a double thread and loosely bind off the loops.
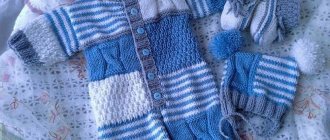
How to knit baby mitts
For mobile and active children, mitts are an ideal option, because the movements of the hands are not constrained by anything. Knitting baby mitts is easy. Often, hats, sweaters, leg warmers or scarves are knitted together with them so that the child’s image looks harmonious. But let’s take a closer look at the process of knitting mitt patterns for children, which will look equally good on both a girl and a boy.
Dimensions
104/110 (116/122) 128/134
Materials
- yarn (50% polyacrylic, 35% alpaca, 15% natural wool; 94 m/50 g) 100 g turquoise;
- 50 g each of beige and green;
- knitting needles No. 5;
- short circular needles size 5.
Knitting patterns
Facial surface
Front rows - front loops, purl rows - purl loops. In circular rows, knit all stitches.
Striped pattern
Knit in stockinette stitch alternately in 4 circular rows with turquoise thread and stripes in 2 circular rows with beige, green and again beige thread.
Rubber
Alternately knit 2, purl 2.
Progress
Using turquoise thread for each mitt, cast on 24 (28) 28 loops on stocking needles, distribute the loops onto 4 knitting needles and knit in circular rows of 2 cm with an elastic band.
Continue working with the striped pattern, marking the 8th stitch and 17 (21) 21st stitch.
For the upper expansion, add in every 7th circle. on both sides of the marked loops 3 (4) 5 x 1 p.
1 cm from the elastic band for the thumb hole, divide the work between the 1st and 4th knitting needles, then knit in rows in forward and reverse directions.
After 4 cm from the starting row, knit again in circular rows.
After 10 (12) 14 cm from the elastic band, tie another 2 cm with an elastic band with turquoise thread, then bind off all the loops.
Step by step lesson “how to knit men’s mitts”
Men's mitts are also very popular, and will always come in handy - after all, they greatly facilitate access to any small items at hand. Let's look at a simple and accessible way of knitting men's mitts. In this case, they are knitted with an elastic band, so they are universal in size, as well as in taste preferences, since they look quite strict and conservative.
Materials
- Alize CASHMIRA yarn - 60-70 g (100% wool, 100 g/300 m);
- stocking needles No. 2.75 (or No. 2.5);
- stocking needles No. 3.
The number of loops corresponds to a man's hand in a circumference of the base of the fingers of 19-21 cm.
Progress
On knitting needles No. 2.75, cast on 60 stitches, distribute on 4 knitting needles and knit with 2x2 rib for 12 rows.
Switch to size 3 needles and continue knitting for another 35 rows.
On 1 knitting needle, move 10 stitches onto a pin for the future finger.
In the next row, cast on 6 stitches above the removed stitches. (by removing 4 loops we make the finger hole narrower than the base of the palm where the thumb begins).
Continue knitting with an elastic band for another 15 rows.
Switch to knitting needles No. 2.75 and knit another 12 rows. Close the loops.
Cast on 2.75 knitting needles with the remaining 10 finger stitches, plus 14 more stitches.
Knit 2x2 rib for 14 rows.
Mitts with frill
Finished product length 16.5cm
To work we will need:
- yarn, 100% wool (100g per 201m) gray – 150g;
- the same for black finishing -50g;
- set of hosiery sp. No4.5;
- straight sp. No4.5;
- marker (M) – 2 pcs.;
- pin;
- black buttons – 6 pcs.
What patterns will we knit:
- UNL - decrease with a tilt to the left: remove 2p. without knitting, we thread them from left to right and knit 1l. behind the front wall;
- DU - double decrease: remove p. as k, knit 2 p. in 1l., put the removed one on the knitted one;
- PNL - increase with a slant to the left: we lift the stitch from under the broach, knit it with a l. for the lower lobule;
- PNP - increase with a slant to the right: raise the st from under the broach, knit it with a l. for the top lobe.
Description
We dial direct sp. No4.5 123p. black threads and make a frill:
1r.: 3i., *9l., 3i.* - repeat from * to * - to the end;
2p.: 3l.* 9i., 3i.* - repeat from * to * - to the end;
3r.: 3i., *UNL, 5l., 2p. in 1l., 3i.* - repeat from * to * - to the end, we have 103p.;
4p.: 3l.*7i., 3l.* – repeat from * to *;
5r.: 3i., *UNL, 3l., 2p. in 1l., 3i.* - repeat from * to *, we have 83p.;
6r.: 3l., *5i., 3l.* – repeat from * to *;
7r.: 3i.* UNL, 1l., 2p. in 1l., 3i.* - repeat from * to *, we have 63p.;
8r.: 3l., *3i., 3l.* – repeat from * to *;
9p.: 3i., *DU, 3i.* - repeat from * to *, we have 43p.
We continue 2 r. inside out n. with black thread. At the same time we decrease 1 p., 42 p. remain.
Change the threads to gray ones, knit holes for buttons:
1st: 21l, M, l.;
2p.: purl.
Right hand: 3p.: 2l., 1n., 2p. in 1l., l. up to 4 p. from M, UNL, 2l., M, 2l., 2p. in 1l, l. We have 40p.
Left hand: 3 p.: knit. up to 4 p. from M, UNL, 2 persons., M, 2 years, 2 p. in 1l., l. to the extreme 4p., UNL, 1n., 2l. We have 40p; from the 4th to the 10th row: l.ch; 11r.: same as 3r. Total 38p.; from the 13th to the 18th: l. Ch. 19 rub.: like 3 rub. Total 36p. Remove M; from the 20th to the 24th: l. Ch.
We move on to the toe sp., distribute the loops: 1st sp. 4p., 2nd sp. 14p., 3rd sp. 14p., 4th sp. – 4p.
Right hand
Move 4th sp. behind the 1st sp., knit (1 st. from the 1st sp. and 1 st. from the right sp.) - four times, perform k. along the 2nd and 3rd sp., then 2p. with 1st and 4th sp. install M. Total 32p.
Left hand
Move 1st sp. behind the 4th sp., knit (1 st. from the 1st sp. and 1 st. from the right sp.) - four times, knit k. along the 2nd and 3rd sp., then 2p. with the 4th and 1st sp. install M. Total 32p.
We redistribute the loops evenly across the 4th sp.
We continue: 1l., PNL, 14l., M, PNP, 2l., PNL, M, 14l., PNL, 1l. Total 36p.
Next 3p. persons Ch.
Track. r.: l. to the first M, M, PNP, persons. up to M, PNL, M, persons. Total 38p.
Next 3p. persons Ch.
Repeat the last 4 times. three more times. As a result, 44p.
Track. r.: persons. to M, remove M, move 12p. on a pin, remove M, knit. Total 32p. Next - persons. Ch. to the desired length, usually 8 rubles. Change the threads to black and do 1p. inside out P.
We close all the loops.
Thumb
We remove 12p. from a pin and distribute evenly into three sp. and knit 3p. persons n. Change the threads to black ones. We do 1 rub. inside out p. Close p. Make the second one in a mirror.
Assembly
Sew on the buttons.