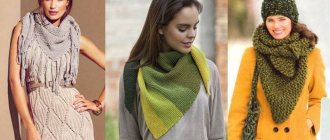
Fashionable knitted beret 2021 for women
The knitted beret has recently become one of the most popular headdresses. It is suitable for both schoolgirls and adult women. A warm version of the winter beret can be knitted in just one evening, just first consider the fashionable models for women. Knitted berets with braids, openwork, warm with lining, as well as classic French options can become the main detail of your wardrobe.
Any beret model is worthy of attention, but each season dictates its own rules and trends.
A simple classic-shaped beret looks very gentle and romantic.
Materials:
- Yarn Drops Alpaca - 100 g
- Knitting needles No. 2.5, No. 3
Cast on the required number of loops, which depends on the volume of the head and the selected yarn.
Knit an elastic band 2*2 at a height of 6 cm using knitting needles No. 2.5
Take needles No. 3 and place markers every 24-26 stitches. Continue knitting in garter stitch. We make increments where the markers are until we increase the original number of loops by about a third.
Next we make decreases - knit 2 loops together. There should be 12 stitches left on the needles. We tighten the remaining loops and make a seam.
Beautiful knitted beret for women: knitting pattern and description
The right yarn and pattern can make a product beautiful. It is important to learn how to combine this accessory with other wardrobe elements.
The calculation was made for a head volume of 54-58 cm
Materials:
- Yarn (90% wool) – 100 g
- Circular knitting needles No. 5
- Sock knitting needles No. 5
When knitting a beret, three patterns are used:
- Elastic band: knit 2, purl 2.
- Knit stitch: in purl rows all stitches are purl, in knit rows all stitches are knit.
- Braids: the number of loops must be a multiple of 12.
The beret is knitted in the round. We knit 4 repeats on each knitting needle. After 28 rows, the rapport will be 36 loops, and after 40 circular rows - 28 loops.
Density: 18 loops * 24 rows = 10 * 10 cm
The beret is knitted from the top of the head down.
Cast on 12 stitches and place 3 on each needle. We close in a circular row.
1st row: 12 persons.
Row 2: double the number of loops by knitting two from each loop - k1, k1. crossed.
3rd row: 24 persons.
Row 4: Double the number of stitches again.
Row 5: knit according to the pattern and switch to circular knitting needles.
After knitting 28 rows, the product will be 11.5 cm, and the number of loops should be 144 (with 12 initially cast on)
After 31 rows you will have 13 cm and a circumference of 80 cm.
After the 34th row, decreases begin according to the pattern.
On the 40th row the number of loops will be 112, and the height of the product will be 16.5 cm.
Next, knit a 5 cm elastic pattern and bind off the loops.
How to knit a voluminous beret for a woman?
a voluminous knitted beret with a pompom on a smiling girl.
The volume of a knitted beret is given by the pattern:
- braids
- interlacing loops
- looseness of knitting elastic
And also the secret lies in the thickness of the thread. The larger it is and the looser you sit on thick knitting needles, the looser and more voluminous the beret will be.
There are two ways to knit such a headdress:
- vertically from bottom to top without seam
- separate dome and trim, which are sewn together
Let's consider the second option for a head volume of 56 cm. It will also be of interest to beginning needlewomen.
- Make a control pattern with an elastic band, knit 1, purl 2, and achieve a density of 13 stitches. x 18 rub.,
- Cast on 91 loops for knitting a dome and knit with knitting needles No. 4-4.5 with a 1x2 elastic band to a height of 23 cm. Use circular knitting needles with fishing line or stocking needles.
- Decrease 30 stitches evenly across the entire fabric.
- After 5 cm, repeat the reduction of loops by another 30 pcs.
- At a height of 30 cm from the beginning of knitting, pull the thread through all the remaining loops and pull them together, cut the thread,
- For the binding, cast on 13 stitches and distribute them as follows: 1 edge, 1 purl, 9 knit stitches for the braid, 1 purl, 1 edge,
- Cross the braid loops at a height of 9 rows,
- When the binding is equal to the circumference of the head, connect the loops of the last row with the first or close them and sew,
- Sew the binding to the dome, evenly distributing its loops so that you get the same volume in a circle,
- Wash the finished product carefully by hand in warm water and leave to dry on a horizontal surface.
A description of one of the options for voluminous women's berets is presented below:
detailed description of knitting a women's beret with cones
How to knit a simple beret for a woman with knitting needles for beginners
A simple knitted beret can be beautiful and original. The main pattern is a stockinette stitch, but a leaf can diversify the classic version and turn it into a chic accessory.
Materials:
- Yarn (50% cotton, 50% bamboo) – 100g/238 m
- You can use an additional second color of yarn to knit the leaf.
- Knitting needles No. 3
To knit a beret with knitting needles for beginners, you will need to understand how to knit 3 loops in the place of the front one.
We knit the leaves according to this pattern:
The beret is knitted from the bottom up.
Cast on 120 loops for the elastic band and close it in a circle.
Using an elastic band 2*2 or 1*1 we knit 3 cm.
Mark with a marker the 10th loop from the beginning and the 10th from the end of the row.
We knit 10 loops (including the 10th), knit 2, yarn over, the last 10 knit.
Markers will no longer be useful.
There will be 170 stitches on the needles.
The next row is knitted with knit stitches, and yarn overs are knitted with crossed knit stitches.
The height part is knitted like this:
We knit 52 knit stitches and the 52nd one should be marked with a marker. Knit the first row with a pattern of leaves and mark the last stitch with a marker, knitting until the end of the row. We continue to knit according to the leaf pattern for about 40 rows. There will be 150 stitches on the needles.
The blue color in the diagram indicates the absence of a loop; they are indicated to maintain symmetry.
Having knitted the leaf, remove the markers and knit further with facial loops until the height is 18 cm.
To knit the top of the beret with knitting needles:
1st row we make decreases: knit the 1st and 2nd loops together with a slant to the right, knit 11, the 14th and 15th loops knit together with a knit stitch slanted to the left. You will get the first beret wedge. We make further decreases until we get 10 wedges. At the end of the row there will be 130 stitches on the needle.
Row 2: knit stitches
Row 3: knit the 1st and 2nd loops together with a slant to the right, knit 9, knit the 12th and 13th loops together with a slant to the left. We make reductions for all wedges. At the end of the row there will be 110 stitches on the knitting needle.
Row 4: knit
Row 5: knit the 1st and 2nd loops together with a slant to the right, knit 7, the 10th and 11th loops knit together with a knit slant to the left. We make reductions for all wedges. At the end of the row you will have 90 stitches on the needle.
Row 6: knit
Row 7: knit the 1st and 2nd loops together with a slant to the right, knit 5, the 8th and 9th loops knit together with a knit one slanted to the left. We make reductions for all wedges. At the end of the row you will have 70 stitches on the needle.
Row 8: knit
Row 9: knit the 1st and 2nd loops together with a slant to the right, knit the 3rd, 6th and 7th loops knit together with a slant to the left. We make reductions for all wedges. At the end of the row you will have 50 stitches on the needle.
Row 10: knit
Row 11: knit the 1st and 2nd loops together with a slant to the right, knit 1, 4th and 5th loops knit together with a slant to the left. We make reductions for all wedges. At the end of the row you will have 30 stitches on the knitting needle.
Row 12: knit
Row 13: *knit 1, knit 2, slanting to the left*, repeat **. At the end of the row you will have 20 stitches on the needle.
Row 14: knit
Row 15: *knit 1, knit 2, slanting to the left*, repeat **. At the end of the row you will have 10 stitches on the knitting needle.
Row 16: knit
Row 17: *knit 1, knit 2, slanting to the left*, repeat **. At the end of the row there will be 5 loops on the knitting needle.
We tighten the remaining loops and cut the thread.
How to knit correctly
In order to knit a beret, you need to correctly calculate the set of loops . First, take the necessary measurements (head circumference) and knit a small 10x10 cm sample from the yarn selected for the beret. This way you can find out the exact number of loops, determine which knitting needles are suitable for knitting, and how the pattern will look on the fabric. Next, count the number of loops in ten centimeters and multiply by the head circumference. Divide by ten and get as many stitches as you need to cast on the knitting needles.
Select the required yarn and matching knitting needles. To make berets from thin yarn, knitting needles with a thickness of 1.5 to 3 mm are used. If the threads are thicker, the thickness of the knitting needle should be from 3 to 5 mm. If knitting a beret is done in the round, use circular knitting needles. To knit the main pattern, knitting needles half a size larger than the thickness of the knitting needles used to knit the elastic are used.
Pattern of a knitted beret for women
This simple description of a knitted beret pattern for beginners will not require any special knowledge or experience from you. Having simple knitting skills, you can easily create a stylish accessory.
To work, take 200 grams of yarn and knitting needles number three and three and a half.
- First, you need to cast on 110 loops on the knitting needles and knit the first row with facial loops.
- Knit an elastic band, alternating knit and purl stitches. This knitting is often used in the manufacture of knitted jackets, sweaters, and necklines of products. Rib is used to make edges when knitting house slippers, and openwork elastic is used when knitting baby booties.
- Next, you will need knitting needles half a size larger. Increase by 10 stitches and work the rice pattern according to the pattern, alternating knit stitches with purl stitches in each row. This pattern is very popular and is used for knitting children's items, men's sweaters, and knitted cardigans.
- When the length of the fabric reaches 22 cm, knit the front row and increase by 30 stitches.
- Next, perform garter stitch using stocking needles. You can see how to knit garter stitch here.
- While knitting, decrease stitches every other row. After 10 loops remain, pull the thread through them, tighten it and secure it well.
can decorate such a product or a large pumpon.
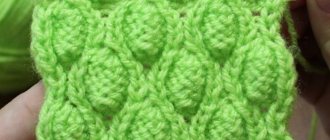
Beautiful voluminous beret, knitted with knitting needles
Voluminous knitted berets look very impressive. Since the finished fabric of the product will be quite heavy, it is necessary to insert a hat elastic band from the wrong side to match the color of the yarn. Prepare 200 grams of yarn and knitting needles number three and a half and knit a fashionable beret style with your own hands according to the pattern with a detailed description.
- First, cast on 79 stitches and knit fourteen rows of rib.
- Then knit 10 rows in stockinette stitch. In the last row you need to add 11 stitches evenly.
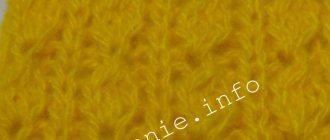
- Next, knitting is done with the “raspberry” pattern. The main thing when knitting this pattern is that the number of loops is a multiple of six. Knit 14 rows. This original pattern is also used when knitting scarves and hats.
- In the next row, add 6 loops from the broach between two purl loops on one side and the other of the “raspberry”.
- Repeat the pattern 2 more times from the first to the fourteenth row.
- Next, start decreasing stitches. When working a purl row, knit two purl stitches together that follow the raspberry row. Follow the sequence of stitches: two purl stitches, one knit stitch and two purl stitches again.
- Decrease until 28 stitches remain.
- Knit sequentially all the purl loops, two at a time, together with a purl loop. Transfer the remaining loops to the working thread and tighten.
- Sew the back seam of the beret.
Step-by-step instructions for knitting a beret for beginners
We offer a description of making a women's knitted beret with knitting needles with step-by-step photos, which is done using stockinette stitch. This is the simplest knitting method, which is used when knitting footwear, socks, mittens and other products by those who are just learning the basics of such needlework.
To work, you will need 60 grams of acrylic and wool yarn, knitting needles numbered four and five.
- First, cast on one hundred and twenty-eight loops on knitting needles No. 2.5 and knit eight rows with an elastic band.
- Then knit the circle, adding 24 stitches evenly.
- Change needles and knit 8 cm in stockinette stitch.
- Then knit two stitches together every 18 stitches.
- And another front row.
- Continue knitting, alternating between decreasing rows and knitting rows, until sixteen stitches remain.
- Now decrease by knitting two stitches together.
- Pull the working thread through the remaining eight loops and pull off the garment.
- To knit a beret loop, take your hook and cast on 8 chain stitches. Make a single crochet.
As you have seen, this knitted beret for women is very easy to make, and the description with diagrams will allow even novice needlewomen to make it with their own hands.
Description of making a knitted beret for women with a checkerboard pattern
To work, you will need circular knitting needles number four and 100 grams of melange yarn.
- Cast on 84 stitches and knit 12 rows with an elastic band.
- Then double the number of stitches (knit two from each stitch).
- Add two additional loops and knit 50 circles in a checkerboard pattern: knit 5 rows, alternating 5 knit stitches and 5 purl stitches. Then 5 rows alternating purl and knit stitches.
- Start decreasing stitches. Using stockinette stitch, knit the product, knitting two loops together.
- Pull the working yarn through the remaining six stitches and fasten off.
If desired, decorate the beret with a pompom with a bead.
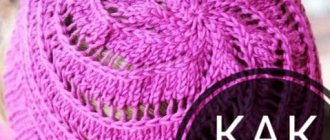
Knitting pattern for an openwork beret
For warm weather, a hat made of fine cotton yarn is ideal. We suggest knitting a simple openwork beret for women with a description of the work and a pattern diagram.
Knitting begins from the top of the head from the wrong side:
- On knitting needles No. 4, cast on 11 stitches and knit a purl row;
- in the next row, the first loop is the front one, and the second is pulled between the two loops of the previous row. The third loop is knit again. This way the row is knitted to the end. The result is 20 loops.
- We knit the third row like this: the first two loops are purl, then two loops are pulled out between the loops of the row and purl again.
- From the next row, knitting of an openwork pattern begins according to the pattern. In total you need to knit 69 rows.
- Then take number three and a half needles and knit seven rows with an elastic band.
- Close the loops and sew the beret.
Beautiful knitted Gerda beret: diagram and description
The knitted Gerda beret has become quite popular due to its originality. It is knitted with a beautiful raised pattern and requires a little knitting skills and attention.
Materials:
- Yarn (65% wool, 35% alpaca) – 50g/75 m
- Stocking needles No. 5
- Circular knitting needles No. 3.5 No. 5
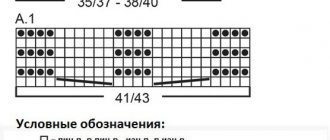
Gerda beret pattern is knitted according to the pattern
Knitting density: 17 loops * 26 rows = 10 * 10 cm
Description is given for two sizes SM and ML
Cast on 84 (96) stitches on thin needles and knit 3*3 (p3, k3) for 10 rows.
New row: *P3, k1, yo, k1, yo, k2, p1, k2, yo, knit, yo, knit*, repeat **. There will be 112 (128) stitches on the needles.
Next we knit with needles No. 5: *P3, according to the pattern (the yarn overs of the previous row are knitted in the lower lobes)* - repeat **
When there are fewer stitches, you can switch to stocking needles.
When 42 (48) rows are knitted in height, we begin to make decreases: every 3 purls. we knit one. 28(32) left. In the next rows we knit every 2 knits. 1 person There are 14 (16) loops left and the thread can be broken.
Step-by-step instructions with diagrams and job descriptions
When you have chosen a beret model for knitting, you should select yarn that matches the color and thickness, and knitting needles. Synthetic or natural thread can be used. Half-wool or wool is used for winter hats because it retains heat well. A thin cotton thread is ideal for summer as it allows air to pass through and does not overheat the skin.
Knitting pattern for a beret made of thick yarn using an English rib
How to knit a lady's beret using an English elastic band? A model with such a pattern looks beautiful, and there is nothing tricky or complicated in its creation. For knitting you will need 100-150 g of yarn. Step by step instructions:
- Start knitting from the edge (height 3 cm) with a simple elastic band or a garter pattern with thinner needles.
- Continue knitting with the main pattern. English rib needs to be knitted with thicker knitting needles: the first row is 1 knit, purl 1, the second row is 1 knit, straight yarn over, the purl one is removed, the loop that remains on the right knitting needle is not knitted.
- The head of the beret is 10-13 cm, excluding the height of the side. Then switch to a 1x1 elastic band, knitting 4 rows like this. Then the loops are decreased according to the scheme described below: 1 row – 2 p.l., 1 l., 1 p.; 2 – knit according to the pattern; 3 – 2 p.l., 1 p.; 4 – according to the drawing; 5 – we knit completely 2 sts. l. below; 6 – from.; 7 – repeat 5; 8 – repeat 6.
- Next, tear off a thread of such size that it is enough to sew the beret together. We remove the remaining loops onto the thread and tighten them tightly. We sew the beret, grabbing 2 threads along the edge.
Master class on knitting a warm beret with large braids
One of the interesting, voluminous and beautiful patterns is braids. It is ideal for creating a lush, warm headdress. To work you will need 150 g of yarn, double-ended and circular knitting needles. Step by step instructions:
- Cast on loops according to the girth size, knit 10 circular rows with a 3x3 elastic band. After this there is a transition row: 3 p., 1 l., 1 yarn over, 1 l., 1 yarn over, 2 l., 1 p., 2 l., 1 yarn over, 1 l., 1 yarn over, 1 l. Continue this pattern to the end of the row.
- Switch to larger diameter knitting needles and knit 7-8 repeats with a braid pattern.
- Next row in the round: purl three together. Next we knit 2 liters each. behind the front wall to the end of the row. Cut the working thread and fasten.
French voluminous mohair beret for the winter
Voluminous berets always remain in fashion. They retain heat well and look interesting. For knitting you will need 150 g of mohair, knitting needles No. 7. Step by step instructions:
- First, knit the upper part of the beret: cast on 91 loops, knit with an elastic band of 1 k, purl 2. Make the fabric 23 cm, then decrease 30 stitches in the first row. Make a three-centimeter elastic band.
- Decrease 30 stitches again. Knit with an elastic band until the height of the upper part reaches 28 cm. Tighten the open loops.
- The binding is knitted separately according to the pattern: 1 r. – 1 p., 9 p., 1 p.; 2 r. – 1 p., 9 p., 1 p.; 3 – 1 purl, 3 knitting needles, remove three on an additional knitting needle, 3 l., knit the removed knitting needles, finish with a purl; 4 – 1 purl, 3 liters, remove three for an additional 3 liters, knit the removed ones with knit stitches, finish with a purl; 5 – purl 1, knit 9, purl 1; 6 – purl 1, knit 9, purl 1; 7 - 1 purl, remove three again for an additional one, knit 3, knit the removed knits, 3 knits, 1 purl; 8 - 1 purl, again we remove three for an additional one, 3 liters, knit the removed ones with knit stitches, 3 liters, 1 purl.
- We repeat the rows until the length of the binding reaches 56 cm. We close all the loops. To assemble the beret, we make a seam along the smaller edge of the binding and on the top part. Sew to the bottom edge of the top, making small gathers.
- Wardrobe - how to choose by size, materials, design and cost
- Non-state fund Soglasie - reliability rating indicators, programs and profitability
- How to receive New Year's children's payments
Beautiful openwork beret made of fine yarn
Knitted berets can be openwork, with shaped gaps, which makes the product a decorative accessory. The version of the headdress proposed in the master class is knitted quickly and easily. To work you will need sock knitting needles No. 3.5, 60 g of thin yarn, a crochet hook, circular knitting needles No. 3, No. 3.5. Step-by-step master class:
- For the strap, cast on 11 sts on size 3 circular needles. We knit with an elastic band 1x1 52 cm.
- Close the loops and crochet the edges.
- From the edge loops we raise the front strips: one loop from the edge, yarn over.
- We knit 4 rows in a circle: first – knit; 2 – facial; 3 – 2 loops alternately knit together, yarn over; 4 – facial.
- We knit a couple of rows with a scarf pattern.
- We alternate openwork and scarf patterns.
- We knit 11 cm, form the bottom with a garter pattern, decreasing the required number of loops in every fourth row, knitting together 3 and 4 of one knit stitch. We make reductions 5 times, knitting 20 rows.
- We knit the remaining two knit stitches.
- We assemble the last row with a crochet hook.
- Cast on 5 loops, knit a five-centimeter elastic band, and close.
- Fold the piece in half and crochet the ends. Place the resulting loop in the hole between the remaining beret loops and tighten the loops.
Fashionable youth hat in the shape of an angora beret
In this master class you will learn how to knit a deep youth headdress. It looks voluminous and beautiful due to the cone pattern. For it you need to select 150 g of angora wool yarn, knitting needles No. 5, No. 7. Step-by-step instruction:
- We cast on No. 7 82 loops. We start with the cone pattern: 1 p. - purl; 2 – 1 chrome, *3 in. purl, from 1 p. knit 3 (1 p., 1 p., 1 p.)*, repeat the area marked with asterisks, 1 edge; 3 – purl, 4 – 1 edge, *knit 3 from 1 loop 3, 3 inm. purl*, repeat the area marked with asterisks.
- At a height of 14 cm between the edges, cut by 16 loops. Do this three times on every other row.
- Next, cut by 8 stitches on the purl row. Tighten the loops with thread.
- On smaller knitting needles, pick up stitches along the cast-on row, knit 6 cm with a pearl pattern: alternating 1 stitch, purl 1. Sew a seam at the back of the head.
Description of a pretty beret for a girl
This master class describes the process of knitting a beautiful beret for a child. It is very simple to make, so even a novice needlewoman can master this product. For knitting, you need 100 g of yarn of the selected color, circular knitting needles No. 3. Step-by-step instructions:
- Cast on 88 loops, make a four-centimeter 1x1 elastic band.
- Knit 1 p. knit stitches, the next one – purl stitches.
- Again make 4 cm with an elastic band.
- Add 2 knits, yarn over. Knit only with knit stitches, increasing throughout the entire row.
- Next, knit with knit stitches without making any increases.
- After 40 rows we make decreases: 10 l., 2 l together. After one row without decreases.
- Next decrease: 9 l., 2 l together. Next row without cuts.
- Third decrease: 8 l., 2 l together. The next one is without abbreviations.
- Continue decreasing until 12 stitches remain. Pull it together with thread and sew a seam at the back.
How to knit a beret from melange yarn in a simple way
Melange yarn is most often used for simple patterns, since the thread itself looks original. In this master class you will learn how to knit a beret in an easy way. To create a headdress, you need to select 100 g of yarn of the color you like, knitting needles No. 3, No. 5. Step by step instructions:
- For a C grade, cast on 9 loops, making an elastic band 52 cm long.
- Raise the loops on a five, working on the long edge of the rim: one loop from the side braid, one yarn over.
- Knit all knit stitches in the purl row.
- We make 10 cm in garter stitch.
- We make decreases by knitting together through a couple of loops.
- We repeat the cuts three times every three rows.
- We knit 2 loops together and tighten the remaining ones with thread. We sew the beret with a knitted seam.
Stylish autumn beret made of grass on knitting needles
Grass is a long-pile thread used in knitting. The products come out original and beautiful. This yarn is good for beginners because it hides all the flaws. For a beret you will need 100 g of grass, 100 g of wool, knitting needles No. 4.5, No. 6. Step by step instructions:
- Cast on 60 stitches with wool on knitting needles No. 4.5. Make 4 cm with a 1x1 elastic band.
- Join the grass and wool together and continue knitting using size 6 needles.
- Every 5 we add a loop to get an extension.
- Knit 5 cm straight.
- We shorten each knit stitch by decreasing a stitch every 5.
- Gather the remaining loops and pull off. Using a knit stitch, join the edges of the beret together.
Method of knitting a beret using short rows of melange yarn
The pattern presented in this master class is knitted in short rows using wedges. The product looks very interesting, especially together with a similar scarf. It is better to use melange yarn in purple, brown or another color. Step by step instructions:
- Cast on 65 stitches, knit one row.
- Next you need to shorten the row by 3 loops on the right.
- We under-knit 2 loops in rows 4 to 32 in each even row.
- On the left, we simultaneously under-knit 4 sts in the 25th row, 3 sts in 27, 29, 31, 33.
- Turn the knitting and knit all the stitches on the right needle.
- We make another row, knitting all the loops of the shortened rows.
- It turns out a wedge, of which 12 pieces are needed.
- Sew the vertical seam of the beret. Measure the elastic band according to the circumference of your head and connect it into a circle.
- Fold up the bottom of the beret and hem it with invisible stitches, inserting an elastic band.
How to knit a beret from bouclé yarn
Hats knitted with boucle yarn look very interesting and original. This thread does not require the use of tricky patterns, since it is self-sufficient on its own. To work you will need 200 g of bouclé yarn, knitting needles No. 3, No. 3.5. Step-by-step instructions:
- We cast on 88 loops on smaller knitting needles, making a three-centimeter 1x1 elastic band.
- We continue with large knitting needles. We knit in purl stitch or stockinette stitch.
- In the first row we add a loop from the broach every 11 stitches.
- We knit the next 4 rows evenly.
- We make additions several times in a checkerboard pattern.
- We knit 3 cm evenly.
- We cut each knit stitch by 12 stitches.
- When there are 10 stitches left, we collect them in a bunch with thread and fasten them from the inside out.
Warm winter beret with knitting needles: diagram and description
Knitting a beret for winter is a very important activity, as it can not only be a warming accessory, but also complement the image. Winter is a great time of year when you can create bright looks with the help of warm accessories.
Bouclé yarn will help create a warm and original item.
Materials:
- Yarn – 90 g
- Stocking needles No. 5
- Markers
We knit in circular rows using stockinette stitch - all stitches are knit.
Before you start knitting a beret, you need to determine the knitting density and calculate the number of loops to cast on. It must be a multiple of 6.
Distribute all stitches onto 4 knitting needles and knit 1 row, placing a marker at the interface between the 6 wedges.
Next we make additions in every 4th row, that is, in each of the wedges there is one loop.
After 6 cm, the increases stop. Next we knit 2 cm and then decrease in every second row. Having knitted the desired height of the beret, break the thread and pull off all the loops. The thread needs to be secured on the wrong side.
We check the beret against the pattern.
At the bottom, crochet a 5 cm headband with single crochets.
Beret with braids: diagram and description
Patterns with braids have always captivated knitters. Any product can become unique when using a pattern with braids. A knitted beret with braids will turn out warm and voluminous.
Beret size: 52/54
Materials:
- Yarn (50% acrylic, 50% wool, 240m/100 g) – 200 g
- Knitting needles No. 4
Patterns used:
- Front stitch: front rows - front loops, purl rows - purl loops
- Garter stitch: purl all stitches
- Elastic band 1*1: knit 1, purl 1.
- Openwork pattern: front rows are knitted according to the pattern, and purl rows according to the pattern.
According to pattern 2, a fantasy pattern is knitted, in which the purl rows are knitted according to pattern B.
The beret is knitted with yarn in two folds of thread.
Cast on 104 loops and knit a 2 cm ribbed pattern. Then we move on to a fantasy pattern (diagram 2). After 15 cm, start making decreases evenly and in every third row you need to close 20 loops.
We continue until there are 5 loops left on the knitting needles. Pull all the loops and sew the beret seam at the back.
Description of knitting patterns for berets
The beret is considered not just an ordinary headdress, but also an adornment of a woman’s image. Thanks to the abundance of all kinds of patterns, a hand-knitted hat can become a real work of art. Expressive, delicate woolen intricacies of threads emphasize the oval of a woman’s face in a way that no other headdress can, while reliably retaining heat and shading the created image.
- Pensioners will not be transferred to Mir cards for a long time
- 12 things grandparents shouldn't do
- How to choose plastic windows for pensioners
— The zigzag pattern is a variant of openwork knitting. It perfectly combines even contrasting colors, creating a wavy pattern with breaking lines. Zigzag gives knitted items a modern, dynamic look. Even a beginner can master it.
— Hedgehog – this pattern is created by adding yarn overs. The pattern is knitted very simply, but it looks interesting and original. The pattern looks beautiful in snoods, hats, and children's clothes, which are voluminous and fluffy.
- Peacock tail - combines wavy lines. It looks very impressive, as you can see from the photo. The peacock tail looks especially interesting when using fancy yarn, including melange.
— Leaves – the pattern looks very elegant, charming. A beret with this pattern is ideal for autumn. Leaves are created by alternating decreases and yarn overs. Suitable for knitting hats, tunics, blouses, easy to make.
How to knit a classic women's beret with knitting needles
Any knitter will want to knit a classic beret with knitting needles, and not only for herself, but also for a child or sister, or you can give it as a gift to a friend. When you don’t know which option the beret wearer might like, the ideal solution would be to knit a simple classic beret.
Materials:
- Yarn in 2 threads: angorgold batik
- Knitting needles No. 2, No. 2.5
Cast on the required number of loops on knitting needles No. 2 (it is calculated from the volume of the head and the sample knitted with your yarn)
We knit with an elastic band 2*2 (2 knits, 2 purl) 4 cm and then purl one row.
The moment comes to make additions: we add 32 loops evenly by knitting two from one front loop.
We switch to knitting needles No. 2.5 and knit until there are 14 cm in knit stitches.
Divide the loops into 8 equal parts - 8 wedges. Decrease 20 stitches per row until there are 8 stitches left on the knitting needles.
Pull the loops and secure the thread, after which you can trim it by pulling it to the wrong side.
This version of the beret is considered classic, since it is knitted with the simplest pattern and does not require special application or choice of style.
You can knit different colors of yarn and get berets for any outfit
You can also decorate the beret, if desired, with beads, flowers or other decorative elements.
Video tutorials on knitting hats and berets for beginners
A beret is a fashionable women's headdress that can create a stylish look with both a feminine outfit and casual jeans. You can choose a model for different face types. The advantage of the form lies in the fact that it suits almost everyone. The YouTube videos below clearly describe the process of knitting hats with different patterns: with wedges, corn, braids. A knitting demonstration will allow any novice craftswoman to master creating a beret with her own hands. The main thing is to be patient and carefully follow the actions of the needlewomen in the video.
How to knit a classic beret with wedges with your own hands
A detailed lesson on knitting a beret hat for a woman
Takes with garter stitch knitting needles: how to knit according to the pattern and description
The garter stitch beret can also be classified as a classic type. It is knitted in one pattern and requires the ability to knit purl and knit stitches.
Materials:
- Yarn - 1 skein of the main color and the rest of the yarn in a contrasting color.
- Spokes
- Hook
Collect 110 loops
Row 1: knit stitches
2nd row: elastic band 2*2
3rd row: according to the picture
We knit 5 cm with an elastic band
The last row of ribbing should be a purl, but we add 28 stitches evenly using yarn overs.
Next, we knit according to the garter stitch pattern: we knit all the loops.
We continue to knit about 11 cm in garter stitch, changing the color of the yarn as desired: 22 rows in the main color, 4 rows in the contrasting color, 2 rows in the main color, 2 rows in the contrasting color.
Making decreases: divide the fabric into 6 equal parts of 23 loops, placing markers.
1st row: knit, in which we knit the first 2 loops with one knit, then we knit two loops together to the marker, and after it with one knit, the last two loops together with the knit.
Cut 12 stitches in a row.
Rows 2-3: garter stitch without decreases.
Row 4: repeat row 1 with decreases of 12 stitches.
Rows 5-6: garter stitch without decreases.
Row 7: repeat row 1 with decreases of 12 stitches.
We make decreases only in the front rows; we do not make decreases in the purl rows.
When there are 18 loops on the knitting needles, decrease in half: tie every two knit stitches with one loop.
There are 9 loops left that need to be transferred to the thread and tied. Sew the side seam.
Hedgehog beret with knitting needles: knitting pattern and description
Knitting a beret with this pattern means adding a warm and original item to your wardrobe. In any season, a hedgehog beret will be a relevant accessory.
The hedgehog pattern is knitted like this:
1st row: edging, knit 1, purl 1, before the edge there should be a knit stitch, edging.
2nd row: knit with knit, purl with double crochet without knitting
Row 3: add another yarn over to the double crochet stitch and throw the stitch together onto the right knitting needle without knitting. We knit purl stitches with knit stitches.
4th row: we knit a loop with two yarn overs, purlwise, purlwise - knitted.
This pattern is also called corn.
On circular needles No. 3, cast on 88 stitches and knit with an elastic band 2*2 7 cm.
Take knitting needles No. 4.5 and knit with a 12 cm pattern.
Next, we close three loops together 15 times and knit two repeats of the pattern without increases. And in the next pattern repeat, cast off 3 loops 10 times. Knit one rapport without increasing, and then pull all the loops together.
The height is 17 cm and 17 repeats.
Openwork beret with knitting needles: diagram and description for beginners
Things knitted with openwork patterns with knitting needles look very beautiful and delicate. The beret can be worn on warm spring days or in the first days of cold weather with the onset of autumn. And even on warm summer days you can wear an openwork beret that will suit your look.
Description suitable for head volume 51-56 cm
Materials:
- Yarn BoutiqueMidnight (red heart)
- Knitting needles No. 5.5, No. 8 (circular)
- Knitting needles No. 8 (hosiery)
- Marker
Knitting density: 13 loops * 16 rows = 10 * 10 cm
Cast on 80 loops and tie with a 2*2 elastic band approximately 4 cm.
Take needles No. 8 and knit another 4 cm.
Row 11: knit 2 knits 4 times from one loop (behind the front, then behind the back wall) - evenly distributed along the knitting needle, the remaining loops are knitted.
Row 12: knit
Rows 13, 20, 27: *K2, yarn over*, repeat **
Rows 14-19, 21-25: knit
Row 29: *k3, k2*, repeat **, 64 stitches left
Rows 30, 32, 36, 38: knit
Row 31: switch to double needles, *knit 2, knit 2*, repeat **
Rows 24, 37: knit 2.
There are 8 loops left, pull them together with thread and secure it on the wrong side.
An openwork knitted beret looks very gentle and is ideal for a romantic look.
Beret with knitting needles: diagram
pale blue knitted beret with leaves and a scarf to go with it.
The pattern of leaves looks nice on a women's beret and is suitable for both warm summer and cold autumn days.
Of the nuances when choosing leaves as the main pattern for knitting a beret, we note:
- combine them with braids on the trim or as stems on the main beret fabric,
- carefully calculate the number of loops so that each pattern repeat is visible on the finished product and does not suffer when the bottom loops are shortened,
- if you like berets with minimal volume, knit 7-8 repetitions of the pattern, if with maximum volume - 10-12,
- when knitting the bottom, switch to knit stitches or select patterns for smaller leaves,
- The center of the bottom of the beret, made in the shape of flower petals, looks original.
For inspiration, look at several leaf patterns shown in the pictures below.
knitting pattern for leaves, option 1
knitting pattern for leaves, option 2
knitting pattern for leaves patterns, option 3
knitting pattern for leaves, option 4
knitting pattern for leaves patterns, option 5
knitting pattern for leaves patterns, option 6
How to knit a beret with shortened rows of knitting needles
What girl doesn't love fashionable and original things? But it’s not always possible to find something in a store that is both stylish and suitable in size and color.
This trendy beret has become all the rage in recent days, and it’s not that difficult to knit. You just need to master knitting short rows with knitting needles. A knitted beret can be decorated with a large pompom.
Materials:
- Yarn NakoPure Wool (100% wool, 220m/100g), knit in two threads.
- Knitting needles No. 4, No. 5 (circular)
Knitting density: 18 loops * 20 rows = 10 * 10 cm
Knit a swatch from your yarn to calculate the number of stitches you need to cast on. If you want a tighter fit to the head, reduce the number of loops by 10%
For a head circumference of 54-56 cm, you need to cast on 74 +1 loops in the Italian way. The extra loop is needed to join into a circle.
Knit 2 round rows with a hollow elastic band.
Row 1: K1, slip stitch purlwise, thread before work
2nd row: remove the loop as knit., leave the thread behind the work, 1 purl.
We continue to knit the beret in short rows.
Row 1: knit stitches, leaving 4 stitches at the end of the row.
Row 2: knit, do not knit 2 loops on each side.
Row 3: knit, do not knit 2 loops on each side.
We knit in this way until the remainder of 7-8 loops.
We knit a row up to the marker and another row until all the joints of the turns are connected to the loops.
Using size 5 needles, knit an English rib in the round.
Row 1: K1, yo, slip 1 stitch purlwise.
2nd row: yarn over, remove the loop as knit, knit the loop and yarn over together purlwise.
3rd row: yarn over and knit, knit together, knit, yarn over, remove loop as purl.
4th row: repeat from the 2nd, like all other even rows
Row 5: repeat as row 3, as well as all odd rows below.
We continue to knit to the required height.
Making decreases:
We knit 4 rows with an elastic band 1*1 and close the crown.
You can sew on the pompom after you have done the WTO and dried the beret.
How to knit a mohair beret for a woman
It is impossible to count how many models of hats there are. There may be different variations of knitted berets, but some of them remain popular from season to season. Berets for women knitted from mohair yarn look feminine.
Material:
- Yarn Laska Troitskaya (50% mohair, 50% acrylic; 430m/100g) – 1 skein
- Knitting needles No. 5.5
We cast on 71 loops. Rib pattern 1*1 (k1, p1) knit 21 rows
Row 22: evenly add 34 stitches in the knit stitches to make a total of 105 stitches.
We knit 20 rows with a 1*2 rib pattern (knit 1, purl 2)
Row 43: add 34 loops (total 139 loops)
We knit 14 rows with an elastic band 1*3 (knit 1, purl 3)
Row 57: decrease every 2 stitches, knit them together. Total 105 loops
We knit 10 rows with an elastic band 1*2
Row 67: decrease - 71 loops and knit 8 rows according to the pattern
Rows 85-86: knit two loops together. There are 18 loops on the needles.
We collect all the threads onto the working thread and fasten it.
Knitted mohair berets look more delicate than similar models made from other yarns. But at the same time they are also a little warmer, which is the advantage of such yarn.
Takes from mink fluff yarn
Size: 54 – 57.
For knitting you will need:
- yarn “Mink Down”, 50 g per 350 m – 60 g;
- knitting needles No. 3.5 and No. 4.
Patterns used:
- elastic band: 1 l. p. on 1 and. P.;
- knit stitch: when knitting in the round, knit all stitches. loops.
Density of knitting on faces. satin stitch made with knitting needles No. 4 after WTO (wet-heat treatment) - 23 stitches by 10 cm.
Description We use knitting needles No. 3.5 to cast on 100 stitches plus 1 stitch to complete the circle.
We knit an elastic band on 8 rows.
Let's go to sp. No. 4 and the “front stitch” pattern.
We divide the entire number of loops into 10 sections of 10 stitches each.
We perform stocking knitting. In each section of 10 loops we knit 9 l. p., then knit 1 l from the previous row. p., knit 1 l. p. from the last 10th loop of the section. As a result, we get 11 points at each site.
We knit the next circular row without increments.
Then we knit the row again with increases. We alternate such rows until each fragment contains 20 stitches.
Next 4 p. we knit without additions.
Now let's start making decreases.
We carry them out in a mirror manner to the increases. We make decreases by knitting the last two loops in each fragment into one loop tilted to the right.
We make decreases until we get 10 stitches in each fragment.
Then we make decreases until 5 stitches remain in the work. We knit a tail with a hollow cord on 3-4 rows. We close all the loops, tighten them, and hide the end of the thread.
Beretik is ready!
Video tutorial
Express master class on knitting a beret from “Mink Down” yarn on video, suitable for beginner needlewomen.
Knitting a beret with wedges: diagram and description
Almost every knitted beret comes with wedges. They are formed by expanding and decreasing loops towards the crown. Only if the pattern is openwork, then it is possible not to monitor the formation of wedges. Knitted berets with knitting needles can be classified as classic versions of hats.
Material:
- 100 g yarn
- Colored markers
- Knitting needles: toe, circular
Tip: look for yarn that can be knitted with size 3 needles. This option will keep its shape and have optimal thickness.
Knit the beret in stockinette stitch, and you can decorate it by knitting a couple of rows with a mesh pattern. Pattern repeat 2 loops - tie the first 2 loops together with a knit loop with a broach, plus a yarn over. Knit even rows with knit stitches.
This beret is knitted from the top of the head.
We cast on 12 loops and divide them into 4 knitting needles: on the 1st and 3rd knitting needles there are 2 loops each, on the 2nd and 4th knitting needles there are 4 loops each. We close the row in a circle.
Row 1: knit stitches
2nd row: we double the loops: we knit two from one loop - one loop is knitted behind the front wall, and it is not removed from the left knitting needle, the second loop is behind the back.
Divide the stitches on needles 1 and 3 in half, separating them with markers.
You will get 6 segments of 4 loops each.
We knit the main fabric: in each odd row we double the outer loops. We knit even rows according to the pattern.
If knitting a product on double needles becomes uncomfortable, switch to circular ones.
Knit a circle with a radius of 12 cm and then you can knit the mesh part - 2 cm.
We finish by knitting a medallion with a radius of 14 cm. Now you can decrease the loops.
In each odd row, in the diagonals that separate the segments from each other, knit 3 stitches so that the central part is above the outer ones. We knit like this 6 cm.
Next we will knit a double hollow elastic band into which you can put an elastic cord. The loops are closed with a knitted seam.
Corn beret with knitting needles: diagram and description
The corn pattern, or hedgehog, is a favorite among many needlewomen, as it is easy to perform, but looks original. For those who want a voluminous item in their wardrobe, this beret option will be the most suitable.
Knitting a beret with a corn pattern will not take much time.
Calculate the required number of loops by knitting a sample of yarn and calculating the number of loops based on the girth of your head.
First, take measurements from your head: the circumference of your head and the distance from the top of your head down to the convex part of your head.
You need to first knit 10 cm of the sample with the desired pattern and calculate how much you need to gain to circumference your head.
The elastic band of your beret should be smaller than the main fabric.
The elastic should only be measured in a stretched state.
The corn pattern is knitted according to the following pattern:
It is most convenient to knit such a beret with medium-thick yarn (wool mixture) and knitting needles No. 2.5 and No. 3
How to knit the corn pattern:
1 row with an elastic band 1*1, taking into account the edges.
2nd row: we knit the front loops with knit stitches, but do not knit the purl loops with a double crochet.
In the third row , remove the double crochet stitch without knitting and add another yarn over. We knit purl stitches with knit stitches.
In the 4th row, knit a loop with 2 double yarn overs, purlwise, and purl stitches with knit stitches.