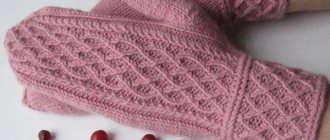
In temperate Russian latitudes, fashionable leather gloves do not always save you. The winter frosts that prevail in our area force us to take care of our own hands. So you have to pick up the knitting needles.
The modern art of creating designer knitted clothing models does not stand still, and much easier ways to create mittens have long been invented than traditional knitting on 5 needles with the endless slipping of some stubborn knitting needle from your hands. Knitting mittens on two knitting needles is easy and simple. Even with a chronic lack of time, this important task will take no more than two evenings. Therefore, we take out knitting needles and yarn, sit down in our favorite chair and start working.
How to knit mittens on two knitting needles? Preparations
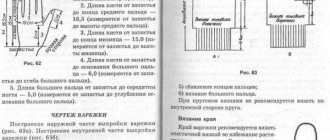
Making mittens on two needles is possible in two ways. You can knit the top and inner parts separately and then sew them with an invisible knitted seam or crochet them with a beautiful decorative runner. Or you can knit both parts with one fabric. This work will have a seam on one side. By and large, both of these methods are similar. It is better to take woolen yarn, if possible non-prickly, of medium thickness (250-300 meters in a 100-gram skein). Knitting mittens on two knitting needles from a thread of this thickness will be most comfortable using tools No. 2.5-3. It’s a good idea to make a sample loop test before work to calculate the number of loops required for casting on. Having knitted a small sample with the chosen pattern, you should steam it and, measuring it with a ruler, find out how many loops and rows are in one centimeter. Then we measure the circumference of the palm, divide by 2 (if we knit two halves separately) and do a simple calculation of the required number of loops. The height of the elastic and the distance to the beginning of the finger and the total length of the product can also be calculated using the loop test. After performing these calculations with a set of the optimal number of loops, you can no longer go wrong. So, we knit mittens on two knitting needles. We already have a scheme to follow.
Knitting the back side of the mitten: elastic
To make a mitten on two knitting needles, we cast on the knitting needles the calculated number of loops + two loops for freedom of fit and seam.
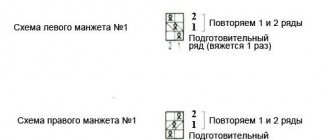
We begin work with an elastic band, which can be anything at the discretion of the craftswoman - 1x1 or 2x2. You can knit the cuff with a jacquard or relief pattern. The elastic band made with garter stitch looks good. Its height also depends on the model chosen by the knitter. The elastic is always knitted with needles of a smaller diameter than the other parts - this rule must be strictly observed. The cuff will stretch less and fit tightly around the wrist.
Middle part of the mitten
Knitting mittens on two knitting needles greatly simplifies the work. After completing the elastic band, we switch to knitting needles of larger diameter.
The middle part of the mitten is made with the pattern you like until the end of the little finger. Now we gradually reduce the fabric, knitting the two outer loops together in each front row. If you want the toe of the mitten to be triangular, then decreases continue until there are 2 loops left on the needles, which are subsequently closed. The oval shape of the toe is achieved as follows: decrease the outer loops (up to 8 loops) and close the knitting.
Product without seam
All mittens start knitting from the cuff and go up. When we reach our fingertips, we go back. This method is used to knit a mitten without a seam. We will knit for a 7 year old child.
On the knitting needles we cast on half the stitches that we would cast on if we were knitting completely for the entire wrist. Taking into account the pattern, if the pattern needs a central buttonhole, we cast on an odd number, and if not, then an even number. Our mitten will have 15 loops. When you have picked it up, we knit it purlwise - this is necessary for a beautiful hem on the front side. Then 6 rows must be knitted with facial buttonholes. We start the seventh row with the edge stitch, then the knit stitch, *make a yarn over and knit two together with the knit stitch* and so on until the last stitch of the row, and again the edge stitch. And in the next row - the eighth - we knit everything purl. It turns out to be a row with holes - this is necessary to make cloves.
Related article: How to sew a ladies' jacket by Coco Chanel: sewing master class
We knit further as if we were just knitting a regular fabric. When we reach the beginning of the thumb, we begin to cast on loops for it. To do this, in the front row, without knitting one buttonhole to the edge buttonhole, there should be two loops left on the left knitting needle. Now let's add one loop. We do the same actions in each front row, it is important to do everything in the same place. It turns out that we will not reach three loops, then four, and so on, until there are 7 loops in the increase.
9 buttonholes will be the buttonholes of our finger. So we knit 9 loops in height to the size of a finger. Now we need to make decreases on each front row - we make one out of two buttonholes. We knit this way until there are three loops left on the knitting needle. Remove the edge stitch to another needle, add, knit stitch, add again, knit the last buttonhole of the row and the edge stitch together, knit stitch only. The work needs to be turned around. Again we do not knit the edge buttonhole and remove it, then we knit it purlwise, and we knit the last buttonhole together with the edge buttonhole with a purl buttonhole. We turn it over again and repeat it all over again until there are 7 buttonholes on the knitting needle.
It turns out that knitting goes in the opposite direction. We continue knitting until the moment where the loops need to be separated. We knit a purl row of 7 buttonholes. Now we need to remove the resulting buttonholes onto a pin. Then we continue knitting the mitten. When the knitting reaches the tip of the little finger, we begin to decrease the loops on both sides on the front rows until we get 7 buttonholes.
Now we will knit the mitten in the opposite direction, as we did with the finger. We knit until we get 23 buttonholes - this is two less than on the back side. We continue to knit in regular stitch until we reach the pin. We insert the knitting needle into the finger loops and continue knitting, only we make decreases in the place where we made increases. And so we knit until the end, the main thing is not to forget to make holes. We knit the last row with front buttonholes, and fasten the last loop with a thread. We cut the thread so that it remains possible to hem the cuffs. We turn it over to the holes and carefully sew the cuffs with thread. Ready!
Related article: DIY round box made of paper and cardboard with a lid
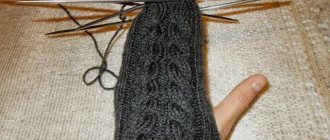
There is nothing complicated, the main thing is to follow the instructions, everything will work out. Using two knitting needles you can knit with a relief pattern.
Knitting mittens on two knitting needles: inner half
We begin knitting the second part of the mitten from the palm side. Up to the line of the beginning of the finger, the work is done in the same way as on the back of the mitten. Particular difficulty in knitting the inner part of the mitten is the execution of the finger. Having tied the finger before starting to perform, we divide the number of loops into 4 parts and remove 3 of them from the needle, collecting them on a pin. For the loops remaining on the knitting needle, we cast on the same amount with an additional thread - that is, we double the number of loops on the needle. We cut the contrasting thread and knit a rectangle from these loops to the height of the thumb. We close the loops in this way: we collect them on a thread, pull them together and tie them tightly. Then we continue knitting the fabric: carefully remove the additional thread at the base of the finger and collect the released loops on a knitting needle. We add loops from a pin to them and do the rest of the knitting in the same way as we did with the upper part of the mitten. It should be remembered that you need to perform the thumb on the mittens in a mirror image.
Knitting the back side
The front side of your product is finished, now you need to move on to the other. To do this, the first one (edge) is removed, then the knit one is knitted, then there is an addition - we make a yarn over, knit the front one, purl it, knit it again and yarn over. The addition is obtained in front of the track. The edge loop is not knitted, but is removed onto the right needle and, grabbing the edge loop of the previous row, we knit them together using the knitting method. Turn the knitting needle and knit the loops according to the picture. The yarn overs on this side will be knitted in the front way. At the end, we knit the edge loop together with the edge loop of the previous row using the purl method.
At the end of each row, the edge loops are knitted: on the wrong side - purlwise, on the front side - knitted. The next row is again adding loops. The first one is removed, the next one is knitted, then the yarn over. Then we knit according to the pattern, and before the penultimate loop we again knit the yarn over, knit stitch, and knit the two edge loops together. Do not forget to knit the edge loops on the front side using the knit method, and on the wrong side using the purl method. The next row without additions is knitted according to the drawing, and at the end two edge rows are knitted using the purl method. Try to tighten the thread when knitting yarn overs to avoid creating too large holes.
In the next row, remove the edge stitch, knit a knit stitch, yarn over and knit according to the pattern until the penultimate stitch. Yarn over again, then knit and two edge yarn overs together in the knit method. Using this method, you need to knit until you have 17 stitches on the knitting needle. Now you should have 13, so there are two additions left, which is 4 rows. Having made the last addition and knitted the wrong side, proceed according to the drawing so that in total you get 8 cm from the beginning of the fingers. Having reached this figure, we will begin to knit the finger.
Another way to knit a finger
When knitting both sides with one fabric, the finger is knitted differently. Starting from the base, additions are made on both sides of the central loop. When a sufficient number of loops are cast to encircle the finger, the fabric for the finger is knitted with additional knitting needles and closed in the same way as described above. To make it easier to knit further, you can immediately make a neat seam on the finger. The middle part of the mitten and its completion are carried out similarly to the description of the product from two separate parts. Decrements are made along the edges of the knitting and on both sides of the central loop. This is how knitting of mittens on two knitting needles ends.
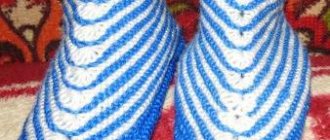
Product assembly
The finished knitting halves are sewn together with an invisible knitted seam, picking up the broaches at the edge loops with a needle alternately on each side. Knitting a mitten on two knitting needles is extremely convenient if you plan to further decorate the top of the product, for example, with embroidery.
In this case, you first need to finish decorating, and then sew both halves of the mitten. As you can see, it’s not at all difficult to knit mittens on two knitting needles. Children's models are performed in the same sequence as for adults. Only the dimensions, number of loops and decoration techniques change.
What are the advantages of mittens?
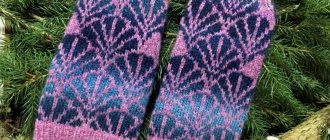
- in mittens, the fingers are collected as if in one “chamber”, thus, larger fingers (with better blood circulation) warm small ones (for example, the little finger); - the total surface area of the mitten is larger than that of the glove, therefore heat loss is reduced; — mittens are very easy to put on. This is especially important if they are put on a child’s hand. But the most important advantage is that you can knit mittens , choosing any color and thickness of yarn you like, and also decorate them to your liking. Alena Zhukovina talks about her process of knitting mittens; we talked about her earlier here.
Mittens, like socks, can be knitted on 5 knitting needles, but when it comes to a small-sized product, inexperienced needlewomen will have to put in a lot of effort to get the desired result. But the most important nuance is that with 2 knitting needles you can knit two mittens at the same time, so they will be identical even when knitting the most complex pattern.
READ ALSO: DIY children's clothing