Fashion does not stand still, but the monotony presented in fashionable and expensive boutiques is already boring and does not receive applause from real ladies. Therefore, modern women are happy to master the knitting technique in order to please themselves and their loved ones with exclusive clothing models that no one else has. Beginner knitters do not immediately jump at complex and difficult patterns, but start with simple and uncomplicated ones - it is important for them to master the technique of knitting basic elements, for which they often knit full-fledged items. Stocking knitting has these features, a diagram whose description will be covered in this article.
What is it for?
The name “hosiery stitch” means that it is used to knit socks, stockings and other hosiery items. But this type of knitting is used not only for this - even experienced needlewomen knit sweaters, sweaters, hats and other products using stockinette stitch. The presented pattern is popular because other patterns can be combined with stocking stitch - these can be an openwork yoke, an insert and other details.
The second name for this pattern is knit stitch. This “nickname” was invented by the craftswomen themselves, because the pattern is knitted using knit stitches. The stockinette stitch with knitting needles is a sequence of knit stitches, which together produce a smooth fabric. On these sides, the products often contain embroidery or appliqué.
In order to create beautiful models with complex patterns, you need to learn how to evenly knit simple elements - patterns and inseparable parts of the entire knitting craft. These include knit and purl stitches, and, accordingly, stocking (knit) and garter stitches. When mastering the craft, it is enough to knit a simple scarf in stocking stitch - this is the simplest and at the same time the most effective way to achieve neatness. When you have smooth loops and rows, then you can proceed to more complex patterns, the design of which will also contain facial loops.
Recommendations
The stocking stitch pattern proposed above is not at all difficult to remember. The front and back loops discussed in this material will be found in any pattern of any pattern, since these loops are basic for all other, much more intricate works of knitted forms.
You can choose the design you like based on numerous photographs of knitted products presented in catalogs, magazines, and on thematic websites. The photographs are usually accompanied by detailed diagrams describing the work. In these diagrams, all loops in the row have their own designations. At first, the design seems complex and confusing, but as the product increases in volume, the given pattern will become increasingly visible and take on a finished look.
If it is difficult to understand from the description the action being performed, then, of course, you should turn to thematic Internet resources and forums, where not only photographs are published, but also video materials with comments and explanations.
Knitting methods
The main theme of knitting is the alternation of front and back stitches. The stocking knitting pattern consists of a front and back part, consisting of front and back loops, respectively. There are two ways of knitting loops: classic and non-classical, which is also called “grandmother’s”.
How to make facial loops
Classic way
This method involves grabbing the stitch to be knitted at the front side on the right side.
Non-classical method
Here the loop for knitting stockinette stitch is knitted with a grip on the back wall.
How to make purl loops
Classic way
The loops for knitting are grabbed onto the front wall.
Non-classical method
In this type, the loops for knitting stockinette stitch are grabbed at the back side.
For all types of knitting knitting stitches with knitting needles, a detailed video master class is offered - there is nothing better than learning to knit while visually examining the technique.
If everything is done correctly, the knitted fabric will turn out even and smooth on both the front and back sides. If you choose a classic knitting pattern, then you need to knit both the front and back rows using this method. You should do the same when choosing the “grandmother’s method”. Otherwise, the rows will be uneven, the loops will be upside down, and the entire fabric will be “pockmarked,” which will affect the appearance of the product.
The stockinette stitch looks great on circular knitting needles - this is how craftswomen knit snoods that are simple in design and attractive to wear for an everyday look.
Purl loop, knit stitch and yarn over
Let's remember how all the basic elements fit together.
Let's start with faces. loops This is most clearly shown in the picture. There are two ways - grandma's and classic. Each knitter chooses the one that is convenient for her, or the one to which she is accustomed. If this is a diagram or description, then under knitting faces.pet. This usually means the classic way of knitting such loops.
Now look at how to knit the purl stitches.
Attention! Persons the loop should be knitted behind the back wall, and the wrong side behind the front. If you do not follow this rule, the loops will twist.
Now let's talk about yarn overs. They come in two types - direct and reverse. In the figure you can see that the yarn over is different in the location of the loop on the knitting needle.
If you learn how to quickly and deftly knit these three elements, then we can say that you have already overcome the first stage. All that remains is to practice and improve your skills.
Knitting technique
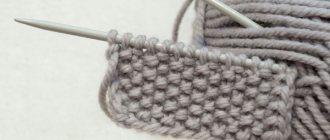
Having carefully studied the methods of knitting loops and choosing it for yourself, you can begin knitting a sample. The stocking stitch pattern is very simple, you don’t need to write down, remember or calculate anything. It consists of alternating front and back rows.
To work, you should cast any number of loops onto a knitting needle - in this type of knitting, their number does not matter. Then you should work according to the following scheme:
- First row. Remove the edge stitch and knit the entire row. Purl the last stitch in all rows so that the edge of the fabric is even.
- Second row. Slip off the first stitch and purl the rest.
From the third row, knit alternating these two rows. The result is an even and smooth canvas that can be used on any side. This is the convenience of stockinette knitting, since it turns out double - only with this pattern can you knit any product, alternating the front and back stitches in one piece.
Considering that with this knitting technique the edges will be wrapped and twisted, the trims and cuffs in the products must be made with an elastic band or other knitting material. This feature is sometimes used to curl the bottom of a cap or design a neckline.
The stocking pattern looks smooth on the front side, and embossed on the back side, which is clearly visible in the photo. Any type of yarn is suitable for this knitting; stockinette stitch made from sectional yarn looks especially good. It makes stylish and fashionable sweaters and jackets, snoods and hats.
Attention! To master the knitting technique, you should choose thick yarn in light shades. You should not choose melange colors - the characteristic ripples will lead to headaches for a beginner. Dark shades of threads will cause difficulties in mastering the technique of the classic and “grandmother’s” knitting method.
Knitting in stocking stitch as an example
In order to understand the principle of knitting and see what kind of loops and patterns are obtained, you need to knit some kind of fabric. This will allow you to fully learn stocking stitch using a knitting pattern.
To begin with, you should cast on about 20 loops on the knitting needles, maybe a little more. The most important thing is not to do less, otherwise nothing will be clear. Knitting needles and yarn can be absolutely anything. The most important thing is that you feel comfortable working with them.
The first thing you need to do is cast on the loops and look at them carefully. To do this, you need to pull one knitting needle out of the loops. Further knitting begins from the second loop. The thread is grabbed using the method you choose and pulled into a loop.
You can alternate knitting methods to see which one is more convenient for you. Do not forget that after knitting the loop from the left knitting needle moves to the right, it must be dropped from the left knitting needle. It is better if you start with purl knitting and then continue with knitting.
Read here - Crocheting napkins - making original openwork patterns with your own hands. 75 photos and video master class
NOTE!
How to crochet a flower to decorate clothes: diagrams with explanations and photo ideas of flowers for clothes (80+ photos)The best options for DIY knitted hats: step-by-step instructions and tips
How to knit a shirtfront simply and beautifully with knitting needles for children, women and men: useful tips and instructions (80+ photos)
Once the row is knitted, turn the knitting over and start making knit stitches again. The work is also carried out from the second loop, the first one is simply thrown off the knitting needle. We continue to knit the row in the same way as the previous one.
Do not forget to remove the knitted loops so as not to spoil the knitting. Knit in this way as many rows as necessary to fully master the skill.
Once you try knitting using the stocking stitch technique several times, you will soon realize how simple it is. After you fully understand what you have learned, try to knit something using this technique. To make the beginning easier, follow the master class video of stockinette knitting with knitting needles. Be sure that everything will work out for you.
Types of simple knitting
The easiest one is garter stitch with knitting needles. It is called that because it is used for knitting scarves. People call this method “ripple”, “beds” and other variations, because the pattern looks like convex stripes. The most convenient way to work is the classic grip of the loops by the front walls. The fabric is knitted only with knit stitches - both straight and reverse rows. When tighter knitting is required, you should use the “grandmother’s” method of grabbing the loops, that is, by the far walls, but this is not very convenient.
This type of knitting is considered double-sided because it looks the same on both the front and back sides. The double stitch knitting technique is used to make belts, scarves, collars, trims, as well as a whole complex product, perfect for a hat. If you use thin yarn and thick knitting needles for knitting, you will get a very loose, almost openwork fabric. This technique is ideal for creating summer clothes and shawls. Stocking and garter stitch are the simplest types that are available to any woman who dreams of mastering this type of needlework.
Also in favor of stockinette knitting is the rapid restoration of rows and loops in the event of an “emergency situation” - when the loops fly off the knitting needles, the stocking pattern is quickly restored on its own.
Stocking knitting: diagram, description
Recently, many needlewomen have become interested in knitting. You can spend your time profitably and create an exclusive wardrobe item. The basis of knitting is stockinette knitting. We will discuss the diagram, description and some of its nuances in today’s article.
Needlewomen master stocking knitting at the very beginning of learning to knit. This knitting method consists of two types of loops - knit and purl. Let's first discuss how to knit basic stitches.
Learning to knit knit stitches
Since the basis of hosiery knitting is alternating rows knitted from front and back stitches, it is important to first master this simple technique. The front surface is always embossed. There are two main ways to knit knit stitches:
- behind the front wall;
- behind the back wall.
In practice, knitters also call these loops “classic” and “granny”. In both cases, the knitting principle is the same. The only difference is in which wall we grab the loop.
Important! You cannot alternate both types of loops in one product, otherwise the stocking stitch will turn out crooked and uneven.
The front loop is knitted according to the following algorithm:
- We place the working thread behind the fabric or cast-on row.
- With the right, that is, working knitting needle, we grab the loop on the left needle by the wall that lies on it.
- Using a working knitting needle, carefully grab the thread and pull out the loop.
- We transfer the knitted loop to a working knitting needle.
Grandmother's knit stitch is knitted in the same way, but with one amendment: we grab the loop by the wall, which is located behind the knitting needle.
Mastering the technique of knitting purl loops
Purl loops are also knitted in two ways:
- with the lobes positioned transversely;
- with slices along.
After knitting several rows of purl stitch, you will see that the pattern turns out to be embossed.
On a note! It is difficult for beginner knitters to determine where the front side is and where the back side is. Look carefully at the canvas. Its edge will always turn towards the front side.
The purl loop with the segments placed crosswise is knitted according to the following algorithm:
- We hold the working thread in front of the product, as if we were throwing it on the left knitting needle.
- Now we thread the working knitting needle into the loop behind the front wall.
- Carefully wrap the knitting needle behind the working thread.
- Use a knitting needle to pull the thread through and pull out a new loop.
The second way to knit a loop is slightly different:
- We start the working thread in front of the fabric.
- We thread the working knitting needle into the loop behind the left needle, that is, we will knit behind the back wall.
- We grab the working thread and pull out a new loop.
To summarize, we can come to the conclusion that the front and back stitches are knitted behind both walls. In this case, the pattern changes somewhat, in particular its inclination.
On a note! Sometimes in knitting patterns there are designations where you need to knit two loops at the same time with a tilt to the right or left. It’s simple: for the right bend we knit behind the front wall, for the left – behind the back wall.
About the stocking stitch technique in detail
The knitting pattern using the stocking stitch technique is very simple. We knit all odd rows, starting from the first, exclusively with knit stitches, and even rows with purl stitches.
Cast on the required number of stitches on the knitting needles. Be sure to add two edges.
Remember the golden rule! In any knitted product, the first edge is always removed without knitting, and the last is pulled with a purl loop in the classical way, that is, behind the front wall.
We knit the first row exclusively with facial loops. We turn the fabric to the opposite side and knit the next row only with purl loops. We use alternating rows in this way until the end of knitting the fabric.
In simple terms, the back surface looks like waves or scars, and the front surface looks like a herringbone pattern.
Advice! To make the product symmetrical and beautiful, it is better to knit the front loops on the back wall, and the purl loops on the front wall. No need to twist the loops.
Tips for Beginner Knitters
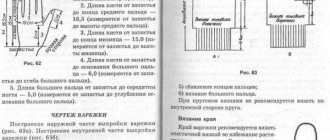
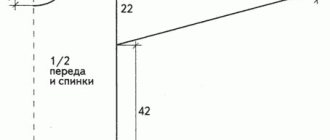
Now you know what stocking knitting is. How to knit a product this way? Take the diagram of your product as a basis. Calculate the number of loops. To calculate the required number of loops, use the following formula:
- Cast on a number of stitches on the knitting needles, which will be 10 cm in length.
- Knit a fabric with stockinette stitch to a height of 10 cm.
- The last row needs to be closed.
Advice! We close the loops in this way: we knit two loops at the same time, return the new one to the knitting needle and knit the pair again. We do this until all the loops are closed.
Now let’s calculate how many loops there are in 10 cm, let’s say 15. There are 1.5 loops in 1 cm. If the width of the product in the diagram is 50 cm, then you need to multiply them by 1.5 loops. It turns out that we need to cast on 75 stitches.
Using the “stocking knitting” technique you can knit various products:
- sweaters;
- jackets;
- dresses;
- socks;
- scarves;
- snoods;
- stoles;
- hats.
On a note! Do you know why this method of knitting is called “stocking”? Previously, alternating rows of knit and purl stitches was used only for knitting stockings on four needles.
When you thoroughly master the technique of knitting knit and purl stitches, you will be able to easily create real knitted masterpieces. There is nothing complicated about it, and stocking stitch serves as the basis for knitting many things. I wish you creative success!
Source: https://ladyspecial.ru/dom-i-xobbi/svoimi-rukami/vyazanie-i-shite/chulochnaya-vyazka-spitsami-skhema-opisanie
Where is it used?
Ability to perform the presented type of knitting; you can knit any product. If you complement it with various designs, you will get a beautiful thing with a fantasy pattern. This knitting is considered universal because its scope of application is widespread. It is used for the following purposes:
- Making products for children, women and men - you can start with a plain and simple model, where additional additions for decoration will be added on the front side.
- As a basis for jacquard knitting, beginners should not use it, since changing threads will quickly lead to confusion.
- As a background for an openwork or relief pattern, the openwork is mainly used in the stockinette stitch (stocking pattern).
- As a canvas for embroidery or making an ornament, on the front side each loop is represented as an embroidery stitch. This is how the selected pattern is tracked and applied.
Since hosiery is knitted this way, it got its name. The presented technique is used to produce knitted fabric, where industrial knitting machines are used to knit loops.
This simple type of knitting can be mastered in a few minutes, even if you have never held knitting needles in your hands - and this is a high start in the art of knitting and creating exclusive things. The fashion for knitted products will never disappear, because knitting is interesting - you will always be on top.