The peacock tail is an incredibly beautiful pattern. It is done with knitting needles in several ways. In some literature, this pattern is also called “fan” or “waves”.
The pattern knitted according to this pattern belongs to the class of openwork patterns. Therefore, it is well suited for summer things, such as blouses, light tunics, but it also looks good on scarves, cardigans and other things.
Classic version and pattern of the “Peacock Tail” pattern
A peacock feather in the classic version of the diagram looks like this:
To knit a pattern, you will have to master the technique of making purl and knit stitches and be able to knit them in pairs. Some of the hinges will have to be tilted left or right. You can easily master the principle of knitting all these types of loops by watching the video on our website.
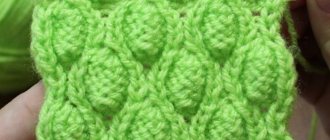
The first option of making this pattern with knitting needles allows you to get a delicate, beautiful, weightless fabric. It can be used to create all kinds of shawls and stoles. In finished form you will receive a control sample like this.
To get it this way, consider the pattern diagram.
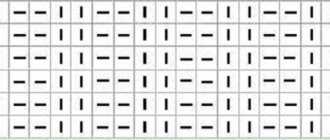
The rapport consists of 17 pcs. We dial a quantity that is a multiple of 17 and add 2 more pcs. for edge decoration. Each feather will occupy 4 rows in height.
- 1R: all stitches are knit stitches. We try to hook them by the front walls.
- 2R.: all purl.
- 3R: from this we move on to the main drawing. The tail begins to form. Use knitting needles to remove 1 stitch, then purl 2. We repeat twice.
- After this, we make a yarn over, as shown in the diagram. We simply pick up the working thread with a knitting needle.
- After this comes knit + yarn over. This stage is repeated 5 times.
- Now we do double purls three times. All that remains is to knit the edge if this is the end of the row or go back to the beginning of the repeat.
- 4R.: and we knit all even ones with purl.
- 5R: go to the beginning of the diagram and repeat it.
LiveInternetLiveInternet
Photo of a knitted shrug cardigan with a peacock pattern (knitted):
Shrug cardigan with peacock pattern. Quite an unusual model, without a doubt for true fashionistas by nature. The cardigan in question has no age restrictions; it will look equally chic on both a young girl and a middle-aged lady. The composition will be absolutely incomparable, complete with dark trousers and a black blouse.
Cardigan size: 46 The shrug cardigan is knitted. You will need: 325 g of Kid Seta yarn (taken in 2 or 3 strands - according to the instructions), of which: 250 g of powder color No. 833 and 75 g of ocher color No. 045; knitting needles No. 5.5; wool needle with a rounded end. Pattern “Peacock” (cast on the number of loops, a multiple of 18 + 4): Row 1: k2. p., * 2 p. together persons. 3 times, (1 knit stitch, 1 yarn over) repeat 6 times, 2 knit stitches together 3 times *, repeat from * to *, k2. p. 2nd and 3rd r.: facial loops. 4th row: purl loops. 5th row: repeat from the 1st row./p Needle: stitches to connect parts. Knitting density in the “Peacock” pattern, two-strand yarn, knitting needles No. 4.5: 17 sts and 18 r. = 10 x 10 cm Elastic band 2 x 2, yarn in three threads, knitting needles No. 4.5: 19 sts and 18 r. = 10 x 10 cm Work procedure Back and right shelf: knit in one fabric, starting from the right shelf. Using ocher yarn, taken in two threads, cast on 130 stitches and knit with the “Peacock” pattern, constantly alternating 12 stitches. ocher color in two threads and 12 r. the color of powder in two threads. During the 60th r. distribute 4 additions evenly. After 33 cm of total height (= 60 r.), continue with a 2 x 2 ribbing in the color of powder in three threads, adding 4 sts evenly throughout the first row. After 7 cm (= 12 r.), to form the right armhole (beginning of the back), continue in this way: knit the first 18 sts, bind off the next 30 sts, then transfer the remaining stitches to the knitting needle; perform the reverse row, again casting on 30 stitches instead of closed loops, then continue knitting all 134 stitches without any changes. After 43 cm from the right armhole (= 78 rubles and the beginning of the left front), perform the left armhole in the same way as we did the right one. After 7 cm from the left armhole (= 12 r.), set aside all the loops. Left front: knit as the right front until the very end of the Peacock pattern (= 33 cm total height, = 60 rubles), distributing 4 additions of stitches during the last row. Sleeves: using ocher yarn, taken in two threads, cast on 130 stitches and knit the border: with the “Peacock” pattern, alternating 8 stitches. ocher color in two threads, 8 r. powder color in two threads and 8 r. ocher color in two threads. After 13 cm of total height (= 24 r.), continue with an elastic band of 2 x 2 powder-colored yarn, taken in three threads, evenly distributing the decrease of 6 stitches during the 1st r. On the sides, decrease within 1 p., 6 times, 1 p. in each 10 r. After 39 cm from the edge (= 70 rubles) for the armholes, close the sides in every 2nd row. 3 times 7 sts, bind off the remaining 16 sts (= 3 cm from the beginning of the armholes). Assembly and finishing: Connect the laid-off loops of the two parts of the left shelf together with stitches. Sew armpits. Sew the sleeves into the armholes.
Knitting pattern for a cardigan (photo), knitting:
A simplified version of knitting the “Peacock Tail” pattern
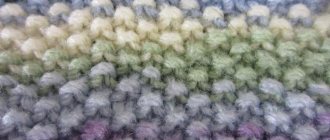
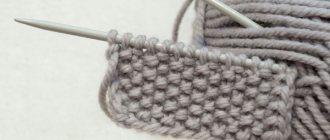
The peacock tail in the second picture is not as delicate as the previous one. It is more similar to a wave and is also done with knitting needles. The knitting pattern is quite simple. This is the sample you should get.
This pattern is based on a repeat of 18 loops. From this calculation we form a set series. To examine the pattern, it is better to knit stitches for two repeats at once. You will better understand which of the two pattern descriptions you prefer.
Add two edges to the required quantity. We start knitting the peacock tail with 4 rows of stockinette stitch. We knit the main pattern from the 5th row.
The work flow is as follows:
- We remove the edge.
- 2 together as purls - repeat three times.
- Knit + yarn over – 6 times in total.
- After this you should have a pattern like this on your knitting needles.
- Three pairs of double purls.
- Let's move on to the first step again.
The pattern continues in row 6. It is all knitted with purl stitches. Moreover, for better formation of the pattern, it is better to pick up the yarn overs and knit them behind the front walls. Thus, the canvas will be more uniform and even.
Rows 1-6 are the main rapport. Let's do it several times to understand how it will look on things. It is worth remembering that the second method produces a feather with wavy lower edges. It is very convenient to use it for skirts, dresses, and sleeve edges. It is better to knit a peacock tail with knitting needles from yarn of the same color. This way the drawing is better visible, it does not get lost in the variety of colors.
Back to the classics
For needlewomen who are just starting their creativity, the classic pattern is perfect. It is distinguished by its simplicity of execution. The classic “peacock tail” is usually just learned and practiced before trying something more complex.
The diagram clearly shows that the first row consists entirely of purl loops. The second row includes only facial loops. The third row is identical to the first. And in the fourth line you will need to knit 2 loops together 3 times, then yarn over. Now one knit stitch and yarn over again. Thus, it is clearly visible that they alternate until the very end of the row, which is completed by 2 knit stitches together 3 times.
Article on the topic: Crocheted napkins. Selection of schemes
If you change the knitting pattern just a little, you can add some flair to this pattern. Below is a description of several fairly successful examples.
Some tips for knitting a pattern
- Since the “Peacock Tail” pattern turns out to be openwork, it is best to select thinner threads. This will allow you to achieve greater tenderness and accuracy.
- An original solution would be to change colors at equal or different distances. Such things will incredibly please children, because... they are pleasing to the eye, look harmonious and beautiful.
- Since there are several options for execution, before moving on to working on the main thing, link control samples according to all the descriptions that you find. You will like one of them more. Choose that one.
- The choice of yarn also plays a big role. The same pattern on thinner threads may look more preferable.
- Use the pattern in combination with other knitting patterns. However, so that the two openwork patterns do not obscure each other, they are not knitted together. Here is a blouse - for the top part they used the front look, for the bottom and sleeves - a feather.
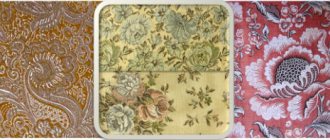
- A combination of several openwork patterns can be beautiful and original. Here, as an example, are four different patterns alternating in one long blouse. Also an interesting DIY thing. But when mixing several types of schemes, it is not always possible to immediately imagine what you will get in the end. Therefore, without much experience and skill, you should not experiment like this.
In any case, you can always make your own changes to the description of knitting things that you found on the Internet. Experiment and create, don’t be afraid to show your imagination. With a simple pattern like the peacock tail, this is very easy to do.
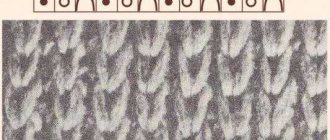
Fantasy waves
The name speaks for itself - for those who like to dream up. This pattern is slightly unusual, but will certainly add charm and originality to the finished work. It is easy to do - 17 loops and 12 rows in height.
Of course, needlewomen know some other pattern options. However, each of the ones proposed above is considered the easiest to implement and chic. They will help you diversify the technique called “Peacock Tail” and make your own adjustments to the product.
Any thing can be changed using contrasting colors, and not just one tone. Or create patterns from unusual, very bright shades, which will make the item unique. This pattern looks quite impressive, even despite its simplicity. Using any of its types, or combining them, you can create excellent masterpieces. If you use your imagination, these patterns will help you both in creating a dress, cardigan or blouse for going to work, and in knitting a wonderful tablecloth for a festive table or napkins.
Related article: Do-it-yourself primitive textile doll
Schemes and description of the “Peacock Tail” pattern
Application of the "Peacock Tail" pattern
Peacock tail is very good if used in individual parts. For example, as in the photo below, it is used to trim the edges of the sweater shelves. They become wavy, which gives the item originality and makes it more interesting.
And here is an example when 1 pattern is used throughout the entire fabric of the item. Light, wavy stripes, curved edges, look great.
The pattern looks impressive when alternating threads of different colors. Especially on children's things.
For adult items, choose a less bright color scheme. Change colors at different distances.