Women's gloves come in many varieties. A separate category is long knitted gloves. They can be openwork - for beauty, dense, even double - for warmth. Learning how to knit long gloves correctly is not difficult even for beginner knitters. The main thing is to decide on the color and style. For the first experience, it is better to knit plain gloves. And if you decide to knit double gloves, then increase the size of the outer gloves. By the way, it is not at all necessary to use new threads for the inner glove. Used ones will be quite useful. We offer you several interesting models.
Openwork gloves
We need:
- yarn, composed of 75% wool, 25% flax (50g per 150m) – 150g;
- set of toe knitting needles No. 2.75;
- pins or loop holders.
Patterns:
- persons Ch.: when knitting in the round, all stitches are face-mi;
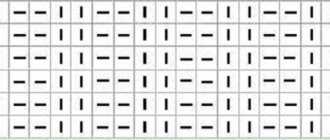
- openwork: performed according to the scheme. In purl r. we knit yarn overs. We repeat the pattern from 1st. 4 rubles each
Density: face. Chapter 17p. for 25 rub. equal to 10 cm by 10 cm.
Description
We begin knitting openwork gloves on two knitting needles. We dial 15p. and knit an openwork pattern. The first and last stitches are edge stitches. Having knitted 52 rubles. (this is 21cm) close the stitch. Fold the resulting strip in half and sew along the short edge. On any of the long sides we raise it by 4 sp. 52 loops and switch to circular knitting of gloves. Please note that the openwork strip is placed on two needles - on the 1st sp. 7p. and on the 2nd sp. – 6p. pattern. The scheme of work is as follows: 1st sp. – 3l., 7p. according to the scheme; 2nd sp. – 6p. according to the scheme, 7l.; 3rd bedroom: 13l.; 4th sp. – 13l. We make decreases for narrowing four times: in every 8th r. knit once in 2 stitches. in 1l. – these should be the first sts for the 1st and 3rd knitting needles and the last for the 2nd and 4th knitting needles.
In 22r. (this is 9cm) from the last decrease row we add under the big st at the beginning of the 1st and at the end of the 4th sp. from a transverse thread 4 times 1 p. in every r. and three times in every 3rd r. Set aside 14 p. for large stitches, distributing them over two pins - 7 stitches each. on each one. We knit the remaining stitches with knitting needles. After knitting 5p. (2cm), from the thumb loops, set aside 8p. for the little finger. Next R. set aside 8 p. for the ring finger. Next R. for average – 10p. And next. R. for the index finger - 10 loops. We knit each finger on 3 needles. We make an increase from the transverse thread: 2p. for the little finger, 4p. for the nameless, 2 p. for the index and middle fingers. We must knit the required height for each finger: 16 rows for the little finger, 19 rows for the index and ring fingers, 21 rows for the middle finger, 15 rows for the thumb. Close the loops by knitting from 2p. knit one until you run out of stitches. We knit the second glove in a mirror manner.
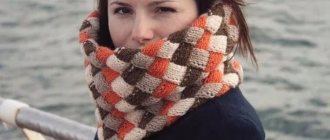
Gloves with braid pattern
We will need:
- yarn, 100% wool, (50g per 175m) – 100g;
- knitting needles No. 3 and No. 3.5;
- additional spoke.
Patterns:
- double elastic band: use waste thread to cast on 1/2 of the required number of stitches:
1st step: perform with working thread; *1l., 1n.* – from * to * repeat until the end of the row;
2p.: *1n. knit in 1 p., remove 1 p. as purl, without knitting, the thread is in front of the work* - from * to * we repeat until the end of the row;
3p.: *1l., remove 1p. as purl, thread in front of work* – repeat from * to * to the end.
We knit the 3rd row again. Having finished the product, we unravel the waste thread.
- elastic band: 2l.x2i.;
- persons gl.: in persons. R. – persons p., in purl. R. - purl;
- purl smooth surface: in faces. R. - purl p., in purl. – persons;
- shawl pattern: in all rivers all loops are knit;
- small braid to the right: performed on 2 p.:
1p.: 2p. cross to the right (we knit the 2nd stitch, passing the right sp. in front of the 1st stitch, and, without removing the knitted stitch, we knit the 1st stitch, remove both stitches);
2p.: 2i.;
3rd row: repeat from the 1st row;
- small braid to the left: performed on 2 p.:
1p.: 2p. cross to the left (we knit the 2nd stitch, passing the right sp. behind the 1st stitch, and, without removing the knitted stitch, we knit the 1st stitch, remove both stitches);
2p.: 2p.;
3rd row: repeat from the 1st row;
- simple braid: done on 4 p.:
1st: persons;
2p., 4p.: purl;
3p.: 4p. cross to the right (leave 3 sts on the extra sp. at work, 1 st, knit a st with the extra sp. knit);
5 rubles: repeat from the 1st row;
- pattern with crossings: number of stitches is a multiple of 5+2 stitches:
1p.: 1i., *2i., 3p. cross to the right (leave 1 stitch on the additional sp. at work, 2 knits, knit a stitch with the additional sp. purl)* – from * to * repeat to the outermost stitch, 1 and .;
2 rub. and all even rows: according to the drawing;
3p.: 1i., *1i., 3p. cross to the right, 1i.* – from * and to * repeat until the last point, 1i.;
5p.: 1i., *3p. cross to the right, 2i.* – from * and to * repeat until the last point, 1i.;
7p.: 1i., *3p. cross to the left (leave 2 stitches on the extra needle before work, 1 st and knit a stitch on the extra knitting needle), 2 and * – from * to * repeat until the last stitch, 1 and;
9p.: 1i., *1i., 3p. cross to the left, 1i.* – from * to * repeat until the last point, 1i.;
11p.: 1i., *2i., 3p. cross to the left* – from * to * repeat until the last point, 1i.
Density: knitting needles No. 3.5 36p. for 33r. equal 10cm by 10cm
Description
We start knitting fingerless gloves with a set of knitting needles No. 3 52p. We must knit with a double elastic band 4p. and go to sp. No3.5. Next r.: *1p. persons ch., 1p. purl ch., 2p. small oblique to the right, 1p. purl ch., 1p. persons ch., 2p. purl ch., 2p. persons ch., 2p. purl Ch.* – from * to * we repeat again, 4p. a simple oblique - this will be the center of the glove, **2p. purl ch., 2p. persons ch., 2p. purl ch., 1p. persons ch., 1p. purl ch., 2p. small oblique to the left, 1p. purl ch., 1p. persons ch.** – from ** to ** repeat 1 more time. At the same time, we add on both sides in every 10th r. 7 times 1 p. After 24cm from the bottom row we knit 2p. shawl pattern and 2p. purl Ch. We continue 12 r. pattern with crossings, 2p. garter stitch, 2p. purl Ch. After 29.5 cm from the bottom edge, close all stitches.
We knit the second fingerless glove in the same way. We sew the edge of the glove at 3.5 cm, pass 4 cm under the thumb hole and finish the seam.
Gray gloves
This model may seem difficult for beginning craftswomen, since it is not performed in the traditional way - from the elastic band down, but on the contrary - from the fingers up.
Size: 7⁄8
We will need:
- yarn, 100% cashmere (725g per 112m) – 75g;
- set of toe knitting needles No. 4;
- straight knitting needles No. 4.5.
Patterns:
- persons satin stitch: when knitting in the round, all stitches are knit;
- elastic band: 1l.x1p;
- main pattern: number of loops is a multiple of 24+15p. Performed with knitting needles according to pattern 1. In purl rows. Knit all stitches according to the pattern, purl the yarn overs. You need to repeat the rapport loops twice, ending the stitch before the arrow. Repeat in height from 1p. for 28 rubles.
Density: on the main pattern with knitting needles No. 4.5, 23.5 sts by 31 r. equal to 10 cm by 10 cm.
Description of knitting long gloves
Right
Let's start knitting faces. satin stitch We knit each finger separately, starting with the minimum number of loops. On the middle, index and ring fingers, bring the number of sts to 18 sts, for the little finger – to 14 sts. In height we knit the middle finger 7.5 cm, the index and ring fingers - 6.5 cm, the little finger -5 cm. Then we combine all the stitches into one fabric, knitting the loops between the fingers together. It should be 56p. Having knitted 4 cm of the combined fabric, we add a large stitch for the jumper on both sides of the left middle stitch in each even row. 2 times 1 p. facial stitch. We make 1 circle with this pattern and set aside stitches.
We knit the large stitch separately, bringing the number of stitches to 20 pieces. Having knitted 4.5 cm in height, we add loops for the jumper: we knit from the first and last sts in each even row. twice 2p. We knit another 1 row. and set aside the stitch. We include these loops in the general fabric, knitting 2 stitches for the jumpers of the large stitch. together. On the central stitches of the back side of the glove we knit the main pattern, the remaining stitches we knit. satin stitch
We continue to work, decreasing stitches for the gusset of the large stitch in every even row. Only 20p. needs to be reduced. We knit the cuff according to the pattern on the remaining 56 stitches. Having received 16cm (i.e. having completed 12 rows of the drawing), we move on to the elastic band. Having knitted 3 cm, we close the stitch according to the drawing.
Assembly
We fasten all the threads, while making seams on the jumpers of the fingers.
The left glove is made in a mirror manner.
How to knit gloves with knitting needles for beginners step by step?
step-by-step photo of knitting women's gloves
We looked at the main blocks of knitting gloves in the previous section. Let's look at the details:
- cast on the number of loops that are a multiple of 4. If, after taking wrist measurements, you get a number with a fraction, discard it and leave the whole value. It is allowed to reduce the wrist circumference by 1 cm so that the gloves fit snugly to the hands,
- Cast on the stitches with two needles at the same time, release one of them and complete the first row with a tight elastic band. As you work, transfer the stitches to the remaining 3 needles,
- mark the beginning of the first needle with a marker, securing it to the first loop. The back of the glove is 1 and 2 knitting needles, the palm is 3 and 4,
- tie the glove cuff with an elastic band to a height of up to 10 cm. If desired, dilute the fabric with inserts of a different color of yarn, for example, every 4 rows,
- change the pattern to knit or purl stitch and from the first row at the beginning of 3 knitting needles, knit a wedge for the thumb. When working on the left glove, the reference point is the end of the last knitting needle in the circle,
- The wedge is formed from yarn overs around the last stitch in row 1, then 3-4 rows in stockinette stitch. Yarn over again, but around an island of 3 knit stitches, again 3-4 rows of knit stitches. Then yarn over around the fabric of 5 loops and continue until you reach the base of the thumb - 5-6 cm,
- Having reached the desired height, transfer the wedge loops to a contrasting thread, pins or an additional knitting needle,
- above them, cast on the number of loops half as many as left,
- Decrease on each row over the remaining thumb stitches. Knit them on both sides in the same way as you knitted the wedge extension,
- continue knitting in the round to the base of the little finger,
- leaving loops for it and adding 4 loops to connect the fabric between the fingers, perform 4 more rows of knitting in the round,
- then distribute the remaining loops for knitting each finger,
- Read more about how to do this in the next section.
Long winter women's gloves
We will need:
- yarn containing 65% wool, 35% alpaca (50g per 75m) – 150g;
- sets of double needles No. 3.5 and No. 4.5;
- pins or loop holders.
Patterns:
- persons satin stitch: when knitting in the round, all stitches are knit;
- elastic band: 3l.x3p;
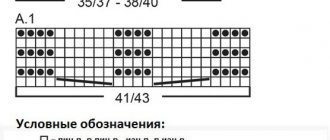
- see diagram: the pattern is shown from the faces. sides.
Density: face. satin stitch 18p. on 24r. equal to 10 cm by 10 cm.
Description
Left glove
We start knitting long gloves with a set of knitting needles No. 3.5 48p. We switch to circular knitting and perform 8p. elastic bands, starting from 3 p. We change the knitting needles to No. 4.5 and continue: 3i., 21p. – pattern from the diagram, *3i., 3l.* – repeat from * to * 4 times. In the row indicated in c. number 1, make decreases by 1 p. for each of the 3 central ribs from the purl stitches of the elastic band on the palm of the hand, knitting from 2i. one. In the row marked with number 2, we decrease by 1 stitch. in the same middle ribs. It turns out that in 3 ribs there is only 1 left. As a result, 34p will remain in the work. In the row marked with number 3, we continue knitting for 15 sts. palms, knit the relief, and do 3i on both sides of it. In the row marked with the number 4, we make increases under the wedge of the large stitch. Before and after the penultimate stitch, we add 1 stitch, making yarn overs. To avoid holes, follow. R. yarn overs need to be knitted at the bottom sections. We repeat the increases 5 times in every even row. - by 2p. more between two yarn overs after each increase. As a result, we get 11p for the big item. There are 48p in total. After 5cm from the beginning of the wedge, remove 11p. large st on a pin and cast on 1 st. behind these loops. We have 38p. We finish the relief according to the diagram - from the place where the loops of the large stitch were removed onto a pin, the distance is 2 cm. We remove 17p. on a pin, leaving a mark. 9p. on the knitting needles and remove the last 12 stitches. on a pin.
Little finger
We take 9p. We get 1p. from the side of the hand. Total - 10p. we knit in the round. satin stitch After 6cm we knit 2 stitches. in 1l. We break the thread, thread it through the remaining 5 stitches, tighten it, bring it to the wrong side, and fasten it.
Hand
Remove the stitch from the pins on the joint. No4.5, raise another 2p. from the little finger side. Total – 31p. We perform 2 p., knitting stitches according to the drawing. Added 2p. we knit with facial stitches. Leave 2 stitches raised from the little finger side, plus 5 stitches. upper arm and 4p. palms on the knitting needles. The remaining 20p. remove it with a pin.
Nameless
We take 11p. We get 1p. from the side of the loops on the pin. Total 12p. We knit the faces in a circle. satin stitch height 7.5 cm. Then we make decreases, knitting all stitches in 2 stitches. in 1l. We break the thread, thread it through the remaining 6 stitches, tighten it, bring it to the wrong side, and fasten it.
Average
We remove 5p. upper arm and 4p. palms on knitting needles No. 4.5. Raise 2p. from the side of the ring finger and dial 1p. from the side of the loops on the pin. Total – 12p. We knit the faces in a circle. satin stitch height 8.5 cm. Then we make decreases, knitting all stitches in 2 stitches. in 1l. We break the thread, thread it through the remaining 6 stitches, tighten it, bring it to the wrong side, and fasten it.
Pointing
We remove the remaining 11 stitches. on knitting needles No. 4.5. Raise 2p. from the side of the middle finger. Total 13p. We knit 3i. on the side, the rest - on the front. We knit a round height of 7cm. Then we make decreases, knitting all stitches in 2 stitches. in 1l. We break the thread, thread it through the remaining 7 stitches, tighten it, bring it to the wrong side, and fasten it.
Big
We remove 11p. over the wedge of the large stitch on knitting needles No. 4.5 and raise 3 stitches. along the edge behind them. Total 14p. We knit the faces in a circle. satin stitch height 6cm. Then we make decreases, knitting all stitches in 2 stitches. in 1l. We break the thread, thread it through the remaining 7 stitches, tighten it, bring it to the wrong side, and fasten it.
Right glove
It is performed in a mirror manner to the previous one, i.e. the beginning of the elastic band is 3 knits. instead of 3i. After 8 p.m. rubber bands continue: 24p. rubber bands, relief, 3pcs. We make increases under the wedge of the large stitch on each side 2 stitches. in a row. We knit the little finger: remove the first 12 stitches. onto a pin (for the palm), leave the next 9 stitches. on a knitting needle. The remaining 17p. transfer it to a pin - this will be the back side of the glove. Further - according to the previous description.
Knitting gloves for men
To repeat this master class for beginners, you will need knitting needles number No. 2 in the amount of five pieces, 160 g. any yarn you like and ten pieces of pins on which you will need to temporarily remove the loops.
The first step is to trace the palm of the person to whom the gloves will be intended on a piece of paper. It makes no difference whether it is the right or left palm. Thanks to this technology, you will take into account all the anatomical curves of your palm as accurately as possible and will be able to knit convenient, comfortable and beautiful gloves. The store usually sells products that are knitted according to a standard pattern, so it is very difficult to choose the right model.
In addition, you will need to perform some more measurements, namely:
- wrist size. In this example, its circumference is nineteen centimeters;
- the size of the palm, which in this master class has a circumference of twenty-two centimeters;
- if you want everything to be clear, then for clarity, also measure the volume of each finger.
Write down all collected measurements on the created print, which will be constantly in your sight. Knowing the circumference of your palm, you can easily determine the knitting density of the product and the number of loops that will be needed in the work. For this pattern, cast on forty-four loops.
Read
We knit an oriental headdress - a turban
Men's knitting gloves start with a set of forty-four links, which are evenly distributed across four tools. After this, knit seven centimeters of elastic one by one. Next, the master class for beginners moves on to knitting palms using the stockinette stitch technique. At 1 p.m. you will need to reduce the number of buttonholes by 4 so that there are only forty left. From the next strip the knitting of the thumb wedge begins. Perform the addition of loops by two reverse casts of yarn between the ninth and tenth loops in each 3 rows. Refer to the sample that is printed on your piece of paper. Determine the height of the thumb wedge. Then knit the fabric in stockinette stitch. The diagram shows a pattern; empty cells indicate faces. loop, and with cells with circles inside, yarn overs are shown.
When the required height is reached, remove all the wedge loops onto the pins along with the ninth and tenth loops. Cast on two air loops on these pins and knit further with knitting needles until you reach the gap between the little finger and the ring finger.
Thanks to the calculated density of the product, 16 links are needed for 1 finger. To knit the gap between the fingers, additionally add four chain buttonholes. You can correctly distribute the loops that will be used to knit men’s gloves yourself. This is very easy to do by drawing a table that will be understandable and convenient only for you.
The master class continues. Now you need to tie each finger separately. The middle one is made from the resulting 16 stitches, which are knitted on four needles until the desired length appears. The knitting is closed by knitting two links together on each needle. Gather and fasten those loops that remain, and tear off the edge of the yarn.
The remaining three fingers should be tied in the same way. At the very end, all that remains is to finish the work on the thumb. Remove fourteen links from the pin, then add six more. Make two things airy above the wedge. After this, distribute the buttonholes on four knitting needles and knit 3 rows. Next, make one reduction on each instrument. Thanks to this technique, the thumb will be able to move even more freely. When the length is reached, close the knitting as usual. It is best to tighten the edges of the thread that have formed on each finger into the inside of the product using a hook. The men's gloves will be ready when you knit the second copy in exactly the same way. And in order to better consolidate the material covered, we suggest you watch a video lesson for beginners.
Read
Jumpers for boys of different ages
Video: Men's gloves knitted
Knitted mitts, knitted models from the Internet
Knitted mitts Spring
The author of the description is Katerina Bessonova.
You will need:
- 1. 50 grams of Baby Wool Batik yarn from Alise;
- 2. Set of double needles #3;
- 3. Pin;
- 4. Markers for knitting;
- 5. Knitting needle for closing loops
Free description in Russian
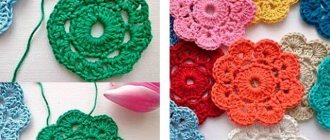
Sunny mitts, master class!
These wonderful sunny mittens were knitted by Elena Bozhkova (lenamasterica) from the Masters Fair.
To knit mitts you will need: Alize Cashmira yarn, 100% Virginia wool. 100 grams, 300 meters (it took less than a skein). Double needles No. 2.5 mm.
Master class at the link
Master class on how to knit mitts quickly and easily with knitting needles
For work, I used children's plush yarn Alize Softi 115m/50g, 100% micropolyester: lilac base color and caral color for the decorative seam; single-pointed needles No. 3, double needles No. 3, elastic thread, needle with a large eye, scissors.
Schemes and description of mitts
How to knit warm and beautiful mittens, master class!
This master class is perfect for those who know how to cast on stitches and knit knit and purl stitches. Today I want to tell you about knitting on 4 needles. It's much easier than it seems. Let's also dwell a little on finger knitting. And I’ll tell you in detail how to knit a braid pattern. Yarn 100% acrylic. Knitted in 2 threads, knitting needles No. 3.
Master class, see the link
Knitted fingerless gloves
The knitting pattern and description below is designed for a hand with a circumference of 17 (20) cm (or 6.75 (8)”). The knitting density is 10x10 cm (25 loops and 30 rows) - for knitting with stockinette stitch.
Description and knitting patterns
Knitted mitts with a Heart pattern
Description and knitting patterns
Knitted mitts Fishtail
Materials:
50 g Reglia Silk yarn (55% merino wool, 25% polyamide, 20% silk, 50g/200m) double needles No. 2.75 – 3.0
Work density: 32 p. persons. smooth surface = 10 cm.
Rubber:
1st row: *1 person. cross, purl 1; rep. from *.
2nd row: *1 person. crossed, 1 person; rep. from *.
Description of work
White mitts knitted with an openwork pattern
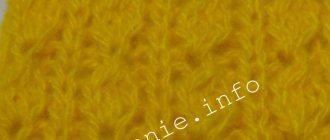
Mitts with knitting needles “Nalu”
Thanks to the raised wavy pattern, the mitts look great in any solid color. The model can easily be converted into mittens.
Knitting density: 23 stitches. x 36 rub. = square 10 cm faces. satin stitch
Sizes: medium (large) Medium measurements: 18 cm long, 9 cm wide.
You will need:
50 (100) grams of wool yarn, about 100 m thick, in 50 g. 4 double needles No. 3 or long circular needles No. 3 for knitting using the “Magic Loop” method. 3 stitch markers extra. knitting needle for braids
Crossed rib: *P1, k1. crossed* (Knit crossed - this is the front one behind the back wall of the loop, the right knitting needle is inserted into the loop from top to bottom.)