In order for curvy women to look elegant and attractive, it is advisable to add a type of clothing such as a tunic to their wardrobe. Its styles, materials for production, methods of applying patterns and color schemes are so diverse that, by bringing at least some of them into reality, you can create a unique collection of charming and exclusive things.
Crochet patterns, patterns and patterns for them presented in the article can help you find your individual image.
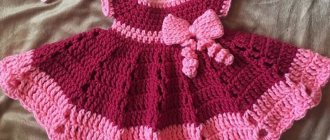
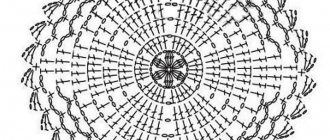
Openwork tunic for overweight people, new items
Before starting work, you must decide on the desired style. For larger women, it is recommended to use loose-fitting tunics. It can be straight, trapezoidal or slightly flared.
Crochet tunics for obese women can be made in different styles
Such styles may have side slits, various types of lacing and ties. The bottom of the product may also have an uneven edge: the front panel is slightly raised, and the back panel is lowered. Using such techniques will add a certain charm and charm.
A crochet tunic for obese women, the patterns for which are presented below, will look openwork, light and very beautiful. However, all these patterns have one similarity that needlewomen should not forget about.
All of them have a vertical orientation, which visually hides fullness and adds height to a woman. It is advisable not to use horizontal patterns, as they will act in the opposite direction - reduce growth and increase volume.
1 way
To begin with, it is recommended to take a simple, even, loose-fitting style. So, having chosen a model, you can get to work. First, you should calculate the length of the chain of air loops for the front and back of the tunic.
To do this, you need to measure the circumference of the woman’s hips and chest, select the largest one and divide it in half. To the resulting value add 15 cm for freedom of movement. That is, 15 cm to the front and the same to the back.
Before work, many experienced craftswomen recommend making a small sample of the pattern that will be applied to match the width of the product and the number of repeats of the pattern.
After calculation, you should dial the chain of the required length. Due to the possible unevenness of the set of loops, with further knitting the width of the fabric may narrow. Therefore, it is recommended to knit a chain of a slightly longer length, and the remaining excess can be hidden in it during the final tying of the edge.
Then you can move on to making the pattern itself. Its rapport is 33 loops. The process uses chain stitches and single crochet stitches. Alternating them with each other, carefully following the pattern, the result is an openwork and beautiful canvas. The product with this pattern can be knitted both from the bottom up and in the opposite direction.
This tunic is recommended to be worn over a light blouse or a contrasting T-shirt. This model also has side slits. Based on the pattern, they should be located inside the vertical stripes formed by 6 double crochets.
Having knitted the fabric of the required length before the beginning of the armholes, you should begin to make them. If these are not provided by the model, you need to continue working until you start cutting the neckline. It can be round, V-shaped or boat-shaped, as desired. If there are sleeves, the armhole is knitted, gradually decreasing a certain number of loops on each side of the front and back according to the size of the tunic.
To knit sleeves, you should cast a chain equal to:
- wrist circumference + allowance for free movement if the sleeve is long;
- arm circumference just below the elbow + allowance if the sleeve length is ¾;
- elbow circumference + allowance, if the sleeve is of the appropriate length;
- arm circumference above the elbow + allowance accordingly if the sleeve is short.
The sleeve cap at the bottom is shaped similarly to the armhole. Then, closer to the shoulder, the sleeve is closed in several rows, decreasing 3-5 loops on each side, depending on the size.
After all the parts are ready, they need to be sewn either with a crochet hook or a sewing needle, and the neckline must be tied. The bottom of the product and sleeves can also be processed if desired. Carry out wet-heat treatment of the tunic.
Method 2
A crochet tunic for obese women (the patterns are very simple to execute) is represented by the following openwork pattern. It also has a vertical orientation. The repeat of this pattern is 14 loops. Therefore, when calculating the width of the product, it is necessary to bring it into line with the number of repeats.
Of the symbols indicated in the diagram, air loops, single crochets and single crochets are used. Such an easy-to-make pattern will look impressive in the finished product.
3 way
The pattern and diagram presented below, upon close examination, have a horizontal orientation. But in the finished canvas, the vertical still predominates.
The pattern looks very gentle and beautiful in light colors for both straight and trapezoidal silhouette models. Knitting a straight style was discussed above.
Crochet tunics: popular patterns
When choosing a pattern for crocheting a tunic, it is important to consider the threads that you plan to use for work. Much depends on their density. You should not choose thick ones for summer clothes and not strong enough for winter clothes.
See also...
✅ Knitting tunic: knitting patterns with description
✅ Crochet patterns and descriptions for beginners
✅ I want to make money by knitting, where to start: an honest opinion from a needlewoman
✅ Three unusual hat models: knitting patterns
Simple pattern: fillet knitting
Let's start with the pink simple tunic for women. This is the most common - fillet crochet (boho - pattern). The size is approximately 46/48 , but you can always adjust it to suit you.
- 318 V.P. into the ring. Make 106 fillet cells (F.Ya.). add a mark at 24 Y. - right sleeve, 29 - front (the same amount for the back), 24 - left sleeve.
- We knit a laska . We make 8 R.
- Pattern with pineapples . Do it very carefully and symmetrically distribute the rapports = 16 R. At the same time, do not forget to knit the sleeves (continue the lacings).
- Carefully monitor the pattern so that it does not slip. Next is an important step about size. If the knitted fabric is enough for your chest circumference, then the details of the shelf and back can be combined. Sleeves - we continue to work. To do this, the patterns of lasette and pineapples alternate: 8 by 16.
- We expand the model for a side bevel 7 cm after connecting the front and back parts of the tunic.
- Divide the canvas before the last pineapple pattern. Finish each piece separately in a straight line.
- To make the product more beautiful and elegant around the perimeter, tie it with “PIKO” . Close the sleeves once they reach the desired size.
- To the crochet tunic looked complete, it needs to be washed in warm water. You can iron it but don't steam, from the inside. Work finished! It will fit perfectly into a woman's wardrobe; its style is universal for summer and autumn.
Crochet beach tunic
Now we suggest crocheting a beach tunic. This clothing option will be very light, almost airy, but nevertheless warm, so you can wear it for a walk in the evening.
Knit sleeves, back and front from top to bottom. 160 V.P. into the ring S.S.
- 1 R.: 3 V.P., 1 S.S.N. in the first V.P., 3 V.P., 2 S.S.N. in the same P., 5 V.P., 2 S.S.N. in 8 P., 3 V.P., 2 S.S.N. in the same P., 5 V.P., (2 S.S.N. in 8 P., 3 V.P., 2 S.S.N. in the same P., 5 V.P., 5 S.S.N. in 8 P. base, 3 V.P., 2 S.S.N. in the same P. base, 5 V.P.) = repeat brackets until the end of the row . The total will be eight times, i.e. 10 rapports. We are finishing R.S.S.
- 2R. and 4 R.: 3 V.P. for lifting, 1 S.S.N. in an arch of 3 V.P. previous R., 3 V.P., 2 S.S.N. in the arch, 5 V.P., 2 S.S.N. into the next arch, 3 V.P., 2 S.S.N. into it, 5 V.P., (2 S.S.N. into the next arch from 3 V.P. of the previous R., 3 V.P., 2 S.S.N. 3 V.P., 2 S.S.N., 5 V.P.). repeat the action in brackets 8 times. This will take 10 rapports. Continue the process according to A/H 1 to 25 RUR. Divide the work into parts: 2 repeats the right and left
- 26 R.: close the back and front of the tunic in a circle, continue according to the pattern up to 82 R. From 83 to 90 R. = C/X 2. Make each pineapple separately according to pattern two (1 - 11 R.).
- Process the bottom of the product and sleeves 1 S.B.N., 1 “PIKO”, 1 S..N., 3 V.P. = to the end R., S.S.
Sirloin crochet is very simple. This is a great way for a beginner to improve their knitting skills. With this pattern you can easily make a tunic for overweight women, for girls, and also for the beach. Loin tops, T-shirts, and sweaters look very good.
Openwork crochet tunic
An openwork tunic with lacing is a stylish and elegant product that you can knit yourself. It is made from beautiful pistachio yarn. It's best to take cotton.
We start the knitting process with a border , which is knitted in the transverse direction. All strips are S.B.N. On the border 1 R.: the main pattern (its repeat: 4 V.P., 3 S.S.N. under the arch, 2 V.P., 3 S.S.N., 1 V.P., 1 C .S.N., 1 V.P.). In all rows, including purl rows, make the pattern as in the front rows.
Crochet tunic from motifs
You will get a stylish women's tunic if you use a knitting pattern from motifs. For this option, it is recommended to choose two or more colors of yarn.
Children's tunic
The tunic is not only women's clothing. It can also be knitted for a child by choosing the appropriate pattern, color, or design. In such clothes any little girl will look cute and unusual. And the fact that the products are made with your own hands will be doubly pleasing.
How to knit a tunic from motifs for a girl (video):
Colored
Knitted items go with almost everything. They can be combined both with each other and with other elements of your clothing. Of course, you won’t wear a knitted dress to a business reception or to work, but for a romantic date it’s perfect. Beautiful knitted skirts can be combined well with tops, crop tops, tank tops or T-shirts.
Crochet summer mesh tunic
The mesh summer tunic is crocheted with classic threads using a very simple pattern. This may require black (or white) yarn. This yarn needs about 350 grams, as well as a size 2.5 crochet hook.
Tie the back and front the same way. A chain of V.P. is being recruited. 41 cm long. Based on the pattern and diagram 1 - knit the fabric. To assemble the tunic correctly: make shoulder and side seams + 18 colors (according to C/X 2) and sew them on the jumper. This step is done at will; you don’t have to decorate with anything at all. Or arrange it in a checkerboard pattern. Along the perimeter - S.B.N.
Openwork tunic for girls
Little girls really want to be like their mothers and older sisters. If you have a wonderful crochet tunic, why can your daughter have the same one?
This openwork summer blouse is crocheted with size 1.25 and light-colored threads. The hook in this type of knitting is much smaller than in the previous ones. This is due to the fact that the openwork technique requires that all the loops and posts be very well made, and be the same in width and length. In order for the future thing to be beautiful, it should be done carefully and slowly.
Here you will need two openwork patterns, which are executed exactly according to the diagrams attached below.
We start our work from the top of the back. To do this you will need to dial 92 V.P. + three P. for lifting, one R. – S.S.N. We continue with openwork pattern 1. To make even armholes at 15 centimeters, we remove 9 P once. Then we continue the process straight. After 27 cm, leave 40 P. in the center. This needs to be done for the neck, so we will continue to perform the drawing separately. After 32 centimeters, the work can be completed, the loops can be closed, and the thread can be cut.
For the top of the front part, we follow all the steps as in the point above, but do not forget that the neckline should be much wider and larger. Therefore, each side must be made separately, starting from 23 cm in height. Also close the work after 32 cm.
Finally we come to the openwork pattern - it is needed to make the hem. Make the side seams, knit in a circle along the bottom edge with the second openwork pattern. After 5 R. - 1 R. S.B.N.
Sleeves, in our opinion, are the most difficult thing in this work, because there are two of them! 70 V.P., 1 R.S.S.S., openwork pattern number one. After 16 cm - leave 9 P on both sides, then 10 times 1 P., 3 times 2 P. At a height of 14 centimeters - close. To assemble the tunic together - shoulder seams, sew in the sleeves. Along the perimeter of the neck - 1 R.S.B.N.
Slightly flared version
If the tunic pattern requires execution from top to bottom, then you should start from measuring the circumference of the chest, measured at the most protruding points of the mammary glands. This model can be knitted either from 2 fabrics (front and back), or as a whole fabric.
It should be remembered that when performing in a circular manner, each row must be performed in the reverse order.
This is due to the fact that when further knitting the armholes, the work will need to be rotated, and therefore the pattern will be different. To create an extension to the bottom of the product, it is necessary to add the same number of loops on each side at equal intervals of the pattern along the side seams.
It is important to ensure that the newly added loops fit correctly into the main pattern. If knitting is done from the bottom up, then it is first recommended to correctly and accurately calculate the number of loops to decrease.
To do this, take 2 measurements: chest circumference (necessarily through the protruding points of the mammary glands) and the width of the finished tunic at the bottom. It can be both minimal and large. This is determined individually according to the style and desire of the woman. The difference between these values is determined.
Next, the resulting segment must be divided by the length of the product from the beginning of the armhole (under the arm) to the bottom. As a result, you will get the gap through which you should decrease the loops in the area of the side seams on each side of the front and back.
Schemes and descriptions of loin crochet tunic
For those who have mastered the technique of loin knitting, patterns for tunics of modern models will help you create different summer dresses or sweaters to suit your taste.
Boho style
Knitted blouse in boho style with roses and birds of paradise. Photos, diagrams and detailed description.
Before you start fillet crocheting a tunic, take measurements and draw a pattern:
Free patterns for loin crochet tunic and step-by-step master class:
- To determine the required number of cells, a sample is knitted. For the size as in the photo above, you will need 92 cells.
- For the back, dial 276 VP + 3 VP lifting, corresponding to the required 92 fillet cells.
- Knit the pattern according to pattern 1:
- After knitting 117 rows, the neckline is made. Leave 24 squares for the shoulders on both sides, and from the inside of the cutout subtract 1 square three times. Finish the mating with 120 rows.
- The creation of the front begins with a set of 276 VP + 3 VP lifting, and is knitted according to pattern 2:
- After marking the middle of the product, placing 24 squares for the shoulders, knitting the neckline in 20 rows and connecting the shoulder seams.
- If it is necessary to increase the width of the product, fasten the thread to the lower part of the front and perform fillet knitting in rotating rows to the end of the back.
- Having determined the exact location of the armholes, perform lateral extensions: first fasten the thread of the product, and knit the fillet cells, not reaching 3 pieces to the end.
- The last three cells are performed without one DC at the end. The product is turned when there are 4 loops on the hook. Decrease from the opposite end and do not knit 3 loops at the end. The final 7 loops are knitted together.
- Knit up to the last 10 rows. The second angle is performed in the same way. The sleeves are knitted in a circle along the edge of the armhole. Strapping schemes:
Read
Filet crochet: patterns with descriptions
- The neckline is tied in one row according to pattern 4, and the sleeves according to pattern 3.
The lower part is made according to scheme 3 in two rows: first 10 rows of fillet mesh, then the first fan. Having retreated 5 cells, perform the second. The 10th row is tied according to scheme 4.
Even more interesting ideas for knitting openwork tunics.
Video: second boho option
Step-by-step video tutorial in three parts for creating a summer sweater from Natalia Rogatovskaya.
Video kryuchkom 1:
Video kryuchkom 2:
Video kryuchkom 3:
Butterfly tunic
Elegant “Butterfly” model using the fillet knitting technique.
To work, you will need 200 g of VITA Pelican yarn (30 m/50 g, 100% cotton) and a 1.25 mm hook.
Loin mesh with 1 ch. between double crochets, i.e. 1 cell = 1 tbsp. with nak., 1 v.p.
Knitting density 33 loops (16 fillet mesh cells) x 14 rows, approximately 10 x 10.5 cm.
Product photo:
Creation schemes:
For the back we knit 8 pattern repeats (diamonds), then we make a floral pattern.
First, we start with the main pattern (diamonds, 2 repeats), then move on to the main pattern (flowers and a large butterfly).
Sleeve: knit 1 repeat of the main pattern, then a fillet mesh.
Slightly flared model for obese women
A special feature of the summer tunic for obese women is the vertical direction of the pattern, which visually lengthens the silhouette and reduces the volume of the body.
If fillet crocheting of a tunic is done from the bottom up, then before starting work, you need to accurately count the number of loops to decrease. To do this, two measurements are used: chest circumference at the protruding points and the width of the finished product along the bottom edge (the last parameter depends on the desired style of the summer dress).
The difference between these measurements is divided by the length of the product from the armhole to the hem and an interval is obtained at which the loops in the area of the side seams on both sides of the back and front are reduced.
Knitting a beach dress from top to bottom begins by measuring the circumference of the chest at the protruding points. This pattern can be knitted either separately from the front and back, or as a whole circular fabric. In the second case, each row is performed in reverse order.
Read
Filet crochet for beginners from A to Z
To achieve expansion, the same number of loops are added at equal intervals in the side seams on both sides.
Patterns for loin crochet tunics for plus size ones:
Models of knitted products for obese women with patterns and descriptions.
Tunic "Snow White"
Fillet crochet tunic with patterns and video tutorial will be interesting for any needlewoman, regardless of her skill level.
The stylish “Snow White” jacket is crocheted from white maxi or coco yarn, 1.1 - 1.5 mm.
Video master class from YouTube:
Patterns for loin crochet tunic:
Option 2 of the Snow White tunic
Photo and design of the “Snow White” blouse from Elena Saenko.
Summer tunics
Modern blouses using the fillet crochet technique using the patterns posted below for free are easy to make even for a beginning knitter or a high school-age child, if you carefully follow the drawings.
With Greek pattern
A stylish model of a summer sweater with a Greek pattern.
Schemes and descriptions of fillet crochet tunic:
Even inexperienced knitters can knit this fashionable blouse. The Greek pattern consists only of air loops and columns that alternate with each other. The model can be slightly modified to your liking, as in the photographs presented, for example, adding raglan sleeves or changing the shape of the neckline.
Crochet tunic according to the drawings of Tatyana Bespichanskaya
Tatyana Bespichanskaya is a popular online needlewoman who specializes in crocheting openwork summer patterns.
Photos and diagrams of the work from Tatyana Bespichanskaya.
Summer openwork tunic with a border is made of thin yarn of bright blue color.
The “highlight” of the product is a large flower made from double crochets.
The border of the tunic combines several motifs at once - “diamonds”, “spiders”, diagonal stripes on a loin mesh.
Vertically directed pattern
The next pattern is also a vertically directed pattern. Its rapport is 21 loops. Its pattern is simple to implement; it uses chain stitches, single crochet stitches and double double crochet stitches.
An interesting feature of this pattern is that the working thread is grabbed not by 1 previous row of air loops, but by 2, creating an entwining effect, like in a hemstitch. The finished product made with this pattern looks feminine and attractive.
Decoding circuits for beginners
Important rules for beginning craftswomen:
- Diagrams are always read from the bottom.
- The first row goes from right to left, and the even row goes, on the contrary, from left to right.
- When knitting in the round, the pattern is read from right to left.
- Rapport between special icons is repeated the required number of times.
- Each row begins with loops for lifting the pattern; in repeat, these loops are usually replaced with a stitch.
The descriptions contain the following designations:
- air loop - VP;
- column - ST;
- double crochet - STN;
- single crochet - STBN.
If the diagram is presented in the form of a picture, a decoding must be given below which icon represents which loop.
Sirloin pattern
Crochet tunics for overweight women, the patterns of which are presented below, have become very relevant in the wardrobe of modern fashionistas.
Using the fillet knitting technique in clothes, a unique coloring of floral patterns is created, giving things lightness, fabulousness and irresistibility.
It should also be remembered that the motifs used are recommended to be placed in a vertical direction and in the center of the product , which helps to concentrate the attention of others on it and hide areas undesirable for viewing.
It is recommended to fill the remaining space with a small pattern in order to more clearly highlight the longitudinal central part of the tunic. It can be made using either the fillet technique or the conventional one. Here are 2 diagrams of possible patterns.
The presented fillet patterns involve either single crochets with an air loop between them, or single crochets, creating a uniform mesh.
In accordance with the pattern of the pattern, certain cells of such a grid are filled, resulting in a beautiful flower or composition. For more dense filling of the necessary cells and a clear outline of the pattern, it is recommended to knit not 1, but 2 columns with 1 vertex under the chain loop of the previous row.
If the bottom cell of the mesh is already filled, then both columns must be crocheted not in one puncture, but in adjacent ones. The central part framed by thin paths, as shown in this diagram, will also look effective.
It is possible to use repeating vertically located elements that will create the effect of an openwork ribbon. They can be located singly or in a certain number, connected to each other by a decorative seam. This knitting technique is used for both straight and trapezoidal tunics.
Greek style
A crocheted tunic for overweight women, whose patterns depict Greek patterns, gives both severity and solemnity.
The presented schemes are very simple to implement. They use only single crochet or double crochet stitches and chain stitches alternating with each other. The use of this pattern is limited.
It is located either:
- at the bottom of the product;
- at the bottom of the sleeves;
- vertically, but not thickly, otherwise its Greek essence will be lost.
Full description of knitting a tunic with a Greek motif
The tunic with patterns of squares is crocheted in the Greek style.
Dimensions: 36/38 (40/42) [44/46].
You will need:
- 400 (450) [500] g of Misgo yarn (100% polyacrylic, 170 m/50 g) from Junghans-Wolle;
- hook No. 3-4.
DESCRIPTION
Patterns 1 and 2 : knit according to the corresponding sections of the pattern. 1 repeat of pattern 1 is performed on 24 VP. 2nd row of pattern 2: number of corresponding stitches. s/n is given in the instructions.
Knitting density:
- size 36/38 crochet number 3: 1 pattern repeat per 24 VP of the initial chain = 10 cm wide and 9 r. in height;
- size 40/42 crochet No. 3.5: 1 pattern repeat for 24 VP = 10.5 cm wide and 9 r. = 9.5 cm in height;
- size 44/46 crochet number 4: 1 pattern repeat for 24 VP = 11 cm wide and 9 r. = 10 cm in height.
The tunic is crocheted in the corresponding number for each size in the transverse direction.
The front and back are made in one piece.
Crochet the corresponding number for a certain size (see “Knitting density”) 144 VP (= 6 repeats) + 3 VP rise and knit 9 rows of pattern 1 according to the pattern. Then continue working with pattern 2 as follows: 1st row (= purl): knit in single crochets. 2nd row (= knits): 48 double crochets, 36 double crochets, 36 double crochets and 24 half double crochets.
At the same time, for the first armhole along the left edge in the 2nd row of pattern 2, cast on new 48 VPs and on these loops in the next row (= 3rd row = purl row of pattern 1) knit with single crochets, knit on the remaining stitches half double crochets for the front arcs of the loops.
Continue knitting by crocheting 9 rows of pattern 1 and 2 rows of pattern 2. In the 3rd row for cutting the neckline (first edge) on the left, leave 18 stitches undone. b/n. Knit 9 rows of pattern 1 and 2 rows of pattern 2; in the 2nd row for the cut in the center of the neckline, leave 30 stitches unknitted. 6/n. Perform 9 rows of pattern 1, while in the 1st row, cast on the left for the second edge of the cut, new 30 VPs. Next, for the second edge of the neckline, cast on new 18 VPs, knit 3 rows of pattern 2 and 9 rows of pattern 1, 3 rows of pattern 2, with In this case, in the 2nd row for the 2nd armhole, leave 48 stitches unknitted along the left edge. 6/n. Complete 9 rows of pattern 1, 3 rows of pattern 2, while in the 2nd row for the back armhole, cast on new 48 VPs. Knit 9 rows of pattern 1 and 3 rows of pattern 2, repeat from * 2 more times, knit 9 rows of pattern 1, finish with 3 rows of pattern 2, while leaving 48 stitches unknitted in the 2nd row. b/n on the left edge.
Assembly and finishing . Straighten the pieces according to the pattern, pin them, cover with a damp scarf and leave until dry. Sew a side seam. Hook the shoulder seams together. Tie the edges of the neckline and armholes with 1 row of stitches. b/n.
The yarn is selected individually, the size depends on the thickness of the thread. If you need a large size, choose jeans type yarn or increase the number of ribbons. The size can also be adjusted by knitting using the fillet technique - this is st. double crochet or patent stitches.
PATENT COLUMN
When knitting a mesh, a patent stitch is often used instead of a double crochet. It is slightly taller than a regular double crochet and slightly lower than a double crochet and is denser. Thanks to the patent column, the cells are more regular (square) in shape. Knitting a double crochet differs from knitting a double crochet in that the loops on the hook are knitted in three steps, not two:
“Do a yarn over. Insert the hook into the base loop and pull the thread through. Grab the thread and pull it through only the first loop on the hook. Grab the yarn again and knit the next two stitches together. Grab the thread again and knit the remaining two loops.”
The patent column is ready. At the beginning of the row, instead of 3 chain stitches, you need to knit 4 chain stitches, as for a double crochet stitch. Some people also use this method when they want to shorten the knitting time and slightly reduce thread consumption when knitting to order (I learned it in secret from one craftswoman).
For a dress size 40-42 I used Lira yarn. For tunic sizes 52-54 - Jeans (hook No. 3).
Return to content
Boho style
This style represents a variety of irregularly shaped styles and combinations of parts. It is ideal for the wardrobe of plus size women. In order to knit a tunic in the boho style, you must first make a pattern of the model you like, and experienced needlewomen just need to have good spatial thinking.
Step by step knitting:
- The first step is to carefully select a pattern or its combination with another.
- Decide where to start work (bottom or top).
- Correctly calculate the parameters of the product and bring them into line with the location of the patterns. Observe symmetry, if any.
When choosing a suitable pattern, you can focus, as described above, on the central part of the product. This is an ornament along the entire length, only on the upper part or on the entire yoke. The fillet technique is perfect for this implementation. The diagrams below show options for the location and implementation of several examples of patterns.
The rest of the fabric is knitted in a small regular pattern, either using the fillet technique, or in any other way, carefully following the contours of the pattern. The pattern diagrams below can serve as examples for filling out most of the tunic. They also have a vertical direction, and will hide problem areas in the finished product.
With ties
Crochet tunics, the patterns and models of which are shown below, may include such a decorative element as ties, which also serve as a clasp. They have different locations: on the neckline, with a split neckline, under the bust, on the waist, sleeves, shoulder and side seams.
But for women with curvy figures, it is recommended to use ties only at the neckline in various versions and at the shoulder seams.
In products with one-piece sleeves, they can continue along it. This decorative element can be a caterpillar cord, thin braid, crocheted in various ways.
Crochet tunics for obese women: model with ties
It is also possible to use satin braid that matches or contrasts in color with the main product.
It can be threaded around the neckline and tied in front.
This use of ties also serves to protect the neckline from stretching during wear.
If they are provided in a model in the neck area with a split slit, one nuance should be taken into account.
The pattern for this product must be selected so that the cut is clearly in the middle.
In addition, it is undesirable to use those floral patterns, the integrity of which may be disrupted by the introduction of such an element.
When using this decorative trim, it is recommended to adhere to the choice of patterns, in which the tunic will not be oversaturated with details that accentuate attention. It is enough to use the same type of beautiful pattern and decorate it with original ties. Examples include the following diagrams.
From squares
One of the interesting ways to create original tunics is knitting from square motifs. But for obese women there are some restrictions. It is not recommended to use large squares. They visually increase the size.
It is better to use small or medium motifs. There is an opinion among craftswomen that the smaller the size of the square, the more accurately the product is close to the pattern and there is no need for additional alignment and adjustment.
For beginning needlewomen, connecting motifs can be difficult. To perform it, when knitting the outermost row of each square, it should be connected in certain places with similar loops in already knitted motifs.
Another advantage of smaller squares is the minimal formation of inter-motif spaces, which subsequently need to be filled with additional fragments.
From square motifs, you can knit the entire fabric, or use it partially. For example, knit only the yoke, the central part of the front, decorate the longitudinal center line of the sleeves, decorate the bottom of the product and sleeves, use it for asymmetrical finishing of the upper and lower parts of the front.
By using this technique when knitting a tunic on its entire fabric or a certain part, you can create many products that are radically different from each other.
From rhombuses
Knitting items from diamonds is the same as knitting from squares. The only difference is in the location of the motives. If, according to the chosen model, the bottom of the tunic and sleeves should be made in the form of teeth, which will give the finished item an elegant look, then this type of knitting should definitely be used here.
The size of the motives should also not be large. Coupling diamonds is done in the same way as using squares. Based on the desired result, it is recommended to carefully select a hook for the yarn used. The optimal size for a thin cotton thread is from 1.5 to 3.
It should be noted that the thicker the hook is used, the softer and more delicate the motif will be. If, according to the plan, a more dense and rigid part is needed that should hold its shape, it is better to take a smaller size. Below are examples of some patterns and patterns that can be used for knitting.
Using the presented various techniques for crocheting tunics for obese women, we can confidently say that any body type can be transformed with skillful selection of style, pattern and decorative trim.
Hot stand
But you wanted to knit cup coasters for your home with paws, but you don’t know how. You can also easily learn.
Related article: Braided hat with shadow: video master classes with descriptions and diagrams
First, let's look at the diagram:
We will knit the warp using it. We knit in white in the round. You need to knit 2 of these warps. They should be the same.
We will also knit the paw pads according to the pattern using brown yarn. We need to knit four circles for the finger pads.
And you need to knit a large, central pillow in the shape of a heart. We will knit it according to this pattern.
When all the individual elements are ready, we sew them onto our white base and get a hot stand. For the base, you need two white identical knitted parts, otherwise the stand will be thin and will not fulfill its function of protecting the table or furniture from hot mugs.
We saw that understanding the circuits is actually easy. You just need to want it. Each knitted item consists of a pattern. Therefore, do not be intimidated by complex tasks; every complex task consists of many small ones. Each large stitch consists of many different double crochets and single crochets, and you can sort it all out if you want. Crocheting will give you freedom, unique style, peace of mind and pride in your work. Create and you will succeed.