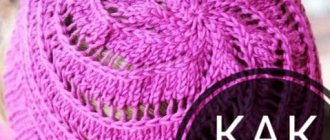
Hat helmet for girls
In such a hat, he will never inflate his ears.
Little fashionistas are already little women and they want beautiful, delicate colors in their clothes. This also applies to hats. The first model in the selection is a pink hat and helmet for a girl. However, by changing the color, you can knit this style for a boy. Author: Jonna Thue. The calculation is presented for age: 6 months; 1; 1.5 and 2 years. With height: 80/92/98/104 cm You will need: - yarn with the characteristics of 55% wool, 45% cotton, 124mt/50g - 100/100/150/150 grams; - knitting needles No. 2.5 and No. 3. Density: 28 stitches = 10 cm (in stockinette stitch using needles No. 3).
Decrease : knit 2 loops together with a slant to the left (slip 1 stitch as knit, knit the next stitch and pull the removed stitch through it). Increase : knit a loop from the broach crossed st.
Knitting pattern for a children's helmet hat:
- On knitting needles No. 3.5, cast on 192/200/208/216 sts and knit with an elastic pattern in the round: k2, * p4, k4. * - repeat from * to *, complete 4 knits. and 2p. (=center of the back). After 5/5.5/6/6.5 cm, do the following: * knit 2 stitches together, purl 4, decrease (see above) * - repeat from *.
- Track. 2 rows: - * K1, P4, K1. *; — * 1 knit, 2 sts together purl, 2 sts purl together, 1 knit. * (=96/100/104/108p.)
- Next, knit with a 2x2 elastic band. After 4/4.5/5/5.5 cm, bind off the central 16/18/18/20 stitches for the front neckline, and on the remaining loops knit with an elastic band in rows “here and there”.
- Mark the center of the back of the helmet with a different color. Close on both sides in each r. 1 time for 2 loops and 2 r. 1 p. On knitting needles 72/74/78/80 p. Next, add on both sides after the edge stitch. 6/6/7/7 times 1 loop (=84/86/92/94p.). Knit the added sts with an elastic band. When you knit 13/14/14.5/15 cm after the color mark, close on 2 sides for the side sector of the helmet at 28/29/31/32 p. For the remaining 28/28/30/30 p. continue in the same way viscous middle sector of the helmet. When the height of the middle sector is the same as the length of the side, close the loops.
- Sew the middle sector to the side parts. Around the front hole, cast on circular needles No. 2.5 in this order: lower sector - 16/18/18/20 sts; 5 points along the curves; 22/25/27/30 p. on the sides; 26/26/28/28 sts at the top. Tie 8 p. elastic band 1x1. Close all items.
For girls
Let's look at how to knit a hat-helmet for little fashionistas. The presented photos indicate that girls' products are more elegant and can have a variety of finishes or knitted patterns (this directly depends on the imagination of the craftswoman).
We offer a description of the process of knitting a hat for experienced needlewomen. The knitting pattern is designed for a model with a head circumference of 50-52 cm. This headdress is knitted from the neckline. On needles No. 3 (circular), cast on 110 sts, close in a circle and knit 2 rows with auxiliary yarn.
Starting from 3 p.m. use the main yarn: knit a 5-6 cm fabric with an elastic band (1*1/2*2 at your discretion), evenly adding 20 loops. Thus, by the end of knitting the fabric there should be 130 stitches. Then, on knitting needles No. 3.5, knit 5 stitches. persons.p.
Where to look for answers to questions that plague you before bed- Natural beads for connoisseurs of quality and elegance
- An electric car is my childhood dream
To form a hole, bind off 33 stitches in the middle. Next, make decreases: in each odd row 4 times 1 stitch, as a result there will be 89 stitches on the knitting needles. Then knit 60-80 rows with your own chosen pattern. A variety of braids look good on this model.
To round the hole, add 1 stitch in odd rows on both sides of the fabric. Now cast on 33 loops on the knitting needles (for the forehead area) and knit 40-60 rows in the round.
Now it’s time to form the crown: divide the fabric into 10-13 equal parts and evenly decrease 1 stitch in each on the front row. Having knitted about 6 cm in this way, pull off the remaining loops.
To knit a cape, unravel the first two rows made with an auxiliary thread. With loops gathered on the knitting needles, knit the shoulder area to a height of no more than 9 cm. Experienced knitters recommend using raglan.
The hat is almost ready: decorate the face area. Cast on loops along the edge and knit a fabric 4-5 cm high with an elastic band. Decorate the finished product as desired.
The proposed descriptions of knitting helmets are, in principle, universal. You can knit them for children regardless of gender. Experiment with patterns, colors, trims, decorations, and your child will be protected from the cold not only by the headdress, but also by the warmth of the soul you put into the creative process.
Knitted helmet for a boy with pompoms
Funny helmet for a boy with pompoms.
And now a model for boys - a knitted helmet with two pompoms from the design studio Drops. You will get a very warm helmet for winter, because it is knitted from 100 percent alpaca, soft and comfortable. Description of the winter hat for sizes: from 1 to 3 months; up to 9 months; up to 1.5 years; up to 2 years; up to 3 - 4 years. Head volume: 40/42; 42/44; 44/46; 48-50; 50-52 cm. You will need: - Alpaca yarn from Drops (100% alpaca, 167mt/50g) - 150/150/150/200/200 grams; - circular and stocking needles No. 4.5.
Density: 18 p. = 10 cm (two folds in stocking stitch). Garter stitch when knitting in the round: 1 row of knit stitches, 1 r. - purl.
Detailed description of knitting a children's helmet hat:
- Cast on 144/153/162/180/198 sts with double yarn and knit 8 rows in garter stitch.
- Continue with the 7x2 rib pattern: * P7, k2. *. Having knitted 3/4/4/5/5 cm, decrease 1 stitch in each purl row, knitting the first 2 purl stitches at once (=128/136/144/160/176 stitches). Make such decreases 4 more times in every second row (=64/68/72/80/88p.), (=K2, P2). Next, continue with a 2x2 elastic band until the height is 11/12/13/14/15 cm. Mark the center of the front and back of the helmet with colored thread. The reference point for the height of the cap is now from here!
- Then knit in stockinette stitch (knit all stitches) to a height of 1/2/2/3/4 cm from the new mark. Transfer the central 10/10/12/12/14 stitches in the front part to an additional thread (=window for the face).
- Next, the helmet cap is knitted in straight rows “back and forth.” From each edge, after 1 row, you must decrease 1 stitch 2/2/2/3/4 times and at the same time, above the central back marked point on both sides, add 1 stitch 4/4/4/5/6 times (= 58/62/64/72/76 p. At a height of 11/12/13/14/15 cm to round the front hole, add 1 p. 4/4/4/5/6 times from each edge after 1 p. Then cast on 6/6/8/8/12 sts and close the knitting into a circle (=72/76/80/90/98 sts).
- When you knit 19/21/22/24/26 cm from the mark, bind off all the loops.
- Fold the helmet in half and sew the top seam.
- Around the face hole, cast on 68-88 sts, including the set sts. Tie 1 p. purl p., second r. - persons.p. Next, knit with an elastic band 2x2 4/4/5/5/6 cm and close the loops of the helmet. Fold the strip inward and sew.
- Make 2 pompoms with a diameter of 4 cm and sew them in the corners at the top of the hat.
"Fox" for a baby
Even a beginner knitter can knit such a hat. It uses knit and purl stitches, as well as crocheted half-stitches.
To make it you will need orange, white and black yarn. 100% acrylic is perfect, but fans of natural materials can take wool blend. In addition, you need knitting needles No. 3.5, a hook No. 2.5-3 and a long needle for stitching the parts.
Using an orange thread, cast on 38 loops (for a head circumference of about 46-48 cm). Next, knit in stockinette stitch, alternating knit and purl (even) rows. 1st row
In the 7th (front) row, make the first increases. Divide the number of loops in half - 19 loops. Knit as follows - 18 knit stitches, 1 increase - knit a loop from the previous row, 1 knit stitch. And then symmetrically - 1 knit, 1 increase, 18 knit stitches.
Knit the increase like this: between the 18th and 19th loops, use the right knitting needle to pick up the thread of the previous row.
Transfer it to the left needle and knit behind the front wall.
This way the loop will turn out to be crossed and no holes will be visible at the place of the increase.
Such increases go exactly in the middle of the cap fabric. The hood is gradually untied.
After a row with increases, knit the next row with purl stitches, then a row with knit stitches, then a row with purl stitches again. And again in the front row, make an increase - already knit 19 front loops, 1 increase, 1 front loop, 1 front loop, 1 increase, 19 front loops. That is, make increases in every 4th row. In total you need to make 9 increases. And the total number of loops is 56. Close the loops of the first part after the 44th row is knitted.
Article on the topic: Crochet owl with diagram and description of the master class
The loops are closed using purl stitches. After this, you should cut off the working thread, leaving a longer tail, fold the piece in half along the increase line and sew the top row.
The hat is designed to be double. Therefore, the second part needs to be knitted the same as the first, with the only difference being that there are 36 stitches, and the part will have 42 rows in height. The number of increments is the same as in the first case.
Connect the inner and outer parts, inserting them into each other back to back, and sew with a needle along the top of the head.
Now you need to knit the elastic band. To do this, take a white thread, folded in half to obtain a more textured elastic band. Along the edge of the hat, crochet the loops and transfer them to the knitting needle. Knit with a 2×2 elastic band, that is, 2 knit stitches and 2 purl stitches.
Having knitted one row, then knit in shortened rows to form the circumference of the child’s forehead. In the 2nd row, do not knit 4 loops to the end and turn the knitting.
In row 3, do exactly the same.
4th row - do not knit another 6 loops (that is, do not knit 10 loops to the end of the row) and turn.
Row 5 - similar.
Row 6: Knit all stitches to the end.
And connect the black thread to work. She knit 2 rows of elastic and bind off the loops according to the pattern.
The main part of the hat is ready. Now you need to knit the little fox’s ears. Cast on one thread again. In orange, cast on 13 stitches. This is the 1st row. Continue knitting like this (all even rows are knitted with purl stitches):
Row 3: knit 4, decrease (knit 2 stitches together), knit 1, knit 2 together, knit 4.
Row 5: knit.
Row 7: K3, two stitches together, k1, two together, k3.
Row 9: k2, two stitches together, k1, two together, k2.
Row 11: 1 knit stitch, two stitches together, 1 knit stitch, two stitches together, 1 knit stitch.
Row 13: knit 3 stitches together and finish knitting.
Knit the second part of the ear in the same way with white thread.
Related article: Crochet children's vest with braids and bumps
Now you need to connect the two ears together. This can be done using a hook and black thread. Fold the two pieces back to back and tie with single crochets. At the top of the ear you can knit double crochets to make the ear more elongated and pointed. Also, at the top, knit three stitches into one loop.
You can sew on the ears using tails of thread left over from knitting.
All that's left to do is hide all the protruding ponytails and make ties. The hat is ready!
Hat helmet for both boys and girls from the top of the head
How to knit a helmet from the top of the head, see the description.
When talking about knitted hats and helmets, one cannot fail to mention the method of knitting from the top of the head. This model of a children's helmet is knitted just from the top of the cap. And you can knit it for both boys and girls. Size: 1.5 - 2 years, head volume 48-50 cm. For knitting, prepare: - Naco Pop Mix (25% wool, 75% premium acrylic, 120m/100g); - knitting needles No. 5. Density: 15 p. = 10 cm
How to knit a hat and helmet from the top?
- Using knitting needles, cast on 4 stitches and knit 6 rows in a circle with knit stitches, in the last 2 rows. add 2 stitches evenly (=6 stitches).
- Next we expand the helmet. To do this, in every second r. Increase 6 stitches evenly 9 times (=60 stitches). Then - another 14 rubles. no additions.
- We make the top of the rounding for the front hole of the helmet. Set aside 10 stitches for an additional thread and knit further in straight rows. In the next 4 r. after 1 r. on the sides, cut 1 stitch on each side (=46 stitches).
- Design of the back of the hat. Mark the center of the back of the helmet. Next time knit like this: 15 knits, 2 together (remove the loop, knit the next knit, then put it on unknitted), 12 knits, 2 together, 15 knits. Do 2 more p. contractions in every second p., reducing the intervals between decreases by 2 p., so that the decreases go one above the other (= 40 p.). Then 8 r. in a straight line.
- In persons.r. cast on 12 sts (chin line) and close in a circle (=52 sts). Tie 11 p. elastic band 1x1.
- Hat shirtfront: divide the work into 4 parts (16 stitches for the front and back, 8 stitches for the hangers + 4 stitches for the raglan). Then continue knit stitches, adding 1 st on each side of the raglan stitch. Such additions must be made 6 times every 1 r. Finish the hat with four p. elastic band 1x1.
- Face window. Along the edge of the neckline, cast on 35 stitches, throw it onto the knitting needles and set aside 10 stitches (= 45 stitches) and knit 4 rows. with a 1x1 rib, then bind off all the loops.
- If you want the face cutout of the helmet to fit more tightly, run 1-2 rows of spandex from the inside.
- Tie a chain of chain stitches for tying and thread it along the neck line.
How to thread spandex thread into a hat?
Ears on top of head
An example of calculating a cap knitted with a rook on OG = 50cm. Knitting density 2.6p=1cm. Calculate how many stitches you need to cast on: 50*2.6 = 130p. Divide the total number of loops into 5 parts: 130/5=26p. Distribute the loops as follows: 26 loops for knitting the ears, 26 loops for knitting the back part and 26 * 2 for the front part.
If the OG is more than 50 cm, or the knitting density differs from the density given in the example, the calculation should be made using the specified formula, simply substituting your data.
How to knit such a cute new thing? Start knitting with ears, knitting two at a time from two balls. Cast on 4 loops for each eye.
Increase 2 stitches in every second row (along the edges after the edge stitch). Add 22 loops in each ear. Plus 4 cast on initially, for a total of 26 loops.
Next, cast on 26 loops between the ears for the back of the hat. The cast-on is done with one thread, i.e. after knitting the front row of one ear, cast on loops and continue knitting the front row of the second ear. Use the same thread to knit the cap until the end. The second thread can be cut.
Knit approximately 2 cm in height, making increases in the front of the ears every second row. After this, the ears should become 30 loops each.
Related article: Bodysuits for young children: knitting pattern and description
Cast on the remaining stitches for the front and close into a circle. On the front you need to cast on 26*2=52 loops; Add 8 loops when knitting the back part, 52-8 = 44 loops remain to be cast on.
Then start making decreases so that the crown is formed. Divide all the loops into five parts and decrease two loops along the edges in every second row. When there are fewer stitches, switch to stocking needles. Close the crown, at the end (when there are approximately 6 loops left in each sector) decrease the loops in each row, and not through the row.
The hat is ready. Next you need to make the lining, decoration, ties - in general, everything your heart desires. Depends on what you want to get in the end.
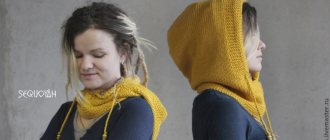
Fashionable charmer
If you want to prevent it from blowing into your ears, thread a string and tie it with a bow.
The next model in the selection is an original winter helmet for girls with ears. The model combines both a hood and a helmet. You may be indignant - what kind of winter hat is it if it doesn’t fit snugly to your face! But we must forgive the designer, he comes up with models, and we apply them to life. You need to stretch a string along the opening for the face and tighten the wide neckline with it, then the wind will not be scary. And any girl will be delighted to wear such an interesting hat. You will need: - Eskimo yarn from Drops (100% wool, 50met/50g) - 250 grams of different colors; - circular knitting needles No. 9.
How to knit a hat and helmet for a girl with ears?
- Using knitting needles, cast on 70 stitches and knit in the round: 1-4 rows: pearl stitch (1 row: knit 1, purl 1; 2 rows: over the front stitch - knit, over the wrong stitch - purl) in red; 5-8p.: stockinette stitch (all stitches) in black; 9-20 rubles: face stitch with red thread;
- From 21 to 60 p.m. knit in stockinette stitch in rows “back and forth”.
- Fold the hat in half and sew the top seam in a loop.
- Tie the neckline for the face 3 times. single crochets, fold the edging inward and sew.
- For the helmet ears, cast on 9 sts with knitting needles and knit in stockinette stitch. In every r. knit 2 stitches along the edges at once. You need to make 4 such parts: two red and two white. Fold them in pairs of different colors (red and white), tie them with black thread in single columns.
- Sew the ears with a neat seam to the helmet.
- Sew on 2 buttons.
Children's helmet for toddlers
This model of a children's hat and helmet is knitted using the heel-toe principle. The style has already been discussed on our website TatuchkaClub.ru, so we will not repeat it. A link to a page with a description of a helmet for 3 sizes of a child under one year old is located under the photo.
Hat and helmet for a boy up to one year old - description here
Another model of a helmet for a newborn boy or girl on knitting needles with a shirtfront and cute ears.
Knitting pattern here
The third style from our website: Gnome helmet.
The hat fits tightly on the head and does not blow into the ears - the mother is calm about the baby.
Description here
If you are looking for a helmet with a knitted bib that can be unfastened, look below:
We knit a warm hat-helmet for a boy for beginners in a master class
To make a hat-helmet for a boy you need:
- 160 g acrylic yarn of any color
- knitting needles No. 3 (one pair of straight and one pair of circular, on fishing line)
- crochet hook the same thickness as the knitting needles
- scissors
How to knit a hat-helmet for a boy (head):
1) We begin our master class by casting on ten loops on straight knitting needles.
2)Next we knit with garter stitch (all levels are performed only with knit stitches) 130 levels. At the end we make the edge. Next, put the knitting needles aside and start crocheting.
3) Crochet one level of single crochet columns. Take knitting needles again.
4) The next 46 levels are performed according to the scheme: edge loop, six knit stitches, then three blocks of the pattern “eight loops need to be removed from the knitting needle and swapped, making a cross, then twelve knit stitches.” At the end of the level there is an edge loop.
5) We divide the workpiece into three parts - we knit each of them separately.
6) Starting from the 52nd level, we perform decreases: every two levels, two loops in the center. The loops need to be knitted together.
7) We close the edge of the workpiece when we have twenty loops left on the knitting needles.
8) After this, we move on to knitting the sides. Crochet from the wrong side.
How to knit a hat-helmet for a boy (neck area):
1) Now we will make the most interesting part of the helmet - the collar. To do this, take circular knitting needles and cast on loops along the edge.
2) At every second level we make increases from two loops (in the center). After this, we continue to knit in the stocking method, using only knit stitches.
3) To determine how long a shirt-front should be knitted, it is better to try it on the child directly.
4) The headdress is almost ready. Do not forget to wet the product before wearing it and dry it on a horizontal surface. That's it, now you can go play in the snow and sculpt a snow woman!
This master class is the basis for knitting a children's hat-helmet. The finished product can be decorated to your taste or supplemented with any patterns.
The simplest option to decorate a helmet is a pompom. Pom-poms (one or more) are formed separately and then sewn on short ties to the top of the head so that they hang down at the back. In such a headdress, the child will look like a cute gnome from a fairy tale. However, keep in mind that models with pompoms are still more suitable for younger children; older children may refuse to wear such a “baby” hat with a pompom.
The material for this type of hat should be chosen depending on the season. For the coldest months, it is better to knit a helmet with the addition of wool or angora yarn. However, keep in mind that these threads can prick and cause itching on delicate baby skin, so it is better to use a lining. Thus, the hat will become warmer and more pleasant to wear.
In the spring, a hat-helmet is more relevant for kids who are still unsteady on their feet. In this case, it should be knitted from thin, smooth yarn. For older children, it is better to choose other models that will not be so hot during active games. In addition, it is more convenient to remove a hat and scarf knitted separately in the spring if the weather suddenly clears up during the day and suddenly becomes warmer.
If a child refuses to wear a helmet...?
If a child, despite all the persuasion, still refuses to warm up and wear a helmet, you can invite him to look at photographs of famous skiers, snowboarders and other athletes. To protect against the cold, many of them wear a so-called balaclava, which protects both the cheeks and the neck. And a hat or helmet is put on top of it. Invite your child to play “real champion” and dress up just like him.
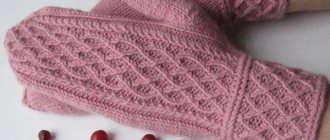
Practical helmet with elastic band. The simplest scheme
The simplest knitting pattern.
This helmet hat, knitted with an elastic pattern, tightly fits the baby's head and ears. The facial window is small, covering even the chin. Size 52-54 cm You will need: - 75 g of Gedifra Merino de Luxe yarn (150m/50g); - knitting needles No. 3.
Description of knitting a hat in the form of a helmet:
- Using knitting needles, cast on 152 sts and knit 14 cm with a 2x2 rib (k2, p2) in the round.
- Close off 54 stitches for the face holes of the helmet cap, close off 54 stitches, continuing further in straight rows of 12 cm.
- Pick up 54 stitches again and go to circular knitting - 8 cm.
- We decorate the top of the children's helmet. Knit all stitches in 2s together and then continue in knit stitch while continuing to decrease. Divide all items into 10 parts. After 1 r. decrease by 1 p. each has 10 sectors. The remaining 10p. Pull together with working thread and secure firmly.
- Crochet the window for the face of the helmet with two rows. double crochets.
Another way to make a helmet hat for a child with a shirtfront using knitting needles in a jacquard pattern in a video tutorial from the experienced craftswoman Svetlana Bersanova MK: