- 3747
- 19-11-2020
- Author: Mysekret Team
- 0
In the cold season it is difficult to do without a hat and scarf. You can buy fashionable items in any store, but knitting them yourself will be much more valuable. We talked about how to knit a beautiful women's hat in THIS ARTICLE , so now we will discuss how to knit a scarf with knitting needles.
By the way, this is one of the lightest products. It is with knitting scarves that many needlewomen begin their acquaintance with the world of yarn and knitting needles.
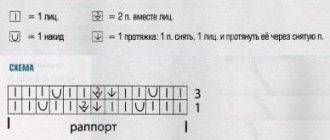
Pattern for knitting a scarf with knitting needles
A classic accessory, knitted quite simply and shaped like a rectangle. Experienced craftswomen recommend that inexperienced needlewomen begin to hone their skills by knitting simple items, for example, a scarf. At the same time, take diagrams of simple patterns and only then move on to more complex designs. In this case, mastering the art of knitting will be interesting and will not end at the beginning, when beginners try to start knitting with very complex patterns and products. As a result, everything is abandoned, with the thought that this is a very difficult task.
Three simple patterns for knitting a scarf:
Method No. 1: Elastic band 2x2
The method is convenient and in demand, the product when knitted in this way does not stretch, retains its original appearance and, due to its volume, is quite warm. Suitable for winter accessory options.
Elastic pattern 2x2
Description of the scheme:
1 r: edge, *k2, p2* - repeat until the end of the row, finish the knit row, turn.
2 r: chrome, *p 2, knit 2* - repeat until the end of the row, finish the knit row, turn.
Alternate rows 1 and 2, to the required length of the product or according to the drawing.
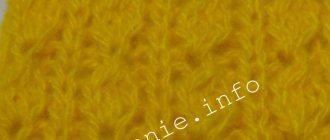
Method number 2: Relief pattern
The pattern has a different name, it is also called “checkerboard”. It holds its shape well, looks beautiful and is quite easy to knit. In this option, the number of loops can be changed arbitrarily, then the shape of the chessboard will change, and accordingly the pattern will look different.
Checkerboard pattern
Description of the scheme:
The repeat consists of 6 loops, not counting the edge loops.
! r: edge, *k3, purl 3* - to the end of the row, edge (knit), turn.
2 r: chrome, *above faces. P3, over P3* - to the end of the row, edge(s), turn.
Then we continue to alternate rows 1 and 2 until row 12. Then the pattern changes, our checkerboard pattern is made from purl stitches, the knit stitch is knitted and vice versa.
Method No. 3: Relief pattern No. 2
This simple pattern will allow you to quickly master knitting and add another fashion accessory to your wardrobe.
Description of the scheme:
Rapport consists of 6 loops. The pattern consists of knit and purl stitches.
Row 1: edging, *P2, knit 4*, to the end of the row, edging, turn.
2 rows: edge, *4 purl, k2*, to the end of the row, edge, turn.
Knit the 3rd and 4th rows like the first two.
5 r: edge, *k2, p2, k2*, to the end of the row, edge, turn.
6 r: edging, * 2 purl, 2 knits, 2 venting *, to the end of the row, edging, turn.
Knit rows 7 and 8 like 5 and 6.
9 r: edge, *4 purl, k2*, to the end of the row, edge, turn.
10 r: edge, *k4, purl 2*, to the end of the row, edge, turn.
Rows 11 and 12 are the same as rows 9 and 10.
Now continue knitting starting from row 1, and finish pattern 12 next to it.
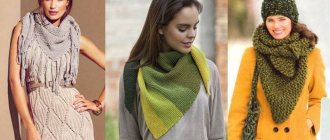
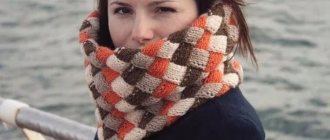
Other models of openwork scarves
The main purpose of a scarf is to protect the head and neck from cold, wind, and bad weather. Over time, the classic types of this accessory have undergone a great “evolution”. Models of scarves were born that were significantly transformed and became more beautiful, functional, and unusual.
Photo selection of modern models of scarves, varying in complexity of knitting, material, shape, size and method of knitting.
With such small items you can begin to master the art of knitting in principle. Scarves are knitted in simple rectangles, starting the study of weaving threads with the simplest patterns. Then, as you gain skill, you can move on to more complex openwork patterns and combined stitched designs.
Scarves don't have to be exactly rectangular. For variety, the edges can be made of scallops or waves, as a result the finished product looks even more beautiful. This design can be done on knitting needles, with the main openwork pattern. Often, crocheting knitted fabric is used to create a border.
An openwork scarf with knitting needles (patterns and descriptions are given above in the text) will decorate any woman’s wardrobe, emphasize the tenderness and romance of nature, and add a touch of sophistication and sophistication to the image. Knitting such a product is not particularly difficult even for a novice craftswoman, but creating a pattern will require special care and accuracy even from a professional.
Knitted openwork stole scarves are special items in a woman's wardrobe. They are so elegant and beautiful that they can be the basis of a woman’s toilet both on weekdays and on holidays. Mohair scarves "Gossamer", despite all their weightlessness, will help you stay warm in the evening, and stoles made of bulky yarn create a feeling of home comfort and security.
There is nothing warmer and more comfortable than a knitted scarf on a cold winter day. A scarf for warmth can be made very functional if its design includes a hood or cap; such a thing will save you from the piercing wind if it is a voluminous and warm snood. Scarves have a great variety of modifications; every woman can choose something of her own.
Warm scarves, bonnets and snoods are a real salvation from the cold wind in autumn and winter. For a professional knitter it will not be difficult to make a beautiful and functional little thing in just 2 or 3 evenings, and for beginning needlewomen there will be an opportunity to apply all their talents to new creative and constructive work.
From the hands of experienced knitters come very beautiful exclusive models that do not have their own doubles. It is important to remember that knitting is a painstaking creative process that has no clear limitations and “loves” improvisation.
Simple scarf with pockets and fringe: diagram, description
An excellent model for beginner needlewomen. The accessory is knitted in simple garter stitch and is complemented by pockets and fringe. The pockets are made with a “braid” pattern, a diagram with a description of the work is below. Size of the finished product: width – 30 cm; length (without fringe) – 2 m 10 cm.
Materials used:
- Yarn (80% wool, 20% acrylic) – 300 g;
- Straight knitting needles No. 4;
- Additional knitting needle or pin (for braids) – 1 pc.;
- The needle is big.
Sample of the main fabric: 10x10 cm = 18p/34r.
Pocket pattern: 22p/28r.
Description of work:
We knit the main fabric according to the pattern:
The diagram shows that all front and back rows are knitted only with front loops.
On a working knitting needle, cast on the required number of loops, in our version = 50 pieces.
Knit with a 210 cm scarf pattern. The edge loops are counted separately and are always knitted at the end of each row with a purl loop. At the beginning of the row, the loop is removed onto a working needle.
Additional details are knitted according to the pattern:
Cast on 34 stitches and knit according to the “pocket diagram” pattern. We knit up to row 48 and bind off the loops. We knit the second pocket in the same way.
Cast on 34 stitches + 2 edge stitches on the knitting needles.
1 r: chrome, P3, k6, P2, K12, P2, K6, P3, chrome.
2 r: chrome, k3, p6, k2, p12, k2, p6, k3, chrome.
Rows 3 and 4: knit similarly to the first two.
5 r: chrome, knit 3, *slip 3 stitches onto an additional needle as knit stitches, knit the next three stitches and with extra stitches. knitting needles also knit 3*, knit 2. Remove 6 spokes for extra. knitting needle, knit the next 6 knits, then with aux. knitting needles 6 knits, 2 knits and repeat from * to * again, 3 knits, chrome.
In this simple way, following the pattern, knit the pocket to the desired height.
Knit the second part in the same way as the first.
We sew the pockets to the main fabric at a distance of 15 cm from the edge of the product and decorate the edges with fringe.
Fringe:
Cut the yarn into pieces of 40 cm. Fold 4 threads together, bend them in half and hook them into the edge hole, resulting in a loop. Then insert the ends into the loop and tighten. So, at a short distance from each other, decorate the product with tassels at both ends.
Moisten the finished product and dry it on a flat surface.
With vertical wave
A scarf with an original openwork “wave” (the diagram and description for it are given below) can be thrown over your shoulders on a cool summer evening.
This beautiful cornflower blue model looks like it was created for sea walks on a deserted beach.
To knit a scarf with a vertical wave you will need:
- yarn – 400 g;
- long straight knitting needles with stoppers (circular knitting needles);
- measuring tape, scissors.
Finished product size: 150 x 55 cm.
Openwork repeat: 14 loops in 24 rows.
Knitting density parameters: 10 cm² = 9 loops x 23 rows.
Description of work: making a scarf involves working in 2 stages - knitting the main fabric with a “wave” openwork and knitting a border with scallops. First you should knit the main part. Using straight knitting needles, cast on 96 stitches for the main pattern plus 2 edge stitches and knit according to the pattern above.
The length of the scarf is 1.5 m and as soon as the knitting reaches this value, the loops should be closed. Next, you need to attach an openwork border with scallops to the short sides of the scarf. To do this, cast on 96 loops from each edge of the scarf and knit the border according to the pattern presented above.
Two-color scarf knitted
A simple way to knit a two-color scarf will allow any mother to turn her baby into a fashionable person. For beginning needlewomen, this is a great option to practice your hand and learn how to knit even and identical knit stitches.
The size of one piece is 15 cm wide and 100 cm long. Product parameters can be changed depending on the age of the child.
Materials used:
- Yarn of two contrasting colors - 2 skeins of 50 g each;
- Knitting needles according to yarn size;
- Decorative buttons – 10 pcs. (5 pcs. for each thread color).
Description of work:
The product is knitted in garter stitch, first a strip of one color is made, then another.
Twist the parts together in the middle and connect the ends with buttons, as shown in the figure.
A fashionable accessory is ready to make your beloved baby stylish.
Accordion pattern for men's scarf
A simple pattern is made from alternating sections of garter stitch and stockinette stitch. Knitting sections are done with different numbers of knitting needles.
Description
We will need two sets of knitting needles with a difference of three numbers. For example, knitting needles No2 and No5.
For the sample we type sp. No2 22 loops and knit 4p. garter stitch. The extreme loops in the rows are edge loops.
We remove the first one without knitting, we knit the last one purlwise. Repeated fragments of the pattern are highlighted in the description with asterisks *-*. Next, we move on to knitting with needles No. 5:
- 5p.: 1 chrome, *from 1p. we knit 2 knits.*, 1 chrome. Our sample has 42p;
- from 6th p.m. to the 12th row: knit stitch.
Next we knit sp. No2:
- 13r.: 1 chrome, *from 2p. knit 1 person*, 1 chrome. Received 22p.;
- from 14r. for 18 rubles: garter stitch.
Next, we knit the pattern with knitting needles for a scarf, repeating from the 5th row. to the 18th r.
Stylish scarf with loop
Knitting an original scarf with knitting needles is not difficult; for this you need to purchase thick yarn and large knitting needles. The model is interesting because it has a loop that allows you to wear the scarf in several ways.
Material:
- The yarn is thick
- Straight knitting needles – 6 mm.
The main pattern of the fabric is 2x2 elastic (diagram attached).
Finished product size: 16 cm – height; 123 cm – length.
Progress:
Cast on 32 stitches on the knitting needles, two of them edge stitches. Knit according to the pattern:
Description of the scheme:
Row 1: *K2, P2* - to the end of the row.
2 r: *P2, k2* - to the end of the row.
When you have knitted 50 rows, remove 4 stitches on an additional needle (1 edge, k2, purl 1) and continue knitting only these four loops, according to the pattern. Knit a strip the width of the scarf, in our case it is 19 rows. Set the connected part aside.
We continue to knit the main fabric. Without knitting 4 loops to the end of the row, according to the drawing. Having raised the main fabric by 19 rows, we leave it. Now you need to knit the second loop from the remaining 4 loops.
We knit the strip to the total height and transfer all the loops to one working knitting needle. Knit the required number of rows to obtain the desired length. Close the loops.
Fasten the ends of all threads and hide them in knitting.
The original scarf with a loop is ready.
Classification of scarves with openwork
A scarf is a very useful and beautiful wardrobe item that can be worn around the neck, on the head or as an elegant cape over the shoulders. Scarves come in men's, women's and children's varieties and currently have many varieties and names.
Scarves are:
- from thick or thin yarn;
- web scarves;
- knitted with simple knitting, elastic or complex openwork;
- square, triangular and rectangular scarves;
- in the form of a closed ring;
- complex stitched shape;
- with a tight fit to the neck or very loose.
All the numerous varieties of knitted openwork scarves can be divided into several groups:
- scarves with one pattern along the entire length (volume);
- scarves with a combination of 1, 2 or more fragments of patterns (rapports);
- scarves with a composition of several completed ornaments and patterns.
In addition, scarves can be classified by design:
- scarf-kerchief;
- scarf-hood;
- scarf stole;
- scarf-shawl;
- scarf-shawl;
- bactus scarf;
- snood scarf;
- scarf-hood;
- scarf sling;
- scarf-front;
- boa scarf.
Super-voluminous scarf knitted from thick yarn
An extraordinary and outrageous look can be created with the help of a voluminous scarf that almost completely covers the entire figure. The accessory is extravagant and not everyone will dare to try it on their image. But wrapped in a soft and warm linen, everyone inside will feel cozy and comfortable.
The product knits quickly and easily. It will take a large amount of yarn, but it’s worth it, because in the end you will get a unique thing that can warm you up not only at work, but on long winter evenings at home.
A small detail, the loops when knitting must be even and identical, otherwise the product will look sloppy. To test your skill in making perfect loops, knit a sample and make sure that the fabric is uniform and without flaws.
Material used:
- Thick yarn (97m/170g) – 3 kg 400g;
- Knitting needles according to yarn size, 25mm.
Size of the finished product: width – 45 cm; length – 400 cm.
The main fabric is knitted in stockinette stitch.
Fold the yarn into 4 threads (according to the pattern in our knitting, 10 cm - 4 loops).
Progress:
Cast on 18 stitches and knit the first 4 rows in garter stitch (all stitches are knit). The edge loop is always knitted purlwise.
Knit 5 and subsequent rows according to the pattern:
Description of the scheme:
Purl rows are knitted with purl stitches.
Facial rows with facial loops.
Work in stockinette stitch the entire length of the piece and finish with 4 rows in garter stitch. Close the loops. Cut the thread.
Openwork leaves
An openwork scarf with knitting needles (patterns and descriptions of the “leaves” pattern are offered below) will decorate even the simplest suit. Such an openwork scarf, made in a contrasting color with the outfit, looks very beautiful. The game of “contrast” and the original design of the product are the best touches to the romantic image of a woman.
To knit a scarf with openwork leaves you will need:
- yarn – 250 g;
- straight knitting needles with stoppers;
- measuring tape, scissors.
Finished product size: 130 x 25 cm.
Rapport openwork “leaves”: 42 loops in 35 rows (main pattern), 44 loops in 17 rows (border).
Knitting density parameters: 10 cm² = 8 loops x 22 rows.
Description of work: cast on 84 stitches on knitting needles (main pattern) plus 2 edge stitches. Knitting a scarf is carried out in two stages - making the main fabric of the scarf with one pattern and knitting the openwork border with another pattern.
First, you should knit a rectangular fabric according to the “leaves” pattern. The length of the scarf is 1.3 m, after it is reached the loops should be closed and the working thread should be cut. Then, from the short sides of the fabric, you need to cast on 44 loops one by one and knit the border according to the “spring leaves” pattern.
Openwork scarf-pipe: diagrams, description
The openwork and delicate accessory has the shape of a cone, narrowed at the top. It is this solution that brings additional comfort while wearing it. The question arises how to knit such a beautiful work of art with your own hands. Answer: simple and easy if you follow the job description and look carefully at the diagrams.
Material:
- Yarn (100% alpaca, 50g/175m) – 2 skeins;
- Circular knitting needles 4mm and 4.5mm, line length 70 cm.
Finished product dimensions:
- Height – 45 cm; top circumference – 60 cm; below – 75 cm.
- According to the sample, pattern density: 10 cm x 20 loops.
Description of work:
Cast on 153 stitches on 4.5mm needles.
1 r: knit all the loops, close the knitting into a ring.
2 p: purl all loops.
3 r: all loops are knit.
Starting from the 4th row, we switch to an openwork pattern according to the diagrams:
We start knitting the pattern from pattern M1.
1 r: *k3, k2 together, k4, yo, k6, yo. K2tog, k2, yo, k2tog, k2, yo, k2tog, yo, k4, yo, k4, k2tog, k3* - repeat 4 times, end the row of knits with a loop.
Thus, according to the pattern, knit 4 rapports up. There are 137 loops in the work.
Change the needles to 4 mm and start knitting the M2 pattern. Also knit 4 rapports up.
We go to the last pattern M3 and knit 1 rapport up. There are 121 stitches on working needles.
Finish the work with three rows that you started knitting with. Close the loops. Break the thread.
Delicate openwork scarf
An openwork scarf may be needed in winter, in the off-season and even in summer. It can be worn with any style of clothing as a neck accessory, as a snood, or as the main accent of an outfit with a beautiful brooch and pin.
To knit an openwork scarf you will need:
- yarn – 250-300 g;
- straight knitting needles with stoppers;
- tape measure;
- scissors.
The size of the finished scarf is: 150 x 30 cm.
Openwork repeat: 16 loops in 12 rows.
Knitting density parameters: 10 cm² = 20 loops x 34 rows.
Description of work: cast on 50 loops on straight (or circular) knitting needles - 48 loops for the main pattern and 2 edge loops. For a thicker edge of the scarf, knit 6 rows in garter stitch. Next, knit according to the pattern. The repeat of the openwork is 12 rows, repeat the pattern from the 13th row.
This is a one-sided openwork knitting, therefore, on the front side of the product, all loops should be knitted with knit stitches, and on the wrong side - purl. The openwork scarf is knitted in a simple rectangle 30 cm wide and 1.5 m long. After the fabric reaches the desired length, you should knit 6 rows of the thickened edge, close the transverse row of loops and cut the working thread.
Master class on snood knitting for beginners
A snood is a type of scarf that replaces two things in your wardrobe at once - a hat and a scarf. Therefore, having such a fashionable accessory, you can always remain fashionable and stylish. We knit a scarf with knitting needles for beginners, details in our MK.
Option No. 1: Snood made on circular knitting needles
Material:
- Yarn of your choice – 100 g;
- Knitting needles according to yarn size, line length 80 cm.
Description of work:
Cast on the knitting needles the required number of stitches, which must be calculated using the pre-knitted pattern. The main knitting will be knit stitches.
Purl the next row. In circular knitting, garter stitch is knitted this way. 1 row, knit, 1 row, purl.
Knit until you alternate rows until you reach the desired height.
In the last row, close the loops in any known way. This snood scarf was made using circular knitting needles.
Option No. 2: Snood knitted on straight knitting needles
The second option is a little easier to knit than the first. To make it, straight knitting needles are required, since knitting takes place in rotating rows. Garter stitch is used for the pattern. All rows are knitted with knit stitches only.
Description of work:
Cast on the required number of stitches on the knitting needles. Knit a row with facial loops. The edges are knitted with a purl loop.
Turn the product and continue knitting with facial loops. Original sectional dyeing of yarn will make the finished product beautiful, without any knitting tricks.
Knit the product to the desired length. Cast off the stitches of the last row. Now the narrow ends of the product need to be connected to each other. This can be done in two ways: with a hook or a needle, whichever is more convenient for you.
This is such a simple, but very fashionable accessory.
Video: Tutorial on knitting a snood for beginners
Scarf stole
A delicate turquoise mohair scarf is a beautiful thing that every woman should have. It will perfectly complement the romantic image of a fashionista and will warm you up on a cool, windy evening.
To knit a stole you will need:
- yarn – 600 g;
- long straight knitting needles with stoppers (or circular knitting needles);
- tape measure;
- scissors.
Size of the finished stole: 250 x 80 cm.
Openwork repeat: 11 loops in 7 rows.
Knitting density parameters: 10 cm² = 7.5 loops x 22 rows.
Description of work: cast on 136 stitches on knitting needles for the main pattern plus 2 edge stitches - this is 8 completed openwork repeats in width.
Next, knit the fabric according to the pattern shown above. Repeat the pattern from rows 1 to 7 from row 8 and continue working until the required length is reached. On the front side, knit all the loops, on the wrong side - purl. As soon as the knitting reaches a length of 2.5 m, bind off all the loops, cut the working thread and make a tack.
Amazing knitted scarf ideas
The variety of scarves never ceases to amaze. Let's look at several options for amazing products with diagrams and descriptions.
Snood scarf with intertwined stripes
This time too, the snood scarf with intertwined stripes amazes the imagination. Despite the fact that the design looks intricate, knitting such an accessory is not difficult. According to the description and video tutorial provided, even a not very experienced teacher can handle the product.
What you will need for work:
- Thick yarn – 150 g;
- Circular knitting needles No. 6, line length 70 cm;
- Tape measure;
- Markers;
- Extra knitting needles or pins for knitting.
Knitting density: 30 p x 24 cm.
Description of work:
If the yarn is not as thick as the knitting needles, then knit in two threads.
Cast on 30 stitches on a needle.
1st row: remove the edge stitch and knit the row completely with knit stitches, knit the edge stitch too, turn the product.
2 r: from the wrong side he also knits with facial loops.
Rows 3-6: knit with knit stitches.
Using markers, divide the product into 5 parts. It turns out there are 6 loops in each part. Now you need to knit each part separately.
We knit the edge stitch, like the other 5 knit stitches, up to the first marker, turn the work and knit it with purl stitches from the inside out. Turn. In this way, purl loops are knitted from the wrong side and knit loops are knitted on the front side. The length of the strip should be 20 cm.
Remove the finished strip onto a pin or auxiliary knitting needle.
We move on to knitting the second strip.
Attach the thread to the beginning of the second strip and knit 6 loops with knit stitches. Knit up in stockinette stitch for 20 cm.
Knit 5 identical parts.
Place all the loops on a working knitting needle, and connect the strips together with knots from the cut ends. We continue knitting from the wrong side.
We continue to knit in garter stitch for 50-60 cm.
Divide the fabric again into 5 parts of 6 loops each and repeat identical knitting of the first 5 strips.
After finishing making 20 centimeter strips, carefully remove each strip onto a separate pin. Now you need to intertwine the strips of the first part with the second in a checkerboard pattern. To do this, the first free strip must be placed under the first strip of the first part, then thrown over the second and placed under the third, thrown over the fourth and left under the heel.
Thus, it will continue to intertwine all the strips with each other.
After the weaving is completed, the loops that are on the pins must be transferred to the knitting needle. Now connect the strips together with the ends of the threads. And continue knitting the product in garter stitch for 6 rows. The first row after joining is considered zero. We close the loops.
Closing the loops:
Two stitches are knitted together, the loose one is thrown onto a working needle, and so on until the end of the row.
Fasten the thread and cut it.
Video: Detailed tutorial on knitting a snood
An effective and very charming scarf
We continue to amaze with unusual scarf patterns that are knitted very simply, but look incredibly beautiful and unique.
Materials:
- Yarn (60% mohair, 40% acrylic in 100g/500m) – 100g;
- Knitting needles No. 4, No. 3;
- Hook 2.5mm.
Description of work:
Cast on 44 stitches on the needles. Knit 8 rows in stocking stitch (knit row with knit stitches, purl row with purl stitches).
Row 9: knit 3, knit 16, knit 5, knit 16, knit 3, edging, turn.
10 r: edge, purl 3, 16 loops cast on a knitting needle, purl 5, purl 16, purl 3, edge turn.
Knit 8 rows in stockinette stitch and repeat rows 9 and 10. That is, make slits into the product every 8 rows.
We continue to knit the fabric to the required length.
Now you need to braid the loops on one side in the form of a braid (as shown in the figure), and secure the latter with thread.
On the other hand, leave it as slits.
The bottom can be decorated with fringe and a decorative button.
The scarf is ready.
First part
Cast on 61 loops using the preliminary cast-on, weave an auxiliary thread into the loops.
Next, make 2 installation rows:- For the first row, cast on two knit stitches with one purl stitch, followed by 3 purl loops, 13 knit stitches, 2 purl stitches - this marker is repeated three times, the row ends with two purl loops and two knit stitches.
- For the second row – 4 knit stitches; marker - 2 knit stitches, 13 purl stitches and 3 knit stitches, repeated 3 times, ending with three knit stitches.
Use a pin to mark the front side. Take a look at the photo of the openwork scarf below; the product is made as follows:
- The first row is the front one, the first loop is knitted as a purl, the thread is wound behind the loop, 1 front loop, 1 purl loop, repeat of 18 loops is repeated 3 times, then two purls with knits.
- The second row is purl, one loop is knitted as a purl, a thread is tied behind it, the next 3 knit loops, a repeat of 18 loops is repeated three times, the schematic row ends with three knit loops. The instructions for knitting scarves correctly indicate that you need to knit 6 repeats of 16 rows each.
Note! Learning to knit sleeves: ways for beginners to knit a sleeve easily and simply (115 photo ideas and patterns)