Rubber band bracelet: Fishtail - photos, diagrams
How many varieties of Fishtail bracelet do you think there are? You can make completely unusual weaves from rubber bands. This is a regular fishtail, a double, a triple, and a reverse fishtail... and many, many other types. Today you will find out what kinds of bracelets with fishtail rubber bands are made, and how to make them?
In this article we will show all possible weaving of fishtail elastic bracelets. We'll tell you what you need for weaving, as well as how to weave bracelets. Let's start with the simplest fishtail bracelet.
How to weave a simple fishtail bracelet from rubber bands
This is a very simple weave, which results in a stylish thin bracelet made of elastic bands. You can weave 3-4 of these thin bracelets, and then intertwine them together - you get one big thick bracelet.
You can weave a simple Fishtail bracelet on a classic loom, on a small Monster Tail loom or on a slingshot. For weaving you will need 2 posts, and you can use them on any instrument. It’s up to you to choose how to weave this bracelet; the result will be the same bracelet. For weaving, you can choose elastic bands of one color, alternate 2 or 3 colors, or weave from all different elastic bands.
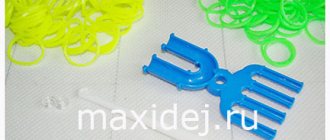
Weaving from rubber bands - techniques: types
Weaving with rubber bands Today, weaving with elastic bands is possible using various techniques and they differ from each other in the tools used.
Thus, weaving on the fork, loom, slingshot and fingers stands out. Weaving on your fingers is the easiest way, but you just won’t be able to make different patterns, and you can come up with a lot of them, especially if you have a very rich imagination. To begin with, it is better to try simple things, for example, bracelets. If you weave a long bracelet and put on a pendant, you get a necklace. Or you can even make a whole set.
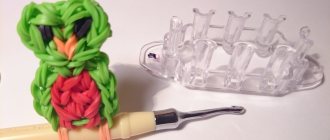
For more complex products, you can no longer do without a hook. It can be ordinary, plastic or even a machine. Machines may differ in size and number of rods for fixing rubber bands. By the way, there are many schemes for creating them on the Internet, but it’s easier to buy a ready-made one.
Weaving bracelets and other figurines involves the use of various techniques. It could be:
- Caterpillar
- Fish tail
- French braid
- Sidewalk
- Dragon scales
You can create other interesting products from rubber bands. These could be toys, keychains, and so on. If children engage in such creativity, they develop motor skills, attention and perseverance. It’s not at all difficult to learn it on your own. You just need to follow the instructions and follow the diagram step by step.
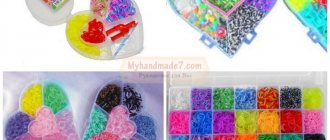
Rubber bands make very good:
- Jewelry - bracelets, rings, necklaces and brooches
- Figures - these can be cartoons, funny animals, fruits, and so on
- Clothes for dolls
- Phone covers
- Useful things in the house
Double fishtail - how to weave?
Another variety, more complex weaving, is the double fishtail. If a simple fishtail is made on two columns, then a double fishtail is braided on 4 columns. Therefore, you can weave this bracelet both on the classic Rainbow Loom loom and on the small Monster Tail loom.
You can make your double fishtail elastic bracelet two-color, one-color, or weave it from all elastic bands of different colors.
Double fishtail - how to weave?
Double fishtail - how to weave?
Watch how to weave a double fishtail in the video:
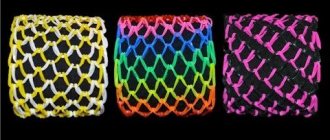
Six-link fishtail - bracelet made of elastic bands on a slingshot
Quite an interesting variation of the usual fishtail, which is also quite simple to weave - a fishtail with sides (or a six-link fishtail). In this version, a machine is also not required; a simple slingshot is enough.
The bracelet is woven quite easily, but requires care.
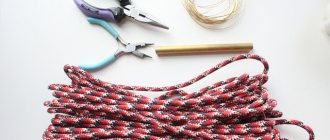
You will need:
- slingshot with two legs,
- crochet hook,
- lock,
- rubber bands (preferably at least two contrasting colors),
- scissors.
Weaving is done on two frame posts or on a regular plastic slingshot...
The main weave will be orange elastic bands, the sides will be black and white elastic bands.
1. Throw an orange elastic band over two columns of the slingshot in a figure eight.
2. Throw the second orange elastic band over the two posts of the slingshot without twisting it.
3. We hook up the lowest elastic band on one side first. Raise the loop up, placing it above the second elastic band, and remove the hook.
4. We also hook the second lower loop on the other side and lift it up.
5. We simply put a black and white elastic band on the left column.
6. We put an orange elastic band on both columns.
7. We put a black and white elastic band on the left column.
8. We put an orange elastic band on both columns.
9. We throw off the bottom orange elastic band from both columns to the middle above the third elastic band.
10. Repeat steps 7-9 until 6 black and white rubber bands are formed on the left column. Therefore, this weaving is called “six-link”.
When the number of free rubber bands on the left column of the slingshot reaches 6 pieces, you need to change the weaving pattern.
11. We drop the bottom black and white elastic band from the outside to the middle between the posts.
12. We put a black and white elastic band on the left column.
13. We put an orange elastic band on both columns.
14. We throw off the bottom orange elastic band from both posts of the slingshot to the middle above the third elastic band.
15. Repeat steps 11-14 until the bracelet reaches the desired length. Considering the distance that the first 6 rubber bands occupied from the edge (this is approximately a little less than 2 cm).
Once we reach the desired length of the bracelet, we will weave it, skipping step 12, when we put a black and white elastic band on the left column.
16. We drop the lower free black and white elastic band from the outside from the left column to the middle between the columns.
17. We put an orange elastic band on two posts of the slingshot.
18. We throw off the bottom orange elastic band from both posts of the slingshot to the middle above the third elastic band.
We repeat steps 16-18 until we place all the black and white rubber bands in the middle between the columns.
19. We put the last orange rubber band on the posts and throw the bottom orange rubber band off both posts of the slingshot to the middle.
20. Without removing the bracelet from the slingshot, fasten the clasp from one edge of the product to the outer loop. Remove 2 extra rubber bands.
21. On the second edge of the bracelet we find a symmetrical loop and hook the clasp to it. In this case, we get 1 extra ring, which we simply cut off.
As a result, we will get a very cute bracelet made of rubber bands.
To make the weaving process more clear, I would like to present to your attention a video tutorial.
Have fun creating!
I was glad to help!
Triple fishtail braiding - triple fishtail
An even more complex type of fishtail weaving from rubber bands. The bracelet has a second name - triple fishtail. This bracelet is woven on 6 columns. If you want to make a wide bracelet, then a triple fishtail is perfect for you. You can make the bracelet a solid color, use alternating 2 or 3 colors in the bracelet, or use all different colored bands in the bracelet.
You can see all the patterns that can be made on a triple fishtail bracelet in our article - Rubber band bracelet: triple fishtail - photos, diagrams. There you will also find videos and weaving patterns for this bracelet.
Triple fishtail braiding - triple fishtail
Basics of Craftsmanship
In order to weave a triple fishtail, we will need the following materials:
- multi-colored elastic bands;
- Monster Tail machine;
- hook for working with rubber bands;
- 3 clips for finishing the bracelet.
The main bracelet is 42 light green Rainbow Loom elastic bands. To complete the drawing, we take 21 pieces of each color: black, green, blue, orange, purple, red.
The colors of our bracelet will alternate. Black, then green, then orange, then blue, purple and red. And again the same.
We take a black elastic band and put it on in a figure eight on the first two columns on the left, as shown in the photo:
Now we do the same thing 2 more times with black rubber bands:
Black rubber bands are arranged vertically in eights in front of us; we take a light green rubber band, which form the base of the bracelet, and put the elastic band on all three columns horizontally on the bottom row.
Using a hook, we lower the elastic bands a little lower, without removing or putting anything away.
Now take the green rubber bands. First we put it vertically on the left column.
We throw it on in the same way as we did with black, only you don’t need to twist the elastic band with a figure eight. We repeat this with the central and rightmost columns. We get the following result.
Again we put the light green elastic band horizontally down on all three posts.
Now we take three orange elastic bands and make vertical throws on the posts of the machine.
Again, horizontally place a light green base elastic on the bottom row of the machine.
As a result, at this point we have 3 light green base elastic bands and 3 layers of cross elastic bands on our machine. Now we take the hook in our hands. And we begin to weave.
We pick up the light green elastic base and throw it from all three columns of the machine to the center.
Now you need to turn the machine over and, using a hook, throw the lowest elastic band into the middle from each column of the machine. In this case, black.
You also need to remove the same black rubber band from the other row of posts. Before discarding it looks like this:
On the other hand, where the elastic band has not yet been thrown off, it also needs to be thrown off. But now we need to do it from the inside. To do this, we need to place our hook inside the light green elastic bands of the base, use the hook to pick up the bottom black elastic band from the post and throw it into the middle, towards the center.
Related article: How to sew a peignoir: video instructions for sewing with your own hands
Let's move on to the second column. Similarly, we place the hook inside the light green elastic bands of the base, hook the black elastic band, it is the bottom one and throw it into the center. We do the same with the third column.
Then we repeat the sequence of our actions. Now we take the blue color of the rubber bands. Place it vertically on top of all three pairs of posts.
Each time after throwing colored elastic bands vertically onto the posts, we must throw a light green horizontal elastic band onto the bottom three posts of the machine.
Again, remove the light green elastic from all the columns to the center.
We turn the machine and hook a green elastic band, throw it into the center, and do the same with the second and third columns.
On the other side of the machine we continue working with green rubber bands. We place the hook inside the light green elastic bands of our base, pick up the bottom green elastic band and throw it into the center. We repeat the same action with two more columns.
Now we have purple rubber bands. Throw 3 purple elastic bands vertically onto 3 columns. Then again the light green horizontal one and perform the folding, as shown above.
After the purple color we have the red color of the rubber bands. We carry out similar actions, and after it it’s black again, and so the colors will continue to alternate.
We repeat our steps until we get the desired length of the bracelet.
When the bracelet is braided to the length we need, we need to finish it correctly.
To do this, throw the bottom light green elastic band into the center.
We remove the bottom elastic bands from all three columns on one side, and remove them from the other side, placing them under the light green elastic bands.
After our actions, we were left with 2 colored rubber bands on one side of the machine, and 2 light green rubber bands on the other side.
Now take the light green elastic band that is at the very top and remove it. We won't need it. And we throw the second light green elastic band towards the center.
Now we have two rubber bands left on each post.
We throw the bottom elastic band back into the center, leaving us with one elastic band each on the posts.
Now we transfer the elastic bands from one side of the machine to the other side. And it turns out that on some columns of the machine we have two rubber bands, and on the other side there are no rubber bands at all.
Now we take the fasteners to finish the weaving and put one fastener on every 2 loops.
On the other side of our bracelet we find black elastic bands and put the same fasteners on pairs of black elastic bands.
Our bracelet is ready!
Related article: Structural knitting patterns: diagrams with descriptions and videos
Quadfish or fishtail - how to weave?
Let's complicate our weaving! Now you know how to weave a simple fishtail bracelet, you can make a double and triple fishtail from elastic bands. But this is not all the varieties of fish tail made from rubber bands. There is even more complicated weaving! This is a Quadrofish fishtail. How to weave such a bracelet?
Quadrofish fishtail is a bracelet made of elastic bands, which is woven on 4 columns. This makes a circular bracelet. And there is another type of round fishtail bracelet - Hexafish, which is woven on 6 columns.
You will find a detailed pattern for weaving a Quadrofish and Hexafish bracelet in our article - Bracelet made of rubber bands: fishtail Quadrofish and Hexafish - photos, diagrams.
Quadfish or fishtail
Weaving a bracelet from rubber bands – Fishtail Rocket
The Rocket bracelet is a type of fishtail weave. You can make this adorable cute bracelet in a variety of ways. And on the classic Rainbow Loom machine, and on the small Monster Tail machine, and on the slingshot. Only 2 columns are used in weaving.
Weaving a bracelet from rubber bands – Fishtail Rocket
You can watch the video on how to weave a Fishtail Rocket bracelet:
How to weave a fishtail rubber band bracelet on a slingshot.
“Fishtail”: technique and subtleties of weaving an elegant accessory.
Among the many existing patterns for all kinds of fashionable bracelets made of rubber bands, which, by the way, are becoming more and more popular every day, the “Fishtail” weaving technique occupies not the last place. This bauble combines ease of execution and elegant appearance. Made in the best traditions of minimalism, it is undoubtedly able to emphasize the individuality of its owner.
In the master class presented to the attention of needlewomen, the process of weaving a “Fishtail” in a cheerful, summer style using rainbow tones will be described, which does not require extraordinary skills. To create such a bracelet, you will need:
silicone rubber bands in eight colors (another color has been added to the standard “rainbow” color scheme - pink, for a smoother transition from purple to red); the most common weaving machine is the “Slingshot”; hook (the simplest plastic one is quite suitable); clasp for connecting the bracelet together.
№1
Stage 1. To begin, take one red elastic band and twist it from the first column of the machine to the second. What comes out is something that looks like the number eight flipped horizontally. Subsequent rubber bands will simply be thrown on - no need to twist anymore.
№2
After the red one, you need to take an orange elastic band; it should be put on top of the red one.
№3
Next, take another rubber band (yellow), which will be worn above the orange one (since a “rainbow” “Fishtail” pattern is formed - the colors of the rubber bands are selected accordingly).
№4
Stage 2. At this stage, the simple process of recreating the “Fish Tail” begins. The principle of weaving is this: each time the elastic band located at the very bottom will be thrown into the middle of the machine, and the elastic band of the next color will be put on top.
And so, the lowest (red) elastic band is thrown to the center, first from the right and then from the left column. To make it convenient to pry off the rubber bands, you should use a hook.
№5
№6
№7
The initial loop is already ready - the beginning has been made. Next, take a green rubber band and throw it over the yellow one.
№8
Then the situation is repeated: using a hook, the bottom (orange) rubber band is grabbed from each column and sent up to the top.
№9
№10
The next one in line is a blue rubber band, put on the “Slingshot”.
№11
Thus, the fishtail will be woven to a length that is sufficient to fit around the wrist.
№12
№13
№14
Stage 3. And so, the required length has been achieved, which means it’s time to complete the bracelet. You don't need to add any more rubber bands. First, the bottom purple rubber bands are removed from the “Slingshot”, followed by the pink ones. There will only be one rubber band left on the “Slingshot”, which now holds the entire structure. It is this rubber band (it’s red) that needs to be thrown onto any of the columns, after which the fastener is attached to it.
№15
№16
№17
№18
№19
The edge of the bracelet on which the clip is attached can already be removed from the machine. Next, you should go to the very beginning of the bracelet and find the first rubber band. By pulling it a little, the second side of the S-fastener is fixed.
№20
№21
Having gone through the simple stages of weaving, summing up the results, so to speak, we get such a wonderful bracelet.
The final look of the craft. Photo 1.
The final look of the craft. Photo 2.
The final look of the craft. Photo 3.
Also pay attention to the master class on weaving a “Bow” bracelet.
Weaving rubber bands fish skeleton bracelet
An original weave with a marine theme - the Fish Skeleton bracelet. You won't be able to make this bracelet using a slingshot because you need 4 stitches. But you can weave it on a classic Rainbow Loom loom or a Monster Tail mini loom.
It turned out to be a very beautiful combination of colors - the base of the bracelet is black, and there are multi-colored elastic bands on the sides. White or other colored rubber bands will look just as beautiful as a base. On the sides you can do not all different colors, but just one contrasting one.
Weaving rubber bands fish skeleton bracelet
Video of weaving a fish skeleton bracelet from rubber bands:
Weaving on forks
Now let's look at the second way to weave such a bracelet - using forks.
The principle is actually the same as we looked at above. But for weaving, instead of a loom, we will use two forks. We can be guided by the number of rubber bands that we calculated for the first bracelet.
In this tutorial we will need 42 black rubber bands and 6 colors, 18 rubber bands of each color.
As in the first method of weaving a triple bracelet, we will place three rubber bands on the tines of a fork in a figure of eight. On the outermost clove of each fork, on the central 2 cloves on each side, put a rubber band in a figure eight, and on the remaining two cloves, another rubber band in a figure eight.
Now take one black rubber band and place it horizontally on the 4 tines of one fork.
Now we put purple rubber bands on the cloves. There will be three of them, just like the black ones, but we don’t turn them into eights. We'll put it on straight. From the edge there is one clove of each fork, and from the center there are 2 cloves per rubber band, and again from the edge there is 1 clove of both forks.
Again, a horizontal black elastic band for 4 cloves of one fork.
We put on 3 elastic bands of lilac color.
And again, a horizontal black elastic band on one side, as we have already done twice. Now we take a hook and we will knit elastic bands.
On one side of the fork we find the lowest black elastic band, which was put horizontally on all 4 cloves. We pry up this elastic band and remove it in the center.
Turn the forks to the other side. And we remove the bottom row of rubber bands from all three teeth.
Turn the forks over again to the other side. We need to remove the bottom black rubber bands, but two horizontal black rubber bands are in the way. You should insert the hook under them, it will be more convenient to pull them back with your finger and then calmly remove our black rubber bands under them from all the teeth to the center.
After the lower elastic bands have been removed, we simply release the black ones that were pulled off with a finger. They stay in the same place.
Without turning the work over, on the side where we have black horizontal elastic bands, add a new color.
Again we put a horizontal black elastic band on top.
Now on the side where we have three black elastic bands, remove the bottom horizontal black elastic band to the center.
Turn the forks and remove the bottom purple rubber bands to the center.
Sometimes the rubber bands on the fork can change places, so it is better to remember which colors we have and where they go so as not to remove the wrong rubber bands.
Now we turn the forks over again, we need to remove the same purple rubber bands on the other side, while, as we have already done, pull off the black rubber bands with your finger.
Related article: Do-it-yourself volcano model from plasticine at home
After removing the purple elastic bands in the center, the black ones, which we pulled off with our finger, simply let go.
On the same side we add pink elastic bands.
Add a black horizontal line again.
And we begin to fold. First the black horizontal bottom.
Turn the forks and remove the lower light purple ones.
On the reverse side, remove the same color by moving the black rubber bands of the fingers to the side. Add three light pink rubber bands. And again black horizontal.
Remove the horizontal black rubber band. Then we turn the work and remove the bottom row of colored ones, turn it towards us again and, pulling off two black elastic bands, remove the bottom row of the same color as we removed on the other side. Now again we add a new color and a horizontal black elastic band. And so we continue to work further and further. We weave in the same way as we did above. After a while we will have the following result:
In order to finish the bracelet, you need to do the following with black.
When we have 2 horizontal black and two colored elastic bands left, the bracelet will already be the length that we need. Let's add 3 black elastic bands, but not horizontally, as we did with black elastic bands, but place these three forks over the teeth of both forks. And then immediately remove one horizontal black elastic band in the center.
We immediately remove the second horizontal black elastic band. Then remove the bottom pink elastic bands. And immediately remove the white rubber bands one at a time in the center. Then we turn the forks over and do the same on the other side.
After these steps, we have 3 black loops left on each fork. We need to transfer the loops from one fork to another so that there are no loops left on one fork, and on the second there are 2 black loops on each clove.
Holding the loops with your finger, carefully transfer each loop one by one to the second fork.
To prevent the bracelet from unraveling, remove the bottom black loops to the center.
We hook the latches on each side, and the bracelet is ready!
Inverted fishtail - how to weave on a slingshot?
You can weave very cute bracelets on a slingshot. Such original weaving can only be achieved with a slingshot. The same two columns as on the machine, but the slingshot is more convenient to hold in your hand. Therefore, all fans of the marine theme in lumigurumi, pay attention to the weaving of the bracelet - Inverted fishtail.
Inverted fishtail - how to weave on a slingshot?
Video of weaving an Inverted Fishtail bracelet from rubber bands: