Needlework
05/31/2018 Anastasia Prozheva
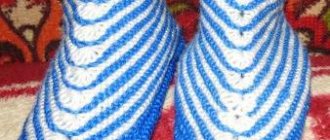
You can knit an interesting product yourself - crocheted bunny slippers. These slippers can be knitted by an amateur because they are crocheted. Crocheting is easier for a beginner to master, so you will definitely get these slippers.
When choosing threads, pay attention to those threads that contain a large amount of wool. Or on threads made entirely of wool. Then the slippers will be very warm. For the sole, thinner threads are suitable, you can use synthetic ones. Then there will be tight knitting. The sole will look like an insole, so the slippers will last longer and their shape will be preserved for a long time. But for the rest of the slippers, you should not use synthetic threads, as they may cause allergies.
You can wash the slippers in a washing machine. However, you should not squeeze them too hard, otherwise they will stretch.
Top part
For slippers we need:
- 50 grams of white thread;
- 50 grams of pink threads;
- cardboard;
- scissors;
- needle;
- hook 2.5 mm.
The following tutorial will help you easily knit the top of the slippers. First, let's look at how to crochet. We put loops on the hook. If you are counting loops, then we do not count the first one. Let's make a single crochet. Next we make a loop to lift the column. We insert the hook into the loop of chain stitches, and thread a new loop into these loops.
For double crochets, you need to cast on stitches in the first stitch. There are as many stitches as high row you need. The more stitches you cast on, the larger the holes in your knitting will be.
Let's start with the slippers. It is necessary to make holes in the felt sole. And we start knitting slippers by tying the soles with threads. Then we continue to knit the side parts of the slippers.
We knit 5-7 rows. Do not tighten the thread too much.
Related article: DIY pasta snowflakes
We close each circle with a connecting column. Before each row we make an air loop.
The toe is knitted according to the following pattern.
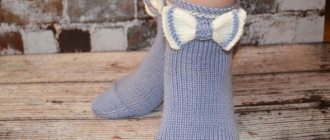
Bunny slippers
We will need:
- Fabric for the outer and inner parts (fleece, velor, wellsoft, etc.)
- Fabric for the sole (raincoat, artificial leather, etc.)
- Insulation for the sole
- Sewing supplies: needles, scissors, marker, safety pins, etc.
I used fleece for the main part, raincoat fabric for the sole, and slimtex as insulation.
The pattern is given for size 37-38. The size of the boot in this case is 32*17 cm. The height (17 cm) can be varied as desired. If you need a different size, be sure to size up or down the pattern!
I will be sewing children's slippers, so I have reduced the pattern. We sew the inner boot. Transfer the pattern to the fabric and cut it out with a 1 cm allowance.
For the boot, cut out two rectangles.
We pin the parts together with the right sides facing each other, as shown in the figure.
Let's sew.
We trim the seam allowances, fold the boot and sew down the back, leaving a hole through which we will turn our boot inside out. Trim the allowances again.
We attach insulation to the foot. In my case, it is slimtex - a dense, warm, soft material. We cut off the excess insulation.
We pin the foot and the top of the slippers with the right sides facing each other, starting from the heel and toe.
Stitch and trim seam allowances. If you don’t have zigzag scissors, make cuts in the bends.
We do the same with the outer parts of the slippers, leaving no holes for turning, of course.
I glued the raincoat for the sole with a edging reinforcer. Cut out 2 parts of the sole.
We cut out the details of the ears and grind them with their right sides facing each other.
We turn them inside out and stitch them at a distance of 5 mm from the edge.
We received 2 pairs of beautiful ears.
We attach the ear to the front side of the inner boot. Please note that the side of the eyelet adjacent to the boot will be on the outside when turned inside out (I hope I wrote it clearly =)
So, we sewed the ears on the sides of the inner boot.
We turn the outer part inside out, insert it into the inner one and secure it with pins. The pieces are folded right sides together!
Sew along the top circle and trim the seam allowances. Through the hole we left on the back of the inner part, we turn the slippers inside out.
We sew the hole with a hidden seam.
We insert the inner part of the slipper into the outer one.
Actually, we could stop there, but I couldn’t =) Using the longest stitch length, we sew our boot from the edge to approximately the middle. Then, by pulling the bottom thread, we get folds on the front of our slippers. We fasten and hide the threads.
For the tails, we cut out, stitched, turned and stuffed two circles. Sewed to boots.
We received such a wonderful pair of bunnies that will warm our feet!
Thank you all for your attention! I will try to answer your questions. Your Katyusha.
We knit the ears
The ears are knitted very simply. We make 11 air loops and knit 9 single crochets. In the 10th loop you need to knit 5 single crochets and then knit the second side.
Next we tie the resulting part. We make 9 double crochets, then in 5 loops we make 2 double crochets, then again 9 double crochets.
This diagram shows how to make a double crochet.
Sew the ears to the toe. Can be sewn on using thread and needle.
Another interesting idea: Felted slippers master class
On the second side of the chain we knit 1 dc, and on the last side we knit 6 dc.
We will make 1 connecting post into the lifting loop. So we close the series.
At the beginning of a new row, make 2 loops on the rise and knit 1 dc each to the loop of the bottom row with increases. At the end we have a loop in which we knitted 7 dc in the previous row. In these 7 dc we knit 2 dc. And then again 1 dc to the next loop of the bottom row with an increase.
There, too, we added in the last row. In 6 additional dcs of the previous row we also knit 2 dcs.
- We connect the row into the 2nd lifting loop.
- In the new row we make 1 lifting loop and knit 10 sc.
- Next we knit 10 pdc.
- Now we knit 1 dc up to the increment loops.
Next we have 14 loops, which we knitted by adding in the last row. We knit them with an increase through 1 loop.
On the second side, we first knit 1 dc in each loop to the loops where we knitted the dc on the other side. We also knit 10 dc into these loops, and in the next 10 we knit 1 dc.
- In the increment loops on this side we knit with an increase through 1, but not dc, but dc.
- At the beginning of a new row, make 1 lifting loop and knit in the round without increasing 1 sc.
- And in the next row we also knit 1 dc without increments.
An interesting idea for decorating a Christmas tree: Crochet skates master class with photos
Now we begin to knit the top of the slipper.
We knit the first row, alternating the front relief stitch and the back relief stitch. So we knit 2 rows.
We knit the next row according to the pattern. But on the rounding we count 2 loops in both directions from the central loop. In total it turns out that we have selected 5 loops. We will knit in them with a decrease. In this case, we simply skip the purl stitches.
Next on the second side we knit according to the pattern.
The next row will be the same. We also make decreases in the center. We skip the purl stitches.
Repeat the row 2 more times.
Now, using a large needle, sew the 2 sides of the slippers. We sew as much as needed for convenience.
Original crochet Crop Top pattern and description
The slipper is ready. We knit the second one according to the same pattern.
Now we will knit a flower - decoration. It will be a simple but pretty pink flower.
Let's make a sliding loop. Next, we cast on 5 air loops and knit 1 dc into a loop. Next we make 2 chain stitches and again 1 dc in the loop. And again 2 air and 1 dc.
We knit this way until we get 7 petals.
Now under the arch we knit 1 dc, 4 dc and another 1 dc. We knit this way under each arch.
Now we need to form arches for the next layer of petals. We knit 1 dc, placing the hook on the wrong side under the dc of the first row.
Next, we make 4 chain stitches and also on the wrong side, insert a hook under the next dc of the first row and knit 1 dc. So we need to knit under all the dc in the first row. We will get 7 new arcs.
Now let's tie the petals. We make 1 sc, 5 dc and 1 more sc under the arch.
We knit this way under all the arches. The 2nd layer of the flower is ready. You can knit the 3rd one in the same way, or you can leave it like that.
We decorate the flower with a bead and sew it to the slipper.
Homemade slippers crocheted with your own hands are ready! You can knit such slippers not only for yourself, but also for your family and friends as a gift for the New Year holidays!
Let's move on to the tail
Cut out 2 circles from cardboard with a hole in the center, 4 cm in diameter.
We wrap the circle with knitting threads in several layers.
Then you need to cut the threads in a circle.
Next you need to connect two circles. To do this, we thread the thread and tie the parts tightly.
The result is a tail like this.
Sew it to the back of the slippers. If the pompom turns out uneven, then trim it.
All that remains is to make the muzzle. They sell ready-made eyes that just need to be glued on. But you can embroider the eyes and mouth yourself.
Description (explanation)
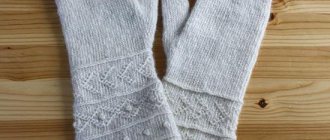
Base and binding
The above diagram is designed for a product for a foot of 14 centimeters and has a height of 4 centimeters. To complete this you will need about half a skein of yarn (50 grams) of medium thickness. If you use thick yarn, the slippers will be larger.
Knitting begins according to the pattern for the foot with a set of 20 air loops.
The cast-on loops are tied on both sides with single crochets (indicated by crosses). It turns out to be a long oval. In the first and last loops, 3 single crochets are knitted.
The first two rows are knitted with single crochets. Next, the expansion for the heel and toes begins with the help of increases and knitting stitches with one and two crochets (the number of crochets is equal to the number of perpendicular “sticks” in the symbols).
The binding is done according to the same pattern and is a continuation of the sole (base).
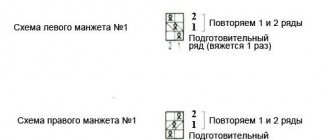
The ear knitting pattern is shown in the third picture.
VP - air loop
runway - air lift loop
sc - single crochet
1st row : 9 ch
2nd row : 1 runway + 8 sbn + 3 sbn (in the last loop) + 8 sbn (further in a circle)
3rd row : unfold knitting; 1 runway + 19 sbn