Rating: 5/5 (4)
If you are a creative person and do needlework, try one of the types of embroidery - ribbon embroidery. One of the features of such works is that they turn out to be very voluminous and bright, which will be a worthy decoration for your interior.
You can embroider paintings, sofa cushions, elements on clothes, tablecloths and various accessories with ribbons. If you have never tried this technique, then let’s work together to understand ribbon embroidery for beginners step by step, get acquainted with the necessary materials and tools, and create paintings embroidered with satin ribbons.
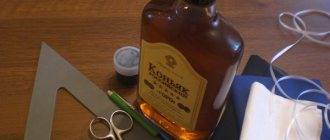
Everything you need for ribbon embroidery
For needlework with ribbons you need to purchase:
- fabric (the base on which the ribbons are sewn);
- ribbons;
- hoop;
- lighter (for processing the edges of ribbons);
- threads;
- needles;
- thimble;
- markers;
- scissors;
- awl;
- decorative accessories: beads, beads, rhinestones and others.
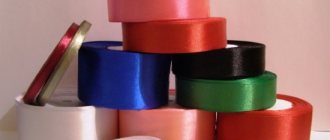
Choosing ribbons
According to their type, tapes are divided into:
- silk;
- satin;
- corrugated;
- calico;
- nylon (organza)
Tapes have different widths and range from 2 to 50 mm, but 7-25 mm tapes are considered the most convenient.
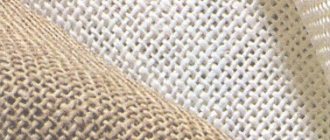
Selecting fabric
The fabric should hold the embroidery, fix the stitch, while allowing the needle and ribbon to pass freely. It can be fabric of any large-uniform weave:
- canvas;
- linen;
- tapestry;
- moire;
- velvet;
- felt;
- Jersey;
- cotton;
- taffeta and others.
Selecting a needle
To embroider with ribbons, you will need needles with wide eyes so that the ribbons fit easily into the eyelet and do not curl or slip off. The needle number depends on the width of the tape. Usually Nos. 18-26 are used. The needle itself must be blunt in order to move the threads apart on the base and not damage them, which is important for the finished product.
The following types of needles are suitable:
- darning;
- tapestry;
- for knitwear;
- bead embroidery;
- for embroidery with ribbons.
Types of markers for ribbon embroidery
There are two types of markers that are suitable for this type of creativity:
- disappearing on their own (after two hours not even a trace remains of it);
- washed off with water.
It is better to apply markings and designs with a disappearing marker, since it is usually better not to wash the work (exception: home textiles and clothing).
Which hoop to choose
From a huge variety, you need to choose those that suit you in terms of the size of the design and its shape.
The hoops themselves are:
- wooden;
- plastic;
- combined (the base is made of wood, and the fastenings are plastic).
And in form:
- rectangular;
- square;
- round;
- oval.
Simple patterns
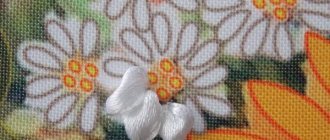
To create a picture with flowers from satin ribbons you need:
- canvas for arranging the composition;
- several needles;
- lilac thread;
- satin ribbon in green, yellow, purple and lilac;
- comfortable hoop;
- graphite.
The design of the selected flower must be transferred to the canvas blank. The first time it is better to use a simpler drawing. For example:
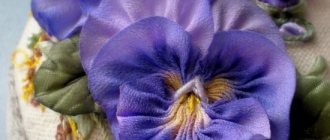
For craftsmen who have little experience behind them, the image shows the stitches that are used in embroidering a picture with patterns of flowers using threads of satin ribbons. When the drawing is transferred to the canvas, it must be secured in a hoop.
The feelings when embroidering with ribbons should resemble the feelings that prevail when writing text, that is, lightness and ease.
The tape must be secured. The three petals located at the top are embroidered with a straight stitch. It is necessary to pull the needle with the main material to the front side. The length of the petal is controlled by the pattern and during the contact process the needle comes out to the wrong side.
After completing the embroidery of the upper petals, the embroidery of the petals on the sides and bottom continues. Their implementation is similar to the upper petals.
When the flower petals are ready, it is necessary to embroider the core of the plant. This means that it is necessary to use a loop stitch. A seam is made with a needle pointed to the side; you should remain on the wrong side and sew the seam again. The loop is tightened and the needle returns to the wrong side. The petals located at the bottom are decorated with floss thread.
Related article: DIY postcard boxes: how to make crafts with diagrams, photos and videos
Stem embroidery is done by twisting the stitches. The needle must be on the front area, turning, forming a ribbon. You must remember to secure the seam with a knot.
The leaves are sewn using a ribbon stitch. The tape is straightened and pierced with a needle. After which the tension level of the satin ribbons is adjusted. Actions continue until the composition is completed.
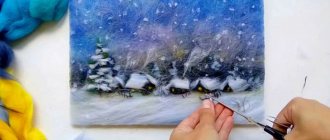
Photo gallery of paintings embroidered with ribbons
Fire red rooster
Required equipment:
- satin ribbons of different colors;
- sackcloth;
- floss thread;
- comfortable hoop;
- needles and scissors;
- tracing paper and pencil.
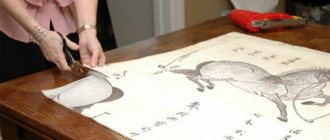
It is necessary to find the center of work. To determine the center of the burlap, it is folded in half and then in half again. Along the fold lines, the fabrics are separated with a “back needle” seam. When the canvas for work is prepared, it is necessary to redraw the image of the bird on tracing paper. After which the pet is transferred onto the burlap on tracing paper.
Related article: Do-it-yourself wedding glasses: master class with photos and videos
Having a finished sketch on the canvas, it can be inserted into the hoop, stretching the fabric. The work with ribbons begins with the embroidery of the largest details; in this exhibition, these are the breast and neck of the bird. It’s easier to start with four stitches on the neck of the rooster with a gold-colored satin ribbon. The thread length of each line is about 15 mm. After that, four more similar lines are made on the chest. But their length is shorter and equal to 10 mm.
According to the diagram outlined above, the entire body of the pet is filled in turn. The stitch angle for the bottom part should be changed. To give volume to the embroidery, some stitches are duplicated. More often, a double layer is used on the neck and chest, in our case it is a yellow satin ribbon. When embroidering the second layer, the stitches are placed in the required direction. Straight ribbon stitches are used to fill out the pet's lower torso. For work, satin ribbons of blue and deep blue colors are used. The cockerel's wing is embroidered with ribbons of the following colors: blue, yellow, deep blue. The bird's head and beak will be golden yellow.
In order to achieve a natural beak, straight ribbon stitches are passed along it. The cockerel's head is also embroidered using curved stitches. In this case, the shortest stitch is applied first, and then subsequent lines are made. In conclusion, it turns out that each subsequent stitch slightly overlaps the previous one. The beard and comb are “drawn” with a scarlet ribbon using a straight stitch. French knots are embroidered in place of the eyes.
Curved stitches are used for the cockerel's tail. To create it, various shades of blue are used. A twisted stem stitch is used to create the long claws and paws of poultry. Short claws are highlighted with straight twisted stitches. When embroidering flower stems, a “back needle” stitch is used.
Straight stitches are also used when embroidering petals, and French knots are used for the core. To embroider grass, regular stitches of different lengths are sufficient.
Related article: How to wash bamboo pillows
The embroidery is ready, you can seal it, insert the embroidery into a frame and hang it on the wall or give it to someone as a gift!
It is also possible to embroider a formidable warrior rooster, as in the photo.
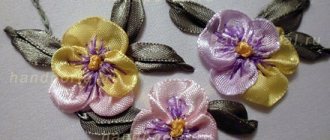
Ribbon embroidery of poppies with spikelets - step-by-step master class
We will be making poppies that are embroidered and not gathered on thread.
To create this picture you need:
- for poppies: red silk ribbon 25 mm wide;
- for spikelets: silk ribbon 7 mm wide, straw color;
- for leaves: tapes with color transitions 1, 7 and 13 mm wide;
- for the center of poppies: black “Iris” threads;
- base fabric: linen;
- needles;
- hoop;
- scissors.
Let's get started:
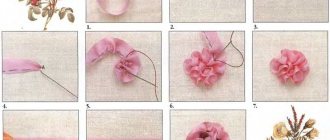
- Think over the composition and mark where each element will be located.
- Embroider three petals with straight stitches (as in Figure 1).
- Bring the tape with a needle onto your face from under the middle of the last petal (Figure 2).
- Make a loop towards the first three petals (see picture 3).
- Make the fifth petal in the same way as you did the fourth (see Fig. 5).
- To make the poppy look lush and voluminous, add 1-2 more petals in the same way at your discretion.
- Embroider two poppies at a distance from each other (you need to leave space between them for leaves and spikelets).
- Embroider poppy leaves using ribbon stitches.
- Embroider a bud of an unopened poppy: use a red ribbon to make a French knot and cover it with a straight stitch on top.
- Add two straight stitches with green ribbon on both sides and embroider the stem
- Make the centers of the poppies: in the middle of the embroidered flower, make a French knot with a green ribbon and overlap it horizontally with a straight stitch. Around the resulting green center, make French knots in a circle using Iris thread. Or you can embroider the middle with black beads from the embroidery kit.
- Embroider the spikelet: start from the top and make a straight stitch 5-6 mm long from top to bottom (Figure 10). To the left of it in the middle of the first stitch, bring the ribbon to the front side and make the next straight stitch, as shown in Figure 11. Using the same technique, make a stitch to the right of the first and then, alternating, embroider the spikelet
- To give a natural look to the spikelets, embroider the spines with long stitches. This can be done with thin threads with lurex.
- Frame the finished painting.
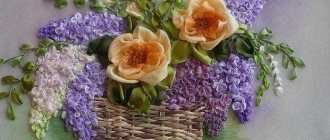
Painting from a bouquet of roses
This master class on making kanzashi panels will teach us how to correctly form flowers from ribbons and place them in the picture. This handmade product will decorate your interior space in Provence style. We will need the following accessories:
- hoop frame;
- canvas for painting;
- satin fabric ribbons;
- needle and thread;
- glue gun;
- thick cardboard;
- scissors;
- golden lace;
- pin.
Read
How to decorate bottles, glasses and other wedding paraphernalia with ribbons
For our panel, you will need seven roses from ribbons. Master class designed for beginners in the kanzashi style.
Insert the canvas into the middle of the frame, it will serve as a base. You can place the hoop on the pillow or use pins, fastening them step by step in order.
Sewing on all the roses and their leaves can occur in a chaotic order, rely on your taste and imagination. But, upon completion of the work, you will have a unique and original painting made by yourself. First of all, leaves are attached to the fabric of the picture, and only then, start attaching roses. Practically, in the end, a vase is created. Based on the diagrams, we cut out the shape of a vase from cardboard and cover it with suitable material. Decorate the vase at your discretion, it could be beautiful ribbons or golden lace. The vase is glued under a bouquet of roses. In this case, you will make a panel with your own hands that will be suitable for decorating any interior of your rooms.
After you have learned the step-by-step steps of creating a painting using the kanzashi technique, let's get down to the main work.
First of all, we draw flowers with ribbons. For the rose we will need a piece of ribbon 10.5 cm long, 8 pieces long, and 11.5 cm, nine pieces long. You don’t have to stick to exactly this number of tapes, use your own discretion. Decide for yourself what flowers you want to make, lush or not. We singe the edges of the segments with matches. Now, we begin to form the buds.
We start by folding the ribbon on the right side and pierce it with a pin. The photo shows the correct actions. We bend it again and fix it with thread, folding it in several layers.
Then, bend the top of the ribbon and fold it into a bud. We fix everything with thread. As a result, you get a rosebud, which is shown in the photo.
Now we draw the petals with ribbons. Take the top and fold it in 0.7cm and then pin it in place. We bend the corner of the tape again and also pin it with a pin. Do the same manipulations on the other side. Take the threads and wind them around the bottom, and then tighten. All remaining petals are made in the same way as described above in the text. If you want the rose to be as similar as possible to the original, then use ribbons for the picture, several tones of the same color. We decorate the completed buds with beautiful beads. All that remains is to attach the leaves to the picture, and the rose is completely ready.
Read
Master class on kanzashi technique for beginners
A master class on making leaves for panels will tell us how to do it correctly. The main thing is to prepare ribbons, thread and needle, scissors and a candle.
Of course, the leaves will be made from satin ribbons, in various shades of emerald. But, if you have nylon ribbons or organza, you can use this material. Try what will be easier for you to work with, then use it.
We will need leaves with sharp ends, the lower part of which is wrapped with thread. Take a tape, scale 5 by 5. Without fail, the tape is scorched by fire.
Fold what you got in half. Then, we bend the ends from the central part to the bottom. Now this part needs to be flashed. Make sure that the needle catches all layers of the ribbon.
Once you have made the stitches, pull them into an accordion shape and then tighten the thread by wrapping it around the leaf.
After the work has been done, you should fix all the workpieces on the panel canvas. And then look what you got.
We reviewed only two master classes, with the help of which we were able to make beautiful paintings from ribbons in the kanzashi style with our own hands. For this, we made various flowers, as well as petals for them, created using different kanzashi methods that exist. But this is not the limit, there are many other options for petals that are made from ribbons and then assembled to decorate a panel. We don’t make such pictures; we draw them, as it were, with ribbons. For beginning needlewomen, it is better to take a simple master class, where you will create a small number of flowers on a small panel. Such works are found in large quantities on the Internet; you will definitely find a suitable option for yourself. You can even bring in your new ideas for creating paintings.
We use ribbons to draw not only canvases, but also small pictures that will fit well into the interior of your home. They will also be an unforgettable gift for your friends. They will appreciate your talent in the kanzashi technique.
Using your own example, you were able to see that such an activity is not too difficult as it seems at first glance. Having made kanzashi flowers with petals several times, you will be able to get a good handle on creating full-fledged bouquets. After all, in essence, the production technology is the same. Having mastered it, you will be able to start doing more voluminous work.
Selection of fabric for the base
You can embroider with satin not only on ordinary fabric, but even on leather and paper. But in the first stages of training, it is recommended to turn to linen or cotton. Unfortunately, the needlewoman has no room for error. Because the needle and ribbon makes a large hole that will be visible. If there is a risk of ruining the canvas, take a regular canvas for cross stitching.
You might be interested in this: MK on embroidery on mesh fabric for wedding dresses
Advice! It is recommended to use thick fabric for embroidery.
Embroidery on canvas